Primera ADL-100 Operator'S Manual Download Page 5

Getting Started  1

Section 1:  Getting Started

A. INTRODUCTION

Thank you . . . 

. . . for purchasing a ADL-100 Autoloader.  This device

automates the transport of up to  100 optical discs (CD-R,

DVD-R, etc.) per batch into and out of a Primera Technology

Accent Disc Laminator.  Designed for reliable, unattended

operation,  the ADL-100 will automatically and effortlessly

transport anything from a just a few CDs to hundreds or

thousands of discs per day.  The ADL-100 is suitable for use 

in office or production environments and fits conveniently on

any desktop.

To begin using your new ADL-100, please read this entire

manual carefully.  You will also need to reference the

Operator's Manual for the Disc Laminator you'll be using with

the ADL-100, so be sure to have it handy before proceeding.
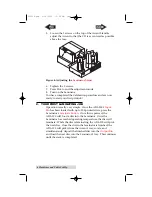
B. CHOOSING A GOOD 

LOCATION

Place ADL-100 in a location with adequate air circulation

to prevent internal heat build up.  You'll need a tabletop

with at least 30" (76cm) of depth for adequate clearance.

Do not place the unit near heat sources such as radiators or

air ducts, or in a place subject to direct sun-light, excessive

dust, mechanical vibration or shock.
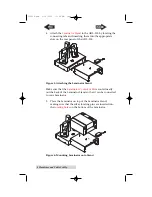
C. 

UNPACKING 

AND INSPECTION

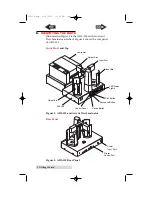
Before you begin, make sure that you have the following items:

ADL-100 Autoloader, including Power Supply and

Input/Output Bins

Accent Disc Laminator with power cord

 Accent Disc 

Laminator Stand

 Laminator Stand with 

Laminator Control Cable (6-pin

mini-DIN)


You'll also want to save the box and packing materials.  It

makes transporting or shipping your ADL-100 much easier 

if this is ever needed some time in the future.

510896.qxd  4/15/2004  11:08 AM  Page 1

TOC

INDEX

Summary of Contents for ADL-100

Page 1: ...040604 510896 01 For Use With the Accent Disc Laminator ADL 100 Operator s Manual 2004 All rights reserved 510896 qxd 4 15 2004 11 08 AM Page i...

Page 2: ...rference to radio communications However there is no guarantee that interference will not occur in a particular installation If this equipment does cause harmful interference to radio or television re...

Page 3: ...et Up 3 A Connecting the Parts and Interface Cables 3 B Calibration 5 C Your First Laminating Job 6 Section 3 Interpreting the LED Status Lights 7 A Power LED 7 B Pause LED 7 Section 4 Maintenance and...

Page 4: ...rs Click on the line with the icon and the document will jump to that page If you want to return to the Table of Contents move the icon to the top of the page and click on the arrow marked TOC Navigat...

Page 5: ...th the ADL 100 so be sure to have it handy before proceeding B CHOOSING A GOOD LOCATION Place ADL 100 in a location with adequate air circulation to prevent internal heat build up You ll need a tablet...

Page 6: ...ear panel of ADL 100 Front Panel and Top Figure 1 ADL 100 and Accent Disc Laminator Rear Panel Figure 2 ADL 100 Rear Panel Output Bin ADL 100 Control Panel Pause Button Sequence Button Pick Button LED...

Page 7: ...hown in Figure 1 2 Connect the Laminator Control Cable that was included with your Laminator Stand Insert it into the ADL 100 rear panel 6 pin mini DIN socket Don t connect the other end yet Figure 3...

Page 8: ...Laminator Stand Make sure that the Laminator Control Cable is routed neatly out the back of the Laminator Stand so that it can be connected to your Laminator 5 Place the Laminator on top of the Lamina...

Page 9: ...DL 100 by plugging in the cord on the other side of the Power Adapter to a suitable wall outlet B CALIBRATION Please note To calibrate the laminator to the ADL 100 the Laminator s Disc Tray should be...

Page 10: ...mple Once the ADL 100 s Input Bin has been loaded with up to 100 printed discs press the Laminator s Laminate Button Once this is pressed the ADL 100 will load a disc into the Laminator Once the Lamin...

Page 11: ...chart A POWER LED Status Condition Off No Power Plug in Power Adapter On Solid Power is ON This is ADL 100 s normal waiting mode Flashing Power is ON but an error condition exists a Didn t pick up a d...

Page 12: ...ns are NOT recommended because they may damage the paint and plastic materials from which the parts are manufactured Always disconnect your ADL 100 and Laminator power cords before cleaning Resume ope...

Page 13: ...apacity 100 disc input 100 disc output Power Requirement 100 240 VAC 50 60 Hz 60 watts Weight 8 9 lbs 4 04 kg Dimensions 16 625 W x 14 H x 10 125 D 422mmW x 254mmH x 257mmD with Accent attached 16 625...

Page 14: ...3 Connections Rear Panel 2 Controls Front Panel 2 Calibration 5 Identifying the Parts 2 LED Status Lights 7 Locating Holes Laminator 4 Location 1 Maintenance 8 Ports Laminator Control 6 Pin mini DIN 3...

Page 15: ...510896 qxd 4 15 2004 11 08 AM Page 11...

Page 16: ...Printed in the United States of America P N 510896 510896 qxd 4 15 2004 11 08 AM Page 12...

Reviews: