background image


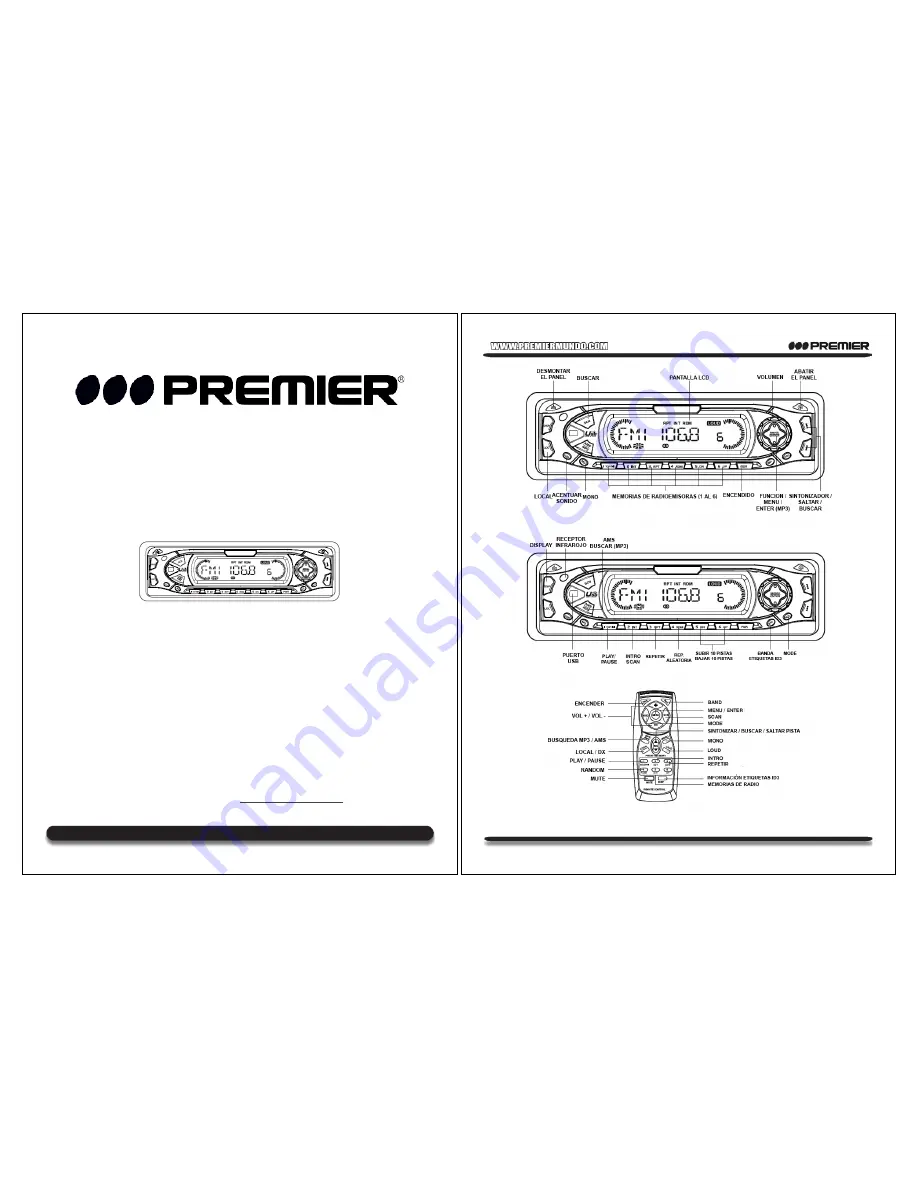
MANUAL DE INSTRUCCIONES 

REPRODUCTOR PARA AUTO CD/MP3  

INTERFASE USB – INTERFASE SD/MMC 

SCR-0934MR 


ESTIMADO CLIENTE 

Felicitaciones por su compra! 
Por favor lea cuidadosamente este manual, y guárdelo para su futura referencia. 
Si necesita soporte adicional, no dude en escribir a: 

[email protected]


Página 1 


Summary of Contents for SCR-0934MR

Page 1: ...P3 INTERFASE USB INTERFASE SD MMC SCR 0934MR ESTIMADO CLIENTE Felicitaciones por su compra Por favor lea cuidadosamente este manual y guárdelo para su futura referencia Si necesita soporte adicional no dude en escribir a info premiermundo com Página 1 ...

Page 2: ...ajosa No use CD s alquilados con etiquetas viejas que están comenzando a despegarse Página 3 Las etiquetas que están comenzando a despegarse dejan residuos pegajosos No utilice CD s propios con etiquetas Las etiquetas se pegan No utilice CD s con formas especiales Utilice solamente CD s redondos en esta unidad pues los CD s de forma especial pueden dañar el funcionamiento de la unidad Asegúrese de...

Page 3: ... los sujetadores incluidos en el empaque dentro de los agujeros que se encuentran a ambos lados de la unidad hasta escuchar un chasquido tal como se muestra en la figura Se puede sacar la unidad del tablero jalando de los sujetadores Página 5 INSTALACION DEL MARCO Antes de ajustar el marco coloque hacia abajo el lado con la etiquete pegada que dice Bottom como se muestra en la ilustración Empuje e...

Page 4: ...cta el panel de control desmontable a la unidad principal es una pieza muy importante Tenga cuidado de no dañarlo con las uñas lapiceros destornilladores etc Nota Si el panel de control desmontable está sucio límpielo solamente con un paño seco Utilice un hisopo de algodón embebido en alcohol isopropilico para limpiar el conector en la parte trasera del panel SOLTAR PANEL PRESIONE Conector Página ...

Page 5: ...ción Página 9 PERILLA DE VOLUMEN CODIFICADOR Cuando la función Menú no está activada gire esta perilla para cambiar el volúmen Cuando la función Menú está activada gire esta perilla para navegar por los diferentes itemes del menú BOTÓN MODE Presione este botón para seleccionar un modo diferente la secuencia es la siguiente a Modo de sintonizador Radio b CDP MP3 solamente si el CD o el disco MP3 ha...

Page 6: ...el de adelante inserte el dico en la ranura de CD el disco se cargará automáticamente y comenzará la reproducción BOTON EXPULSAR CD Presione este botón para extraer el CD Este botón está ubicado detrás del panel de adelante deberá abrir hacia abajo el panel para acceder a este botón M1 REPRODUCIR PAUSAR CD PRIMERA PISTA Presione este botón para pausar la reproducción del CD y vuelva a presionarlo ...

Page 7: ... P 4 2 La ranura para conectar la tarjeta de memoria SD MMC está en la parte superior del panel frontal como se muestra en la ilustración P 5 3 Coloque la tarjeta de memoria SD MMC en la ranura en la dirección correcta hasta que escuche un chasquido Clic 4 Cierre el panel frontal 5 El mensaje MEM CARD aparecerá en la pantalla indicando que la tarjeta de memoria ha sido colocada correctamente y la ...

Page 8: ...lla Use los botones VOL VOL para seleccionar la pista que desee El número de pista puede ser de 1 2 o 3 dígitos El método para seleccionar un número de pista es el siguiente a Números de un dígito Una vez elegido el número de pista mantenga presionado el botón ENTER por más de un segundo para confirmar e iniciar la reproducción b Número de 2 y 3 dígitos Introduzca primero el dígito de la izquierda...

Page 9: ... 5 107 9 MHz Frecuencia media 10 7 MHz Sensibilidad Más de 15dB a 30dB S N Separación estéreo 25dB a 1KHz Proporción S N 50dB AM Rango de frecuencia 530 1710 KHz Frecuencia media 450 KHz Sensibilidad Más de 45dB Proporción S N 40dB GENERAL Fuente de energía DC 11 14 V Polaridad Negativo a tierra Impedancia de las bocinas 4 ohms Potencia máxima 33 Watts x 4 NOTA Nos reservamos el derecho a realizar...

Page 10: ...Y PAUSE BUTTON INTRO SCAN BUTTON REPEAT BUTTON RANDOM BUTTON USB JACK 10 TRACK UP 10 TRACK DN BUTTON PWR INT RPT RDM BND MOD INFRARED RECEIVER TUNING SEEK CD TRACK UP DOWN BUTTON POWER BUTTON VOLUME UP DOWN BUTTONS MODE BUTTON MENU ENTER BUTTON DISPLAY ID3 TAG INFORMATION BUTTON PRESET BUTTONS SCAN BUTTON MUTE BUTTON LOCAL DX BUTTON PLAY PAUSE BUTTON RANDOM BUTTON MP3 SEARCH AMS BUTTON MONO BUTTON...

Page 11: ... processing refer to the manual for your CD R CD RW writing software or CD R CD RW recorder Additionally depending on the recording status it may prove impossible to play certain CDs record on CD R or CD RW 5 Do not use solvents such as benzine thinner commercially available cleaners or antistatic spray intended for analog discs Page 2 Page 3 2 INSTALLATION Before finally installing the unit conne...

Page 12: ...he trim plate the side with a Bottom Label stuck should be at down side as shown on diagram Push the trim plate against the main panel until it is fitted Page 5 3 DETACHABLE CONTROL PANEL D C P Removing The Detachable Control Panel D C P CAUTION DO NOT insert the D C P from the left side Doing so may damage it The D C P can easily be damaged by shocks After removing it place it in a protective cas...

Page 13: ...SS BAS TREBLE TRE BALANCE BAL FADER FAD Rotate Volume Control to adjust desired level within 5 seconds NOTE BASS AND TREBLE WILL BE SKIPPED IF DSP MODE IS ACTIVATED B OTHER OPERATION press MENU button for more than 2 seconds to open another set of menu press MENU button repeatedly to navigate through the menu items while the desired menu item is displayed use Volume control to adjust the selected ...

Page 14: ...s AMS button again AUTO MEMORY STORE PRESET SCAN BUTTON AMS SCAN BUTTON SCAN Press this button the radio will tune up to search stations the available stations will blinking and stay on the display for a few seconds RESET BUTTON In case of Reset Button is located behind the front abnormal operation use a pencil tip or other non metallic object to press the re set button Reset button is located beh...

Page 15: ...n will activate Repeat Function in the following order Repeat On Repeat Off The RPT indicator will turn on RESE T M2 7 MMC SD CARD USB DEVICE OPERATIONS START THE USB DEVICE MODE 1 The USB mini socket is accessible as indicated in picture 1 P 1 2 Plug in the USB drive device completely by USB adapter cable as indicated in picture 2 P 2 and display will show USB DRIV to indicate that the USB drive ...

Page 16: ...e are four ways to select your favorite folder tracks 1 By Track Up Down Button Press track up down button to skip the current tracks or Press 10 track up M6 or 10 track down button M5 to skip 10 tracks at one time Navigating through folders and tracks Using MP3 Search Button 8 MP3 OPERATIONS CD R CD RW SD MMC USB FILES Loading MP3 File CD MMC SD USB Drive Insert the MP3 as usual if it is an MP3 d...

Page 17: ... correct number 2 Searching by track While the LCD is showing TRK SCH press MP3 Search Button one more time the LCD changes to FILE SCH the unit is at Folder Search mode if no action is taken for about 5 seconds normal play will resume At Folder Search mode press Enter Button once the first folder will be shown use Volume up down Control to scroll through all folders When the desired folder is fou...

Page 18: ...TAI 9279 MRD MP3 MDATAO RESET 9279 MWE MP3 CLK VDD VSS XOUT XIN GND GND LCD INH LCD DO LCD CLK BEEP AVDD LCD CE USB IN CL OP SW NC SDIN EQIN R KIN 1 KIN0 CDC ON CDC DATA SCOR DECINT CDP S W CW REMO RDS CLK RDS DATA LOC STIN ST MONO AF MUTE BAND1 BAND2 AGC VDD EQ0 EQ1 VDDPLL FMIF R139 33K R138 4K7 R321 100 Q307 9014C Q308 9014C Q309 9014C C302 103 R318 1K5 R317 150 D302 IN4148 EC301 0 47UF R316 1K ...

Reviews: