background image


Assembling the Equipment 

9


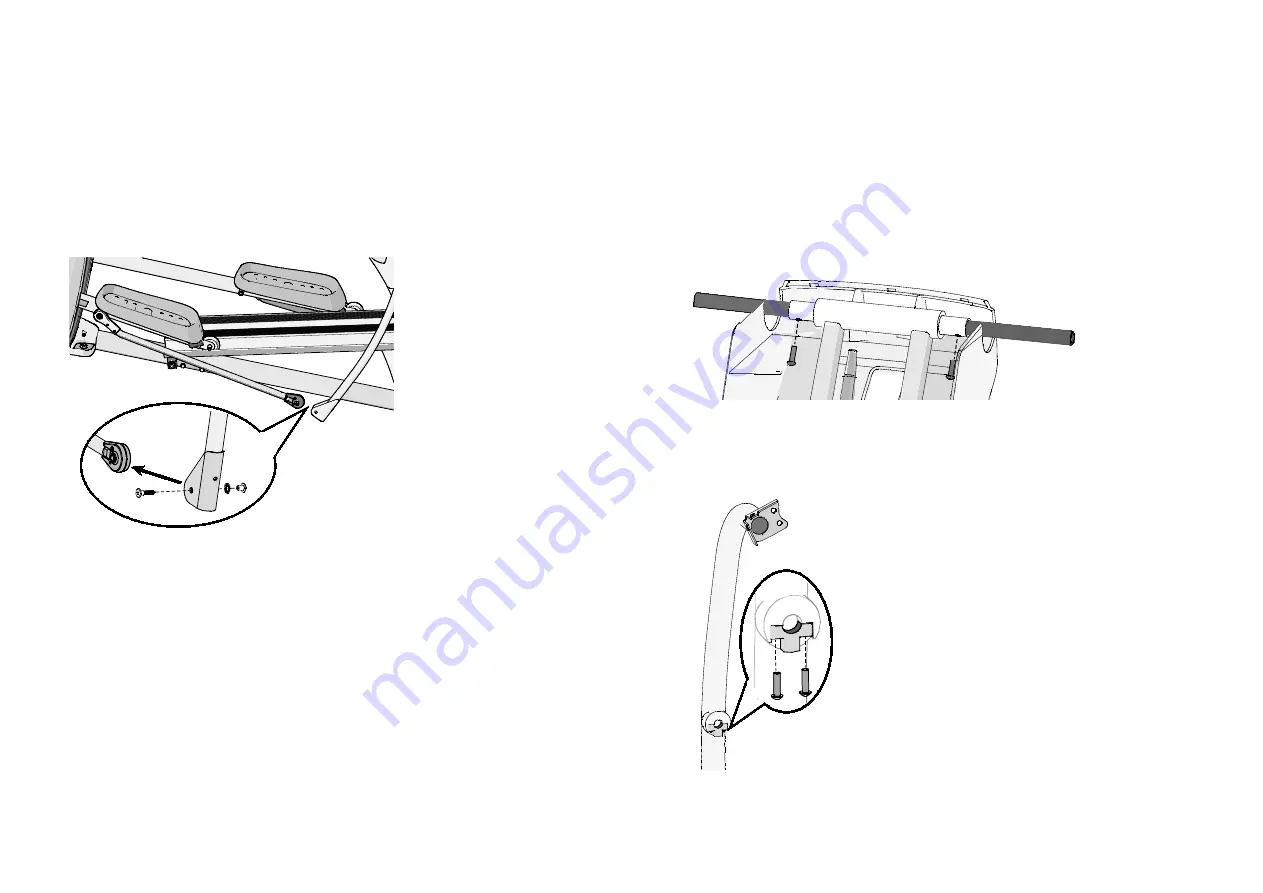
To attach the lower link arms to the movable arms: 

1.


Attach the right lower link arm to the movable arm using one joint connector 

screw, one star washer, and one joint connector nut. Fully tighten the 

fasteners using the 5 mm hex wrench.   

CAUTION: Guide the handlebar to its balance point and let it rest there. When 

attaching the lower link arms, have your assistant hold the moving handlebar. 

Failure to do so could result in injury. 


Figure 12: Lower link arm attachment 

2.


Repeat this procedure to attach the left lower link arm to the left movable arm. 


Attaching the Stabilizer (EFX 423 Model Only) 

This assembly procedure applies to EFX 423 model only. For other models, the 

stabilizers will be attached at a later point in the assembly. 

To attach the stabilizers: 

1.


Slide the handlebar shaft into the stabilizer assembly as shown in the 

following figure and secure it using two 

¹₄

-inch x 

⁷₈

-inch buttonhead screws. 

Fully tighten the fasteners.   


Figure 13: Secure the handlebar shaft 

2.


Insert a clamp into each stabilizer and secure it loosely with two buttonhead 

screws.   


Figure 14: Location of clamp in stabilizer 

Summary of Contents for EFX 245

Page 1: ...use the touch sensitive handrail grips use both hands Make sure both hands are moist not dry when you grasp the touch sensitive handrail grips SmartRate Features When you begin an exercise session a blinking segment in the SmartRate display appears if you entered your age during the setup phase The blinking segment indicates the current zone of your heart rate The calculation used for the heart ra...

Page 2: ...rical supply in your house before you use the EFX STEP 1 Turn the equipment on STEP 4 Grasp handles firmly with both hands STEP 7 Use the control on the console to adjust the amount of resistance If the equipment includes a motorized CrossRamp adjustment use the control on the left to adjust the CrossRamp height and the control on the right for the resistance STEP 2 If the locking pin is engaged r...

Page 3: ...uch sensitive heart rate grips on the handrails If you prefer to use the touch sensitive handrail grips use both hands Make sure both hands are moist not dry when you grasp the touch sensitive handrail grips SmartRate Features When you begin an exercise session a blinking segment in the SmartRate display appears if you entered your age during the setup phase The blinking segment indicates the curr...

Page 4: ...OWNER S MANUAL Precision Energy SE RIES ELLIPTICALS EFX 447 EFX 245 WELCOME TO A PERSONALIZED FITNESS EXPERIENCE FOR YOUR HOME ...

Page 5: ......

Page 6: ... unit from the electrical outlet immediately after using and before cleaning WARNING To reduce the risk of burns fire electric shock or injury take the following precautions Do not allow children or those unfamiliar with the operation of the equipment on or near it Do not leave children unsupervised around the unit Never leave the equipment unattended when it is plugged in Unplug the equipment fro...

Page 7: ... not attempt to service the equipment yourself except to follow the maintenance instructions found in this manual Never drop or insert objects into any opening Keep hands away from moving parts Use the equipment only for its intended purpose as described in this manual Do not use accessory attachments that are not recommended by the manufacturer as such attachments may cause injuries Do not set an...

Page 8: ... Approvals for Cardiovascular Equipment Precor equipment has been tested and found to comply with the following applicable safety standards Cardiovascular Type Equipment CAN CSA IEC 60335 1 Household and similar electrical appliances Safety ...

Page 9: ... accordance with all local codes and ordinances Failure to properly ground the equipment could void the Precor Limited Warranty DANGER Improper connection of the equipment grounding conductor can result in a risk of electric shock Check with a qualified electrician or service person if you are in doubt as to whether the unit is properly grounded Do not modify the plug provided with the equipment I...

Page 10: ... the equipment does cause harmful interference to radio or television reception which can be determined by turning the unit off and on you are encouraged to try to correct the interference using one or more of the following measures Reorient or relocate the receiving antenna for your TV radio VCR DVR etc Increase separation between the unit and the receiver TV radio etc Connect the equipment into ...

Page 11: ...es Communications du Canada ATTENTION Haute Tension Débranchez avant de réparer Obtaining Service You should not attempt to service the equipment except for maintenance tasks as described in this manual The equipment does not contain any user serviceable parts that require lubrication For information about product operation or service see the Precor web site at www precor com Should you need more ...

Page 12: ...er bar just below the power switch Figure 1 EFX serial number label position The console serial number is located inside the USB connector compartment on the back of the console You will need to open the cover of this compartment to see the number Figure 2 Console serial number label position ...

Page 13: ...e Console Controls 16 Connecting Your Apple Device 19 Setting Up Your Equipment 21 Measuring Your Heart Rate 25 Using SmartRate 27 Getting Accurate Heart Rate Readings 29 Setting Your Target Heart Rate 31 Troubleshooting Heart Rate Readings 32 Choosing and Completing a Workout 33 Choosing a Workout 35 Available Workouts 39 Changing Settings and Metrics While You Work Out 47 Finishing Your Workout ...

Page 14: ...e System Settings 66 Retrieving System Information 68 Displaying the Error Log 69 Maintenance 70 Inspection 70 Cleaning the Equipment 71 Storing the Chest Strap 71 Long Term Storage 71 Precor Residential Equipment Limited Warranty 72 ...

Page 15: ... the beginning of this manual Location It is important to keep the area around the equipment open and free from encumbrances such as furniture or other fitness equipment For user safety and proper maintenance be sure to allow three feet one meter of space on all sides of the equipment Turning the Unit On and Off To turn the unit on and off use the power switch located on the back of the unit near ...

Page 16: ...e To lock the EFX insert the pin securely into one of the holes just behind the rollers Important The locking spring loaded ball near the end of the pin must pass through both sides of the arm You should be able to feel it when it clicks into place The following figure shows how the pin looks when it is properly seated Figure 4 Locking pin in use ...

Page 17: ...Owner s Manual EFX 447 245 12 When you want to use the EFX remove the pin from the hole and store it in the hole under the bottom of the ramp The following figure shows how the pin should look while the EFX is in use Figure 5 Locking pin in storage during a workout ...

Page 18: ...e the equipment To get started with your new EFX 1 Turn the equipment on if necessary 2 If the locking pin is engaged release it refer to Using the Locking Pin 3 Hold one handrail and step onto the pedals 4 Grasp the handlebars securely 5 Touch one of the following buttons Go to start the suggested workout QuickStart 6 Use the motion controls to adjust the intensity of your workout The control on ...

Page 19: ...workout higher CrossRamp settings change the motion of your feet and legs bringing additional focus to your quadriceps and gluteal muscles The following two figures show how the different CrossRamp settings target different muscle groups in your lower body Note On 400 series EFX models the CrossRamp range is available as a larger number of smaller level changes than those available on 200 series m...

Page 20: ... addition to exercising different groups of muscles you may also find that certain settings adjust the performance of the EFX to your height and body geometry Note If your EFX is equipped with movable arms using them also exercises muscle groups in your arms and chest Note also that 200 series EFX models provide a more limited range of CrossRamp levels ...

Page 21: ...sstrainer Owner s Manual EFX 447 245 16 Using the Console Controls The figure and table on the following page show the main areas on the front surface of the console You can reach any menu setting control or feature of your equipment by using these areas ...

Page 22: ... you work out the current track information appears along the top edge Note You must use your player s screen to display video but you can play its audio portion through the console Touch the capacitive buttons to enter your personal settings set up the equipment and choose workouts Depending on what you re doing these buttons have different names and purposes The names of the buttons appear next ...

Page 23: ...els shown on the level indicators The playback controls navigate through the tracks and set the volume on your Apple device if it is connected to the console The following figure shows how the home screen appears on the console All eight buttons are active and the name of each button appears next to it Figure 10 Home screen and capacitive buttons ...

Page 24: ...installed on your iPhone you can also upload the your workout results to your Preva account Tip If you are using a different mobile device that has a USB charging cable you can charge your device by connecting it to the console However the console s playback controls and headphone connector work only with Apple devices To connect your device to the display console 1 Gently open the access cover on...

Page 25: ...7 245 20 3 Insert the USB connector into the jack on the back of the console as shown in the following figure Figure 12 USB connector positioning 4 Close the access cover 5 Plug the other end of the cable into your device 6 Feed any excess cable through the opening in the reading tray ...

Page 26: ...o enter this information before you can start to use the equipment If you need to change it later you can do so at any time refer to Changing the System Settings Note You can find the model number of your equipment on the sales receipt invoice or packing list that you received with the equipment To set up the console 1 Turn the equipment on 2 At the Welcome screen touch Start Figure 13 Welcome scr...

Page 27: ... Manual EFX 447 245 22 4 At the Model screen use the up and down arrow buttons to select the model you have then touch Next Figure 14 EFX Model screen 5 At the Date screen use the arrow buttons to enter the current date When you have finished entering the date touch Next ...

Page 28: ...12 Hour 24 Hour button and the arrow buttons to enter the current time When you have finished entering the time touch Next 7 At the Unit Preference screen use the up and down arrow buttons to select kilometers or miles then touch Next Figure 15 Unit selection ...

Page 29: ...reen 9 Continue according to whether you want to set up the first user profile for this equipment If Then touch And You want to set up a user profile Next Set up a profile refer to Creating User Profiles You do not want to set up a user profile right now Skip Use the equipment as a guest Important If you do not set up user profiles now be sure to set them up as quickly as possible Anyone who uses ...

Page 30: ... a few seconds the console displays your current heart rate If SmartRate is on a second heartbeat icon appears over your current heart rate zone refer to Using SmartRate Before you start working out make sure you know your maximum heart rate Then as you work out be sure to reduce the intensity of your exercise if you reach or exceed that number CAUTION Your heart rate should never exceed 85 of you...

Page 31: ...7 Heart rate target zones On the Workout List you can find several heart rate workouts refer to Available Workouts These workout courses automatically manage your heart rate at a target level based on your age By monitoring your heart rate and making changes to the equipment s settings as you exercise the workouts keep your heart rate within a few beats per minute of the target rate ...

Page 32: ...ber SmartRate uses that percentage to find your current zone For example if you were 35 years old and wanted to work out in the suggested cardiovascular zone your target heart rate would be between 128 and 154 beats per minute 207 35 0 67 70 128 beats per minute 207 35 0 67 84 154 beats per minute The following table shows the percentage ranges for each zone Table 2 SmartRate zone boundaries Heart...

Page 33: ...perly set in your user profile The equipment can read your heart rate properly If you are using a chest strap you must moisten and position it properly If you are using the touch sensitive grips on the equipment you must maintain contact with both grips for five to ten seconds Note SmartRate is on by default but it is not available if the Guest account is selected To turn on SmartRate 1 During you...

Page 34: ...he manufacturer of the implanted device before using a chest strap transmitter Important Precor cardio equipment works with 5 KHz chest straps only It does not work with Bluetooth based chest straps which are designed for use with mobile apps Note To receive an accurate reading the strap needs to be in direct contact with the skin on the lower sternum just below the bust line for women 1 Carefully...

Page 35: ...isplay console for a few seconds This allows the receiver in the console to recognize the signal from the chest strap If you use the touch sensitive grips be sure to grasp them securely but not tightly use a loose cupping hold on both sides You may need to wait for 15 to 20 seconds before your heart rate is displayed Important The touch sensitive grips work well for most people However because of ...

Page 36: ...rt rate setting is not saved along with your workout To set your target heart rate 1 During your workout touch Options 2 At the Options screen touch Change Target HR 3 At the Set Target Heart Rate screen use the up and down arrow buttons to adjust your target heart rate As the rate changes the corresponding SmartRate zone for your age appears next to it Figure 22 Set Target Heart Rate screen 4 Whe...

Page 37: ...ered with any sort of salve rub or lotion If they are wash them Check that your hands are not too dry If they are moisten them slightly For a chest strap Make sure the strap is fastened positioned and moistened correctly Make sure the strap is compatible with the equipment It must be a 5 kHz strap Heart rate straps that function at other frequencies and Bluetooth based straps are not compatible wi...

Page 38: ...leted workout as a personal favorite and use it again later refer to Finishing Your Workout If you ve made any adjustments to the intensity of the workout your changes will be stored as well The human body is extremely efficient If it makes the same motion regularly over many days or weeks it learns to make that motion with less and less effort This process called muscle adaptation has one drawbac...

Page 39: ...eep your oxygen consumption as high as possible which improves your fitness over time Benefits of aerobic conditioning include greater heart and lung capacity stress management and an overall sense of vitality Weight loss workouts are designed to maintain a steady state lower intensity level of exercise keeping you in a workout zone that burns a higher amount of fat calories Toning and sculpting w...

Page 40: ...ined workouts The following sections describe each of these options Choosing QuickStart The QuickStart option allows you to get moving as quickly as possible just touch QuickStart and start exercising This workout is manually controlled and starts out with the intensity settings at their lowest levels Simply adjust the settings to produce the workout profile you want Tip You can use QuickStart to ...

Page 41: ...e again later The equipment also remembers your last four workouts whether you save them or not To use a recent or saved workout again touch My Workouts refer to Finishing Your Workout Figure 23 My Workouts button Using the Suggested Workout The equipment always displays a suggested workout when you first turn it on If you are signed in under your user profile the equipment suggests a workout that...

Page 42: ...uch as one mile or 5K Fitness Test Note You choose one of the first four as your primary focus when you create your user profile refer to Creating User Profiles After that your focus is highlighted in the workout list and the workout assigned to the Go button is always a workout associated with that focus However you can always choose any workout no matter what your primary focus is To select a wo...

Page 43: ...wner s Manual EFX 447 245 38 3 Touch Open to show the workouts available for that focus Touch Close to hide them again Figure 26 Workout type selection 4 Use the up and down arrow buttons to highlight the workout you want then touch Start Figure 27 Workout selection ...

Page 44: ...re you get the best results out of every workout The training parameters for these workouts vary according to their training goals In this chapter the following symbols describe how each workout varies its intensity and how you can modify it The workout changes this type of intensity automatically You can manually adjust the changes that the workout makes ...

Page 45: ...wo minutes of work and one minute of rest 4 1 Interval Cycles of four minutes of work and one minute of rest Workout Profile CrossRamp Resistance Total Body Interval Cycles of intense exercise and resting periods designed to train your upper and lower body at the same time The equipment provides instructions on how best to exercise your arms and when to pedal backward Rolling Hills A simulated run...

Page 46: ...bing gear required Hill Climb A simulation of a steady climb to the top of a large hill The equipment provides instructions on when to pedal backward Workout Profile CrossRamp Resistance Heart Rate Cardio Work and rest cycles managed by the equipment to keep your heart rate at the best level for moderate cardiovascular conditioning ...

Page 47: ...inutes of rest Aerobic Workout routine designed to challenge and improve your aerobic fitness Workout Profile CrossRamp Resistance Fat Burner Calorie burning routine with cycles of gradually increasing resistance Heart Rate Fat Burn Workout managed by the equipment to keep your heart rate at the most effective level for weight loss moderate intensity but with a high intensity stage in the middle ...

Page 48: ...ance 1 4 Interval Cycles of one minute of intense exercise and four minutes of rest 1 2 Interval Cycles of one minute of intense exercise and two minutes of rest Heart Rate Zone Quick bursts of intense exercise managed by the equipment to keep your heart rate at a high performance level ...

Page 49: ...pe of your thighs and gluteal muscles Glute Toner Plus More intense workout targeting your thighs and gluteal muscles Workout Profile CrossRamp Resistance Leg Sculpt Cycles of increasing intensity designed to define and strengthen your leg muscles Leg Sculpt Plus More intense version of the Leg Sculpt workout Note To provide the best possible results the equipment advises you to pedal backward dur...

Page 50: ...rget heart rate After you complete the test the equipment displays your score The treadmill ends the test prematurely if either of the following things happen The treadmill cannot detect your heartbeat Your heart rate exceeds 85 of your maximum safe rate for 15 seconds or more Your heart rate changes too quickly You stop pedaling Important For best results sit and rest for at least five minutes be...

Page 51: ...28 or below 28 33 33 or above 40 49 26 or below 26 31 31 or above 50 59 24 or below 24 28 28 or above 60 or over 22 or below 22 26 26 or above Table 4 Cardio Respiratory Fitness Score Category Men Fitness Category Age in Years Low Fitness Medium Fitness High Fitness 20 39 35 or below 35 42 42 or above 40 49 32 or below 32 39 39 or above 50 59 29 or below 29 36 36 or above 60 or over 24 or below 24...

Page 52: ...ph so that it displays the information you want to see You can make the following changes at any time Workout selection between workouts that can be interrupted Workout length Information displayed on progress graph Metrics displayed on screen Metrics Scan all available metrics appear in sequence on the screen In addition if you are signed in under your user profile you can change the following Ta...

Page 53: ...t of time you can do that after you have started your workout To change the length of your current workout 1 At the main workout screen touch Change Time Figure 28 Change Time button 2 Use the up and down arrow buttons to increase or decrease the length of your workout Figure 29 Change Duration screen 3 Touch Save to return to the main workout screen Note Touching Back instead of Save returns you ...

Page 54: ...rogress or metrics as shown in the following figure and table Simply touch the button next to the measurement you want to change Note If you are signed in under your user profile the equipment will save your display settings and metrics selections for the next workout even if you don t save your workout Figure 30 Time measurement selection ...

Page 55: ...egment Time time remaining in the current intensity segment of the workout Achievement Total Distance Distance Remaining for workouts whose total distance is defined Total Strides total number of strides completed Elevation Gain total for this workout Metric Types Available Speed Strides Min current speed in strides per minute Avg Strides Min average speed for the whole workout in strides per minu...

Page 56: ... METs that s three times the energy you would use if you weren t moving Some personal trainers and medical professionals suggest tracking METs instead of calories because your MET target doesn t change as your weight changes If you want to see all of this information during your workout you can turn on Metrics Scan While Metrics Scan is on each metric changes every three seconds to show all of the...

Page 57: ...ng your workout To change the progress graph 1 During your workout touch Options 2 At the Options screen touch Change Graph 3 Use the arrow buttons to move between the types of information you can display on the graph strides per minute CrossRamp or heart rate Touch Add or Remove to select one or two types of information Figure 31 Change Graph Preference screen ...

Page 58: ... per minute SPM lines Note The bars in the progress graph can describe strides per minute CrossRamp or a combination of both refer to Available Workouts The width of each bar corresponds to one minute for timed workouts or 200 meters 656 feet for distance controlled workouts These bars scroll from right to left as your workout continues The line above the bars shows the entire length of your worko...

Page 59: ...ll be saved in your profile and you can save the mixed workout to use it again later refer to Finishing Your Workout Note You can t change to a heart rate workout or a fitness test and you can t change from a fitness test to another workout To change a workout in progress 1 Touch Options 2 On the Options screen touch Change Workout 3 Select a new workout from the workout list then touch Start Note...

Page 60: ...he progress graph remains in the center of the screen If you finish the workout normally you go through a short less intense cooldown stage after the workout itself This additional stage brings your heart rate down in a gradual controlled manner and helps prevent stiff sore muscles later After the cooldown stage the Workout Summary screen appears You can see the effect of the cooldown stage by tou...

Page 61: ...hat last longer than 15 seconds as well as the actual total time Note You can save your workout only if it lasted five minutes or more You cannot save your workout under any of the following conditions You worked out for less than five minutes You have changed between a distance workout such as a 10K run and a timed workout in either direction You were using a heart rate controlled workout or taki...

Page 62: ...t 3 When you have finished specifying the name touch Save To use a saved workout again 1 If necessary switch to your own user profile refer to Choosing a User Profile 2 At the home screen touch My Workouts Note Your saved workouts are listed in the order in which you last used them with the most recent workout first 3 Use the up and down arrow buttons to select a workout then touch Start Note The ...

Page 63: ...llowing weekly totals Workouts completed Distance covered Time hours and minutes completed Calories burned Figure 35 My Stats screen Touch Home to return to the home screen To track your progress over more than one week and to coordinate your workouts on this equipment with your other forms of exercise connect to Preva before each workout refer to Tracking Your Progress with Preva Using Preva you ...

Page 64: ...kout history To make sure Preva follows the progress you make on your new fitness equipment 1 If necessary download the free Preva app from iTunes or the Apple App StoreSM 2 Make sure that you are signed in to Preva 3 At any time before you finish your workout connect your iPhone to your equipment Note before you begin your workout you will need to connect your iPhone data cable to the console ref...

Page 65: ...want Receive workout suggestions based on your own fitness focus Save favorite workouts and use them again later Set your own default workout duration and display settings Automatically see accurate calorie use estimates based on your age Track your progress throughout the week Note Some features of the equipment are available only if you are signed in under your user profile Those features are id...

Page 66: ...ults or workouts To create a profile 1 At the home screen touch Change User 2 On the user list screen the buttons on the right show the names of user profiles that have already been created The first available button is labeled Add User Touch this button to continue Note If no Add User button appears the equipment already has as many user profiles as it can store In this case if you want to create...

Page 67: ... Next to continue 4 On the Enter Weight screen use the arrow buttons to enter your current weight Touch Next to continue 5 On the Select Gender screen use the up and down arrow buttons to confirm your gender then touch Next 6 On the Enter Date of Birth screen use the arrow buttons to enter the date when you were born When you have finished entering your birthdate touch Next ...

Page 68: ...ne Touch Next to continue 8 On the My Profile screen review the information you have entered If Then touch All of the information is correct Save Some of the information needs to be changed Back or Edit As you lose weight or if you want to change any of your other profile information you can make your changes easily Just touch My Profile at the home screen Your profile is then displayed and you ca...

Page 69: ...le is available Your visitors can choose the Guest profile if they want to use the equipment but it will not store their results Note SmartRate is not available when the Guest profile is selected To choose a user profile 1 At the home screen touch Change User 2 On the user list screen touch one of the buttons on the right side of the screen Figure 37 User profiles Note The user profile you have se...

Page 70: ... the up and down arrow buttons to make your adjustment then touch Save to return to the My Settings screen Deleting User Profiles You have to select a profile before you can delete it This helps prevent people from accidentally deleting each other s profiles To delete a user profile 1 At the home screen touch Change User 2 Using the buttons on the right of the screen select the user profile you wa...

Page 71: ...t all users For example if you set the distance units to kilometers everyone sees their workout distances in kilometers To correct the model number 1 At the Settings screen use the up and down arrow buttons to select Model then touch Edit 2 At the Set Model screen use the up and down arrow buttons to select the model you have then touch Save To change the date 1 At the Settings screen use the up a...

Page 72: ...2 Hour 24 Hour button and the arrow buttons to enter the current time When you have finished entering the time touch Save To switch between kilometers and miles 1 At the Settings screen use the up and down arrow buttons to select Distance Units then touch Edit 2 At the Set Unit Preference screen use the up and down arrow buttons to select kilometers or miles then touch Save ...

Page 73: ...tion about your equipment is available for reference Software release part number Software version numbers Hardware version and serial numbers console LPCA equipment base unit control circuit version number Total equipment usage in hours and minutes Odometer total usage in kilometers or miles To view the system information 1 At the home screen touch Settings 2 At the Settings screen touch Informat...

Page 74: ...e Data providing details about the error The time and date when the error occurred The odometer setting when the error occurred To display the error log 1 At the home screen touch Settings 2 At the Settings screen touch Information 3 At the Information screen touch Error Log Figure 39 Error log 4 When you are finished viewing the error log touch Home ...

Page 75: ...ny maintenance tasks Inspection Inspect the EFX before use Look and listen for loose fasteners unusual noises worn or frayed power cords and any other indications that the equipment may be in need of service If you notice any of these obtain service Important If you determine that the EFX needs service make sure that the EFX cannot be used inadvertently Turn the unit Off insert the locking pin and...

Page 76: ...e EFX to dry completely before using it again Frequently vacuum the floor around the unit to prevent the accumulation of dust and dirt which can affect the smooth operation of the unit Use a soft nylon scrub brush to clean the foot pedals Storing the Chest Strap Store your chest strap in a place where it remains free of dust dirt and moisture such as in a closet or drawer Be sure to protect the ch...

Page 77: ... only against defects discovered within the warranty period and extends only to the original purchaser of the product Parts repaired or replaced under the terms of this warranty will be warranted for the remainder of the original warranty period only To make claim under warranty the buyer must notify Precor or their authorized Precor dealer within 30 days after the date of discovery of any nonconf...

Page 78: ...ions This warranty is valid only in accordance with the conditions set forth below 1 The warranty applies to the Precor product only if a It is serviced by a Precor certified technician b It remains in the possession of the original purchaser and proof of purchase is demonstrated c It has not been subjected to accident misuse abuse improper service or non Precor modifications d Claims are made wit...

Page 79: ...erein are the exclusive warranties given by Precor and supersede any prior contrary or additional representations whether oral or written ANY IMPLIED WARRANTIES INCLUDING THE WARRANTY OF MERCHANTABILITY OR FITNESS FOR A PARTICULAR PURPOSE THAT APPLY TO ANY PARTS DESCRIBED ABOVE ARE LIMITED IN DURATION TO THE PERIODS OF EXPRESS WARRANTIES GIVEN ABOVE FOR THOSE SAME PARTS PRECOR HEREBY DISCLAIMS AND...

Page 80: ...ONTRACT INCLUDING WARRANTY TORT INCLUDING ACTIVE PASSIVE OR IMPUTED NEGLIGENCE AND STRICT LIABILITY OR OTHERWISE FOR DAMAGE TO THE EQUIPMENT PROPERTY DAMAGE LOSS OF USE REVENUE OR PROFIT COST OF CAPITAL COST OF SUBSTITUTE EQUIPMENT ADDITIONAL COST INCURRED BY BUYER BY WAY OF CORRECTION OR OTHERWISE OR ANY OTHER INCIDENTAL SPECIAL INDIRECT OR CONSEQUENTIAL DAMAGES WHETHER RESULTING FROM NONDELIVERY...

Page 81: ...Precision Series Energy Series Elliptical Fitness Crosstrainer Owner s Manual EFX 447 245 76 Notes ...

Page 82: ...ph Workout Selected Elevation Gain Workout Complete Resistance Total Strides Heart Rate current Strides per Minute Heart Rate average Strides per Minute average Heart Rate max Strides per Minute graph Heart Rate target Total Strides Heart Rate graph Total Distance SmartRate Distance Remaining Current heart rate zone Time Elapsed Time spent in target heart rate zone Time Remaining Calories total Ti...

Page 83: ...widely recognized for its innovative award winning designs of exercise equipment Precor aggressively seeks U S and foreign patents for both the mechanical construction and the visual aspects of its product design Any party contemplating the use of Precor product designs is hereby forewarned that Precor considers the unauthorized appropriation of its proprietary rights to be a very serious matter P...

Page 84: ...WELCOME TO A PERSONALIZED FITNESS EXPERIENCE FOR YOUR HOME Assembly Guide PRECISION SERIES ELLIPTICALS MODELS 447 425 423 ...

Page 85: ......

Page 86: ...m Assembly EFX 447 and 425 Models Only 8 Attaching the Stabilizer EFX 423 Model Only 9 Attaching the Lift Cover 12 Attaching the Stabilizers EFX 447 and 425 Models Only 13 Attaching the Console Bracket 15 Attaching the Accessories 16 Attaching the Console 18 Fully Tighten the Remaining Fasteners 18 Completing the Assembly 19 Connecting the Power Cord 19 Leveling the EFX 19 Changing the EFX 447 fro...

Page 87: ...niques Do not grasp any plastic part while lifting or moving the unit The plastic parts are not reinforced and they may break Obtain assistance Ask another capable adult for assistance during the assembly process Use your fingers or the appropriate tools to insert fasteners Proper alignment helps alleviate crossthreading Do not fully wrench tighten fasteners until instructed to do so Unpacking the...

Page 88: ...ch 1 Hex head cap screw inch x inch 18 Lock nut inch 2 Phillips head screw 10 x inch 4 Buttonhead cap screw inch x 2 inch 2 Flat washer inch 18 Flat washer inch 2 Table 2 Additional Fasteners and Tools for the EFX 423 Model Only Fasteners Quantity Buttonhead cap screw inch x inch 10 Self tapping screw 8 x inch 8 Handlebar tube covers 2 sets Table 3 Additional Fasteners and Tools for EFX 447 and 42...

Page 89: ...400 Series Assembly Guide 4 Table 4 Additional Parts and Accessories Two adjustable feet Bottle holder Two clamps Top cover Two device holders Heart rate chest strap ships with all models except the EFX 423 ...

Page 90: ...of the equipment is critical When you install fasteners leave room for adjustments Do not fully tighten the fasteners until you are instructed to do so The following figure identifies the major components of the equipment referred to in this manual Figure 1 Major components of the EFX ...

Page 91: ...back covers together Gently squeeze the sides of the back covers to release the tabs and remove the front lift cover Important The lift screw shaded in figure below is lubricated before shipping Grease on the lift screw is required for proper operation but can stain clothing Be careful not to get grease on your clothing as you remove the lift cover Figure 4 Tab locations To attach the lift assembl...

Page 92: ...ap screws two inch washers and two inch lock nuts Fully tighten the fasteners using a inch hex key and a inch socket wrench Figure 7 Ramp to yoke attachment 5 Fully tighten the two fasteners at the base of the lift motor assembly using a inch socket wrench Do not use the socket wrench extension in this step Figure 8 Fastener location at base of lift motor 6 Cut the tie wrap that secures the lift m...

Page 93: ...0 Moving arm attachment To attach the movable arms 1 Position the left movable arm carefully onto the pivot tube Support the weight of the movable arm with one hand while you turn the joint screw at least four times with your other hand Important If the joint screw is resistant do not force it Reposition the movable arm and try again Forcing the joint screw may cause crossthreading Figure 11 Tight...

Page 94: ...re 12 Lower link arm attachment 2 Repeat this procedure to attach the left lower link arm to the left movable arm Attaching the Stabilizer EFX 423 Model Only This assembly procedure applies to EFX 423 model only For other models the stabilizers will be attached at a later point in the assembly To attach the stabilizers 1 Slide the handlebar shaft into the stabilizer assembly as shown in the follow...

Page 95: ... of the EFX off the floor and place a wedge of packaging cardboard beneath its base Figure 16 Place packaging under the EFX 5 Have your assistant hold the stabilizer with a cable protruding from both ends next to the handlebar shaft and base frame while you connect the base cable You will hear a click when the cable is properly attached Store excess cable in the stabilizer frame Figure 17 Attach t...

Page 96: ...e attachment 7 Secure the stabilizer to the handlebar shaft by fully tightening the clamp screws 8 Repeat this procedure except for data cable connection to attach the other stabilizer To attach the handlebar shaft covers 1 Locate the four covers two sets for the handlebar shaft 2 Slide a bottom cover into place under the handlebar shaft and secure it using two 8 self tapping screws 3 Secure the t...

Page 97: ...secure the front lift cover and fully tighten them using the long handled inch hex wrench Figure 20 Lift cover attachment 2 Align the tabs and apply downward pressure and press the magazine rack and back cover together A click is heard when the magazine rack is secured properly Note For ease of assembly refer to the following figure and apply pressure straight down in the direction of the three ar...

Page 98: ...re the nut rests against the stabilizer Figure 23 Adjustable foot attachment 3 For easier access to the base mounts lift the front of the EFX off the floor and place a wedge of packaging cardboard beneath its base Figure 24 Wedge packaging beneath base frame 4 Have your assistant hold the stabilizer with a cable protruding from both ends next to the movable arm assembly and base frame while you co...

Page 99: ...e mounts loosen the clamp screws and realign the stabilizer Tighten the clamp screws once you have attached the stabilizer to the base frame Figure 26 Base frame attachment 6 Secure the stabilizer to the moving arm assembly by fully tightening the clamp screws 7 The other stabilizer does not have a data cable Repeat the remaining steps in this procedure to attach the other stabilizer ...

Page 100: ...e upper portion of the stabilizers 3 Insert the two top inch x inch hex head screws and inch washers Figure 28 Tightening the fasteners 4 Insert the four inch x inch hex head screws and four inch washers into the side mounts and partially tighten them Figure 29 Console bracket attachment 5 Insert the two rear inch x inch hex head screws and four inch washers and fully tighten the fasteners Note Pe...

Page 101: ... 31 Removing the rear screws Attaching the Accessories Locate the device holders bottle holder and top cover To attach the accessories 1 Place the device holders around the console bracket and slide them together Figure 32 Device holder attachment 2 Press them together until they snap into place over the console bracket Figure 33 Fit device holder together ...

Page 102: ...nd attach it using two 10 Phillips head screws Fully tighten the fasteners Figure 35 Bottle holder placement 5 Fully tighten the fasteners on the back of the bottle holder 6 Place the top cover over the console bracket by hooking it in the back and rotating it forward Attach it using two 10 Phillips head screws Fully tighten the fasteners Note For proper fit make sure the tabs are lined up on the ...

Page 103: ...ointing down Figure 38 Cable attachment 2 Set the console onto the console bracket It should sit flush on the bracket without gaps If there is a gap check to make sure that no wires are being pinched Figure 39 Securing the display console 3 Secure the display console using four buttonhead screws Fully tighten the fasteners Fully Tighten the Remaining Fasteners Return to the fasteners on the equipm...

Page 104: ...er end into a grounded outlet so you can maintain a consistent power source without overloading any other circuitry Be sure to use the appropriate voltage Refer to Grounding Instructions in the Owner s Manual 3 Use the power switch to turn the unit On Check that the Precor banner appears on the display If the display remains blank recycle the power If the display continues to remain blank check th...

Page 105: ...dal frame by pressing the pin on the socket end and pulling it outward Figure 42 Location of pin on socket end of lower link arm 2 Twist the socket end toward the floor and insert the pin into the quick pin release socket on the base frame in front of the back cover Figure 43 Changing socket end position 3 Repeat the previous two steps for the pedal on the opposite side of the EFX Figure 44 Positi...

Page 106: ......

Page 107: ...g designs of exercise equipment Precor aggressively seeks U S and foreign patents for both the mechanical construction and the visual aspects of its product design Any party contemplating the use of Precor product designs is hereby forewarned that Precor considers the unauthorized appropriation of its proprietary rights to be a very serious matter Precor will vigorously pursue all unauthorized app...

Reviews: