background image


POWXQ5330 

EN


Copyright © 2013 VARO 

P a g e

 | 

12


www.varo.com 

10 CLEANING AND MAINTENANCE 

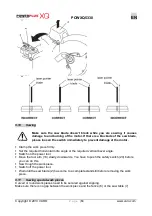
Before performing any work on the equipment, pull the power plug. 

10.1 

Cleaning 

  Regularly clean the machine housing with a soft cloth, preferably after each use. 

  If the dirt does not come off use a soft cloth moistened with soapy water. 

  Never use solvents such as petrol, alcohol, ammonia water, etc. These solvents may 

damage the plastic parts. 

Make sure no water can reach the inside of the power tool! 

10.2 

Connecting cable 

If the connecting cable (or mains plug) is damaged, it must be replaced. Replacement of the 
connecting cable should only be carried out by a qualified specialist (qualified electrician). 

11 CUTTING CAPACITY 


Worktable angle 

Head tilting 
angle 

Height x width (mm) 

0° 

0° 

75 x 130 mm 

45° (left) 

0° 

75 x 90 mm 

45° (right) 

0° 

75 x 90 mm 

0° 

45° 

50 x 130 mm 

45° (right) 

45° 

50 x90 mm 

45° (left) 

45° 

50 x 90 mm 

12 TECHNICAL DATA 

Nominal Voltage 

230V ~ 50 Hz 

Power rating 

1500W 

No load speed 

4200min-1 

Protection class 

II 

Blade size 

254mm x 30 mm x 2.8mm 

Weight 

18 kg 

13 SOUND EMISSION 

Sound pressure level LpA 

90,2 dB(A)         K = 3 m/s² 

Sound power level LwA 

103,2 dB(A)       K = 3 m/s² 

Vibration 

1,09 m/s² 

14 STORAGE 

  Thoroughly clean the whole machine and its accessories. 

  Store it out of the reach of children, in a stable and secure position, in a cool and dry place, 

avoid too high and too low temperatures. 

  Protect it from exposure to direct sunlight. Keep it in the dark, if possible. 


Don’t keep it in plastic bags to avoid humidity build-up. 


Summary of Contents for XQ POWXQ5330

Page 1: ...Y 7 8 1 Assembling the extension hoops 7 8 2 Assembling the locking knob 7 8 3 Assembly of the mitre locking knob 7 9 OPERATING INSTRUCTIONS 7 9 1 Transporting the mitre saw 7 9 2 Dust and chip extrac...

Page 2: ...013 VARO P a g e 2 www varo com 10 2 Connecting cable 12 11 CUTTING CAPACITY 12 12 TECHNICAL DATA 12 13 SOUND EMISSION 12 14 STORAGE 12 15 TROUBLE SHOOTING 13 16 WARRANTY 13 17 ENVIRONMENT 13 18 DECLA...

Page 3: ...Extension hoop screws 13 Tool arm 14 ON OFF switch 15 Handle 16 Tightening knob for transportation 17 Locking knob for bevel angle vertical 18 Scale for mitre angle verticale 19 Wrench 20 Dust bag 21...

Page 4: ...e of inflammable liquids gases or dust Power tools create sparks which may ignite the dust or fumes Keep children and bystanders at a distance when operating a power tool Distractions can cause you to...

Page 5: ...lts and be safer if used in the context for which it was designed Do not use the power tool if the switch cannot turn it on and off A power tool with a broken switch is dangerous and must be repaired...

Page 6: ...for longitudinal sawing of smaller workpieces so that your hands and fingers are kept well away from the saw blade Always store your push block whenever it is not in use Pay special attention to the...

Page 7: ...r beam at people directly or indirectly through reflecting surfaces This laser complies with class 2 according to the relevant standard The unit includes no servicing components Do not open the housin...

Page 8: ...ards Rotate the saw table 5 to the required angle to the right or to the left The required angle can be read of the scale flute Release the lever Tighten the locking knob 9 clockwise 9 5 Adjustment of...

Page 9: ...e power tool to the power supply Pull the on off switch 14 in the direction of the handle The saw blade rotates as long as you keep the switch engaged When you want to turn off the machine you have to...

Page 10: ...required horizontal mitre angle or the required vertical bevel angle Switch on the power tool Move the tool arm 18 slowly downwards You have to push the safety switch 20 before you can do this Saw tro...

Page 11: ...re touching the saw blade It can be very hot The dents of the saw blade are very sharp Position the saw in the uppermost position Loosen the screw of the guard plate Turn it around until the attachmen...

Page 12: ...lified specialist qualified electrician 11 CUTTING CAPACITY Worktable angle Head tilting angle Height x width mm 0 0 75 x 130 mm 45 left 0 75 x 90 mm 45 right 0 75 x 90 mm 0 45 50 x 130 mm 45 right 45...

Page 13: ...o do not fall under the warranty provisions We also disclaim all liability for any bodily injury resulting from inappropriate use of the tool Repairs may only be carried out by an authorised customer...

Page 14: ...2500 Lier BELGIUM declares that product Mitre saw trade mark POWERplus model POW XQ5330 is in conformity with the essential requirements and other relevant provisions of the applicable European Direct...

Reviews: