


5
Portable
Goals
Detail
"D"
7
8
6
2
1
3
4
7
8
CROSSBAR, POST
& BACKSTAY
ASSEMBLY
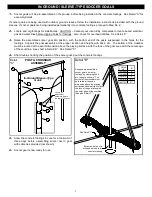
Locate crossbar
attachment
hardware toward
the rear of the goal
2.
Assemble crossbar to each post as shown in
Detail "D".
3.
Assemble formed backstays to posts as shown in
Detail "D".
4.
Assembly of portable soccer goal is now
complete. CAUTION – This step requires several
adults who are capable of lifting this soccer goal.
The assembled portable soccer goal can now be
raised to its playing position, and moved into
place. Proceed immediately to Step 5 for
installation of anchor system.
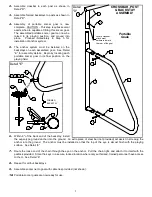
5.
The anchor system must be installed on the
backstays on each assembled goal. See Detail
“E” for assembly details. Begin by locating each
portable soccer goal in its final position on the
playing field.
6.
Within 6" of the back end of the backstay, install
the auger-type ground anchor into the ground. An extra piece of steel bar (not provided) will assist in screwing the
anchor into the ground. The anchor must be installed so that the top of the eye is almost flush with the playing
surface. See Detail “E”.
7.
Route the loose end of the chain through the eye on the anchor. Pull the chain tight, and attach it to itself with the
padlock provided. Store the keys in a secure, locked location where only authorized, trained personnel have access
to them. See Detail “E”.
8.
Repeat for all four backstays.
9.
Assemble soccer net to goal with cable ties provided (not shown).
10.
Portable soccer goals are now ready for use.
14
13
15
13
11
12
10
14
9
9
FORMED
BACKSTAY
10
11
16
12
Detail "E"