Pontiac 2008 G6 Getting To Know Manual Download Page 4

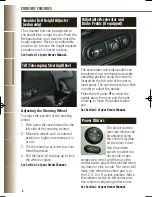
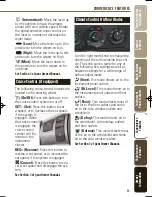
The power seat can be adjusted up or

down using the power height adjuster

located on the outboard side of the 

driver’s seat. The seat can be manually

adjusted forward or rearward.

Move the Seat Forward or

Rearward

• Lift and hold the bar under the front

of the seat to manually slide the

seat.

Raise or Lower the Entire Seat

• Press and hold the height adjuster

control up or down.

Raise or Lower the Front or Rear of

the Seat Cushion (if equipped)

The 6-way power seat also features

seat cushion adjustment.
• Press and hold the front or rear of

the control up or down.

See Section 1 of your Owner Manual.

4

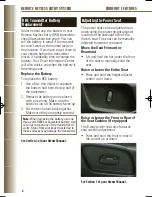
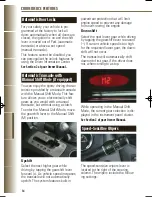
RKE Transmitter Battery

Replacement

Under normal use, the battery in your

Remote Keyless Entry (RKE) transmitter

should last about two years. You can

tell the battery is weak if the transmit-

ter won’t work at the normal range in

any location. If you have to get close to

your vehicle before the transmitter

works, it’s probably time to change the

battery. Your Driver Information Center

will also advise you when the battery is

becoming weak.

Replace the Battery

To replace the RKE battery:
1. Use a flat, thin object to separate 

the bottom half from the top half of 

the transmitter. 

2. Remove the battery and replace it 

with a new one. Make sure the 

positive side of the battery faces up.

3. Put the two halves back together. 

Make sure they are tightly secured. 

See Section 2 of your Owner Manual.

Note:

When replacing the battery, use one

three-volt CR2032 or equivalent battery. Use

care not to touch any of the transmitter cir-

cuitry. Static from your body transferred to

these surfaces may damage the transmitter.

Adjusting the Power Seat 

REMOTE KEYLESS ENTRY SYSTEM 

COMFORT FEATURES

G6 2008 A  4/30/07  11:23 AM  Page 4

Summary of Contents for 2008 G6

Page 1: ...Adjuster 6 Tilt Telescoping Steering Wheel 6 Adjustable Accelerator and Brake Pedals 6 Power Mirrors 6 AUDIO SYSTEM FEATURES Audio System 7 Audio Steering Wheel Controls 8 Multiple Disc CD Player 9 XM...

Page 2: ...mitter is pressed and held for approxi mately one second You can open the trunk with the transmitter when the vehicle is stationary The trunk may also be opened using the Trunk Release button located...

Page 3: ...mote start the engine will run for about 10 minutes before turning itself off but can be extended 10 min utes by performing another remote start sequence at any time After two consecutive remote start...

Page 4: ...rs You can tell the battery is weak if the transmit ter won t work at the normal range in any location If you have to get close to your vehicle before the transmitter works it s probably time to chang...

Page 5: ...veral times for the desired amount of support Adjust the seatback position by pulling up the recliner handle B and adjusting the seatback forward or rearward Release the handle to secure the seat back...

Page 6: ...ly when the control pad is in the 12 3 6 or 9 o clock position Move the selector switch to the center posi tion when not adjusting either mirror See Section 2 of your Owner Manual Shoulder Belt Height...

Page 7: ...Comfort Features Remote Keyless Entry System AUDIO SYSTEM FEATURES Audio System Seek Scan Press the up or down arrow to go to the next or previ ous radio station or when a CD is play ing to the next o...

Page 8: ...the desired station 4 Press the AUTO TONE button to select the equalization 5 Press and hold one of the six num bered pushbuttons until you hear a beep The station is now preset See Section 3 of your...

Page 9: ...y See Section 3 of your Owner Manual Note CDs with any affixed labels may jam in the CD player Label a CD using a permanent marker If more than one CD is inserted into the slot at one time or if scrat...

Page 10: ...Outlets G Hazard Warning Flashers Button H Adjustable Pedal Button if equipped I Instrument Panel Brightness Control J Fog Lamps Switch K Hood Release L Cruise Control if equipped M Horn N Audio Stee...

Page 11: ...panel clus ter includes these key features A Tachometer B Speedometer C Odometer D Engine Coolant Temperature Gauge E Fuel Gauge See Section 3 of your Owner Manual A B C D E Note The instrument panel...

Page 12: ...n to select a menu option or to acknowledge a warn ing message Vehicle Information Press the INFO button to scroll through the following vehicle information Trip A Trip B Fuel Range until empty Averag...

Page 13: ...essage will be dis played once again See Section 3 of your Owner Manual 13 Owner Information Maintenance Features Convenience Features Instrument Panel Features Audio System Features Comfort Features...

Page 14: ...your safety your vehicle is pro grammed at the factory to lock all doors automatically when all doors are closed the ignition is on and the shift lever is moved out of Park automatic transaxle or abo...

Page 15: ...l on the lever to increase or decrease the wiper delay Low Move the lever up to this position to turn the wipers on Low High Move the lever up to this position to turn the wipers on High Mist Move the...

Page 16: ...c head lamps will come on immediately After driving into daylight the system will switch to the DRLs after about a one minute delay Also when driving into dark tunnels or garages the system delays tur...

Page 17: ...the switch again ALC is always turned on when the vehicle is started See Section 3 of your Owner Manual 17 Owner Information Maintenance Features Convenience Features Instrument Panel Features Audio S...

Page 18: ...of your Owner Manual Convertible Top if equipped See the Convertible Top Operation Guide and Section 2 of your Owner Manual 60 40 Split Rear Seat The split folding rear seatback permits loading of lon...

Page 19: ...installed The Check Gas Cap message will turn off after a few driving trips with the cap properly installed See Section 3 of your Owner Manual Vehicle Symbols Glossary Following are examples of symbo...

Page 20: ...ation to the advisor Location of the vehicle Telephone number and your location Vehicle model year and color Vehicle mileage Vehicle Identification Number VIN Vehicle license plate number Pontiac rese...

Reviews: