background image

VISIT WWW.THEPONDBOSS.NET FOR PRODUCT INFORMATION AND TIPS.

4

EN

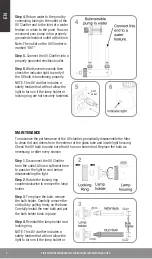
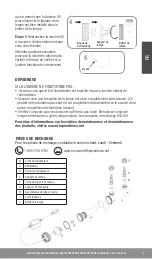
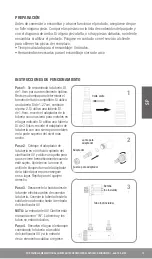
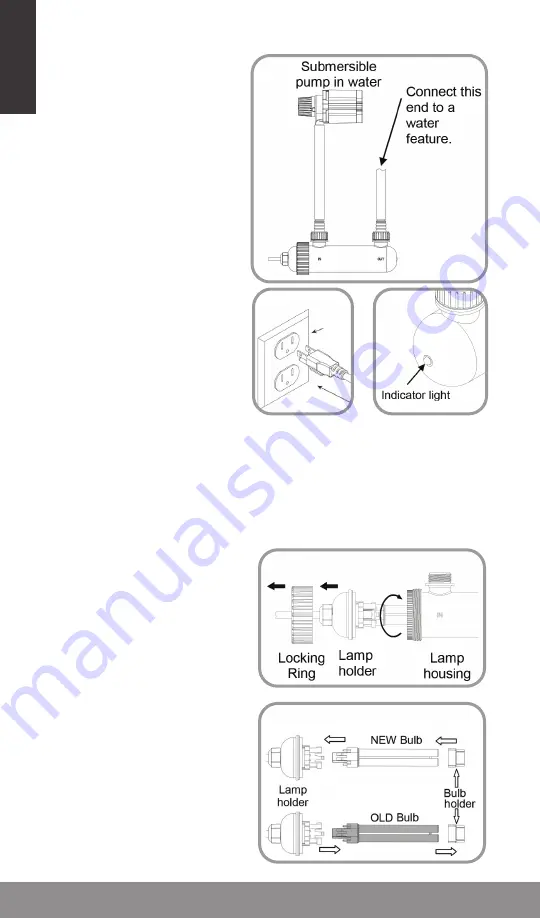
Step 4

. Return water to the pond by 

connecting tubing to the outlet of the 

UV Clarifier and to the inlet of a water 

feature or return to the pond. You can 

reconnect your pump into a properly 

grounded electrical outlet at this time.
Note: The outlet on the UV Clarifier is 

marked “OUT”.

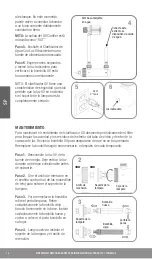
Step 5.

 Connect the UV Clarifier into a 

properly grounded electrical outlet.

Step 6. 

Wait several seconds then 

check the indicator light to verify if 

the UV bulb is functioning properly.
NOTE: This UV clarifier includes a 

safety feature that will not allow the 

light to turn on if the lamp holder or 
locking ring are not securely fastened.

MAINTENANCE

To maximize the performance of the UV clarifier, periodically disassemble the filter 

to clean dirt and debris from the exterior of the glass tube and inside light housing. 

Check the UV bulb to make sure that it has nor burned out. Replace the bulb as 

necessary, or after every season.

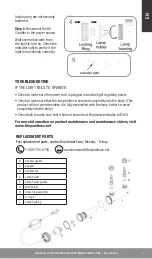
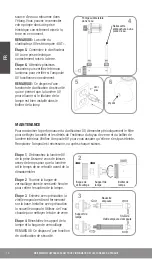
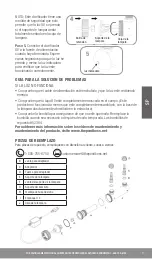
Step 1

. Disconnect the UV Clarifier 

from the outlet. Allow a sufficient time 

to pass for the light to cool before 

disassembling the light.

Step 2

. Rotate the locking ring 

counterclockwise to remove the lamp 

holder.

Step 3

. To replace the bulb, remove 

the bulb holder. Carefully remove the 

old bulb by pulling firmly on the base. 

Carefully install the new bulb and put 

the bulb holder back in place.

Step 4

. Reinstall the lamp holder and 

locking ring.
NOTE: This UV clarifier includes a 

safety feature that will not allow the 

light to turn on if the lamp holder or 

GFCI 
outlet

4

5

6

2

3

Summary of Contents for 52735

Page 1: ...RE RETURNING TO STORE Contact Customer Care 1 888 755 6750 Merci d avoir choisi pond boss AVANT DE RETOURNER AU MAGASIN Contact Les Soins de Client 1 888 755 6750 Gracias por elegir pond boss ANTES DE DEVOLVER AL MINORISTA Contacte Atención al Cliente 1 888 755 6750 ...

Page 2: ...utions 7 8 Contenu de l emballage 8 Préparation 9 Instructions d utilisation 9 10 Maintenance 10 11 Dépannage et pièces de rechange 11 Garantie limitée 12 Advertencias y precauciones 13 14 Contenido del paquete 14 Preparación 15 Instrucciones de funcionamiento 15 16 Mantenimiento 16 17 Solución de problemas y piezas de repuesto 17 Garantía limitada 18 19 Français Español TABLE DES MATIÈRES TABLA D...

Page 3: ...ibly also the use of chemicals in order to prevent and keep the occurrence of micro organisms and harmful bacteria especially legionellae that are responsible for legionnaire s disease under control Non observance of this information about correct maintenance and care can entail the spreading of harmful bacteria Due to the fact that for decorative purposes water nozzles distribute water in the air...

Page 4: ... portal will remove the harmful effects of the UV light but still allow you to see the bulb operating Do not attempt to operate this product unless the lamp is completely assembled within the light housing This product conforms to the Code of Federal Regulations CFR requirements including Title 21 Chapter 1 Subchapter J Radiological Health Specifications Lamp Voltage 60 V UV Irradiance 23μW cm2 La...

Page 5: ...termine a compatible tubing size If using 1 2 in ID tubing continue to step 2 If using 3 4 in ID tubing trim the tubing adapter using a hacksaw at the location indicated If using 1 in ID tubing trim the tubing adapter using a hacksaw at the top of the widest tier Step 2 Place the tubing adapter on the left hole of the UV Clarifier and use a gasket for it to be sealed tightly when fastened Hand tig...

Page 6: ...stened MAINTENANCE To maximize the performance of the UV clarifier periodically disassemble the filter to clean dirt and debris from the exterior of the glass tube and inside light housing Check the UV bulb to make sure that it has nor burned out Replace the bulb as necessary or after every season Step 1 Disconnect the UV Clarifier from the outlet Allow a sufficient time to pass for the light to c...

Page 7: ...Check to make sure that the lamp holder is screwed completely into the body This product will not operate unless it is fully assembled with the lamp holder screwed completely into the body Check bulb to make sure that it has not burned out Replacement bulbs 52364 For more information on product maintenance and maintenance videos visit www thepondboss net 4 5 For replacement parts contact Customer ...

Page 8: ...maged in transit a claim should be filed with the carrier DISCLAIMER Any oral statements made about the product by the seller the manufacturer the representatives or any other parties do not constitute warranties should not be relied upon by the user and are not part of the contract for sale The seller s and manufacturer s only obligation and buyer s only remedy shall be for the manufacturer to ei...

Page 9: ...non respect de ces consignes pour la maintenance et l entretien corrects peuvent entraîner la prolifération de bactéries dangereuses pour la santé Du fait que les ajutages projettent de l eau dans l air à des fins décoratives des gouttes d eau contenant des bactéries présentant un danger pour la santé peuvent atteindre les poumons et causer des maladies mettant la vie en péril Il incombe au propri...

Page 10: ...ation dans des piscines ou des jacuzzis NOTES IMPORTANTES Ce produit est conçu pour ne pas fonctionner sauf s il est complètement assemblé avec la base de la lampe vissée complètement dans la boîtier Les rayons UV sont dommageables pour vos yeux et votre peau Les rayons UV nuisent à vos yeux et à votre peau Le portail de l indicateur enlève les effets néfastes de la lumière UV mais vous permet qua...

Page 11: ... utilisez un tube 1 9cm DI coupez l adaptateur de tube à l aide d une scie à métaux à l endroit indiqué Si vous utilisez un tuyau 2 54cm DI coupez l adaptateur de tuyau à l aide d une scie à métaux au sommet du niveau le plus large Étape 2 Placez l adaptateur de tuyau sur le trou gauche du clarificateur UV et utilisez un joint d étanchéité pour qu il soit étanche hermétiquement lorsque fixé Serrer...

Page 12: ...mpoule en tirant fermement sur la base Installez avec précaution la nouvelle ampoule Utilisez de l eau chaude pour nettoyer le tube de verre Étape 4 Réinstallez le support de la lampe et la bague de verrouillage REMARQUE Ce dispose d une fonction de clarification de sécurité source d eau ou retournez dans l étang Vous pouvez reconnecter votre pompe dans une prise électrique correctement mise à la ...

Page 13: ...son Les ampoules de rechange 52364 Pour plus d informations sur les vidéos de maintenance et de maintenance des produits visitez www thepondboss net qui ne permet que la lumière UV pour allumer si le titulaire de la lampe est bien installé dans le boîtier de la lampe Étape 5 Rebranchez la lumière UV à la source d alimentation lorsque vous avez terminé Attendez quelques secondes pour que la lumière...

Page 14: ...ion doit être déposée auprès du transporteur CLAUSE DE NON RESPONSABILITÉ Toutes déclarations orales faites au sujet du produit par le vendeur le fabricant les représentants ou tout autre partie ne constituent pas des garanties ne devraient pas être considérées par l utilisateur et ne font pas partie du contrat de vente La seule obligation du vendeur et du fabricant et le seul recours de l acheteu...

Page 15: ...enimiento y cuidado así como todas las pruebas de agua que se ejecutaron en relación con los efectos de fuente Sólo el propietario es el único responsable de la seguridad de los efectos de fuente GeoGlobal Partners no tiene ninguna influencia en el uso o el mantenimiento de los equipos vendidos y el sistema De GeoGlobal Partners sólo se puede reclamar la responsabilidad de los errores de fabricaci...

Page 16: ... La lámpara no ha sido probada para usarse en piscinas de natación ni en tinas calientes NOTAS IMPORTANTES Este producto no funcionará a menos que esté completamente ensamblado con la base de la lámpara absolutamente atornillada en la estructura Los rayos UV son dañosos a sus ojos y piel El portal del indicador quitará los efectos dañosos de la luz UV pero todavía permitirá que usted vea el funcio...

Page 17: ... 1 9cm recorte el adaptador de la tubería con una sierra para metales en el lugar indicado Si utiliza una tubería DI de 2 54cm recorte el adaptador de la tubería con una sierra para metales en la parte superior del nivel más ancho Paso 2 Coloque el adaptador de la tubería en el orificio izquierdo del clarificador UV y utilice una junta para que se cierre herméticamente cuando esté sujeto Apriete c...

Page 18: ...ra Soporte de la lámpara Bombilla nueva Bombilla vieja portalám paras Paso 1 Desconecte la luz UV de la fuente de energía Deje enfriar la luz durante un tiempo considerable antes de extraerla Paso 2 Gire el anillo de retención en el sentido contrario al de las manecillas de reloj para extraer el soporte de la lámpara Paso 3 Para reemplazar la bombilla retire el portalámparas Retire cuidadosamente ...

Page 19: ...prenda y revise la luz indicadora para verificar que la luz este funcionando correctamente 4 5 GUIA PARA LA SOLUCION DE PROBLEMAS SI LA LUZ NO FUNCIONA Compruebe que el cable de alimentación esté enchufado y que la luz esté recibiendo energía Compruebe que la tapa UV esté completamente enroscada en el cuerpo Este producto no funcionará a menos que esté completamente ensamblado con la base de la lá...

Page 20: ...lacionado con la instalación o la remoción de los productos o las partes en virtud de esta garantía En el caso de los productos que se hayan dañado durante su traslado deberá presentarse la reclamación ante el transportista LIMITACIÓN DE RESPONSABILIDAD Las declaraciones orales que el vendedor el fabricante los representantes u otras personas realicen sobre el producto no constituyen una garantía ...

Page 21: ... expresa todas las demás garantías y todos los demás resarcimientos incluso las garantías implícitas de aptitud y comerciabilidad para un uso determinado Esta garantía proporciona al comprador y al usuario derechos legales específicos Además el comprador y el usuario pueden tener otros derechos que varían según cada estado Algunos estados no permiten la exclusión o la limitación de los daños impre...

Page 22: ......

Page 23: ......

Page 24: ...artners LLC pond boss is a registered trademark of GeoGlobal Partners LLC pond boss Need help Call Customer Care at 1 888 755 6750 US or visit www thepondboss net Show us your ponds and projects Share with us 10 20 ...

Reviews: