background image

Set available languages in the Login Screen

By default, the Collaboration Server Web Client interface is displayed only in English. However, the 

system administrator can choose the languages available for selection on the Login screen. These 

languages are represented by flags.

Procedure

To set available languages in the 

Login

 screen:

1.

On the Collaboration Server menu, click 

Setup

 > 

Customized Display

 > 

Multilingual Setting.

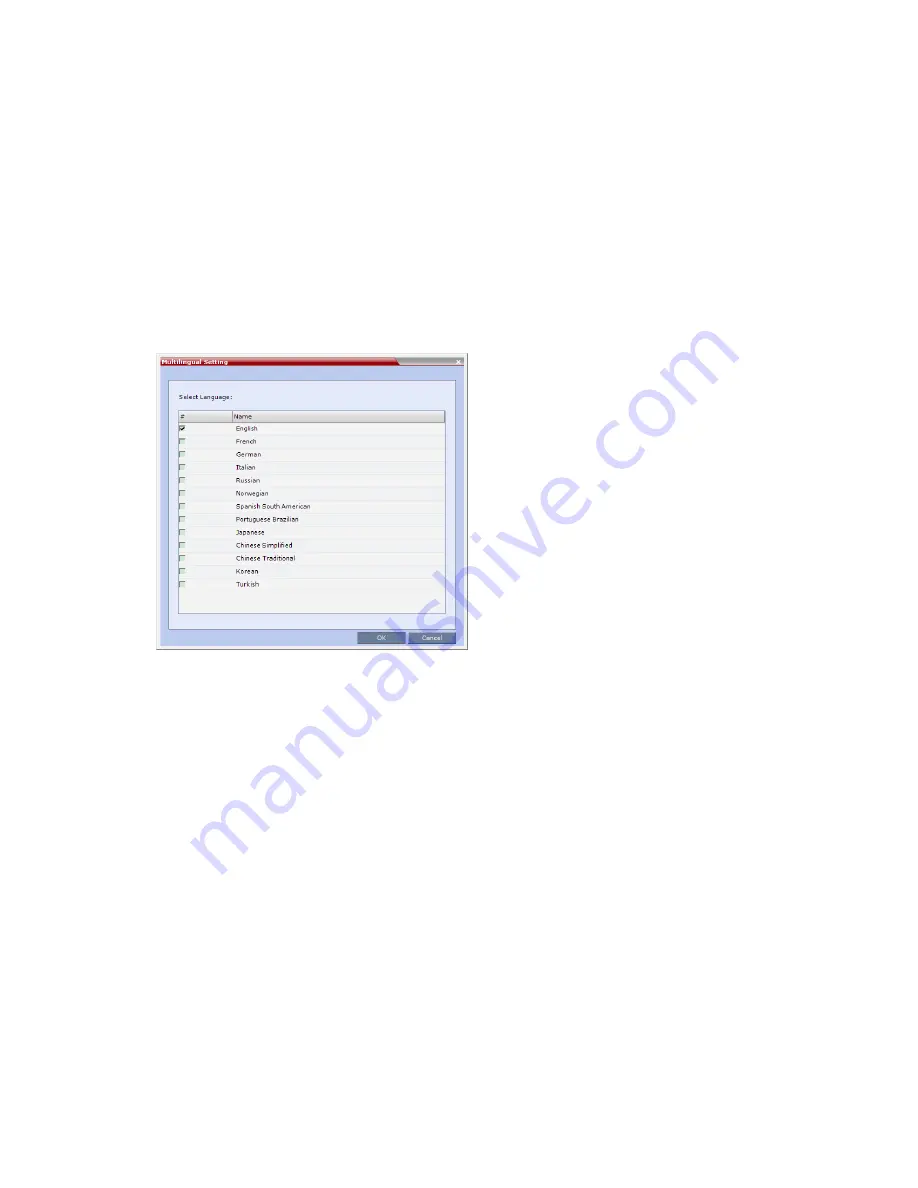
The 

Select Language

 window is displayed as below:


2.

Click the check boxes of the languages, then click 

OK

.

If the selected language is not supported by the browser or the workstation Operating System, the 

Collaboration Server Web Client is displayed in English.

3.

Log out and reconnect to the Collaboration Server.

The 

Login

 screen will display the flags of the selected languages.

For more information see 

Multilingual Setting

 in the related Administrator Guide.

Default System Flags

By default, the following system flags are used to define the system behavior when defining and running 

conferences:

Login to RealPresence Collaboration Server

Polycom, Inc.

40

Summary of Contents for RealPresence Collaboration Server Virtual Edition 1800

Page 1: ...GETTING STARTED GUIDE 8 7 1 October 2016 3725 74201 000B1 RealPresence Collaboration Server 1800 2000 4000 Virtual Edition ...

Page 2: ...fter the distribution date of the applicable product or software at a charge not greater than the cost to Polycom of shipping or distributing the software to you To receive software information as well as the open source software code used in this product contact Polycom by email at Disclaimer While Polycom uses reasonable efforts to include accurate and up to date information in this document Pol...

Page 3: ...11 Preparing the Installation Site 11 Unpack RealPresence Collaboration Server RMX 1800 2000 4000 13 Contents of Shipment 14 Install the Telescopic Rail Runners on the Rack 15 Installing the RealPresence Collaboration Server RMX 1800 17 Mount the RealPresence Collaboration Server RMX 1800 in a Rack 17 Connect the RealPresence Collaboration Server RMX 1800 to a Power Source 18 Connect Cables to the...

Page 4: ...lPresence Platform Director 33 License Your System with an Activation Key 34 Obtain the Activation Key 34 Login to RealPresence Collaboration Server 35 Workstation Requirements 35 Windows 7 Security Settings 35 Configure Internet Explorer 8 37 Login to RealPresence Collaboration Server 39 Set available languages in the Login Screen 40 Default System Flags 40 Starting Conferences Using Default Prof...

Page 5: ...es are general that is the Polycom RealPresence Collaboration Server system However when information applies to a specific edition the reference will be specific that is Polycom RealPresence Collaboration Server Virtual Edition or Polycom RealPresence Collaboration Server Appliance Edition Get Help For more information about installing configuring and administering Polycom products refer to Docume...

Page 6: ...d support information Participate in discussion forums to share ideas and solve problems with your colleagues To register with the Polycom Community simply create a Polycom online account When logged in you can access Polycom support personnel and participate in developer and support forums to find the latest information on hardware software and partner solutions topics Audience Purpose and Requir...

Page 7: ...r if your RealPresence Platform Director system was installed in a VMware vCenter environment with the required credentials you can use the RealPresence Platform Director system to deploy Polycom software For complete instructions on how to use the RealPresence Platform Director system to deploy the Polycom RealPresence Collaboration Server Virtual Edition see the RealPresence Platform Director Sy...

Page 8: ...al CPU For example a system with 8 physical cores can support up to 16 virtual processors divided up into any combination among the virtual machines running on that host When you are using Hyper V Polycom recommends disabling the Virtual Machine Queue of the Network Interface Card NIC For more information see https support microsoft com en us kb 2902166 Note CPU reservations can only be done after...

Page 9: ...r When creating the new instance in the RealPresence Platform Director you can choose to configure a static IP address and assign it to the RealPresence Collaboration Server Virtual Edition or to assign a IP address to the RealPresence Collaboration Server Virtual Edition through a DHCP server If the static IP address is configured in the RealPresence Platform Director and assigned to RealPresence...

Page 10: ... more information see https support microsoft com en us kb 2902166 Note Polycom recommends that a VMware or Hyper V administrator install the software After installation into the virtual environment additional configuration should be done by someone who understands video conferencing Virtual Edition Installation Polycom Inc 8 ...

Page 11: ...on Review the most recent Polycom RealPresence Collaboration Server 1800 2000 4000 Release Notes Prepare for System Installation Before you start you must gather network addresses to be used for the configuration from your Network administrator IP Services The IP addresses and network parameters which enable communication among the RealPresence Collaboration Server its management application and t...

Page 12: ...ss This is optional to RealPresence Collaboration Server 2000 4000 systems This is not applicable for RealPresence Collaboration Server 1800 system Media Card 3 IP Address This is optional to RealPresence Collaboration Server 4000 systems This is not applicable for RealPresence Collaboration Server 1800 2000 systems Media Card 4 IP Address This is optional to RealPresence Collaboration Server 4000...

Page 13: ... missing safety grounds and so forth Locate the main circuit breaker within the room Locate the emergency power OFF switch within the room Never assume that power is disconnected from a circuit Use only the power cord supplied with the system Each power cord should only be connected to a power outlet that has a protective ground contact Ensure that the power cord is easily accessible from the back...

Page 14: ... and do not touch their components or connector pins Keep components in anti static bags when not installed in the RealPresence Collaboration Server The following precautions should be followed with regards to installation of the Collaboration Server Use a regulating uninterruptable power supply UPS to protect the RealPresence Collaboration Server from power surges and voltage spikes to keep your ...

Page 15: ...erify that the components match the packing slip 2 The RealPresence Collaboration Server RMX 1800 2000 4000 is shipped in a packing case with Stratocell packaging and the top cover must be unlocked and lifted Boxes are placed on the top Stratocell and contain installation accessory kit Telescopic rail runners accessory kit and optional ISDN card package 3 Write down the RealPresence Collaboration ...

Page 16: ...00 3 an optional ISDN printed ISDN license is available Installation Accessory Kit RMX 1800 RMX 2000 RMX 4000 1 AC power cable 1 power cable 3 power cables 2 Ethernet cables 1 Ethernet cable 4 Ethernet cables 1 USB Key 1 USB Key 1 USB Key 1 Serial Cable NA NA Telescopic Rail Runners Accessory Kit of RealPresence Collaboration Server RMX 2000 4000 Part Kit no Item Item no Item Sample Item Quantity ...

Page 17: ...maximum of 80cm within the rack for installation Procedure To install the Telescopic rail runners on the rack 1 Determine the location of the Collaboration Server on the rack Allow for a 1U gap above and below the system for ventilation Use the Rack Spacer item no 3 to predetermine its position on the rack post making sure that square studs of the spacer fit into the rack post s square rounded mou...

Page 18: ...beled LEFT and fasten the flat head screws 3 10 mm 4 as shown in the following figure Detail of front rack spacer assembly for RealPresence Collaboration Server RMX 2000 4000 On the RealPresence Collaboration Server RMX 2000 4000 the top hole on the Rack Spacer must be left clear as it is required for fixing the Collaboration Server to the rack post Appliance Edition Installation Polycom Inc 16 ...

Page 19: ...r RMX 1800 The Polycom RealPresence Collaboration Server 1800 2000 4000 Appliance Edition can be installed in a rack For the RealPresence Collaboration Server 1800 system you also need a shelf to mount it in a rack This system can also be placed directly on a level surface Mount the RealPresence Collaboration Server RMX 1800 in a Rack You need a shelf to mount the RealPresence Collaboration Server...

Page 20: ... RMX 1800 to AC power Insert the power cable into the power connector on the rear panel of the RealPresence Collaboration Server RMX 1800 system Warning Use only the Polycom supplied AC power cable Do not connect the green or green yellow wire to the system single point ground screw Connect Cables to the RealPresence Collaboration Server RMX 1800 This section outlines the way to connect the cables...

Page 21: ... rear of the system It is recommended to install the ISDN card before the system is placed in a rack An RMX Software License is included with the ISDN card and must be registered as part of the Product Remove the blank cover from the rear of the RealPresence Collaboration Server RMX 2000 Before you can install an RTM ISDN card into the RealPresence Collaboration Server RMX 2000 system you must rem...

Page 22: ...ration Server 2000 3 Push the card into the slot until the ejector levers touch the front edge of the card cage 4 Push the ejector levers to their fully closed position 5 Tighten the captive screws on each side of the rear panel of the card securing the RTM ISDN card to the RealPresence Collaboration Server Mounting the RealPresence Collaboration Server RMX 2000 4000 in a 19 Rack There are two met...

Page 23: ...shelf Fasten the RealPresence Collaboration Server to the rack with screws through the four holes in the RealPresence Collaboration Server front mounting brackets Install the RealPresence Collaboration Server RMX 2000 on a shelf Connect Cables to RMX 2000 Do not remove the protective caps from LAN1 LAN3 and ShMG ports when you connect the cables to RMX 2000 Connect the following cables to the back...

Page 24: ...ed to install with MPMRx card perform following steps a Connect the RJ 45 terminated E1 T1 cables to PRI ports b When the one LAN port RTM ISDN card is installed connect the LAN cable to LAN 1 In MPMRx card mode and when the four LAN ports RTM ISDN card is installed connect the LAN cable to LAN1 and LAN 2 RMX 2000 rear panel view with cables Installing the RealPresence Collaboration Server RMX 400...

Page 25: ... MPMRx card located in the top slot on the front of the RMX Procedure To install RTM ISDN Card on RealPresence Collaboration Server 1 On the new RTM ISDN card move the ejector levers to their fully open position 2 Slide in the RTM ISDN card in the RealPresence Collaboration Server slot An RTM ISDN card must connect directly to an MPMRx card in the opposite facing front slot Install RTM ISDN Card o...

Page 26: ...in the rack that is allocated to the RealPresence Collaboration Server RMX 4000 is exactly 6U the feet must be removed from the RealPresence Collaboration Server RMX 4000 to install it in the rack Optional feet and handle removal Mounting the RealPresence Collaboration Server RMX 2000 4000 in a 19 Rack There are two methods for installing the RealPresence Collaboration Server 2000 4000 in a 19 rac...

Page 27: ... Server unit on the shelf Fasten the RealPresence Collaboration Server to the rack with screws through the four holes in the RealPresence Collaboration Server front mounting brackets Install the RealPresence Collaboration Server RMX 2000 on a shelf Install the RealPresence Collaboration Server RMX 4000 in a 23 Rack To install the RealPresence Collaboration Server RMX 4000 in a 23 rack Appliance Ed...

Page 28: ...Rack mounting screws must be supplied by the rack manufacturer Warning Ground connection When the unit is installed on a rack the rack must be properly grounded to the central office ground The rack must be grounded with two hole compression type connectors using copper conductors tinned or untinned Wire bus bar or braided strap connectors are acceptable The procedures of reverse mounting RealPres...

Page 29: ...erver RMX 4000 Warning AC power Do not connect the green or green yellow wire to the system single point ground screw Customers are required to only use AC power cables supplied by Polycom The size of the protective earthing conductor should be a minimum of 10 AWG All three outlets intended for connection of the three power cords must be protected with an external overcurrent protection device eit...

Page 30: ...nd the slot cannot be used on a system with DC Voltage 5 Connect the green or green yellow wire to the system single point M6x15 Ground bolt Warning Protective earthing conductor The rating of the protective earthing conductor should be a minimum of 10 AWG If the unit is rack mounted the single point ground on the MCU must be connected to the rack with a single conductor and fixed as to prevent lo...

Page 31: ...on Server RMX 4000 connect the LAN cable to LAN 2 With LAN Redundancy and Multiple Network Services configurations connect the LAN cable to LAN 1 An MPMRx card on the front of the RMX must always be seated or connected opposite to either a 4 ports RTM LAN card or RTM ISDN card on the rear of the chassis The RTM LAN type card is always required with Multiple Networks and LAN Redundancy configuratio...

Page 32: ...cable to LAN1 and LAN 2 RealPresence Collaboration Server RMX 4000 rear panel with AC powers and communication cables First Entry Power up and Configuration Before power up the system for the first time you must configure it to your local network settings using the LAN Configuration Utility in the USB Key Modify Network Settings in USB Key The USB Key contains a text file lan cfg which holds the f...

Page 33: ...SB in the RealPresence Collaboration Server then powering up the server the modified network configurations in USB will upload to the server Procedure To power up for the Collaboration Server first time using the USB Key 1 Insert the USB Key containing the modified IP addresses in USB port the RealPresence Collaboration Server 1800 2000 4000 back panel 2 Power the Collaboration Server ON RealPrese...

Page 34: ...em Errors the STATUS LED on the front panel of Collaboration Server turns green On the MPMRx card of the RealPresence Collaboration Server RMX 2000 4000 initially the ERR RDY ACT LEDs all flicker and flash until only the RDY LED turns ON on the media card while the ERR LED on the CTNL unit is still ON Do not remove the USB Key from the RealPresence Collaboration Server until the connection with th...

Page 35: ...ensed and monitored After you install your system you need to add your Polycom RealPresence Collaboration Server system instance to the RealPresence Resource Manager system to establish communication For complete instructions on how to use the RealPresence Resource Manager system see the RealPresence Resource Manager System Operations Guide License Your System with RealPresence Platform Director I...

Page 36: ...tain the Activation Key 1 Access the Service Support page of the Polycom website at http support polycom com 2 Log in with your email address and password or register as a new user 3 Select Product Registration 4 Follow the on screen instructions for product registration and product activation The MCU serial number on the product sticker on the back of the unit For more information refer to the Co...

Page 37: ...lled in an environment that meets the following requirements Minimum Hardware Intel Pentium III 1 GHz or higher 1024 MB RAM 500 MB free disk space Workstation Operating System Microsoft Windows XP Windows 7 and Windows 8 Network Card 10 100 1000 Mbps Web Browser 32 bit Microsoft Internet Explorer Version 7 8 9 and 10 Collaboration Server Web Client and RMX Manager are optimized for display at a re...

Page 38: ...me dialog boxes may not appear properly To change the text size click Control Panel Display Windows XP Click the Appearance tab select Normal for the Font size and click OK Windows 7 click the Smaller 100 option and click OK When installing the RMX Web Client Windows Internet Explorer Security Settings Internet Options Security Settings must be set to Medium or less It is not recommended to run Co...

Page 39: ...he following procedure Procedure To configure Internet Explorer 8 1 Close all browsers running on the workstation 2 Use the Windows Task Manager to verify that no iexplore exe processes are running on the workstation If iexplore exe processes are found end the process 3 Open Internet Explorer but do not connect to the MCU 4 In the Internet Explorer menu bar select Tools Internet Options 5 In the B...

Page 40: ...leted 7 Again in the Browsing history field of the General tab click Settings button The Temporary Internet Files and History Settings dialog box is displayed 8 In the Temporary Internet Files and History Settings dialog box click the View objects button The Downloaded Program Files folder containing the installed program files is displayed Login to RealPresence Collaboration Server Polycom Inc 38...

Page 41: ...of the MCU as assigned to it by the DHCP or as you assigned to it if a DHCP is not configured in your environment in the format http MCU IP Address For RealPresence Collaboration Server Virtual Edition you must enter https Control Unit IP Address b Click Enter The RealPresence Collaboration Server Web Client Login screen is displayed Note Solve the browser environment error If the error Browser en...

Page 42: ...uage window is displayed as below 2 Click the check boxes of the languages then click OK If the selected language is not supported by the browser or the workstation Operating System the Collaboration Server Web Client is displayed in English 3 Log out and reconnect to the Collaboration Server The Login screen will display the flags of the selected languages For more information see Multilingual Se...

Page 43: ... Range 2 16 Default 8 MCU Display Name The MCU name is displayed on the endpoint s screen Default name Blank Terminate Conference when Chairperson Exits When Yes is selected default the conference ends when the chairperson exits even if there are other participants connected When No is selected the conference automatically ends at the predefined end time or when all the participants have disconnec...

Page 44: ...ce You can set up a conference in many ways such as using your own profiles meeting rooms entry queues and reservations The dialing strings vary per the conferencing methods conferencing network and participant end point types For more information refer to your system s Administrator Guide Procedure To start a New Conference using a default profile 1 In the Conferences pane click New Conference Th...

Page 45: ...ngs to participants so they can dial in to the conference Dialing string formats vary per different conferencing scenarios Example of dialing Strings for H 323 Participants AVC CP Only and Mixed Conferences For H 323 participants the dialing string can of the following formats MCU Prefix in gatekeeper Conference ID MCU Signaling Host IP address Conference ID If your conference has the following pa...

Page 46: ...nce ID You may need to know your Conference IDs so as to compose the dialling string You can find your conference ID from the Conference pane Procedure To view your conference ID Conference IDs appear in the Conferences pane View Your MCU Signaling Host IP Address or MCU Prefix in Gatekeeper You may need to know your MCU Signaling Host IP Address or MCU Prefix so as to compose the dialling string ...

Page 47: ...ocedure To view your conference routing name 1 In the Conferences pane right click your conference and select Conference Properties 2 Your routing name can be found in the General tab You can also set your routing name when you create a conference If not specified the default routing name is the same as the Display Name Starting Conferences Using Default Profiles Polycom Inc 45 ...

Reviews: