background image

5

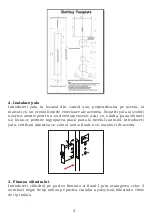
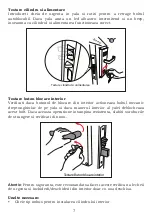
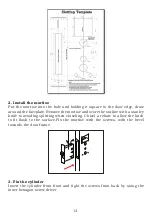
2. Instalare yala

Introduceti yala in locasul din cantul usii, perpendicular pe acesta, si 

marcati cu un creion limitele exterioare ale acesteia. Scoateti yala si scobiti 

usor (cu atentie pentru a nu deteriora excesiv usa)  cu o dalta, pana obtineti 

un locas ce permite ingroparea placii pana la nivelul cantului. Introduceti 

yala, verificati alinierea cu cantul usii si fixati-o cu suruburi de acesta.

3. Fixarea cilindrului

Introduceti  cilindrul  pe  partea  frontala  si  fixati-l  prin  strangerea  celor  2 

suruburi negre de tip imbus pe partea cealalta a yalei/usii, folosind o cheie 

de tip imbus. 

Summary of Contents for CH2000L Gold

Page 1: ...PNI CH2000R CH2000L Gold HOTEL DOOR LOCK YALA CONTROL ACCES HOTELIER Manual de utilizare pagina 2 User manual page 9 ...

Page 2: ...strare evenimente salveaza ultimele 1000 de actiuni de deschidere usa inclusiv deschiderea cu cheie Distanta actionare card 0 5cm fata de senzor Greutate yala 3 4 kg Dimensiuni exterioare 244 x 77 x 26mm ATENTIE PentruaputeafolosiyalaCH2000avetinevoiedeprogramatorul de card PNI FLH60 include CD software si card de proximitate si de cardurile de proximitate PNI EMC 05 13 56 MHz MF1 Manualul de util...

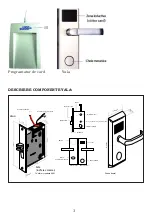
Page 3: ...ti la baterii 22 0mm 90 0mm 4 0mm 30 0mm 155 0mm 200 0mm Instalare maner Motor Bolt zavor yala Bolt auxiliar Control din interior bolt mecanic Fata Verso Instalare cilindru Senzor Baterii Panou frontal Panou spate Capac cilindru Buton deschidere manuala Deadbolt in afara camerei Conform standard ANSI Panou frontal ...

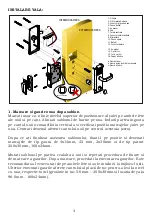
Page 4: ...fete ale usii si pe cant Aliniati sablonul de hartie pe usa Indoiti partea ingusta pe cantul usii urmand linia verticala si verificati pozitia marcajelor yalei pe usa Centrati desenul aferent cantului usii pe centrul acestuia zero Dupa ce ati finalizat asezarea sablonului fixati l pe pozitie si desenati marcajele de tip gaura de 4x14mm 22 mm 2x30mm si de tip patrat 200x30mm 160x24mm Mutati sablonu...

Page 5: ...u a nu deteriora excesiv usa cu o dalta pana obtineti un locas ce permite ingroparea placii pana la nivelul cantului Introduceti yala verificati alinierea cu cantul usii si fixati o cu suruburi de acesta 3 Fixarea cilindrului Introduceti cilindrul pe partea frontala si fixati l prin strangerea celor 2 suruburi negre de tip imbus pe partea cealalta a yalei usii folosind o cheie de tip imbus ...

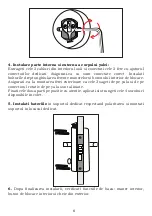
Page 6: ...terior de blocare Asigurati va la montarea fetei exterioare ca cele 2 sageti de pe yala si de pe conectorul rotativ de pe yala sunt aliniate Fixati cele doua parti pe pozitie cu atentie aplicati si strangeti cele 4 suruburi disponibile in colet 5 Instalati bateriile in suportul dedicat respectand polaritatea si montati suportul in locasul dedicat 6 Dupa finalizarea instalarii verificati functiile ...

Page 7: ...erificati daca butonul de blocare din interior actioneaza boltul mecanic dreptunghiular de pe yala si daca manerul interior al yalei deblocheaza acest bolt Daca aceasta operatiune intampina rezistenta slabiti suruburile de strangere si verificati din nou TestareButonblocareinterior Atentie Pentru siguranta este recomandat sa faceti aceste verificari ale cheii de urgenta si inchiderii deschiderii d...

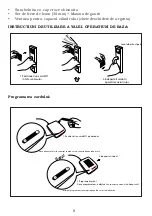
Page 8: ... un card MF1 in fata senzorului Ledul albastru clipeste 2 Indepartati cardul si apasati manerul in jos B Programarea cardului 1 Pozitionati un card MF1 pe decodor 2 Programati cardul 3 Indepartati cardul Daca programarea s a efectuat cu succes se va auzi un beep scurt In timpul programarii se vor aprinde un led rosu si un led verde Beep Daca dispozitivul este conectat in mod corect se aprind doua ...

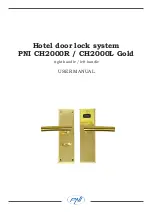
Page 9: ...Hotel door lock system PNI CH2000R CH2000L Gold right handle left handle USER MANUAL ...

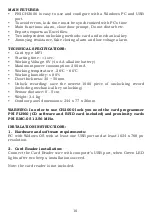
Page 10: ...ature 26 C 60 C Working humidity 80 Door thickness 30 50mm Unlock recording save the newest 1000 piece of unclocking record including mechanical key unlocking Sensor distance 0 5cm Weight 3 4 kg Outdoor panel dimensions 244 x 77 x 26mm WARNING In order to use CH2000 lock you need the card programmer PNI FLH60 CD software and RFID card included and proximity cards PNI EMC 05 13 56 MHz INSTALATION I...

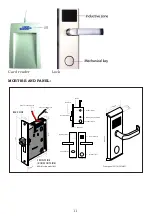
Page 11: ...8 0mm 20 0mm m m 0 3 4 2 Connect to PCB board Connect to battery pack 22 0mm 90 0mm 4 0mm 30 0mm 155 0mm 200 0mm Handle install Motor Latch bolt Auxiliary bolt Deadbolt control install FRONT SIDE BACK SIDE Cylinder install Sensor window Battery pack front panel back panel Cylinder cover Thumb turn Deadbolt ROOM OUTSIDE ANSI Mortise model K2S Front panel L5118 5218 M1 ...

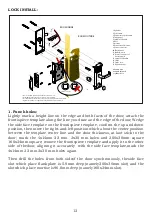
Page 12: ... without notice is reserved arrow horizontal 1 Punch holes Lightly mark a height line on the edge and both faces of the door attach the frontispiece template along the line you draw and the edge of the door Wedge the side face template on the frontispiece template confirm the up and down position then move the right and left position which about the center position between the template center line...

Page 13: ...ise and score the outline with a stanley knife to avoiding splitting when chiseling Chisel a rebate to allow the latch to fit flush to the surface Fix the mortise with the screws with the bevel towards the door frame 3 Fix the cylinder Insert the cylinder from front and tight the screws from back by using the inner hexagon screw driver ...

Page 14: ...e with square shaft ensure the lock plate and the mortise connection are reliable finally screw the lock plate in the door 5 Install the batteries in the battery pack comprtment 6 After the installation completed check if the basic function works is necessary Test cylinder and power Instert the emergency key and turn it to make the latch retracted if the lock shows blue light and one beep that is ...

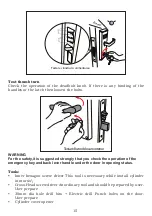
Page 15: ... the safety it is suggested strongly that you check the operation of the emergency key and back lever handle under the door in opening status Tools Inner hexagon screw driver This tool is necessary while install cylinder in mortis Cross Head screw driver An ordinary tool and should be prepared by user User prepare 30mm dia hole drill bits Electric drill Punch holes on the door User prepare Cylinde...

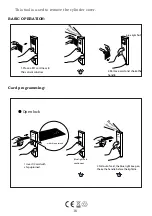
Page 16: ... window Place a M1 card near to blue light flash 2 handle Remove card and shake the B Card programming blue light flash continuous 2 Pull out of card the blue light keep on 1 Shake the handle before the light die Insert IC card with chip upturned with chip upturned Open lock B B ...

Page 17: ...the following Internet address https www mypni eu products 4516 download certifications RO Declaratie UE de conformitate simplificata SC ONLINESHOP SRL declara ca Yala control acces hotelier PNI CH2000L Gold PNI CH2000R Gold este in conformitate cu Directiva EMC 2014 30 EU si Directiva ROHS 2011 65 EU Textul integral al declaratiei UE de conformitate este disponibil la urmatoarea adresa de interne...

Reviews: