WRE-1200
Quick Installation Guide
802.11ac Dual Band Wall Plug
Wi-Fi Range Extender
1. Package Contents
Thank you for choosing PLANET WRE-1200. Before installing the range
extender, please verify the contents inside the package box.
WRE-1200
Quick Guide
Note
If there is any item missing or damaged, please
contact the seller immediately.
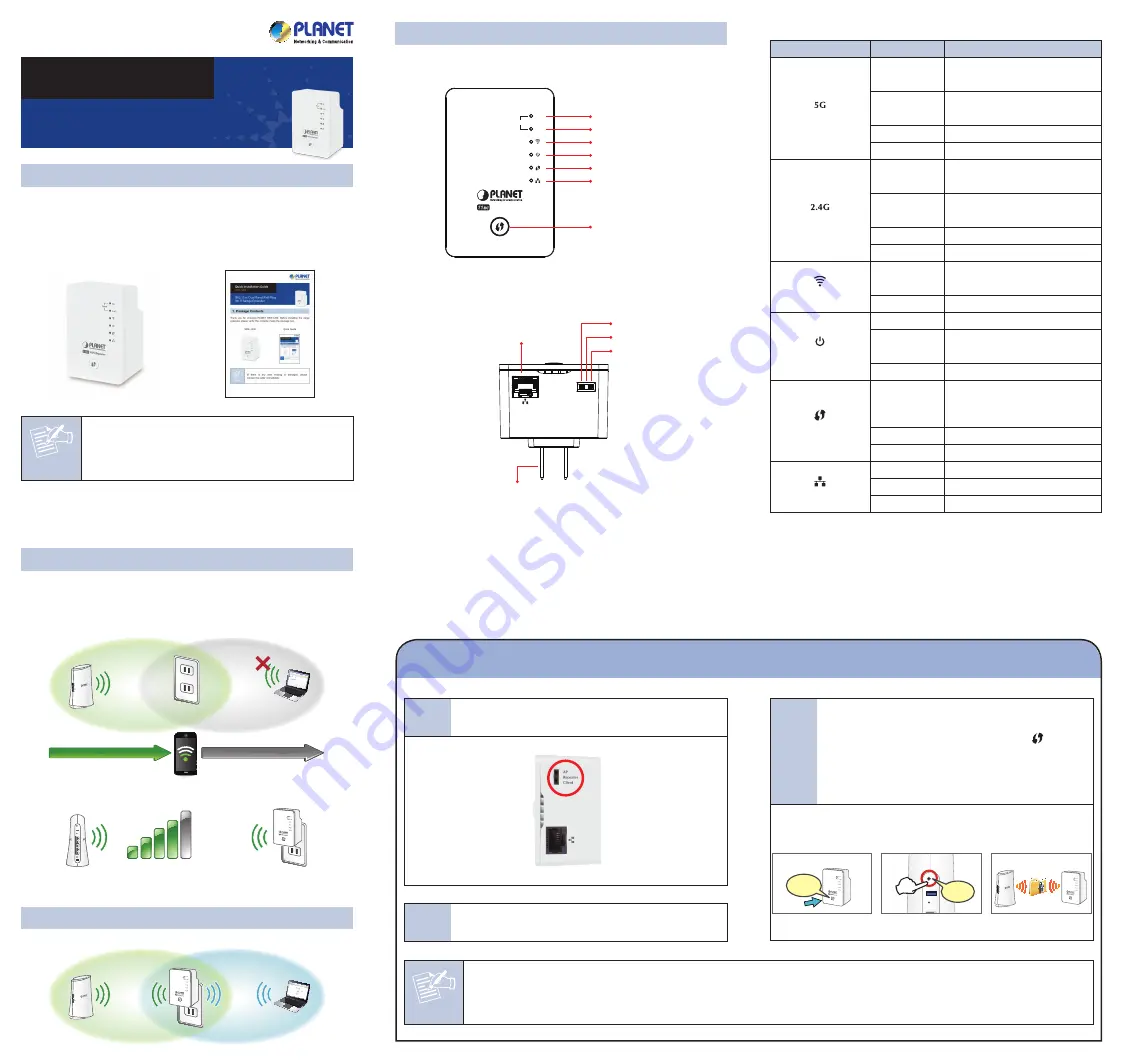
LED Definition
LED
LED Status
Description
Signal Status (5G)
Steady On
Good signal reception
(100%~50%).
Slow Blinking
Normal signal reception
(50%~25%)
Quick Blinking Poor signal reception (<25%)
Off
Out of signal or disconnected.
Signal Status (2.4G)
Steady On
Good signal reception
(100%~50%).
Slow Blinking
Normal signal reception
(50%~25%)
Quick Blinking Poor signal reception (<25%)
Off
Out of signal or disconnected.
WLAN
Blinking
Connect to wireless Router or AP,
wireless function is active.
Off
Wireless network is switched off.
Power
Steady On
Power is turned on.
Slow Blinking
Ready for “Reset to factory
default”, power LED is blinking.
Off
Power is turned off.
WPS
Blinking
WPS is in progress of waiting
another WPS device’s connection,
blinking for 2 minutes.
Quick blinking WPS error.
Off
NO WPS is in progress.
LAN
Steady On
LAN port is connected.
Blinking
LAN port is active.
Off
LAN port is not connected.
3. Before Getting Started
Find an optimal power outlet between your existing wireless router and
your wireless dead zone. You may utilize the smartphone or tablet to
detect the Wi-Fi signal strength.
Dead Zone
Existing Wi-Fi Coverage
Power Outlet
Wireless Router
Range Extender
Recommended Signal Strength
>70%
4. Quick Installation – Repeater Mode
Step 1:
Make sure the operation mode by hardware switch is
Repeater Mode
(Default Setting).
Step 2:
Plug the WRE-1200 into the wall outlet, and wait for the
WRE-1200 to boot up.
2. Product Introduction
Front – Button and LEDs
5G
Signal
2.4G
WiFi Repeater
11ac
5G Signal
2.4G Signal
WLAN
Power
WPS
Ethernet
WPS/Reset Button
Bottom – LAN Port & DIP Switch
Client
Repeater
AP
Client
Repeater
10/100/1000Mbps LAN Port
US/EU/UK Universal Power Pin
(Type of power pin required)
AP
Step 3:
How to establish connection with AP:
(1) On the front panel of the WRE-1200, press the WPS
Button for more than 2 seconds until the WPS LED
blinks slowly.
(2) On the Wireless Router or AP, press the WPS Button
for 2 seconds.
(3) Wait for the connection to be established.
Step 1
One-touch Wi-Fi Range Extension
Press
Step 3
Step 2
Press
There are two ways you can quickly setup the Wi-Fi Range Extender –using the
WPS
button or using
web browser
.
If your existing wireless router supports WPS, follow the
Method A - Press the WPS Push Button
to connect to the WRE-1200.
If your existing wireless router does not support WPS, follow
Method B - Manual Connection by Web browser
to connect to the WRE-1200 and run the
Setup Wizard.
If you are not sure how to enable WPS on your wireless router, please refer to your router user manual.
Note
For the first-time setup, you can move the WRE-1200 closer to the access point you wish to connect to. After the connection is
established, you can move the WRE-1200 to the place you wish to use.
Method A:
Press the WPS Push Button for Automatic Connection


