Planet MAP-2100 Quick Start Manual Download Page 7


5. Hardware Installation Procedures 

Before you proceed with the installation, it is necessary that you have enough information about the 
MAP-2100.  
1.  Locate an optimum location for the MAP-2100. Plan for the output frequency of the MAP-2100, 2.4GHz 

or 5GHz. 

2.  Assemble the antennas to MAP-2100 follow the frequency band plan. Try to place them to a position 

that can best cover your wireless network. The antenna’s position will enhance the receiving sensitivity. 
When installing antenna(s), follow these general tips: 

‹


For most elevated antenna installations, we recommend you to ask the professional installers 

for proper installation and safety. 

‹


For the safety reasons, you are 

recommended never to touch a high-gain 
antenna when it is transmitting or point it at 
any part of your body. 

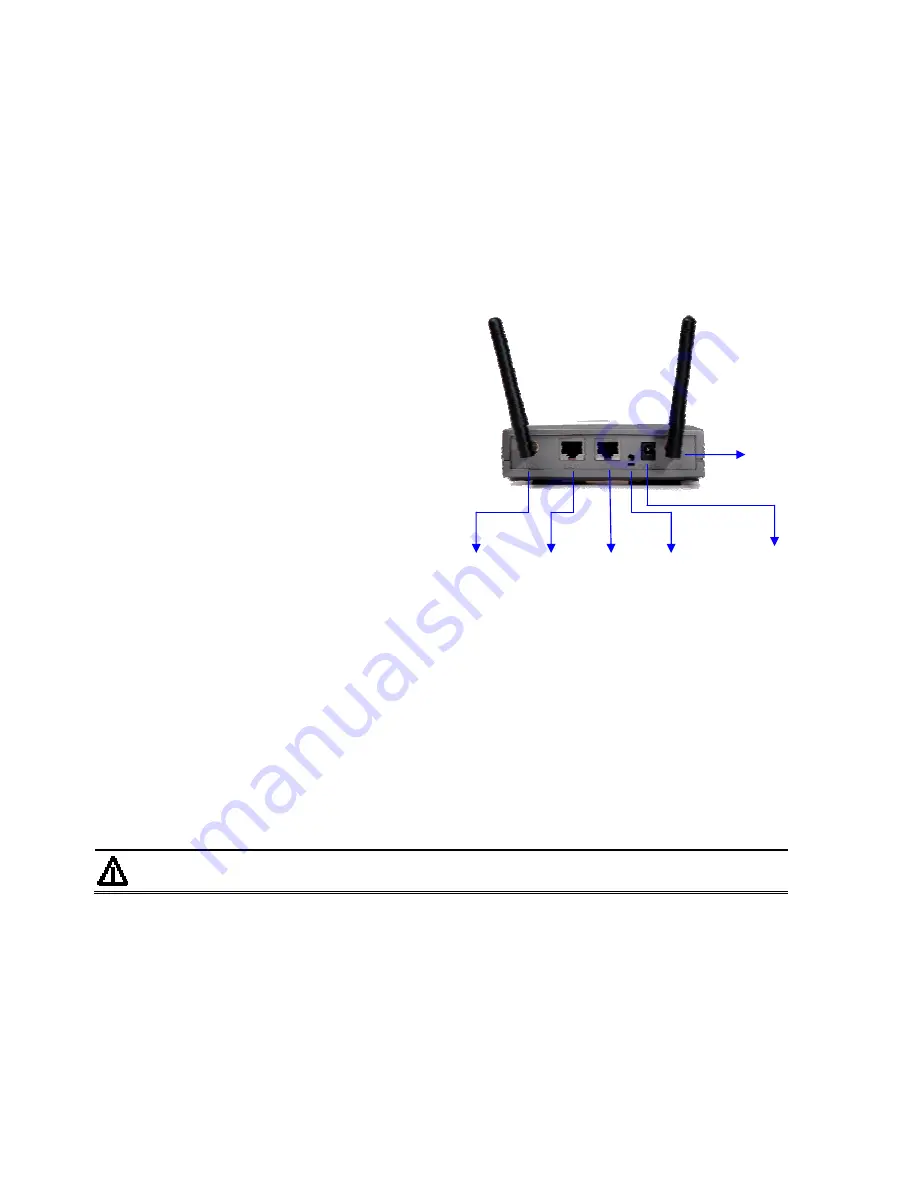
LAN Port  WAN Port    Reset button / 

Restore Default 
DIP Switch 

Power 
Receptor  

Radio 2 
Access Point


Radio 1 
Backhaul

‹


Please, follow carefully the instructions 

with your antenna. 

‹


Keep antennas away from metal 

objects/obstructions (heating and 
air-conditioning ducts, large ceiling trusses, 
building superstructures, and major power 
cabling runs). 

‹


Use a directional antenna when you 

establish a link between two buildings. A 
directional antenna must be properly 
aligned to the point at the other antenna, 
line-of-sight. 

‹


Locate an omni-directional antenna in the middle of the desired coverage area if possible. 

‹


Place the antenna as high as possible to increase the coverage area. 

‹


Outdoor antennas should be mounted at a sufficient height to prevent the radio path from 

above the obstructions such as trees and buildings. 

‹


Antenna towers should keep a safe distance from overhead power lines. The recommended 

safe distance is twice the tower height. 


3.  Using Category 3 or higher UTP or STP cable, connect the LAN port of MAP-2100 to a 10Mbps or 

10/100Mbps Ethernet hub or switch, and connect the management station to a hub or switch on the 
same LAN. 

4.  Connect the power adapter to the receptor on MAP-2100 and plug the other end to a wall outlet or 

power strip. 


 Note 

ONLY use the power adapter supplied with the MAP-2100. Otherwise, the 
product may be damaged. 


6. Startup the MAP-2100 

To get the initial management of the MAP-2100, please follow the following steps. 
1.  Connect the MAP-2100’s LAN port to an active network. 
2.  Connect the PC to the network as well. 
3.  Check the WAN MAC address of the MAP-2100. For example, 00-30-4f-4b-09-64. 
4.  Convert the last two set of hexadecimal number into two decimal number. For example, (09H-64H), into 

(9.100). Then the LAN/WLAN1 interface will use the IP address: 172.9.100.1 as default. 

5.  Setup the PC into the same IP subnet of the MAP-2100, for example, 172.9.100.2 

Summary of Contents for MAP-2100

Page 1: ...Any software described in this manual is sold or licensed as is Should the programs prove defective following their purchase the buyer and not PLANET its distributor or its dealer assumes the entire...

Page 2: ...ents 1 Preference 3 2 Package Contents 3 3 Before Installation 3 4 Network Planning 4 5 Hardware Installation Procedures 7 6 Startup the MESH AP 7 7 Startup the first client connection 9 8 Further Con...

Page 3: ...2100 the default IP address will base on the MAC address of the device you get For example the WAN MAC address 00 30 4f 4b 09 30 The last two hexadecimal set 09h and 30h will be converted into decima...

Page 4: ...rs 3 RADIUS server or MLRD Mobile Location Register Daemon server are optional servers that vary on the installation site Each MAP 2100 support up to 250 user registration the basic set above then can...

Page 5: ...ss output power The MAP 2100 support level output power adjustment In some areas please follow the local regulation to configure the output power together with the antenna 4 2 2 Network Subnet 802 11b...

Page 6: ...ckhaul security etc please refer to the user guide to have the MAP 2100 configured for the network 4 2 2 Software consideration The MAP 2100 provides the three management interfaces Secured Web access...

Page 7: ...aligned to the point at the other antenna line of sight Locate an omni directional antenna in the middle of the desired coverage area if possible Place the antenna as high as possible to increase the...

Page 8: ...RL https 172 9 100 1 to bring up the management interface of the MAP 2100 7 The browser pop up the user name and password request Key in the password and username with admin 8 Now the MAP 2100 is read...

Page 9: ...etwork WLAN Radio2 SSID PLANET Hide SSID Enabled Wireless Frequency Auto Hint 1 To make sure the first connection accurately it is suggested to configure double check the Radio 2 to 802 11g 2 Turn off...

Page 10: ...AP will ask for password either from Local User Database or from RADIUS where the setting are empty by default 7 2 Steps to configure the client PC and get connected to MESH AP Please follow the steps...

Page 11: ...IP address Then with the command IPCONFIG to check the IP address the PC get from the DHCP server Then check if it matches the WAN MAC address to the MESH AP you would like to test As the example the...

Page 12: ...address from the MESH AP 6 Then startup the Internet Browser With Require User Login option disabled the client should access the Internet right away And with require user login the pop up screen wil...

Page 13: ...manual in the CD The CD will including User Guide for Web Management Management Utility User Guide for Management Utility If you have any difficulty on resolving the problem while installing or using...

Reviews: