background image

Quick Installation Guide


- 5 -

3. Terminal Setup


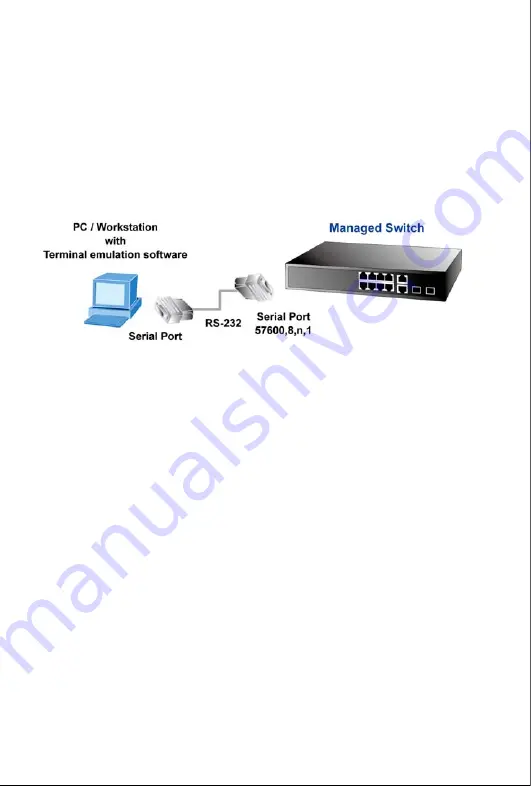
To configure the system, connect a serial cable to a 

COM port

 on a PC or 

notebook computer and to serial (console) port of the Managed Switch. 

The console port of the Managed Switch is DCE already, so that you can 

connect the console port directly through PC without the need of Null 

Modem. 


Figure 3-1

 Serial / Console connection 


A terminal program is required to make the software connection to the 

Managed Switch

. Windows' 

Hyper Terminal

 program may be a good 

choice. The Hyper Terminal can be accessed from the 

Start

 menu.   

1. Click 

START

, then 

Programs

Accessories

 and then 

Hyper 

Terminal

2. 

When the following screen appears, make sure that the COM port 

should be configured as: 


 Baud 


: 57600 

 Parity 


: None   

 Data bits  

: 8 

 Stop bits  

: 1 

 Flow Control  : None   

Summary of Contents for FGSD-1022

Page 1: ...8 Port 10 100Mbps 2G TP SFP Combo Managed Switch FGSD 1022P 8 Port 10 100Mbps 2G TP SFP Combo Managed PoE Switch FGSD 1022HP 8 Port 10 100Mbps 2G TP SFP Combo Managed 802 3at PoE Switch Quick Install...

Page 2: ...le of Contents 1 Package Content 3 2 Requirements 4 3 Terminal Setup 5 4 Logon to the Console 7 5 Configure IP address 8 6 Start Web Management 11 7 While IP Address be changed or forgotten admin pass...

Page 3: ...e cover page of this Quick Installation Guide Upon open the box of the Managed Switch and carefully unpack it The box should contain the following items The Managed Switch x 1 This Quick Installation...

Page 4: ...that running Windows XP 2003 Vista Windows 7 MAC OS X Linux Fedora Ubuntu or other platform compatible with TCP IP protocols Ethernet Port connect Network cables use standard network UTP cables with R...

Page 5: ...through PC without the need of Null Modem Figure 3 1 Serial Console connection A terminal program is required to make the software connection to the Managed Switch Windows Hyper Terminal program may b...

Page 6: ...Quick Installation Guide 6 Figure 3 2 Hyper Terminal Setting...

Page 7: ...hen the following message asks the login user name and password The factory default username password as following and the login screen in Figure 4 1 appear User name admin Password admin Figure 4 1 M...

Page 8: ...55 255 0 To check the current IP address or modify a new IP address for the Managed Switch please use the procedures as follow Show the current IP address 1 On Switch prompt enter configure 2 On Switc...

Page 9: ...mand and press Enter As show in Figure 5 2 Switch config ip address 192 168 1 100 255 255 255 0 Switch Config ip default gateway 192 168 1 254 The previous command would apply the follow settings for...

Page 10: ...Switch config copy running config startup config If the IP is successfully configured the Managed Switch will apply the new IP address setting immediately You can access the Web interface of the Manag...

Page 11: ...ent Diagram The following shows how to startup the Web Management of the Managed Switch please note the Managed Switch is configured through an Ethernet connection make sure the manager PC must be set...

Page 12: ...following dialog box appears please enter the default user name admin and password admin The login screen in Figure 6 2 appears In the following we use FGSD 1022 as the example yet it is same settings...

Page 13: ...in Screen of FGSD 1022 series Managed Switch Now you can use the Web management interface to continue the Managed Switch management please refer to the user manual for more detail For security reason...

Page 14: ...ssword to factory default mode default user name and password are both admin Press the hardware reset button at the front panel about 5 seconds After the device is rebooted you can login the managemen...

Page 15: ...ed more support information please contact PLANET switch support team PLANET online FAQ http www planet com tw en support faq php type 1 Switch support team mail address support_switch planet com tw C...

Reviews: