


R1224 Regulator
Installation Instruction
12-1001
24-30-01
Rev. M
: 01 Dec. 2021
Page: 6-11
© 2021 - Hartzell Engine Technologies - All rights reserved
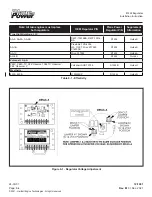
6.12 Regulator Installation Guide-I
A. Prepare the replacement regulator
(1) Use the R1224 regulator and a 12-1021 mounting plate (which can be purchased from Plane-Power).
Ensure regulator jumpers are set to match aircraft battery voltage (12V or 24V).
(2)
Ensure that the factory installed jumper between SENSE and ENABLE is in place.
B. Prepare the installation
(1)
Cut the wires at the regulator body and new ring lugs provided with the R1224 regulator.
(2) Unplug the wire connector from the aircraft plug.
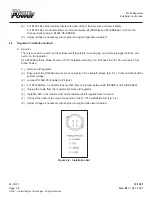
(3) Connect the ring lugs to the R1224 regulator as shown below:
- Red to ENABLE
- Blue to Field
- White to AUX
- Yellow to LAMP
(4) Mount the R1224 regulator on the 12-1021 plate using appropriate AN or MS hardware.
C. Replace the regulator
(1) Remove the original regulator from the aircraft.
(2) Install the R1224 regulator on the 10-1021 plate in the same location using existing hardware.
(3) Plug the harness from the R1224 the aircraft plug.
(4) Remove the alternator lamp lead from the ALTERNATOR switch on the aircraft and connect it to the
aircraft positive BUS via a 1A in-line fuse & holder.
The installation is complete after testing.