background image


77 

4.4 Dishwasher detergent 


D

ISHWASHER DETERGENTS ARE DIVIDED INTO 

2

 GROUPS DUE TO THEIR 

CHEMICAL COMPOSITION


conventional, alkaline detergents with caustic components. 


low-alkaline concentrated detergents with natural enzymes. 


"Normal"  programmes  combined  with  concentrated  detergents  prevent  pollution 

and are also good for your dishes. Such programmes support the washing effect of 

the  enzymes.  Therefore,  "normal"  programmes  combined  with  concentrated 
detergents are as effective as "intensive" programmes. 


T

HERE ARE 

3

 KINDS OF DISHWASHER DETERGENTS

 
1.


with phosphate and chlorine. 

2.


with phosphate / without chlorine 

3.


without phosphate / without chlorine 

 
Most recent powdered dishwasher detergents usually do not contain any phosphate 

so they do not soften the water. In such a case add a water softener(= dishwasher 

salt) even if the hardness of water is e.g. 6dH. Otherwise white spots may occur on 

your dishes and glasses.  
Dishwasher detergents without chlorine only bleach slightly, so they do not remove 

tough stains. In such a case select a programme with a higher temperature. 


D

ISHWASHER TABS


Dishwasher tabs of different manufacturers may need different periods of time for 

washing your dishes. So some kinds of tabs cannot be used when operating a short 

programme.  Always  select  long  lasting  programmes  to  clean  your  dishes 
completely. 


T

HE DETERGENT CONTAINER


You  must  fill  the  container  matching  the  information  of  the  programme 

schedule. 


Use detergents which are suitable for dishwashers only. 


Always keep your detergent dry. 


Fill the container just before starting a programme. 


The  detergent  and  rinse  aid  consumption  of  your  appliance  is  lower  than  the 
consumption of conventional appliances. In general you need 1 tablespoon of 

detergent for a normal programme. 


You must increase the amount of detergent if your dishes are heavily soiled. 


Summary of Contents for GS6-6FI2

Page 1: ...16 04 2018 Bedienungsanleitung Instruction Manual GESCHIRRSPÜLER VOLLINTEGRIERT DISHWASHER FULLY INTEGRATED GS6 6FI2 Deutsch Seite 2 English Page 51 www pkm online net ...

Page 2: ... Installation 11 2 1 Entpacken und Wahl des Standorts 11 2 2 Wasseranschluss Abwasseranschluss 11 2 3 Vor der Installation 12 2 3 1 Raumbedarf 12 2 3 2 Abmessungen der vorderen Dekorblende 15 2 4 Installation des Gerätes und der Dekorblende 16 2 5 Elektrischer Anschluss 19 2 6 Wasseranschluss 20 2 6 1 Sicherheits Wasserzufuhrschlauch 20 2 6 2 Kaltwasseranschluss 20 2 7 Installation des Abwassersch...

Page 3: ... 10 Entsorgung 49 11 Garantiebedingungen 50 12 Zusätzliche Zeichnungen Additional drawings 95 Entsorgen Sie dieses Gerät nicht zusammen mit ihrem Hausmüll Das Gerät darf nur über eine Sammelstelle für wiederverwendbare elektrische und elektronische Geräte entsorgt werden Entfernen Sie nicht die Symbole Aufkleber am Gerät Die in dieser Bedienungsanleitung enthaltenen Abbildungen können in einigen D...

Page 4: ...mmsten Fall zum Tod führen Bewahren Sie diese Bedienungsanleitung so auf dass sie bei Bedarf jederzeit griffbereit ist Befolgen Sie sorgfältig alle Hinweise um Unfälle oder eine Beschädigung des Gerätes zu vermeiden Prüfen Sie auf jeden Fall auch das technische Umfeld des Gerätes Sind alle Kabel oder Leitungen die zu ihrem Gerät führen in Ordnung Oder sind sie veraltet und halten der Geräteleistun...

Page 5: ...en nicht mit dem Gerät spielen Reinigung und Benutzer Wartung dürfen nicht von Kindern ohne Beaufsichtigung durchgeführt werden DIESE BEDIENUNGSANLEITUNG MUSS FÜR JEDE PERSON WELCHE DAS GERÄT BETREIBT STETS ZUGÄNGLICH SEIN VERGEWISSERN SIE SICH DASS DIE BEDIENUNGSANLEITUNG VOR DEM BETRIEB DES GERÄTES GELESEN UND VERSTANDEN WURDE 1 1 Signalwörter GEFAHR verweist auf eine Gefahrensituation die wenn ...

Page 6: ...rn Sie niemals den mit dem Gerät mitgelieferten Netzstecker Falls dieser nicht für Ihre Netzsteckdose geeignet sein sollte lassen Sie die Netzsteckdose immer von einer qualifizierten Fachkraft Elektrotechniker in ersetzen Keine Garantieleistung 6 Versuchen Sie niemals selbst das Gerät zu reparieren Falls Ihr Gerät nicht ordnungsgemäß funktioniert kontaktieren Sie den Kundendienst Lassen Sie nur Or...

Page 7: ...le Verpackungsbestandteile und Transportsicherungen vollständig entfernt haben 4 Betreiben Sie das Gerät nur mit 220 240V 50Hz Wechselspannung Alle Netzanschlussleitungen die Beschädigungen aufweisen müssen von einer qualifizierten Fachkraft Elektrotechniker in ausgewechselt werden Lassen Sie alle Reparaturen nur von Ihrem autorisierten Kundendienst durchführen 5 Verwenden Sie zum Anschluss des Ge...

Page 8: ...feld flimmern liegt eine Fehlfunktion des Gerätes vor Trennen Sie in diesem Fall das Gerät umgehend von der Strom und Wasserversorgung 17 Benutzen Sie das Gerät niemals ohne eingesetzte Filter 18 Kinder dürfen niemals mit dem Gerät spielen 19 Dieses Gerät kann von Kindern ab 8 Jahren und darüber sowie von Personen mit verringerten physischen sensorischen oder mentalen Fähigkeiten oder Mangel an Er...

Page 9: ... Sie die Tür nicht offenstehen da Sie ansonsten über diese stolpern können HINWEIS 1 Die Sprüharme können mit einer Transportsicherung versehen sein Entfernen Sie unbedingt alle Transportsicherungen vor dem Aufbau des Gerätes 2 Der Geschirrspüler darf niemals ohne ordnungsgemäß eingesetzte Filter betrieben werden 3 Benutzen Sie immer einen Wasserenthärter Spülmaschinensalz zur speziellen Verwendun...

Page 10: ...e 13 Gegenstände aus Kunststoffen dürfen nicht die Heizelemente berühren 14 Geben Sie nur solche Gegenstände aus Kunststoffen in das Gerät die zur Reinigung in einem Geschirrspüler geeignet sind Geeignete Gegenstände werden durch ihren Hersteller entsprechend gekennzeichnet 15 Überprüfen Sie nach jedem Spülprogramm ob der Aufnahmebehälter für das Spülmaschinen Spülmittel leer ist 16 Benutzen Sie z...

Page 11: ...Sicherheitssteckdose installiert werden 5 Stellen Sie das Gerät auf einem geraden trockenen und festen Untergrund auf Kontrollieren Sie mit einer Wasserwaage den ordnungsgemäßen Aufbau Ihres Gerätes 6 Die Rückseite des Gerätes muss an der hinteren Wand und die Seiten an eventuell angrenzenden Schränken bzw Wänden ausgerichtet sein 7 Das Gerät muss ordnungsgemäß mit der Strom und Wasserversorgung v...

Page 12: ...ch verfügen die für gewöhnlich rechts oder links angebracht werden können2 2 3 1 Raumbedarf SEITLICHER RAUMBEDARF DER GEÖFFNETEN GERÄTETÜR Um die Tür des Geschirrspülers ungehindert öffnen zu können muss der seitliche Mindestabstand der geöffneten Tür zu einem Schrank einer Wand etc mindestens 50 mm betragen 2 Ausstattung abhängig vom Modell ...

Page 13: ...ES Falls nur das Gerät selbst in der Einbauöffnung installiert wird beachten Sie bitte die Einbaumaße in der folgenden Abbildung X Aussparung für Netzkabel Wasserzufluss sowie Wasserablaufschlauch beide Seiten Y Einbauöffnung ...

Page 14: ...el eingepasst werden soll beachten Sie bitte die zusätzlichen Einbaumaße in der folgenden Abbildung X Aussparung für Netzkabel Wasserzufluss sowie Wasserablaufschlauch beide Seiten Y Einbauöffnung C D und E sind die Abmessungen der Dekorblende Die Installationsöffnung bleibt unverändert ...

Page 15: ...bb unten können entsprechend des Griffs variieren Die Abmessungen C D und E s Abb unten können entsprechend der Dekorblende variieren Die Abmessung E s Abb unten sollte in einem Bereich von 16 22 mm liegen ERLÄUTERUNGEN ENGLISCH DEUTSCH deep tief changed by handle durch Griff verändert through durch decorative panel Dekorblende ...

Page 16: ...16 2 4 Installation des Gerätes und der Dekorblende 1 Befestigen Sie den Türgriff an der Dekorblende s Abb unten 2 Installieren Sie die Standfüße auf der Unterseite des Gerätes s Abb unten ...

Page 17: ...den Standfuß die Standfüße justieren A s Abb unten A STANDFUß 5 Kontrollieren Sie mit einer Wasserwaage den ordnungsgemäßen Aufbau Ihres Gerätes 6 Befestigen Sie die Dekorblende an der Tür des Geschirrspülers wie auf den folgenden Abbildungen Abb 1 und Abb 2 gezeigt 7 Befestigen Sie zuerst die Dekorblende mit den zwei Scharnieren und den Schrauben 2 8 insgesamt 16 auf der Bodenplatte der Installat...

Page 18: ...18 ABB 1 SICHT VON OBEN ABB 2 SEITLICHE ANSICHT ...

Page 19: ...s den mit dem Gerät mitgelieferten Netzstecker Falls dieser nicht für Ihre Netzsteckdose geeignet sein sollte lassen Sie die Netzsteckdose immer von einer qualifizierten Fachkraft Elektrotechniker in ersetzen Keine Garantieleistung WARNUNG Verwenden Sie zum Anschluss des Gerätes an die Stromversorgung keine Steckdosenleisten Mehrfachsteckdosen oder Verlängerungskabel BRANDGEFAHR WARNUNG Das Gerät ...

Page 20: ...isiertem Kundendienst überprüfen Keine Garantieleistung 2 6 Wasseranschluss Der Wasserdruck muss zwischen 0 04 und 1 MPa liegen Wenden Sie sich an den Kundendienst falls Ihr Wasseranschluss abweichende Werte aufweist 2 6 1 Sicherheits Wasserzufuhrschlauch Es handelt sich hierbei um einen Doppelwand Schlauch Das Sicherheitssystem unterbricht den Wasserfluss wenn der Versorgungsschlauch bricht und d...

Page 21: ...Sie das Wasser ab 2 Verringern Sie den Wasserdruck indem Sie den Druckminderungs Knopf drücken Der verminderte Druck schützt Sie und den Raum vor spritzendem Wasser 3 Nehmen Sie erst danach den Wasserzufuhrschlauch vom Wasserhahn ab 2 7 Installation des Abwasserschlauchs Setzen Sie den Abwasserschlauch in ein Abwasserrohr mit einem Durchmesser von mindestens 4 cm oder in ein Spülbecken ein s unten...

Page 22: ...22 ABB A ABB B ABB C ...

Page 23: ...ten Falls Sie eine Schlauchverlängerung benötigen verwenden Sie einen baugleichen Schlauch Die maximal zulässige Länge beträgt 4 Meter da ansonsten die Reinigungswirkung des Gerätes reduziert wird 3 Gerät und Bedienfeld 3 1 Gerät VORDERANSICHT RÜCKANSICHT 1 SALZBEHÄLTER 2 SPÜLMITTELSPENDER 3 BESTECKKORB 4 FILTEREINHEIT 5 KLARSPÜLER SPENDER 6 SPRÜHARME 7 TASSENREGAL 8 KORB 9 WASSERZUFUHRANSCHLUSS 1...

Page 24: ...it um 1 Stunde und wird auf dem Display angezeigt 3 DISPLAY Zeigt die verbleibende Betriebszeit und den Betriebsstatus zeitverzögerter Start etc 4 KLARSPÜLERANZEIGE Leuchtet wenn der Klarspüler Spender gefüllt werden muss 5 SALZWARNANZEIGE Leuchtet wenn der Salzbehälter gefüllt werden muss 6 PROGRAMMANZEIGE Zeigt das gewählte Spülprogramm an 7 PROGRAMMTASTE Drücken Sie diese Taste um das gewünscht...

Page 25: ...llt lediglich eine Übersicht über die Grundfunktionen Ihres Gerätes dar und ist kein Ersatz für die Bedienungsanleitung Lesen Sie vor der Erstinbetriebnahme unbedingt die gesamte Bedienungsanleitung sorgfältig durch anderenfalls sind Sie über mögliche Betriebsrisiken und die weiteren Funktionen dieses Gerätes nicht hinreichend informiert GERÄT EINSCHALTEN Öffnen Sie die Tür Drücken Sie zum Einscha...

Page 26: ...e beladen PROGRAMM AUSWÄHLEN Drücken Sie die PROGRAMMTASTE 7 bis das gewählte Programm aufleuchtet PROGRAMM STARTEN Öffnen Sie zuerst den Wasserhahn und schließen Sie dann die Tür Der Spülvorgang beginnt automatisch nach ca 10 Sekunden PROGRAMMENDE Nach Ablauf eines Spülprogamms ertönt achtmal ein akustisches Signal Anschließend endet das Programm Öffnen Sie die Tür VORSICHT Öffnen Sie die Tür imm...

Page 27: ...einen Wasserenthärter Spülmaschinensalz zur speziellen Verwendung in einem Geschirrspüler Alle anderen Wasserenthärter bzw Salze besonders Tafelsalz beschädigen den Wasserenthärter Behälter Füllen Sie den Behälter nur vor einem beginnenden kompletten Spülprogramm Dadurch verhindern Sie dass eventuell verschüttete Rückstande des Enthärters am Boden des Gerätes verbleiben und somit zu möglichen Korr...

Page 28: ... wenn die Wasserenthärteranzeige aufleuchtet Solange der Wasserenthärter sich nicht aufgelöst hat kann die Wasserenthärteranzeige auch bei befülltem Behälter aufleuchten Falls Sie beim Befüllen Wasserenthärter verschüttet haben können Sie ein Einweich oder Schnellprogramm einstellen um Rückstände auszuwaschen 4 2 1 Einstellen des Salzverbrauchs SCHRITT 1 MODUS SALZEINSTELLUNG AUFRUFEN Öffnen Sie d...

Page 29: ...r neben dem Spülmittel Spender Öffnen Sie zum Füllen die Kappe und gießen Sie Klarspüler in den Behälter bis die Füllanzeige komplett schwarz ist Das Volumen des Behälters beträgt ca 110 ml Der Klarspülspender hat vier oder sechs Einstellungen Modellabhängig Der Klarspülers wird während eines Spülprogramms automatisch hinzugegeben und gewährt ein flecken und streifenfreies Trocknen Ihres Geschirrs...

Page 30: ...ls links und nehmen Sie diese ab 2 Füllen Sie den Klarspüler in den Behälter Überfüllen Sie den Behälter nicht 3 Setzen Sie die Kappe wieder am offen open Pfeil ausgerichtet auf und drehen Sie die Kappe in Richtung des zu close Pfeils rechts EINSTELLEN DES KLARSPÜLSPENDERS Beginnen Sie mit Stufe 4 Bei Flecken oder schlechten Trockenergebnissen wählen Sie Stufe 5 Sollten die Probleme weiter auftret...

Page 31: ...EI SORTEN VON SPÜLMASCHINEN SPÜLMITTELN 1 mit Phosphat und Chlor 2 mit Phosphat ohne Chlor 3 ohne Phosphat ohne Chlor Neue Spülmaschinen Spülmittel in Pulverform enthalten normalerweise kein Phosphat also ist die Wasser enthärtende Wirkung nicht gegeben In diesem Fall empfehlen wir die zusätzliche Verwendung eines Wasserenthärters Spülmaschinensalz auch wenn der Wasserhärtegrad nur z B 6 dH beträg...

Page 32: ...öffel Spülmittel für einen normalen Spülprogramm Stärker verschmutztes Geschirr erfordert eine höhere Menge an Spülmittel FÜLLEN DES SPÜLMITTELBEHÄLTERS 1 Wenn der Deckel geschlossen ist drücken Sie den Riegel und der Deckel springt auf s Abb unten Riegel zum Öffnen drücken 2 Geben Sie das Spülmittel immer vor dem Beginn eines jeden Spülprogramms hinzu Benutzen Sie nur für Spülmaschinen geeignete ...

Page 33: ...rfen nicht die rotierenden Sprüharme blockieren Geben Sie Gefäße wie Tassen Gläser oder Töpfe mit der Oberseite nach unten in das Gerät damit sich in den Gefäßen kein Wasser ansammelt Geschirr darf im Gerät nicht aneinander liegen oder sich gegenseitig abdecken Gläser dürfen sich nicht berühren damit sie keinen Schaden nehmen Beladen Sie die Körbe folgendermaßen a Gegenstände wie Tassen Gläser Töp...

Page 34: ...n Korb so dass die einzelnen Gegenstände nicht durch das Versprühen des Spülwassers bewegt werden 1 TASSEN 2 SCHÜSSEL 3 GLÄSER 4 UNTERTASSEN 5 SCHALEN 6 OVALE SERVIERPLATTE 7 ESSTELLER 8 SUPPENTELLER 9 DESSERTTELLER 10 BESTECKKORB 11 SERVIERLÖFFEL ...

Page 35: ...s Gerät damit Sie die rotierenden Sprüharme nicht blockieren BESTECKART 1 GABELN 5 MESSER 2 SUPPENLÖFFEL 6 SERVIERLÖFFEL 3 DESSERTLÖFFEL 7 SAUCENLÖFFEL 4 TEE KAFFEELÖFFEL 8 SERVIERGABELN VORSICHT 1 Lassen Sie keine Gegenstände durch den Boden des Besteckkorbs ragen 2 Geben Sie scharfe Gegenstände immer mit der scharfen Seite nach unten in den Besteckkorb ...

Page 36: ...CH EINGESCHRÄNKT ZUM SPÜLEN IN EINEM GESCHIRRSPÜLER GEEIGNET 1 Einige Glasarten können nach einer hohen Anzahl an Spülvorgängen stumpf oder trüb werden 2 Gegenstände aus Silber oder Aluminium neigen dazu sich beim Spülen zu verfärben 3 Glasierte Muster können bei häufigem Spülen verblassen 5 4 Schäden an Glaswaren oder anderem Geschirr MÖGLICHE URSACHEN EMPFOHLENE ABHILFEN Die Art des Glases Gesch...

Page 37: ...en Nutzung für normal verschmutztes Geschirr 1 Vorspülen Hauptspülen 450 Abspülen 650 Trocknen 18 g oder 3 in 1 230 Min 0 609 kWh 6 5 l Ja Glas Für empfindliches und Temperatur empfindliches Geschirr und Gläser Hauptspülen 450 Abspülen Abspülen 600 Trocknen 18 g oder 3 in 1 75 Min 0 650 kWh 5 8 l Ja 90 min Für leicht verschmutztes Geschirr das keine besondere Trocknung benötigt Hauptspülen 650 Abs...

Page 38: ...gramm öffnen hört die Programmanzeige auf zu blinken und der Geschirrspüler gibt minütlich ein akustisches Signal ab bis das Programm durch Schließen der Tür wieder in Betrieb genommen wird 6 2 Wechsel eines Spülprogramms VORSICHT Es ist gefährlich die Tür bei laufendem Betrieb zu öffnen Heißes Wasser kann aus dem Gerät herausspritzen VERBRÜHUNGSSGEFAHR Sie können ein laufendes Spülprogramm kann n...

Page 39: ...beginnt automatisch nach ca 10 Sekunden 6 4 Ende eines Spülprogramms VORSICHT Warten Sie einige Minuten bevor Sie nach Beendigung eines Spülprogramms die Tür öffnen da heißer Dampf entweichen kann VERBRÜHUNGSGEFAHR Nach Beendigung eines Spülprogramms ertönt für 8 Sekunden ein akustisches Signal Schließen Sie die Wasserzufuhr und öffnen Sie vorsichtig die Tür des Gerätes Schalten Sie das Gerät mit ...

Page 40: ...n können VERBRENNUNGSGEFAHR HINWEIS Der Geschirrspüler darf niemals ohne ordnungsgemäß eingesetzte Filter betrieben werden Halten Sie Ihr Gerät immer sauber damit es nicht zur Ausbildung unangenehmer Gerüche kommt Legen Sie vor allen Reinigungs und Wartungsarbeiten alle Ringe an Ihren Fingern sowie allen Armschmuck ab ansonsten beschädigen Sie die Oberflächen des Gerätes 7 1 Filtersystem DAS FILTE...

Page 41: ...gen Sie also die Filter regelmäßig Entfernen Sie größere Nahrungspartikel und andere Rückstände nach jedem Spülgang indem Sie die Filter unter klarem fließenden Wasser abspülen Für das Reinigen des Grob und des Feinfilters können Sie eine geeignete Reinigungsbürste benutzen Wir empfehlen das gesamte Filtersystem einmal pro Woche zu reinigen Schlagen Sie nicht gegen die Filter da diese dadurch besc...

Page 42: ...hrter Reihenfolge vor 7 2 Reinigung der Sprüharme Reinigen Sie die Sprüharme regelmäßig weil Chemikalien und Mineralien die Düsen und die Lager verstopfen Um den Sprüharmbausatz abzunehmen greifen Sie ihn in der Mitte und ziehen Sie ihn nach oben Spülen Sie die Sprüharme mit klarem Wasser gründlich ab und bringen Sie ihn vorsichtig wieder an Vergewissern Sie sich dass die Sprüharme frei drehbar is...

Page 43: ...der Tür und der Türdichtungen niemals Sprühreiniger da diese das Schloss und die Elektrik nachhaltig beschädigen können Benutzen Sie einen leicht warmen und feuchten Lappen um die Seitenflächen der Tür zu reinigen Reinigen Sie die Türdichtungen regelmäßig mit einem weichen feuchten Schwamm Sie stellen damit den ordnungsgemäßen Betrieb des Gerätes sicher und verhindern unangenehme Geruchsbildung 7 ...

Page 44: ... FEHLER MÖGLICHE URSACHE N MAßNAHMEN GERÄT ARBEITET ÜBERHAUPT NICHT 1 Die Sicherung im Sicherungsautomat ist ausgelöst worden 1 Sicherungsautomat überprüfen 2 Das Gerät wird nicht mit Strom versorgt 2 Prüfen Sie ob das Gerät eingeschaltet die Tür ordnungsgemäß geschlossen und der Netzstecker eingesteckt ist 3 Niedriger Wasserdruck 3 Prüfen Sie den Wasseranschluss und den Wasserdruck 4 Die Tür des ...

Page 45: ...s Gerätes Falls Sie sich unsicher sind kontaktieren Sie einen geeignete n und qualifizierte n Installateur in Keine Garantieleistung SCHAUMBILDUNG 1 Ungeeignetes Spülmittel 1 Benutzen Sie nur geeignetes Spülmaschinen Spülmittel 2 Verschütteter Klarspüler 2 Wischen Sie verschütteten Klarspüler immer umgehend auf Öffnen Sie die Tür und warten Sie bis der Schaum verdunstet ist FLECKEN IM INNEREN DES ...

Page 46: ... für das Spülen in einem Geschirrspüler nicht geeignet SPÜLMITTEL VERBLEIBT IM SPENDER 1 Geschirr blockiert den Spülmittel Behälter 1 Beladen Sie das Gerät ordnungsgemäß DAMPF 1 Normal 1 Etwas Dampf dringt normalerweise aus der Entlüftung an der Türverriegelung während des Trocknens und Abpumpens SCHWARZE GRAUE STELLEN ODER ROSTFLECKEN AUF DEM GESCHIRR 1 Aluminium Gegenstände haben gegen das Gesch...

Page 47: ...rden konnte kontaktieren Sie den Kundendienst 8 1 Fehlermeldungen FEHLERCODE BEDEUTUNG MÖGLICHE URSACHEN E 1 Lange Wassereinlasszeit Wasserhahn ist nicht geöffnet Wasserzufuhr ist eingeschränkt Zu niedriger Wasserdruck E 3 Erforderliche Temperatur wird nicht erreicht Fehlfunktion des Heizelementes Kontaktieren Sie bitte den Kundendienst E 4 Über Auslaufen Überfüllung Zu große Wasserzufuhr Eine Kom...

Page 48: ...ruck 0 4 10 bar 0 04 1 0 MPa Programme 6 Startzeitvorwahl ja Display ja Abmessungen H B T in cm 45 30 55 00 52 00 Gewicht netto brutto in kg 20 50 24 60 1 Von A höchste Effizienz bis D niedrigste Effizienz 2 Basierend auf 100 Standartprogrammen mit Kaltwasser und Niedrig Verbrauch Betriebsarten Der tatsächliche Energieverbrauch hängt von der Art der Benutzung des Gerätes ab 3 Basierend auf 1 Stand...

Page 49: ...den und direkt mit dem Netzstecker entfernen und entsorgen 4 Demontieren Sie immer die komplette Tür damit sich keine Kinder einsperren und in Lebensgefahr geraten können 5 Entsorgen Sie Papier und Kartonagen in den dafür vorgesehenen Behältern 6 Entsorgen Sie Kunststoffe in den dafür vorgesehenen Behältern 7 Falls es in Ihrem Wohnumfeld keine geeigneten Entsorgungsbehälter gibt bringen Sie diese ...

Page 50: ...chswert des Produkts keinen Einfluss haben 3 Schäden infolge Betriebs und Bedienungsfehler 4 Schäden durch aggressive Umgebungseinflüsse Chemikalien Reinigungsmittel 5 Schäden am Produkt die durch nicht fachgerechte Installation oder Transport verursacht wurden 6 Schäden infolge nicht haushaltsüblicher Nutzung 7 Schäden die außerhalb des Gerätes durch ein PKM Produkt entstanden sind soweit eine Ha...

Page 51: ...Water connection Drain connection 59 2 3 Before installation 59 2 3 1 Space requirement 59 2 3 2 Dimensions of the front decorative panel 62 2 4 Installation of the appliance and the decorative panel 62 2 5 Electrical connection 65 2 6 Water supply 66 2 6 1 Safety supply hose 66 2 6 2 Cold water supply 66 2 7 Installation of the water drain hose 67 3 Appliance and control panel 69 3 1 Appliance 69...

Page 52: ...te 92 10 Waste management 93 11 Guarantee conditions 94 12 Zusätzliche Zeichnungen Additional drawings 95 Do not dispose of this appliance together with your domestic waste The appliance must be disposed of at a collecting centre for recyclable electric and electronic appliances Do not remove the symbol from the appliance The figures in this instruction manual may differ in some details from the c...

Page 53: ...periphery of the appliance Do all wires and connections to the appliance work properly Or are they time worn and do not match the technical requirements of the appliance A check up of existing and newly made connections must be done by an authorized professional All connections and energy leading components incl wires inside a wall must be checked by a qualified professional All modifications to t...

Page 54: ...ry CAUTION indicates a hazardous situation which if not avoided may result in minor or moderate injury NOTICE indicates possible damage to the appliance 1 2 Safety instructions DANGER To reduce the risk of electrocution 1 Non observance of the instructions of this instruction manual will endanger the life of the user and can cause damage to the appliance 2 All electrical work to connect the applia...

Page 55: ...m within such a period of time open all hot water taps and let the water flow for several minutes to release the hydrogen During this period do not smoke and do not use any open flames or naked light because hydrogen is flammable 2 While unpacking the packaging materials polythene bags polystyrene pieces etc should be kept away from children and pets CHOKING HAZARD 3 Do not connect the appliance t...

Page 56: ...ay with the appliance 19 This appliance may be operated by children aged from 8 years and above as well as by persons with reduced physical sensory and mental capabilities or lack of experience and knowledge if they are supervised or have been instructed concerning the safe use of the appliance and do comprehend the hazards involved Children must not play with the appliance Cleaning and user maint...

Page 57: ...washer cleaner or liquid cleaners otherwise you will damage the appliance 5 Only use a detergent and additives which are suitable for dishwashers Do not use soap washing agents hand wash detergents etc 6 When you move the appliance hold it at its base and lift it carefully Keep the appliance in an upright position 7 Never use the door for moving the appliance as you will damage the hinges 8 The ap...

Page 58: ...en and pets CHOKING HAZARD RISK OF INJURY 1 Unpack the appliance carefully Completely remove the transport protection Be very careful and do not use any aggressive or abrasive detergents to remove residuals of the transport protection 2 The spray arms may be equipped with a transport protection Remove the transport protection before installing the appliance 3 Install the appliance in a dry and wel...

Page 59: ...onnector kids only 4 We recommend to secure the water supply with a back pressure valve 2 3 Before installation The back of the appliance must face the wall The appliance must be equipped with a water supply and a water drain hose which can be installed on the left or right 7 2 3 1 Space requirement LATERAL SPACE REQUIREMENT OF THE OPEN DOOR To open the door of the appliance freely the lateral min...

Page 60: ...nstallation dimensions given in the figure below if only the appliance itself will be installed in the installation opening X Opening in the built in furniture for the power cable the water supply hose and the water drain hose both sides Y Installation opening ...

Page 61: ...n the figure below if also the decorative panel will be fitted in the built in furniture X Opening in the built in furniture for the power cable the water supply hose and the water drain hose both sides Y Installation opening C D and E are the dimensions of the decorative panel The installation dimensions remain unchanged ...

Page 62: ...ensions A and B s fig below may vary according to the handle The dimensions C D and E s fig below may vary according to the decorative panel Dimension E s fig below should be in a range of 16 22 mm 2 4 Installation of the appliance and the decorative panel 1 Fix the door handle on the decorative panel s fig below ...

Page 63: ...ting feet on the bottom of the installation opening A s fig below 4 Adjust the supporting foot feet to ensure that the appliance is in a level position A s fig below A SUPPORTING FOOT 5 Check the correct installation of the appliance with a bubble level 6 Fix the decorative panel on the door of the dishwasher as shown on the figures below fig 1 and fig 2 ...

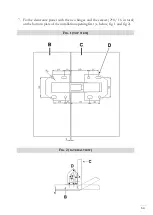
Page 64: ...64 7 Fix the decorative panel with the two hinges and the screws 2 8 16 in total on the bottom plate of the installation opening first s below fig 1 and fig 2 FIG 1 TOP VIEW FIG 2 LATERAL VIEW ...

Page 65: ...liance if it will not fit the outlet have a proper outlet installed by a qualified electrician not covered by the guarantee WARNING Do not use any extension cords multiple sockets or adapters RISK OF FIRE WARNING The appliance must be properly grounded before initial operation Find related information on the nameplate Connect the appliance to a properly grounded safety socket only The connection m...

Page 66: ...e The safety system blocks the flow of water if the supply hose breaks and water flows into the space between the supply hose and the outer corrugated hose 2 6 2 Cold water supply Connect the cold water hose to a 3 4 inches thread When the hoses are new or were not used for an extended period of time let the water flow until it is clear of any contamination Otherwise the water inlet will be blocke...

Page 67: ...allation of the water drain hose Insert the drain water hose into a drain pipe with a diameter of at least 4 cm or into a sink s below fig A and fig B Do not bend or squeeze the hose Fix the water drain hose properly s below fig C The free end of the water drain hose must not be higher than 60 cm and must not be immersed into water to avoid reflux When installed to a water outlet the hose must be ...

Page 68: ...rectly Drain excess water in a suitable container which is held outside and lower than the sink If an extension is needed use a structurally identical hose The length of the hose including extension should not exceed 4 meters otherwise the performance of the appliance will be reduced ...

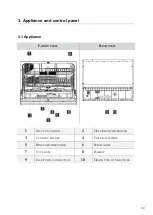
Page 69: ...trol panel 3 1 Appliance FRONT VIEW REAR VIEW 1 SALT CONTAINER 2 DETERGENT DISPENSER 3 CUTLERY BASKET 4 FILTER ASSEMBLY 5 RINSE AID DISPENSER 6 SPRAY ARMS 7 CUP SHELF 8 BASKET 9 INLET PIPE CONNECTOR 10 DRAIN PIPE CONNECTORS ...

Page 70: ... the display 3 DISPLAY Indicates the remaining operating time as well as the operating status delayed start etc 4 RINSE AID INDICATOR Goes on when the rinse aid dispenser has to be refilled 5 SALT INDICATOR Goes on when the salt container has to be refilled 6 PROGRAMME INDICATORS Indicate the selected washing programme 7 PROGRAMME BUTTON Press this button to select the desired washing programme 8 ...

Page 71: ...nctions of the appliance only and does not replace the instruction manual It is essential to read the complete instruction manual before initial operation otherwise you are not adequately informed about potential operational risks as well as the additional functions of the appliance HOW TO SWITCH ON THE APPLIANCE Open the door Press the ON OFF BUTTON 1 s chapter 3 2 CONTROL PANEL to switch on the ...

Page 72: ...ARTING OF A PROGRAMME Open the tap first and then close the door The programme will start after approx 10 seconds automatically END OF A PROGRAMME When a programme has ended an acoustic signal sounds eight times The programme has ended Open the door CAUTION Open the door carefully Hot water vapour can escape when the door has been opened Switch off the appliance using the ON OFF BUTTON 1 If no ent...

Page 73: ...er container 2 When you fill the container for the first time pour approx 1 l water into the container 3 Put the equipped funnel10 in the opening and pour approx 1 kg water softener dishwasher salt in the container 4 Close the lid in clockwise direction carefully The lid must be closed properly 5 The control light for the hardness of water usually goes off after 2 6 days 6 Start a programme as soo...

Page 74: ...ter 3 2 CONTROL PANEL for 5 seconds The appliance is in the salt setting mode now The display indicates the current status of the salt consumption e g H 4 STEP 2 SETTING OF THE SALT CONSUMPTION Press the PROGRAMME BUTTON 7 to select a suitable setting corresponding to your local requirements The settings are consecutively numbered H 4 H 5 H 6 H 1 H 2 H 3 STEP 3 EXIT MODE When you have not made an ...

Page 75: ...he spot is black The volume of the container is 110 ml The rinse aid is added automatically during operation and supports the spot free and perfect drying of the dishes Do not overfill the container otherwise severe foam formation may occur The rinse aid dispenser has 4 or 6 levels depending on model Max capacity of the container approx 110 ml Do not forget to close the lid after refilling When th...

Page 76: ...SET THE RINSE AID DISPENSER Start with position 4 Select position 5 when stains have occurred or the drying is not satisfying Select position 6 if these problems occur again The recommended and factory adjustment is position 4 A ROTARY KNOB If water drops or scale marks are on your dishes after washing increase the amount of rinse aid If whitish stripes are on glasses or bluish film is on the cutl...

Page 77: ...n if the hardness of water is e g 6dH Otherwise white spots may occur on your dishes and glasses Dishwasher detergents without chlorine only bleach slightly so they do not remove tough stains In such a case select a programme with a higher temperature DISHWASHER TABS Dishwasher tabs of different manufacturers may need different periods of time for washing your dishes So some kinds of tabs cannot b...

Page 78: ...ch are suitable for dishwashers only A Detergent for main wash B Detergent for pre wash Note the manufacturer s dosage instructions on the packaging of your dishwasher detergent 3 Close the lid and press until it locks If the dishes are soiled heavily select a programme which includes a pre wash function and add some more dishwasher detergent into the container of the pre wash function B ...

Page 79: ... The dishes must not touch or cover each other Glasses must not touch each other Fill the racks as follows a Objects such as cups glasses pots and pans upside down b Curved objects and objects with recesses in a slanted position so the water can drain off c Arrange the dishes safely and tightly in the rack so they cannot tip over d The dishes must not block the rotating spray arms e Do not put ver...

Page 80: ...y except sharp knives with the handles at the bottom Place long objects vertically and safely in the appliance so they do not block the spray arms TYPE OF THE CUTLERY 1 FORKS 5 KNIVES 2 SOUP SPOONS 6 SERVING SPOONS 3 DESSERT SPOONS 7 GRAVY SPOONS 4 TEA COFFEE SPOONS 8 SERVING FORKS CAUTION 1 Do not let any items extend through the bottom 2 Always load sharp items with the sharp side down ...

Page 81: ...uers and paints THE FOLLOWING OBJECTS ARE PARTIALLY SUITABLE TO BE WASHED IN A DISHWASHER 1 Some glass types may become dead or cloudy after a large number of programmes 2 Objects made of silver or aluminium may decolourise 3 Glazed motifs may dull when often washed in a dishwasher 5 4 Damage to glasses and dishes POSSIBLE CAUSES RECOMMENDED SOLUTION Type of the glasses dishes or their production ...

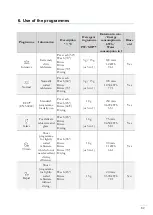
Page 82: ...3 g 15 g or 3 in 1 120 min 1 050 kWh 7 7 l Yes ECO EN 50242 Standard programme for daily use Pre wash Wash 450 Rinse 600 C Drying 18 g or 3 in 1 230 min 0 609 kWh 6 5 l Yes Glass For delicate tableware and glass Wash 450 Rinse Rinse Drying 18 g or 3 in 1 75 min 0 650 kWh 5 8 l Yes 90 min Short programme for lightly soiled tableware which do not need excellent drying efficiency Wash 650 Rinse Rinse...

Page 83: ...NSIVE NORMAL The programme indicator 6 indicates the selected programme 7 Close the door of the dishwasher properly 8 The programme will start after approx 10 seconds automatically If you open the door of the appliance during operation the programme indicator stops flashing and an acoustic signal sounds every minute until you close the door to re start operation 6 2 How to change a programme CAUTI...

Page 84: ...s stopped operation 3 Now you can add dishes 4 Close the door of the dishwasher properly 5 The programme will start after approx 10 seconds automatically 6 4 End of a programme CAUTION Wait a few minutes before you open the door as hot damp may escape RISK OF SCALDING An acoustical signal sounds for 8 seconds when a programme has ended Turn off the water supply and open the door of the appliance c...

Page 85: ...asant odours do not occur Take off all rings and bracelets before cleaning or maintaining the appliance otherwise you will damage the surface of the appliance 7 1 Filter system THE FILTER SYSTEM COMPRISES A MAIN FILTER 1 A FINE FILTER 2 AND A COARSE FILTER 3 S FIG BELOW 1 The MAIN FILTER shreds remnants with a special nozzle on the bottom of the spray arm 2 The FINE FILTER catches remnants in the ...

Page 86: ...e entire filter system once a week Do not knock against the filters as you will damage them Your appliance will not work properly if the filters are damaged Always install the filters properly Improperly installed filters may damage the appliance and dishes HOW TO REMOVE INSERT THE FILTER SYSTEM 1 Turn the complete filter system 1 2 3 to the left and lift it carefully 2 Lift the FINE FILTER 2 and ...

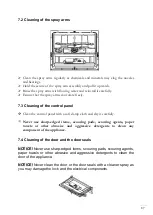
Page 87: ...the control panel with a soft damp cloth and dry it carefully Never use sharp edged items scouring pads scouring agents paper towels or other abrasive and aggressive detergents to clean any component of the appliance 7 4 Cleaning of the door and the door seals NOTICE Never use sharp edged items scouring pads scouring agents paper towels or other abrasive and aggressive detergents to clean the door...

Page 88: ...not operate the appliance for a certain period of time e g during holidays vacancies let a programme run empty appliance before 2 Disconnect the plug und turn off the water supply of the appliance 3 Leave the door slightly ajar to protect the seals and to avoid the generation of unpleasant odours 8 Trouble shooting WARNING Disconnect the appliance from the mains before you clean or maintain it RIS...

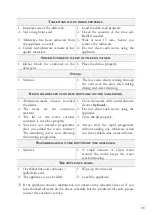
Page 89: ...oper function of the appliance is not affected If you are in doubt contact a qualified professional not covered by the guarantee FOAM IN THE APPLIANCE 1 Unsuitable detergent 1 Use dishwasher detergent only 2 Spilled rinse aid 2 Remove any spilled rinse aid immediately Open the door and wait until the foam has evaporated STAINED INTERIOR 1 Detergent contains colorants 1 Use colorant free detergents...

Page 90: ...the marks with a mild abrasive cleaner by hand 2 The items are not corrosion resistant 2 Do not clean such items using the appliance 3 The lid of the water softener container is not close properly 3 Close the lid properly 4 You have not started a programme after you added the water softener The remaining salt is now affecting the running programme 4 Always start the rapid programme without adding ...

Page 91: ...ntact the customer service E 4 Leakage Overflow Overfilled Too much inlet water An element of the appliance leaks please contact the customer service E d Communication error Short circuit cable breakage Please contact the customer service If overflow occurs turn off the main water supply before calling a service If there is water in the base pan because of an overfill or small leak remove the wate...

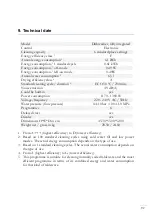
Page 92: ... 220 240 V AC 50Hz Water pressure flow pressure 0 4 10 bar 0 04 1 0 MPa Programmes 6 Delayed start yes Display yes Dimensions H W D in cm 45 30 55 00 52 00 Weight net gross in kg 20 50 24 60 1 From A highest efficiency to D lowest efficiency 2 Based on 100 standard cleaning cycles using cold water fill and low power modes The actual energy consumption depends on the type of use 3 Based on 1 standa...

Page 93: ... and the plug immediately 4 Remove the door completely so children are not able to get into the appliance as this endangers their lives 5 Dispose of any paper and cardboard into the corresponding containers 6 Dispose of any plastics into the corresponding containers 7 If suitable containers are not available at your residential area dispose of these materials at a suitable municipal collection poi...

Page 94: ...o not influence the utility value of the product 3 damage caused by handling errors or false operation 4 damage caused by aggressive environmental conditions chemicals detergents 5 damage caused by non professional installation and haulage 6 damage caused by non common household use 7 damages which have been caused outside the appliance by a PKM product unless a liability is forced by legal regula...

Page 95: ...95 12 Zusätzliche Zeichnungen Additional drawings D Abmessungen mit Variabel entsprechend der Dekorblende GB Dimensions with Variable according to the decorative panel ...

Page 96: ...undendienst auf der Einlage in dieser Bedienungsanleitung Aftersales service information on the leaflet inside this instruction manual Änderungen vorbehalten Subject to alterations STAND UPDATED 06 03 2021 03 06 2021 PKM GmbH Co KG Neuer Wall 2 6 D 47441 Moers ...

Reviews: