background image

Visit our website at: http://www.harborfreight.com

Email our technical support at: [email protected]

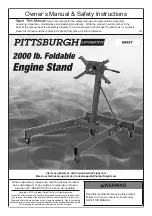
Owner’s Manual & Safety Instructions

Save This Manual


Keep this manual for the safety warnings and precautions, assembly, 

operating, inspection, maintenance and cleaning procedures.  Write the product’s serial number in the 
back of the manual near the assembly diagram (or month and year of purchase if product has no number). 
Keep this manual and the receipt in a safe and dry place for future reference.


20c

When unpacking, make sure that the product is intact 

and undamaged.  If any parts are missing or broken, 

please call 1-888-866-5797 as soon as possible.

Copyright

©

 2012 by Harbor Freight Tools

®

.  All rights reserved.  

No portion of this manual or any artwork contained herein may be reproduced in 

any shape or form without the express written consent of Harbor Freight Tools.  

Diagrams within this manual may not be drawn proportionally.  Due to continuing 

improvements, actual product may differ slightly from the product described herein.  

Tools required for assembly and service may not be included.

Read this material before using this product. 
Failure to do so can result in serious injury. 
SAVE THIS MANUAL.

Summary of Contents for 69521

Page 1: ...ence 20c When unpacking make sure that the product is intact and undamaged If any parts are missing or broken please call 1 888 866 5797 as soon as possible Copyright 2012 by Harbor Freight Tools All...

Page 2: ...roperty damage 1 Study understand and follow all instructions before operating this device 2 Do not exceed rated capacity Be aware of dynamic loading Sudden load movement may briefly create excess loa...

Page 3: ...welded at an angle from the Legs and are different from each other Be sure to insert the Legs into the Base so that the wheels will be parallel pointing forward not out to the sides 2 Attach the Colu...

Page 4: ...ollar of the Column 4 Align the holes and insert the Pin 12 7 Slide off one of the Handle 5 rubber grips and insert the Handle 5 through the large holes at the end of the Mounting Plate 6 post Replace...

Page 5: ...e 6 side and securely tighten them into the engine The bolt heads must press against the back of the Arms if needed use flat washers not included as spacers 6 Tighten the Bolts 10 and Nuts that hold t...

Page 6: ...n and free of dirt or grease 3 Before each use check that hardware is securely fastened 4 Check that the Casters are clean and turn properly 5 AFTER USE clean external surfaces of the stand with a cle...

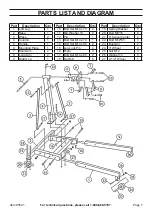
Page 7: ...Short Arm 2 8 Long Arm 2 9 Right Leg 1 Part Description Qty 10 Bolt Set M14 x 70 4 11 Big Washer 15 4 12 Pin 1 13 Bolt Set M14 x 70 1 14 Bolt Set M14 x 90 2 15 Leg Lock Pin 4 16 R pin 4 17 Bolt Set M...

Page 8: ...epairs or alterations outside our facilities criminal activity improper installation normal wear and tear or to lack of maintenance We shall in no event be liable for death injuries to persons or prop...

Reviews: