


En
10
4
MASTER REC (WAKE UP) button
!
MASTER REC
: This is used to record the sound output from the
unit on a USB device inserted in the device insertion slot for
USB2.
=
Recording the performance
(p. 10 )
!
WAKE UP
: Cancels the auto standby mode.
=
About the auto standby function
(p. 29 )
5
TRACK MARK button
It divides the tracks when they are being recorded on the USB device.
=
Splitting tracks while recording
(p. 10 )
Recording the performance
The same sound as the sound being output from the [
MASTER1
] termi-
nal can be recorded as a WAV file on a USB device.
!
The name of the files created when the sound is recorded is in the
format [
REC***.WAV
] (*** is a 3-digit number).
1 Insert the USB device in the USB2 device insertion
slot.
2 Press the [MASTER REC (WAKE UP)] button.
Recording starts.
The [
MASTER REC (WAKE UP)
] button lights.
!
When the [
MASTER REC (WAKE UP)
] button is pressed again, the
[
MASTER REC (WAKE UP)
] button turns off and recording stops.
!
The recording capacity of a 1 GB USB device is about 90 minutes.
Splitting tracks while recording
Press the [TRACK MARK] button while recording.
The currently recording track is split and stored on the USB device.
The file is divided right at the point where the [
TRACK MARK
] button
is pressed. From this point onwards, the sound can continue to be
recorded as a new file.
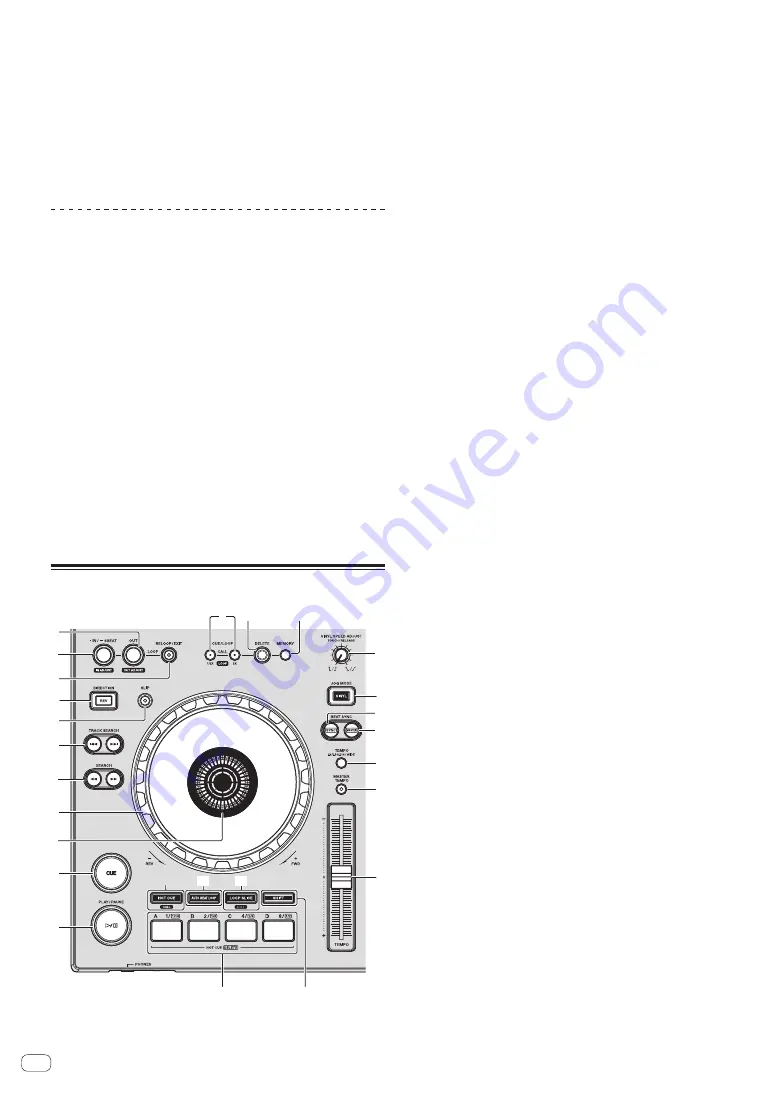
Deck section
4
1
7
2
3
5
6
8
b
a
9
f
c
d
e
i
g
h
j
k
l
q
o
p
n
m
1
LOOP IN/4BEAT (IN ADJUST) button
Use this to set and fine-adjust the loop in point.
=
Setting loops
(p. 13 )
2
LOOP OUT (OUT ADJUST) button
Use this to set and fine-adjust the loop out point.
=
Setting loops
(p. 13 )
3
RELOOP/EXIT button
Use this to return to loop playback (reloop) or cancel loop playback
(loop exit).
=
Returning to Loop playback (Reloop)
(p. 13 )
=
Canceling Loop playback (Loop Exit)
(p. 13 )
4
DIRECTION, REV button
Use this to turn reverse playback on and off.
This lights when playing in the reverse direction.
=
Playing in reverse
(p. 12 )
5
SLIP button
=
Using the slip mode
(p. 15 )
6
TRACK SEARCH
o
,
p
buttons
Use these to search for the beginnings of tracks.
7
SEARCH
m
,
n
buttons
The track is forwarded/reversed while the button is held in.
=
Forward and reverse scanning
(p. 11 )
8
Jog dial
!
Scratch
When the [
VINYL
] mode is set and the jog dial is turned while
touching a metal part on its top, the sound is played according to
the direction and speed at which the jog dial is turned.
=
Operating the jog dial
(p. 12 )
!
Pitch bend
The playing speed can be adjusted by turning the outer part of
the jog dial during playback.
=
Operating the jog dial
(p. 12 )
9
Jog dial display section
=
Jog dial display section
(p. 19 )
a
CUE button
Sets a cue point or moves the cue point.
=
Setting Cue
(p. 12 )
b
f
(PLAY/PAUSE) button
Use this to play/pause tracks.
=
Playback
(p. 11 )
c
CUE/LOOP CALL,
c
(LOOP 1/2X),
d
(LOOP 2X) buttons
Use these to call out stored cue and loop points.
=
Calling out stored cue or loop points
(p. 14 )
When pressed during loop playback, the loop is cut or extended.
=
Cutting loops (Loop Cut)
(p. 13 )
=
Extending loops (loop doubling)
(p. 13 )
d
DELETE button
Use this to delete cue and loop points.
=
Deleting stored cue or loop points
(p. 14 )
e
MEMORY button
Use this to store cue and loop points in the memory.
=
Storing cue or loop points
(p. 13 )
f
VINYL SPEED ADJUST TOUCH/RELEASE control
Use this to adjust the speed at which playback slows down and stops
when the top of the jog dial is pressed and the speed at which nor-
mal playback resumes when the top of the jog dial is released.
=
Adjusting the playback and stopping speeds
(p. 12 )
g
VINYL MODE button
Use this to switch between the [
VINYL
] mode and normal mode.
=
Switching the jog dial mode
(p. 12 )


