background image

Altri informazioni

09

46

It

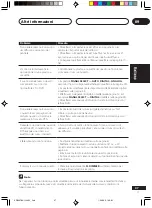
Soluzione dei problemi

Un funzionamento anomalo può essere spesso interpretato come un guasto o un problema di
funzionamento. Se si ritiene che il presente componente non funzioni correttamente, eseguire i
controlli secondo la lista sottostante. Talvolta il problema può riguardare un altro componente.
Controllare gli altri componenti e gli apparecchi elettrici usati. Se non si riesce a risolvere il
problema neppure dopo aver eseguito i controlli che seguono, rivolgersi al centro assistenza
Pioneer più vicino o al proprio rivenditore per la riparazione.

Problema

L’apparecchio non si accende.

Non viene emesso alcun suono
quando si seleziona una
funzione.

Non viene emessa alcuna
immagine quando si seleziona
una funzione.

Si sentono rumori molesti
durante la trasmissione radio.

Le stazioni radio non possono
essere selezionate
automaticamente.

Rimedio

• Collegare la spina di alimentazione alla presa a muro.
• Scollegare la spina di alimentazione dalla presa, quindi
reinserirla.
• Assicurarsi che non vi siano conduttori esposti del cavo dei
diffusori a contatto con il pannello posteriore. Questo potrebbe
causare lo spegnimento automatico del ricevitore.

• Assicurarsi che il componente sia collegato correttamente
(rimettersi alle pagine 12–17).
• Premere 

MUTE 

sul telecomando per disattivare il

silenziamento.
• Regolare il 

MASTER VOLUME

.

• Assicurarsi che il componente sia collegato correttamente
(rimettersi alle pagine 12–15).
• Selezionare il componente corretto (utilizzare i tasti 

INPUT

SELECTOR

).

• Sintonizzarsi sulla frequenza corretta.
• Collegare l’antenna (rimettersi alle pagine 15–16).
• Allontanare i cavi digitali dai terminali e dai cavi dell’antenna.
• Estendere completamente l’antenna FM a filo, collegare nella
posizione che consente la ricezione ottimale e fissarla al muro.
• Collegare un’antenna FM esterna (rimettersi alla pagine 15–16).
• Regolare la direzione e la posizione per consentire una
ricezione ottimale.
• Collegare un’antenna aggiuntiva AM interna o esterna
(rimettersi alle pagine 15–16).
• Spegnere l’apparato che crea disturbi o allontanarlo dal
ricevitore.
• Sistemare l’antenna lontana dall’apparato che crea disturbi.

• Collegare un’antenna esterna (rimettersi alla pagine 15–16).

XRE3078A.It.46.52_2nd

1/23/04, 9:16 AM

46

Summary of Contents for VSX-D514

Page 1: ...AUDIO VIDEO MULTI CHANNEL RECEIVER SINTOAMPLIFICATORE AUDIO VIDEO MULTICANALE VSX D514 Operating Instructions Istruzioni per l uso ...

Page 2: ... terminals in your plug proceed as follows The wire which is coloured blue must be connected to the terminal which is marked with the letter N or coloured black The wire which is coloured brown must be connected to the terminal which is marked with the letter L or coloured red Replacement and mounting of an AC plug on the power supply cord of this unit should be performed only by qualified service...

Page 3: ... 60 cm at top 10 cm at rear and 30 cm at each side WARNING Slot and openings in the cabinet are provided for ventilation and to ensure reliable operation of the product and to protect it from overheating to prevent fire hazard the openings should never be blocked and covered with items such as newspapers table cloths curtains etc Also do not put the apparatus on the thick carpet bed sofa or fabric...

Page 4: ...setup 19 3 D view of speaker setup 19 POWER COAD CAUTION 19 04 Controls and displays Remote Control 20 Front Panel 22 Display 24 05 Listening to your system Playing sources 26 Listening in surround sound 26 Using the Advanced surround effects 27 Listening in stereo 28 Using the Virtual Surround Back mode VSB 28 Choosing the input signal 29 Using Loudness and Midnight listening 29 Using the tone co...

Page 5: ...n presets 40 An introduction to RDS 41 Using the RDS display 42 Searching for RDS programs 42 Basics of EON 43 Using EON 43 Clearing all stations from the RDS or EON search 44 08 Making recordings Making an audio or a video recording 45 09 Additional information Troubleshooting 46 Resetting the main unit 48 Cleaning the unit 48 Specifications 48 ...

Page 6: ...tructions Loading the batteries Dry cell batteries AA size IEC R6 x 2 Incorrect use of batteries may result in such hazards as leakage and bursting Observe the following precautions Never use new and old batteries together Insert the plus and minus sides of the batteries properly according to the marks in the battery case Batteries with the same shape may have different voltages Do not use differe...

Page 7: ...n the source and the sound settings of the receiver DVD Video has become the basic source material for home theater due to its size quality and ease of use Depending on the DVD you can have up to seven different audio tracks coming from one disc all of them being sent to different speakers in your system This is what creates a surround sound effect and gives you the feeling of being there This rec...

Page 8: ...you hook up using an optical cable you should refer to Digital input settings on page 35 to assign the optical input to DVD Use a video cord to connect the video output on your DVD to the receiver using the jacks shown below 2 Hook up your TV Use a video cord to connect your receiver to the TV using the jacks as shown below Î 8 7 4 1 STANDBY ON 0 3 DVDPLA YER S IN OUT MONITOR OUT SUB WOOFER PREOUT...

Page 9: ... front speaker setting see Speaker setting on page 32 to large Make sure you connect the speaker on the right to the right terminal and the speaker on the left to the left terminal Also make sure the positive and negative terminals on the receiver match those on the speakers You can use speakers with a nominal impedance of 6Ω to 16Ω see Switching the speaker impedance on page 37 if you re using sp...

Page 10: ... the receiver and switch it on followed by your DVD player your subwoofer and the TV Make sure you ve set the video input on your TV to this receiver Check the manual that came with the TV if you don t know how to do this Also make sure that DVD LD is showing in the receiver s display indicating that the DVD input is selected If it isn t press DVD LD to set the receiver to the DVD input 5 Press QU...

Page 11: ...tween small medium or large S M or L M being an average sized room 6 Press ENTER 7 Use the MULTI JOG dial to choose your listening position You can cycle between the following choices MID BACK FWD FWD If you are nearer to the front speakers than the surround speakers MID If you are equal distance from the front and surround speakers BACK If you are nearer to the surround speakers than the front sp...

Page 12: ... connect the monitor TV Connect red plugs to R right white plugs to L left and the yellow plugs to VIDEO Be sure to insert completely L R VIDEO Digital audio cords Optical cables Commercially available digital audio coaxial cords standard video cords can also be used or optical cables not supplied are used to connect digital components to this receiver Be sure to insert completely Digital audio co...

Page 13: ...ing audio components To begin set up connect your analog audio components such as a cassette deck to the jacks For components you want to record with you need to hook up four plugs a set of stereo ins and a set of stereo outs but for components that only play you only need to hook up one set of stereo ins two plugs You should also hook up your digital components to analog audio jacks if you want t...

Page 14: ...sconnected from the wall outlet Connecting DVD 5 1 channel components If you prefer to use a seperate component for decoding DVDs you can connect a decoder or a DVD player with multi channel analog outputs to the multi channel inputs of this receiver When connecting your equipment always make sure the power is turned off and the power cord is disconnected from the wall outlet The 5 1 channel input...

Page 15: ...end vertically along a window frame or other suitable area etc Connecting antennas Connect the AM loop antenna and the FM wire antenna as shown below To improve reception and sound quality connect external antennas see Using external antennas below Always make sure that the receiver is switched off and unplugged from the wall outlet before making or changing any connections AM LOOP ANTENNA FM WIRE...

Page 16: ...onnecting the supplied AM loop antenna For the best possible reception suspend horizontally outdoors AM loop antenna Assemble the antenna and connect to the receiver Attach to a wall etc if desired and face in the direction that gives the best reception Antenna snap connectors Twist the exposed wire strands together and insert into the hole then snap the connector shut 10mm Using external antennas...

Page 17: ... change the front speaker setting see Speaker setting on page 32 to large Make sure you connect the speaker on the right to the right terminal and the speaker on the left to the left terminal Also make sure the positive and negative terminals on the receiver match those on the speakers You can use speakers with a nominal impedance of 6Ω to 16Ω see Switching the speaker impedance on page 37 if you ...

Page 18: ...trands together 2 Loosen speaker terminal and insert exposed wire Make sure that all the bare speaker wire is twisted together and inserted fully into the speaker terminal If any of the bare speaker wire is touching the back panel when you switch the unit on the power may cut off as a safety measure Use good quality speaker wire to connect the speakers to the receiver 3 Tighten terminal Place the ...

Page 19: ...when your hands are wet as this could cause a short circuit or an electric shock Do not place the unit a piece of furniture etc on the power cord or pinch the cord Never make a knot in the cord or tie it with other cords The power cords should be routed such that they are not likely to be stepped on A damaged power cord can cause a fire or give you an electrical shock Check the power cord once in ...

Page 20: ...l levels for the most accurate reproduction of a source MIDNIGHT LOUDNESS page 29 Use to switch to Midnight or Loudness listening 3 TOP MENU DVD control Displays the disc top menu of a DVD TUNER EDIT receiver control pages 39 40 Press to memorize and name a station for recall 4 DVD Use to switch over to the DVD controls on the remote control The DVD controls on the remote control TOP MENU MENU and...

Page 21: ...e used to find radio frequencies The STATION buttons can be used to select preset radio stations CLASS page 39 40 Use to switch between the three banks classes of station presets MPX page 38 39 Use to switch between auto stereo and mono reception of FM broadcasts If the signal is weak then switching to mono will improve the sound quality DISPLAY page 40 42 Use to switch the display between the sta...

Page 22: ...station presets 11 MPX page 38 Press the MPX button to receive a radio broadcast in mono 12 PTY SEARCH page 42 Use to search for different program types in RDS mode 13 EON MODE page 43 44 Use to search for different programs that are transmitting traffic or news information this search method is called EON 14 MUTE Use to mute the sound or restore the sound if it has been muted 15 LISTENING MODE bu...

Page 23: ...NAL SELECT page 29 Use to select between an analog or digital signal 17 MIDNIGHT LOUDNESS page 29 Use to switch to Midnight or Loudness listening 18 SPEAKER IMPEDANCE page 37 Use to switch the speaker impedance when using low impedance speakers 19 VSB MODE page 28 Press to switch the Virtual Surround Back mode on or off 20 TONE page 29 Press this button to access the bass and treble controls which...

Page 24: ...tandard mode of the receiver is on this lights to indicate decoding of a Dolby Digital signal 4 2 PRO LOGIC II When the Standard mode of the receiver is on this lights to indicate Pro Logic II decoding 5 VIR SB Lights during Virtual surround back processing 6 DIRECT Lights when source direct playback is selected Direct playback bypasses the tone controls and channel levels for the most accurate re...

Page 25: ...ed Surround Lights when one of the Advanced Surround listening modes of the receiver is selected 14 LOUDNESS Lights during Loudness listening 15 TUNER indicators STEREO Lights when a stereo FM broadcast is being received in auto stereo mode MONO Lights when the mono mode is set using the MPX button TUNED Lights when a broadcast is being received 16 Master volume level Shows the overall volume leve...

Page 26: ...on your speaker setup and the type of source you re listening to INPUT SELECTOR RECEIVER CD R TAPE MD MIDNIGHT LOUDNESS ADVANCED SURROUND STANDARD TUNER EDIT RECEIVER TOP MENU DVD SETUP ENTER STEREO SLEEP DVD LD CD FM AM TV SAT DVR VCR DVD 5 1CH FLDIMMER INPUTATT MENU While listening to a source press STANDARD If the source is Dolby Digital DTS or Dolby Surround encoded the proper decoding format ...

Page 27: ... for sports programs with alot of action adding to the excitement by bringing background action to the forefront GAME Useful when playing video games It works especially well with sound moving from left to right in game software with alot of movement EXPANDED This mode is especially designed to give sound depth to stereo sources and lets you hear two channel stereo signals as simulated multi chann...

Page 28: ...he source audio signal as possible If you switch on Midnight listening Loud ness or the Tone controls when DIRECT is selected the receiver automatically switches to STEREO Using the Virtual Surround Back mode VSB Selecting this mode allows you to hear a virtual back channel through your surround speakers For example you can choose to listen to sources with no surround back channel information for ...

Page 29: ...nnections page 13 and set the signal input to DIGITAL Some DVD players don t output DTS signals For more details refer to the instruction manual supplied with your DVD player You can only select DIGITAL if the source you selected is assigned to a digital input See page 35 for more on the digital input settings Using Loudness and Midnight listening The Loudness listening feature can be used to get ...

Page 30: ... you can t use the SIGNAL SELECT INPUT ATT TONE and MIDNIGHT LOUDNESS buttons as well as the Standard Advanced Surround and Stereo Direct sound modes When 5 1 channel playback is selected only the volume and channel levels can be set Using the sleep timer The sleep timer switches the receiver into standby after a specified amount of time so you can fall asleep without worrying about the receiver b...

Page 31: ...hown for each option as you cycle through the display Speaker setting page 32 Specify the number and type of speakers you have connected Subwoofer setting page 32 Specify how the subwoofer is used Crossover frequency setting page 33 Determine which frequencies will be sent to the subwoofer or large speakers LFE attenuator setting page 33 Specify the peak level for the LFE channel Front speaker dis...

Page 32: ...terisk if no speaker is connected Cycle through the available choices using or and choose a configuration that matches your speaker setup One of the following configurations should match your setup FL CL SL FL CL SS FL CL S FL CS SL FL CS SS FS C SS FS CS S FS CS SS FL C S FL C SS FL CS S FS C S FL C SL If the cone size diameter of the speaker is larger than 15 cm set the speaker size to L If you ...

Page 33: ...frequency for your small speakers 100 Hz Sends bass frequencies below 100 Hz to the subwoofer or L speakers 150 Hz Sends bass frequencies below 150 Hz to the subwoofer or L speakers 200 Hz Sends bass frequencies below 200 Hz to the subwoofer or L speakers If all speakers front center and surround are set to L the crossover frequency can t be set because there are no S speakers appears in the displ...

Page 34: ...me Use or to set the distance of the surround speakers from the main listening position within a range of 0 1 m to 9 0 m When S is selected in the speaker setting the surround distance can t be set Subwoofer distance setting Default setting 3 m Like your speakers you should set the distance of your subwoofer accurately to hear sounds coming from all speakers at the same time Use or to set the dist...

Page 35: ...e right front speaker will play channel 2 Use or to cycle through the possible DUAL MONO settings ch2 Lch1 Rch2 ch1 Digital input settings Here you tell the receiver what components you have hooked up to the coaxial and optical DIGITAL IN jacks on the back of the receiver After you assign a component to a digital jack whenever you select that component for example a DVD player the receiver automat...

Page 36: ...or each ADVANCED SURROUND mode Since the subwoofer transmits an ultra low frequency its sound may seem quieter than it actually is Using test tones to set up your speaker system will overwrite any previous settings you had for the STANDARD or ADVANCED SURROUND modes Setting the relative volume level of each channel Default setting 0 dB For best surround sound playback you should set the relative c...

Page 37: ... STATION TUNING TUNER EDIT CLASS MPX MULTI JOG PTY SEARCH UP DOWN MULTI JOG MASTERVOLUME ENTER AUDIO VIDEO MULTI CHANNEL RECEIVER VSX D514 SPEAKER IMPEDANCE MIDNIGHT LOUDNESS VSB MODE TONE QUICK SETUP MULTI JOG With the receiver in standby press STANDBY ON while holding down the SPEAKER IMPEDANCE button Each time you do this you switch between the impedance settings SP 6 OHM Use this setting if yo...

Page 38: ...TT MENU ENTER VOLUME 1 Press the FM or AM button to select the tuner 2 Tune to a station There are three ways to do this Automatic tuning To search for stations in the currently selected band press and hold the TUNING buttons for about a second The receiver will start searching for the next station stopping when it has found one Repeat to search for other stations Manual tuning To change the frequ...

Page 39: ...you often listen to a particular radio station it s convenient to have the receiver store the frequency for easy recall whenever you want to listen to that station This saves the effort of manually tuning in each time This unit can memorize up to 30 stations stored in three banks or classes A B and C of 10 stations each When saving an FM frequency the MPX setting see previous page is also stored U...

Page 40: ...e three classes then press and to select the station preset you want You can also use the the MULTI JOG dial front panel to select a station preset 5 Press ENTER After pressing ENTER the preset class and number stop blinking and the receiver stores the station Naming station presets For easier identification you can name your station presets 1 Choose the station preset you want to name See Listeni...

Page 41: ...n These can be anything the broadcaster chooses a talk radio station might give out it telephone number as RT for example Program Service Name PS is the name of the radio station Program Type PTY indicates the kind of program currently being broadcast The receiver can search for and display the following program types NEWS News AFFAIRS Current affairs INFO General information SPORT Sports EDUCATE ...

Page 42: ...E is shown If this happens the PS display is shown after a few seconds This unit converts lower case characters transmitted by broadcast station to upper case characters Searching for RDS programs One of the most useful features of RDS is the ability to search for a particular kind of radio program You can search for any of the program types listed on page 41 Use the front panel controls to do thi...

Page 43: ...t This mode will set the tuner to pick up traffic information when it s broadcast 2 NEWS This mode will set the tuner to pick up news when it is broadcast Using EON Use the front panel controls to do this 1 Press the FM button to select the FM band EON is only broadcast on FM 2 Tune into an EON FM station The indicator lights to inform you that the currently tuned station carries the EON data serv...

Page 44: ...ess the EON MODE button and turn the EON mode off Clearing all stations from the RDS or EON search The receiver will automatically register an identifying marker called a PI code for any station you input into the memory classes which can receive RDS or EON data If you want to remove the currently memorized stations from RDS and EON searches you can do it by erasing the PI codes 1 Press and hold E...

Page 45: ...o record Use the INPUT SELECTOR buttons to do this 2 Select the input signal if necessary Press SIGNAL SELECT on the front panel to select the input signal corresponding to the source component see page 29 for more on this 3 Prepare the source you want to record Tune to the radio station load the CD video DVD etc 4 Prepare the recorder connected to either the CD R TAPE MD or DVR VCR outputs Insert...

Page 46: ...and insert again Make sure there are no loose strands of speaker wire touching the rear panel This could cause the receiver to shut off auto matically Make sure the component is connected correctly refer to pages 12 17 Press MUTE on the remote control to turn muting off Adjust the MASTER VOLUME Make sure the component is connected correctly refer to pages 12 15 Select the correct component use the...

Page 47: ... speakers properly refer to pages 17 18 Move the cassette deck further from your receiver until the noise disappears Set the SIGNAL SELECT to AUTO DIGITAL or ANALOG according to the type of connections made refer to page 29 Set the digital input settings correctly refer to page 35 Make digital connections refer to page 13 and set the SIGNAL SELECT to DIGITAL refer to page 29 Refer to the instructi...

Page 48: ...R CD R TAPE MD DVD LD TV SAT 88 64 dB 0 3 Resetting the main unit Use this procedure to reset all the receiver s settings to the factory default Use the front panel controls to do this 1 Switch the receiver on 2 While holding down the TONE button press and hold the STANDBY ON button for about three seconds 3 When you see RESET appear in the display press the TONE button OK shows in the display 4 P...

Page 49: ... p 75 Ω Output Level Impedance DVR VCR 1 Vp p 75 Ω Frequency Response DVR VCR DVD LD TV SAT MONITOR 5 Hz to 7 MHz dB Signal to Noise Ratio 55 dB FM Tuner Section Frequency Range 87 5 MHz to 108 MHz Usable Sensitivity Mono 13 2 dBf IHF 1 3 µV 75 Ω 50 dB Quieting Sensitivity Mono 20 2 dB Stereo 38 6 dBf Signal to Noise Ratio Mono 73 dB at 85 dBf Stereo 70 dB at 85 dBf Signal to Noise Ratio DIN Mono ...

Page 50: ...arecchio Se un tale oggetto dovesse cadere accidentalmente sull apparecchio il fuoco potrebbe espandersi sull apparecchio con pericolo d incendio D3 4 2 1 7a_It Questo prodotto è conforme al DM 28 8 1995 Nº548 ottemperando alle prescrizioni di cui al DM 25 6 1985 par 3 all A e DM 27 8 1987 All I D44 8 4a_It Questo prodotto è conforme alla direttiva sul basso voltaggio 73 23 CEE emendata 93 68 CEE ...

Page 51: ... e per migliorare la dispersione del calore lasciate uno spazio minimo di 60 cm in alto di 10 cm dietro l unità e di 30 cm ai lati AVVERTENZA Feritoie ed aperture nella struttura sono previste solo per la ventilazione e in modo da assicurare il buon funzionamento del prodotto proteggerlo dal surriscaldamento dai rischi d incendio le aperture non devono mai essere ostruite o ricoperte da oggetti co...

Page 52: ...la configurazione dei diffusori 19 PRECAUZIONI RIGUARDANTI IL CAVO DI ALIMENTAZIONE 19 04 Comandi e display Telecomando 20 Pannello anteriore 22 Display 24 05 Ascolto del sistema Riproduzione delle fonti 26 Ascolto del suono surround 26 Utilizzo degli effetti surround Advanced 27 Ascolto in stereo 28 Utilizzo del modo Virtual Surround Back VSB 28 Scelta del segnale di entrata 29 Utilizzo del modo ...

Page 53: ...oltare le stazioni preselezionate 40 Introduzione al sistema RDS 41 Utilizzo del display RDS 42 Ricerca di programmi RDS 42 Informazioni di base sull EON 43 Utilizzo del sistema EON 43 Per cancellare la ricerca RDS ed EON da tutte le stazioni 44 08 Per eseguire una registrazione Per eseguire una registrazione audio o video 45 09 Altre informazioni Soluzione dei problemi 46 Reimpostazione dell unit...

Page 54: ...sso tempo Quando si eliminano le batterie esaurite attenersi alle norme governative o delle istituzioni preposte all ambiente in vigore a livello nazionale o di zona Collegamento dei cavi Assicurarsi di non disporre i cavi in modo che questi si ripieghino sulla parte superiore dell apparecchio come mostrato nell illustrazione Se ciò dovesse accadere il campo magnetico creato dai trasformatori cont...

Page 55: ...audio impostati sul ricevitore I DVD video sono diventati fonte basica per il teatro casalingo grazie alle proprie dimensioni alla qualità e alla facilità di utilizzo A seconda del DVD è possibile l emissione di sette differenti tracce audio da un unico disco tutte inviate a differenti diffusori collegati con l apparecchio Questo sistema crea un effetto di suono surround e offre la sensazione di s...

Page 56: ...o mediante un cavo ottico è necessario rimettersi a Impostazioni ingresso digitale a pagina 35 per fissare l entrata ottica al DVD Utilizzare un cavo video per collegare l uscita video del lettore DVD al ricevitore servendosi delle prese jack come mostrato nella pagina successiva 2 Collegare il televisore Utilizzare un cavo video per collegare il ricevitore al televisore servendosi delle prese jac...

Page 57: ...zione dei diffusori a pagina 32 su large grande Assicurarsi di collegare il diffusore sulla destra al terminale destro ed il diffusore sulla sinistra al terminale sinistro Assicurarsi inoltre che i teminali positivi e negativi sul ricevitore corrispondano a quelli situati sui diffusori È possibile usare diffusori dall impedenza nominale da 6Ω a 16Ω vedere Commutazione dell impedenza del diffusore ...

Page 58: ... lettore DVD o dei dischi della fonte si può ottenere un suono digitale ed analogico a 2 canali In questo caso il modo di ascolto deve venire impostato su STANDARD dovrebbe essere già impostato vedere pagina 26 se necessario se si desidera un suono surround multicanale Per utilizzare la configurazio ne rapida È possibile utilizzare la configurazione rapida per mettere in funzionamento l apparecchi...

Page 59: ...o Large grande M va bene per un ambiente di medie dimensioni 6 Premere ENTER 7 Utilizzare il selettore MULTI JOG per scegliere la propria posizione di ascolto Sono possibili le seguenti opzioni MID BACK FWD FWD Se si è più vicini ai diffusori frontali che a quelli surround MID Se si è a distanza uguale dai diffusori frontali e surround BACK Se si è più vicini ai diffusori surround che a quelli fro...

Page 60: ...pine rosse a R destra le spine bianche a L sinistra e le spine gialle a VIDEO Assicurarsi di effettuare l inserimento per intero L R VIDEO Cavi audio digitali Cavi ottici Per collegare dei componenti digitali al presente ricevitore vengono utilizzati dei cavi coassiali audio digitali disponibili sul mercato si possono inoltre utilizzare cavi video standard o cavi ottici non forniti in dotazione As...

Page 61: ...re CD Sintonizzatore TV o via satellite Collegamento di componenti audio Per avviare la configurazione collegare i componenti audio analogici come un vano cassette alle prese Per i componenti con i quali si desidera registrare è necessario collegare quattro prese una serie di entrate stereo e una di uscite stereo ma per quanto riguarda i componenti che unicamente permettono la riproduzione è neces...

Page 62: ...amento di componenti video Collegare i componenti video alle prese come mostrato in basso Per quanto riguarda i componenti video digitali come un lettore DVD si devono utilizzare i collegamenti illustrati in questa pagina per il segnale video ma per poter utilizzare una fonte digitale come un DVD si deve collegare l audio ad una entrata digitale vedere pagina precedente Inoltre è una buona idea co...

Page 63: ...e la ricezione e la qualità del suono collegare delle antenne esterne vedere Utilizzo di antenne esterne qui di seguito Assicurarsi sempre che il ricevitore sia spento e scollegato dalla presa a muro prima di effettuare o modificare qualsiasi collegamento Antenna FM a filo Collegare l antenna FM a filo ed estenderla completamente in senso verticale lungo l intelaiatura di una finestra o altro luog...

Page 64: ...e ricezione possibile sospendere orizzontalmente all esterno AM LOOP FM UNBAL 75 Ω ANTENNA Antenna esterna Antenna interna filo rivestito in vinile 5 6m Antenna AM a telaio Montare l antenna e collegarla al ricevitore Fissare alla parete ecc se lo si desidera e orientarla nella direzione che consente la ricezione ottimale Connettori a scatto dell antenna Avvolgere insieme i conduttori del cavo esp...

Page 65: ... Impostazione dei diffusori a pagina 32 su large grande Assicurarsi di collegare il diffusore sulla destra al terminale destro ed il diffusore sulla sinistra al terminale sinistro Assicurarsi inoltre che i teminali positivi e negativi sul ricevitore corrispondano a quelli situati sui diffusori È possibile usare diffusori dall impedenza nominale da 6Ω a 16Ω vedere Commutazione dell impedenza del di...

Page 66: ...ale distanza rispetto al televisore Quando si installano i diffusori vicino al televisore si consiglia di utilizzare diffusori schermati magneticamente per evitare possibili interferenze come la distorsione del colore dell immagine quando il televisore si trova acceso Se non si dispone di diffusori schermati magneticamente e si notano distorsioni nel colore dell immagine televisiva allontanare i d...

Page 67: ... le mani bagnate in quanto si potrebbe verificare un corto circuito o una scossa elettrica Non collocare mai l apparecchio un mobile ecc sul cavo di alimentazione e non stringere il cavo Non annodare mai il cavo e non legarlo con altri fili I cavi di alimentazione andrebbero instradati in maniera tale da non essere mai calpestati Un cavo elettrico danneggiato potrebbe causare un incendio o provoca...

Page 68: ...di una fonte di programma MIDNIGHT LOUDNESS pagina 29 Utilizzare per passare all ascolto Midnight o Loudness 3 TOP MENU Comando DVD Visualizza il menu superiore del disco di un DVD TUNER EDIT Comando del ricevitore pagine 39 40 Premere per memorizzare e dare il nome ad una stazione per poi richiamarla 4 DVD Utilizzare per passare ai comandi del DVD sul telecomando Nota I comandi del DVD sul teleco...

Page 69: ...venire utilizzati per trovare delle frequenze radio I tasti STATION possono venire utilizzati per selezionare stazioni radio preselezionate CLASS pagine 39 40 Scorre i tre gruppi categorie di stazioni preselezionate MPX pagine 38 39 Utilizzare per scorrere tra la ricezione automatica stereofonica e monoaurale di una trasmissione FM Se il segnale è debole passando a monoaurale si migliora la qualit...

Page 70: ...oi richiamarla 10 CLASS pagine 39 40 Scorrere i tre gruppi categorie di stazioni preselezionate 11 MPX pagina 38 Premere il tasto MPX per ricevere una trasmis sione radio nel modo monoaurale 12 PTY SEARCH pagina 42 Utilizzare per la ricerca di vari tipi di programmi nel modo RDS 13 EON MODE pagine 43 44 Utilizzare per la ricerca di vari programmi che trasmettono notizie sul traffico o informazioni...

Page 71: ... di programma 16 SIGNAL SELECT pagina 29 Utilizzarlo per effettuare una selezione tra i segnali analogici e digitali 17 MIDNIGHT LOUDNESS pagina 29 Utilizzare per passare all ascolto Midnight o Loudness 18 SPEAKER IMPEDANCE pagina 37 Utilizzare per commutare l impedenza del diffusore quando si utilizzano diffusori a bassa impedenza 19 VSB MODE pagina 28 Premere per attivare o disattivare il modo V...

Page 72: ... Quando è attivato il modo Standard del ricevito re questo indicatore si illumina per indicare la decodificazione di un segnale Dolby Digital 4 2 PRO LOGIC II Quando è attivato il modo Standard del ricevito re questo indicatore si illumina per indicare la decodificazione di Pro Logic II 5 VIR SB Si illumina durante l elaborazione Virtual surround back 6 DIRECT Si illumina quando si trova in funzio...

Page 73: ...S 12 Display caratteri 13 ADV SURR Surround Avanzata Si illumina quando viene selezionato uno dei modi di ascolto Advanced Surround del ricevitore 14 LOUDNESS Si illumina durante la riproduzione Loudness 15 Indicatori TUNER STEREO Si illumina quando si riceve una trasmissione FM stereo nel modo stereo automatico MONO Si illumina quando si imposta il modo monoaurale con il tasto MPX TUNED Si illumi...

Page 74: ...urazione dei diffusori e dal tipo di fonte che si sta ascoltando INPUT SELECTOR RECEIVER CD R TAPE MD MIDNIGHT LOUDNESS ADVANCED SURROUND STANDARD TUNER EDIT RECEIVER TOP MENU DVD SETUP ENTER STEREO SLEEP DVD LD CD FM AM TV SAT DVR VCR DVD 5 1CH FLDIMMER INPUTATT MENU Mentre si ascolta una fonte premere STANDARD Se la fonte ha codifica Dolby Digital DTS o Dolby Surround il formato di codifica appr...

Page 75: ...nti portando al centro della scena l azione che si svolge posteriormente GAME Utile per i videogiochi Particolarmente efficace quando il suono si sposta da sinistra a destra in software con molto movimento EXPANDED Questo modo è specialmente ideato per dare profondità sonora alle fonti stereo e permette di ascoltare i segnali stereo a due canali come suono simulato surround multicanale Da utilizza...

Page 76: ...Se si accendono i comandi di ascolto Midnight Loudness o Tone quando è selezionato DIRECT il sintoamplificatore viene automaticamente commutato su STEREO Utilizzo del modo Virtual Surround Back VSB La selezione di questo modo permette di ascoltare un canale posteriore virtuale attraverso i diffusori surround Ad esempio è possibile scegliere di ascoltare fonti senza informazioni sul canale posterio...

Page 77: ... e situare l entrata del segnale su DIGITAL Alcuni lettori DVD non emettono segnali DTS Per ulteriori dettagli rimettersi al manuale di istruzioni fornito in dotazione con il lettore DVD Si può selezionare DIGITAL unicamente nel caso in cui la fonte selezionata è assegnata ad una entrata digitale Vedere alle pagina 35 per ulteriori dettagli sulle impostazioni di entrate digitali Utilizzo del modo ...

Page 78: ... i tasti SIGNAL SELECT INPUT ATT TONE e MIDNIGHT LOUDNESS oltre ai modi di suono Standard Advanced Surround e Stereo Diretto Se viene selezionata la riproduzione a 5 1 canali è possibile impostare unicamente i livelli del volume e del canale Utilizzo dello sleep timer Lo sleep timer commuta il sintoamplificatore in standby dopo un certo periodo di tempo in modo che sia possibile addormentarsi senz...

Page 79: ...ffusori pagina 32 Specificare il numero e il tipo di diffusori collegati Impostazione del subwoofer pagina 32 Specificare come viene utilizzato il subwoofer Impostazione della frequenza di crossover pagina 33 Determinare quali frequenze verranno inviate al subwoofer o ai diffusori grandi Impostazione dell attenuatore LFE pagina 33 Specificare il livello massimo di un canale LFE Impostazione della ...

Page 80: ...diffusore Scorrere tra le scelte disponibili o e scegliere una configurazione che corrisponda con quella dei diffusori Una delle seguenti configurazioni dovrebbe corrispondere con la propria FL CL SL FL CL SS FL CL S FL CS SL FL CS SS FS C SS FS CS S FS CS SS FL C S FL C SS FL CS S FS C S FL C SL Nota Se le dimensioni del cono diametro dei diffusori sono superiori a 15 cm impostare le dimensioni d...

Page 81: ...e dei bassi inferiori ai 100 Hz al subwoofer o ai diffusori L 150 Hz Inviare le frequenze dei bassi inferiori ai 150 Hz al subwoofer o ai diffusori L 200 Hz Inviare le frequenze dei bassi inferiori ai 200 Hz al subwoofer o ai diffusori L Nota Se tutti i diffusori anteriori centrale e surround sono impostati su L non è possibile impostare la frequenza di crossover in quanto non sono presenti diffus...

Page 82: ...fusori surround e la posizione di ascolto principale entro una gamma da 0 1 m a 9 0 m Nota Se si è selezionato S nell impostazione dei diffusori non è possibile impostare la distanza dei diffusori surround Impostazione della distanza del subwoofer Impostazione implicita 3 m Come per i diffusori è necessario impostare la distanza del subwoofer in modo preciso per poter sentire contemporaneamente i ...

Page 83: ... impostazioni DUAL MONO ch2 Lch1 Rch2 ch1 Impostazioni ingresso digitale Si dice al sintoamplificatore quali componenti sono stati collegati agli ingressi coassiale e ottico DIGITAL IN sul retro del sintoamplificatore Dopo aver assegnato il componente a una presa jack digitale ogni qualvolta si selezioni tale componente ad esempio un lettore DVD il ricevitore commuta automaticamente all impostazio...

Page 84: ...CED SURROUND Nota Poiché il subwoofer trasmette frequenze ultrabasse il suono potrebbe sembrare più basso di quanto non sia in realtà L uso di segnali di prova per impostare il sistema dei diffusori cancellerà qualsiasi impostazione precedentemente effettuata per i modi STANDARD o ADVANCED SURROUND Impostazione del rispettivo livello di volume di ogni canale Impostazione implicita 0 dB Per la migl...

Page 85: ...MULTI JOG PTY SEARCH UP DOWN MULTI JOG MASTERVOLUME ENTER AUDIO VIDEO MULTI CHANNEL RECEIVER VSX D514 SPEAKER IMPEDANCE MIDNIGHT LOUDNESS VSB MODE TONE QUICK SETUP MULTI JOG Con il sintoamplificatore in standby premere STANDBY ON mentre si tiene premuto il tasto SPEAKER IMPEDANCE Ogni volta che lo si fa si commuta tra le impostazioni di impedenza SP 6 OHM Utilizzare questa impostazione se i diffus...

Page 86: ...selezionare il sintetizzatore 2 Sintonizzare su una stazione Vi sono tre modi di effettuarlo Sintonizzazione automatica Per cercare le stazioni nella banda attualmente selezionata premere e tenere premuti i tasti TUNING per circa un secondo Il sintoamplificatore comincerà a cercare la stazione successiva fermandosi quando ne trova una Ripetere la ricerca di altre stazioni Sintonizzazione manuale P...

Page 87: ...he il ricevitore memorizzi la frequenza per poterla poi richiamare facilmente ogni volta che si desideri ascoltare quella stazione Questa funzione consente di sintonizzarla manualmente ogni volta Il presente apparecchio può preselezionare fino ad un massimo di 30 stazioni memorizzate in tre gruppi o categorie A B e C di 10 stazioni ciascuna Quando si preselezionano le frequenze FM viene memorizzat...

Page 88: ...rammarle 4 Premere CLASS per selezionare una delle tre classi quindi premere e per selezionare la stazione preselezionata che si desidera È possibile inoltre utilizzare il selettore MULTI JOG pannello anteriore per selezionare una stazione preselezionata 5 Premere ENTER Dopo aver premuto ENTER la categoria ed il numero preselezionati terminano di lampeggiare ed il ricevitore memorizza la stazione ...

Page 89: ...ne radio Questi messaggi possono essere di qualsiasi tipo ad esempio una stazione radio può diffondere il suo numero di telefono come testo radio RT Il Nome di servizio programma PS è il nome della stazione radio Il Tipo di programma PTY indica il tipo di programma trasmesso attualmente Il ricevitore può cercare e visualizzare i seguenti tipi di programmi NEWS Notiziari AFFAIRS Attualità INFO Info...

Page 90: ... PTY Se questo accade apparirà il display PS dopo un paio di secondi Il presente apparecchio converte i caratteri minuscoli trasmessi dalle stazioni radio in maiuscoli Ricerca di programmi RDS Una delle funzioni più utili dell RDS è la capacità di cercare un particolare tipo di programma radio È possibile cercare uno qualsiasi dei tipi di programmi elencati a pagina 41 Per eseguire ciò utilizzare ...

Page 91: ...odo fa sì che il sintonizzatore riceva un bollettino sul traffico quando questo viene trasmesso 2 NEWS Questo modo fa sì che il sintonizzatore riceva un notiziario quando questo viene trasmesso Utilizzo del sistema EON Per eseguire questa funzione utilizzare i comandi del pannello anteriore STANDBY ON PHONES DVD LD DVD 5 1 TV SAT DVR VCR CD CD R TAPE MD FM AM STATION STANDARD ADVANCED SURROUND STE...

Page 92: ...to EON MODE e disattivare il modo EON Per cancellare la ricerca RDS ed EON da tutte le stazioni Il ricevitore registrerà automaticamente un codice di identificazione chiamato codice PI per ogni stazione immessa nelle categorie della memoria che permettono la ricezione di dati RDS o EON Se si desidera rimuovere le stazioni attualmente memorizzate dalle funzioni di ricerca RDS e EON è necessario can...

Page 93: ... INPUT SELECTOR 2 Selezionare il segnale di ingresso se necessario Premere SIGNAL SELECT sul pannello frontale per selezionare il segnale di ingresso corrispondente al componente fonte vedere pagina 29 per altre informazioni in proposito 3 Selezionare la fonte che si desidera riprodurre Sintonizzare la stazione radio inserire il CD il video il DVD ecc 4 Selezionare il registratore collegato alle u...

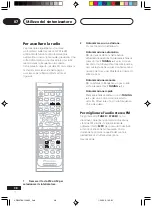
Page 94: ...e non vi siano conduttori esposti del cavo dei diffusori a contatto con il pannello posteriore Questo potrebbe causare lo spegnimento automatico del ricevitore Assicurarsi che il componente sia collegato correttamente rimettersi alle pagine 12 17 Premere MUTE sul telecomando per disattivare il silenziamento Regolare il MASTER VOLUME Assicurarsi che il componente sia collegato correttamente rimette...

Page 95: ...18 Allontanare la piastra a cassette dal ricevitore finché non scompare il rumore molesto Impostare SIGNAL SELECT su AUTO DIGITAL o ANALOG secondo il tipo di collegamenti effettuati rimettersi alla pagina 29 Impostare correttamente le impostazioni delle entrate digitali rimettersi alle pagina 35 Effettuare i collegamenti digitali rimettersi alla pagina 13 ed impostare SIGNAL SELECT su DIGITAL rime...

Page 96: ...impostare tutte le impostazioni del sintoamplificatore ai valori predefiniti in fabbrica A tale scopo utilizzare i comandi del pannello frontale 1 Accendere il sintoamplificatore 2 Tenendo premuto il tasto TONE premere e tenere premuto il tasto STANDBY ON per circa tre secondi 3 Quando si vede RESET apparire sul display premere il tasto TONE Sul display viene visualizzato OK 4 Premere TONE ancora ...

Page 97: ... 75 Ω Risposta in frequenza DVR VCR DVD LD TV SAT MONITOR 5 Hz to 7 MHz dB Rapporto segnale rumore 55 dB Sezione sintonizzatore FM Gamma di frequenza 87 5 MHz a 108 MHz Sensibilità utilizzabile Mono 13 2 dBf IHF 1 3 µV 75 Ω Soglia di sensibilità a 50 dB Mono 20 2 dB Stereo 38 6 dBf Rapporto segnale rumore Mono 73 dB a 85 dBf Stereo 70 dB a 85 dBf Rapporto segnale rumore DIN Mono 62 dB Stereo 58 dB...

Page 98: ... PIONEER ELECTRONICS OF CANADA INC 300 Allstate Parkway Markham Ontario L3R OP2 Canada TEL 905 479 4411 PIONEER EUROPE NV Haven 1087 Keetberglaan 1 B 9120 Melsele Belgium TEL 03 570 05 11 PIONEER ELECTRONICS ASIACENTRE PTE LTD 253 Alexandra Road 04 01 Singapore 159936 TEL 656 472 1111 PIONEER ELECTRONICS AUSTRALIA PTY LTD 178 184 Boundary Road Braeside Victoria 3195 Australia TEL 03 9586 6300 PION...

Reviews: