background image

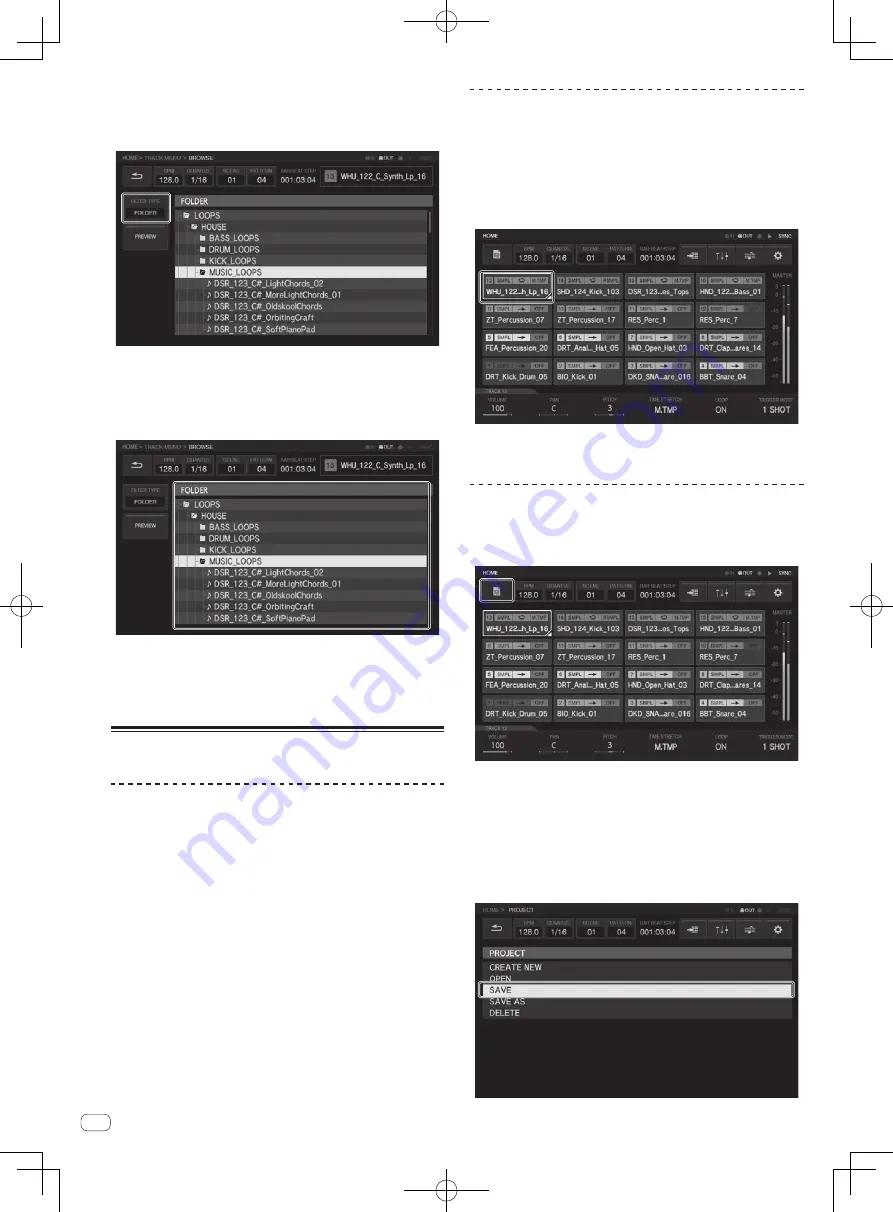
3  Tippen Sie auf [FILTER TYPE] und wählen Sie 
[FOLDER].

Die Daten des internen Speichers und des USB-Geräts werden als Baum 
auf der rechten Seite des Touchscreens angezeigt.

4  Drehen Sie den Drehregler, wählen Sie den Sample, 
den Sie laden möchten, und drücken Sie dann den 
Drehregler.

Der Sample wird zum Track geladen und der Name des geladenen 
Samples wird oben rechts im Bildschirm angezeigt.

!

  Wenn Sie den Drehregler drücken, wenn ein Ordner ausgewählt ist, 

wird der Ordner geöffnet oder geschlossen.

!

  Wenn Sie den Drehregler drehen, während Sie auf die [

SHIFT

]-Taste 

drücken, wird der Fokus auf einer Ordnerbasis (Sampledateizeilen 
werden übersprungen) verschoben.

Ein Pattern erstellen

Eine Performance aufnehmen 

(dynamisches Aufnehmen)

1  Drücken Sie die [

k

]-Taste.

Die [

k

]-Taste leuchtet rot und die Aufnahme wird aktiviert.

2  Drücken Sie die [

d

]-Taste.

Die [

d

]-Taste leuchtet grün und die Sequenz wird abgespielt, während 

die Aufnahme aktiviert wird.

3  Drücken Sie auf die Performance-Pads, um Trigger 
aufzunehmen.

Ein Trigger wird in dem Timing aufgenommen, in dem das Pad gedrückt 
wird. Die Step-Taste, für die der Trigger eingegeben wurde, leuchtet oder 
blinkt in der Track-Farbe..

Trigger programmieren (Step-Aufnahme)

1  Tippen Sie auf einen Track für die Step-Aufnahme.

Die Sequenz des ausgewählten Tracks wird auf den 16-Step-Tasten 
angezeigt.

!

  Ein Track kann auch durch Drehen des Drehreglers ausgewählt werden.

!

  Ein Track kann auch ausgewählt werden, indem Sie auf ein 

Performance-Pad drücken, während die [

TRACK

] auf ON eingestellt 

ist.

2  Drücken Sie die 16-Step-Tasten, um Trigger einzugeben.

Die Step-Tasten, die der programmierten Sequenz entsprechen, leuch-
ten in der Track-Farbe.

Ein Projekt speichern

1  Tippen Sie auf die [PROJECT]-Taste.

Der PROJEKT-Bildschirm wird im Touchscreen angezeigt. Im Projekt-
Bildschirm können Sie z. B. Projekte laden und speichern.

2  Drehen Sie den Drehregel zum Wählen von [SAVE] 
und drücken Sie dann den Drehregler.

Ein Speichern-Fenster wird angezeigt. Der Fortschritt wird durch einen 
Statusbalken im angezeigten Fenster angegeben.

!

  Wenn das Speichern abgeschlossen ist, wird das Fenster ausgeblen-

det und der Projekt-Bildschirm wird angezeigt.

!

  Um den Projektnamen zu ändern und dann das Projekt zu speichern, 

wählen Sie [

SAVE AS

], geben einen Projektnamen ein und speichern 

dann das Projekt.

De

12

Summary of Contents for TORAIZ SP-16

Page 1: ...tellte Fragen Informationen über Software und andere wichtige Informationen und Dienste die Ihnen helfen Ihr Produkt optimal zu verwenden Il sito Pioneer DJ indicato qui sopra offre una sezione FAQ informazioni sul software ed informazioni e servizi di vario tipo per permettere un uso più confortevole dei nostri prodotti Op bovengenoemde Pioneer DJ website vindt u FAQ s informatie over software en...

Page 2: ...g equipment should be used only for lawful copying and you are advised to check carefully what is lawful copying in the country in which you are making a copy Copying of copyright material such as films or music is unlawful unless permitted by a legal exception or consented to by the rightowners K018_A1_En If you want to dispose this product do not mix it with general household waste There is a se...

Page 3: ...ch the receiver is connected Consult the dealer or an experienced radio TV technician for help D8 10 1 2_A1_En Information to User Alterations or modifications carried out without appropriate authorization may invalidate the user s right to operate the equipment D8 10 2_A1_En CAUTION This product satisfies FCC regulations when shielded cables and connectors are used to connect the unit to other eq...

Page 4: ...t see the Operating Instructions for this unit For instructions on acquiring the operating instructions see Acquiring this unit s Operating Instructions p 5 Before start Features 5 Acquiring this unit s Operating Instructions 5 What s in the box 5 Usable media 5 Names of Parts Top panel 6 Connections Connecting the input output terminals 7 Example of connections 8 Operation Playing a demo project ...

Page 5: ...ck the FIND TUTORIALS MANUALS icon 4 Click the TORAIZ SP 16 icon in the PRODUCTION category 5 Click on the required language on the download page What s in the box AC adapter Power cord USB cable LAN cable Warranty for some regions 1 Operating Instructions Quick Start Guide This document Software license notice 1 The included warranty is for the European region Usable media This unit is compatible...

Page 6: ... LOW PASS RESONANCE control 6 HIGH PASS CUTOFF control 7 ACTIVE button 8 USB STOP WAKE UP button 9 USB device insertion slot a USB indicator b HOME button c BACK button d Rotary selector e Touch display f Parameter adjustment knobs g SCENE button h PATTERN button i Playback bar display indicators j Bar selection keys k d button l g button m k button n SHIFT button o 16 step keys p Pad mode selecti...

Page 7: ...rnal sequencer etc Synthesizer etc Headphones PRO DJ LINK compatible DJ system a 1 Cord hook Hook the AC adapters power cord here The sound will be interrupted if the AC adapter s power cord is disconnected from the unit during playback Using the cord hook Hook the AC adapter s power cord onto the cord hook to fasten it in place This prevents the power cord from being accidentally pulled caus ing ...

Page 8: ...SIGNABLE OUT terminals a OUT1 2 MASTER ASSIGNABLE OUT terminals b PHONES terminals Example of connections When transferring samples from a PC Computer USB cable When importing samples from a USB device USB devices When synchronizing with external devices Audio cable Audio cable LAN cable MIDI cable PRO DJ LINK compatible DJ system Synthesizer etc Starting up and preparing the unit 1 Connect the un...

Page 9: ...tton during playback stops playback while allowing reverberations and other sound to remain and returns to the beginning of the pattern Pressing the g button again stops all sounds including the reverberations 2 Press the PATTERN button The unit enters the pattern switching mode and the PATTERN button lights in white The 16 step keys are lit in the current scene color during pattern switching mode...

Page 10: ... and Resonance and add true analogue warmth and presence 1 Press the ACTIVE button The analog filter effect is enabled activated In the active state the button is lit in red 2 Turn the LOW PASS CUTOFF control The low pass filter s cutoff frequency changes Turning the control counterclockwise moves the cutoff frequency toward the lower frequencies and turning it clockwise moves the cutoff frequency...

Page 11: ...name the project together with an on screen keyboard 4 Enter the project name with the on screen keyboard and tap OK A new project is created and the main screen appears Loading a sample to a track 1 Tap the track to which you wish to load the sample and then tap again while selected The track menu screen appears You can also go to the track menu screen by turning the rotary selec tor to select a ...

Page 12: ...he timing that the pad is tapped The step key to which the trigger was input lights or flashes in the track color Programming triggers step recording 1 Tap a track for step recording The sequence of the selected track is indicated on the 16 step keys A track can also be selected by turning the rotary selector A track can also be selected by hitting a performance pad while the TRACK button is in th...

Page 13: ...isconnecting USB devices 1 Press and hold the USB STOP button until the USB indicator stops flashing Do not remove the USB device or turn Off the power of the unit while the USB indicator is flashing The management data in the unit may get deleted Also the USB device may become unreadable USB indicator USB STOP button 2 Disconnect the USB device ...

Page 14: ...njoyment and accord ing to copyright laws may not be used without the consent of the copy right holder When handling music downloaded from the Internet etc it is the full responsibility of the person who has downloaded the music to ensure that it is used in accordance with the contract concluded with the download site Specifications AC adapter Power AC 100 V to 240 V 50 Hz 60 Hz Rated current 0 9 ...

Page 15: ...En 15 English ...

Page 16: ...itif de déconnexion du secteur il devra être débranché au niveau de la prise secteur pour que l appareil soit complètement hors tension Par conséquent veillez à installer l appareil de telle manière que son cordon d alimentation puisse être facilement débranché de la prise secteur en cas d accident Pour éviter tout risque d incendie le cordon d alimentation sera débranché au niveau de la prise sec...

Page 17: ...mode d emploi reportez vous à Acquisition du Mode d emploi de cet appareil p 4 Informations préliminaires Caractéristiques 4 Acquisition du Mode d emploi de cet appareil 4 Contenu du carton d emballage 4 Support utilisable 4 Noms des éléments Panneau supérieur 5 Raccordements Raccordement des prises d entrée sortie 6 Exemple de raccordements 7 Fonctionnement Lecture d un projet de démonstration 8 ...

Page 18: ... FIND TUTORIALS MANUALS 4 Cliquez sur l icône TORAIZ SP 16 dans la catégorie PRODUCTION 5 Cliquez sur la langue souhaitée sur la page de téléchargement Contenu du carton d emballage Adaptateur secteur Cordon d alimentation Câble USB Câble LAN Garantie pour certaines régions 1 Mode d emploi Guide de démarrage rapide ce document Avis relatif à la licence du logiciel 1 La garantie incluse est destiné...

Page 19: ...SONANCE 6 Commande HIGH PASS CUTOFF 7 Touche ACTIVE 8 Touche USB STOP WAKE UP 9 Fente d insertion de dispositif USB a Indicateur USB b Touche HOME c Touche BACK d Sélecteur rotatif e Écran tactile f Molettes de réglage des paramètres g Touche SCENE h Touche PATTERN i Indicateurs d affichage des barres de lecture j Touches de sélection des barres k Touche d l Touche g m Touche k n Touche SHIFT o To...

Page 20: ...seur etc Casque a Système DJ compatible PRO DJ LINK 1 Crochet de cordon Accrochez le cordon d alimentation de l adaptateur secteur ici Le son sera interrompu si le cordon d alimentation de l adapta teur secteur est débranché de cet appareil pendant la lecture Utilisation du crochet de cordon Enroulez le cordon d alimentation de l adaptateur secteur autour du crochet de cordon pour le maintenir en ...

Page 21: ...UT b Prises PHONES Exemple de raccordements Lors du transfert d échantillons à partir d un ordinateur Ordinateur Câble USB Lors de l importation d échantillons à partir d un appareil USB Dispositifs USB Lors de la synchronisation avec des appareils externes Câble audio Synthétiseur etc Système DJ compatible PRO DJ LINK Câble audio Câble LAN Câble MIDI Mise en service et préparation de cet appareil...

Page 22: ...lecture arrête cette der nière tout en permettant la conservation des réverbérations et des autres sons tout en revenant au début du rythme Appuyer à nouveau sur la touche g arrête tous les sons y compris les réverbérations 2 Appuyez sur la touche PATTERN L appareil bascule en mode de sélection de rythmes et les touches PATTERN s allument en blanc Les touches 16 pas sont éclairées dans la couleur ...

Page 23: ...nt la dynamique la coupure et la résonance et ajouter une véritable chaleur et présence numériques 1 Appuyez sur la touche ACTIVE L effet du filtre analogique est activé En mode actif la touche s allume en rouge 2 Tournez la commande LOW PASS CUTOFF La fréquence de coupure du filtre passe bas change Tourner la commande dans le sens antihoraire déplace la fréquence de coupure vers les fréquences le...

Page 24: ... Saisissez le nom du projet avec l écran tactile et appuyez sur OK Un nouveau projet est créé et l écran principal apparaît Chargement d un échantillon sur un morceau 1 Appuyez sur le morceau sur lequel vous souhaitez charger l échantillon puis appuyez de nouveau après l avoir sélectionné L écran du menu du morceau apparaît Vous pouvez également accéder à l écran de menu du morceau en tournant le ...

Page 25: ...n du pad La touche de pas correspondant au déclencheur s allume ou clignote dans la couleur du morceau Programmation des déclencheurs enregistrement en pas à pas 1 Appuyez sur un morceau pour enregistrer en pas à pas La séquence du morceau sélectionné est indiquée sur les touches 16 pas Un morceau peut également être sélectionné en tournant le sélec teur rotatif Un morceau peut également être séle...

Page 26: ...positif USB 1 Appuyez et maintenez le bouton USB STOP enfoncé jusqu à ce que l indicateur USB arrête de clignoter Ne retirez pas le dispositif USB et n éteignez pas l appareil pendant que l indicateur USB clignote Les données de gestion de l appareil peuvent être supprimées Le dispositif USB peut également devenir illisible Indicateur USB Touche USB STOP 2 Débranchez le dispositif USB Fr 12 ...

Page 27: ...ffectués sont destinés à votre usage personnel et conformément aux lois sur les droits d auteur il se peut que leur utilisa tion soit soumise au consentement du détenteur des droits Lorsque de la musique est téléchargée d Internet etc la personne qui a effectué le téléchargement est responsable de l utilisation de cette musique conformément à l accord conclus avec le site de téléchargement Spécifi...

Page 28: ...lichkeit bei Anschluss an andere Geräte über abgeschirmte Kabel und Stecker Verwenden Sie nur die als Zubehör mitgelieferten Verbindungskabel D44 8 2_A1_De Aufnahmegeräte und Urheberrecht Aufnahmegeräte dürfen nur für rechtmäßige Kopien verwendet werden und Sie sollten sorgfältig prüfen welche Kopien in Ihrem Wohngebiet rechtmäßig sind Kopieren von urheberrechtlich geschützten Materialien wie Film...

Page 29: ...chiff eine Funktionsstörung auftritt die eine Reparatur des Gerätes erforderlich macht werden die Reparaturkosten dem Kunden selbst dann in Rechnung gestellt wenn die Garantiefrist noch nicht abgelaufen ist K041_A1_De WARNUNG Kleine Teile außerhalb der Reichweite von Kleinkindern und Kindern aufbewahren Bei unbeabsichtigtem Verschlucken ist unverzüglich ein Arzt aufzusuchen D41 6 4_A1_De Deutsch ...

Page 30: ...g dieser Einheit der Bedienungsanleitung für diese Einheit Anweisungen zur Erhalten der Bedienungsanleitung siehe Erhalten der Bedienungsanleitung dieser Einheit S 5 Vor der Inbetriebnahme Merkmale 5 Erhalten der Bedienungsanleitung dieser Einheit 5 Lieferumfang 5 Geeignete Datenträger 5 Bezeichnungen der Teile Oberseite 6 Anschlüsse Anschließen an die Eingangs Ausgangsbuchsen 7 Anschlussbeispiel ...

Page 31: ...ken Sie auf Support 3 Klicken Sie auf das FIND TUTORIALS MANUALS Symbol 4 Klicken Sie auf das TORAIZ SP 16 Symbol in der PRODUCTION Kategorie 5 Klicken Sie auf die erforderliche Sprache auf der Download Seite Lieferumfang Netzteil Netzkabel USB Kabel LAN Kabel Garantie für bestimmte Regionen 1 Bedienungsanleitung Kurzanleitung dieses Dokument Hinweis zur Software Lizenz 1 Die mitgelieferte Garanti...

Page 32: ...F Regler 5 LOW PASS RESONANCE Regler 6 HIGH PASS CUTOFF Regler 7 ACTIVE Taste 8 USB STOP WAKE UP Taste 9 USB Gerät Einsetzschacht a USB Anzeige b HOME Taste c BACK Taste d Drehregler e Touchscreen f Parameter Justierknöpfe g SCENE Taste h PATTERN Taste i Anzeigen des Playbackbalken Displays j Balken Auswahltasten k d Taste l g Taste m k Taste n SHIFT Taste o 16 Step Tasten p Pad Modus Auswahltaste...

Page 33: ...ktivlautsprecher Audio I F Externer Sequenzer usw Synthesizer usw Kopfhörer a PRO DJ LINK kompatibles DJ System 1 Kabelhaken Haken Sie das Netzkabel des Netzteils hier an Der Sound wird unterbrochen wenn das Netzkabel des Netzteils während der Wiedergabe von dem Gerät abgetrennt wird Verwendung des Kabelhakens Haken Sie das Netzkabel des Netzteils auf den Kabelhaken um es zu befestigen Dadurch wir...

Page 34: ... Buchsen a OUT1 2 MASTER ASSIGNABLE OUT Buchsen b PHONES Buchsen Anschlussbeispiel Für das Übertragen von Samples von einem PC Computer USB Kabel Für das Importieren von Samples von einem USB Gerät USB Geräte Für das Synchronisieren mit externen Geräten Audiokabel Synthesizer usw Audiokabel LAN Kabel MIDI Kabel PRO DJ LINK kompatibles DJ System Starten und Vorbereiten dieser Einheit 1 Schließen Si...

Page 35: ... angehalten wobei der Nachhall und anderer Sound erhalten bleibt und kehrt zum Beginn des Patterns zurück Wenn Sie die g Taste erneut drücken wird der gesamte Sound angehalten auch der Nachhall 2 Drücken Sie die PATTERN Taste Das Gerät wechselt in den Pattern Umschaltmodus und die PATTERN Taste leuchtet weiß Die 16 Step Tasten leuchten in der aktuellen Scene Farbe während des Pattern Umschaltmodus...

Page 36: ...Resonanz und fügen Sie echte analoge Wärme und Präsenz hinzu 1 Drücken Sie die ACTIVE Taste Der Analogfiltereffekt wird aktiv aktiviert Im aktiven Zustand leuchtet die Taste rot 2 Drehen Sie den LOW PASS CUTOFF Regler Die Schwellenfrequenz des Tiefpassfilters ändert sich Durch Drehen des Reglers gegen den Uhrzeigersinn verschiebt sich die Schwellenfrequenz in Richtung niedrige Frequenzen das Drehe...

Page 37: ...ben können 4 Geben Sie mithilfe der Tastatur auf dem Bildschirm einen Projektnamen ein und tippen Sie auf OK Es wird ein neues Projekt erstellt und der Hauptbildschirm wird angezeigt Ein Sample zu einem Track laden 1 Tippen Sie auf den Track den Sie laden möchten und tippen Sie erneut darauf während dieser ausgewählt ist Der Track Menü Bildschirm wird angezeigt Sie rufen den Track Menü Bildschirm ...

Page 38: ...s Pad gedrückt wird Die Step Taste für die der Trigger eingegeben wurde leuchtet oder blinkt in der Track Farbe Trigger programmieren Step Aufnahme 1 Tippen Sie auf einen Track für die Step Aufnahme Die Sequenz des ausgewählten Tracks wird auf den 16 Step Tasten angezeigt Ein Track kann auch durch Drehen des Drehreglers ausgewählt werden Ein Track kann auch ausgewählt werden indem Sie auf ein Perf...

Page 39: ...acht ein Abtrennen von USB Geräten 1 Drücken und halten Sie die USB STOP Taste bis die USB Anzeige aufhört zu blinken Während die USB Anzeige blinkt dürfen Sie weder das USB Gerät tren nen noch das Gerät abschalten Die Verwaltungsdaten im Gerät könnten gelöscht werden Zudem wird das USB Gerät möglicherweise unlesbar USB Anzeige USB STOP Taste 2 Trennen Sie das USB Gerät ab ...

Page 40: ...zum Urheberrechte Aufnahmen die Sie vornehmen sind für persönlichen Genuss gedacht und dürfen nach dem Urheberrecht nicht ohne Zustimmung des Urheberrechtsinhabers anderweitig verwendet werden Beim Umgang mit Musik die aus dem Internet heruntergeladen wurde usw liegt es in der vollen Verantwortung der Person die den Musik Download ausgeführt hat sicherzustellen dass die aufgenommenen Inhalte entsp...

Page 41: ...De 15 Deutsch ...

Page 42: ...mpo relativamente lunghi ad esempio durante una vacanza D3 4 2 2 2a _A1_It Prima di usare il prodotto controllare le norme sulla sicurezza stampate sul suo fondo D3 4 2 2 4_B1_It Questo prodotto soddisfa le normative sul rumore elettromagnetico quando è collegato ad altri componenti attraverso cavi e connettori schermati Usare solo i cavi di collegamento allegati come accessori D44 8 2_A1_It Attre...

Page 43: ... dal medico D41 6 4_A1_It Questo prodotto è destinato esclusivamente all uso domestico Eventuali disfunzioni dovute ad usi diversi quali uso prolungato a scopi commerciali in ristoranti o uso in auto o su navi e che richiedano particolari riparazioni saranno a carico dell utente anche se nel corso del periodo di garanzia K041_A1_It Italiano ...

Page 44: ...e ottenere le istruzioni per l uso vedere Come procurarsi le Istruzioni per l uso di questa unità p 5 Prima di cominciare Caratteristiche 5 Come procurarsi le Istruzioni per l uso di questa unità 5 Contenuto della confezione 5 Supporti utilizzabili 5 Nome delle varie parti Pannello superiore 6 Collegamenti Collegamento ai terminali di ingresso uscita 7 Esempio di collegamenti 8 Impiego Riproduzion...

Page 45: ... Fare clic sull icona FIND TUTORIALS MANUALS 4 Fare clic sull icona TORAIZ SP 16 nella categoria PRODUCTION 5 Nella pagina di download fare clic sulla lingua desiderata Contenuto della confezione Adattatore di CA Cavo di alimentazione Cavo USB Cavo LAN Garanzia per alcune regioni 1 Istruzioni per l uso Guida di avvio veloce questo documento Avvertenza sulle licenze del software 1 La garanzia acclu...

Page 46: ... CUTOFF 7 Pulsante ACTIVE 8 Pulsante USB STOP WAKE UP 9 Slot del dispositivo USB a Indicatore USB b Pulsante HOME c Pulsante BACK d Manopola selettrice e Display a sfioramento f Manopole di regolazione dei parametri g Pulsante SCENE h Pulsante PATTERN i Indicatori delle misure in riproduzione j Tasti di selezione delle misure k Pulsante d l Pulsante g m Pulsante k n Pulsante SHIFT o 16 tasti di in...

Page 47: ...attatore di CA L audio viene interrotto se il cavo di alimentazione dell adattatore CA viene scollegato dall unità durante la riproduzione Uso del gancio del cavo Agganciare il cavo di alimentazione dell adattatore CA al gancio del cavo per fissarlo al suo posto Questo evita che il cavo di alimentazione possa venire tirato accidentalmente scollegando la presa dal terminale L audio viene interrotto...

Page 48: ...asferiscono campioni da un PC Computer Cavo USB Quando si importano campioni da un dispositivo USB Dispositivi USB Quando si esegue la sincronizzazione con dispositivi esterni Cavo audio Cavo MIDI Cavo audio Cavo LAN Sintetizzatore ecc Sistema DJ compatibile con PRO DJ LINK Avvio e preparazione di questa unità 1 Collegare l unità come descritto a Collegamenti p 7 2 Premere l interruttore u sul pan...

Page 49: ...nizio del pattern Se si preme nuovamente il pulsante g si interrompe la riproduzione di tutti i suoni compresi gli effetti di riverbero 2 Premere il pulsante PATTERN L unità passa in modalità di commutazione dei pattern e il pulsante PATTERN si illumina in bianco Durante la modalità di commutazione dei pattern i 16 tasti di incremento sono illuminati nel colore di scena cor rentemente selezionato ...

Page 50: ... por tata taglio e risonanza e aggiungere calore e presenza analogici 1 Premere il pulsante ACTIVE L effetto del filtro analogico viene abilitato attivato Quando è attivo il pulsante è illuminato in rosso 2 Girare il comando LOW PASS CUTOFF La frequenza di taglio del filtro passa basso viene modificata Se si gira il comando in senso antiorario la frequenza di taglio si sposta verso le frequenze pi...

Page 51: ...gnare un nome al progetto 4 Immettere il nome del progetto con la tastiera su schermo e toccare OK Viene creato il nuovo progetto e viene visualizzata la schermata principale Caricamento di un campione in un brano 1 Toccare il brano in cui si desidera caricare il campione quindi toccare nuovamente mantenendo la selezione Viene visualizzata la schermata del menu dei brani È inoltre possibile visual...

Page 52: ... incremento utilizzato per immettere il trigger si illumina o lampeggia nel colore corrispondente al brano Programmazione dei trigger registrazione a incrementi 1 Toccare il brano per il quale si desidera eseguire la registrazione a incrementi La sequenza del brano selezionato viene indicata con i 16 tasti di incremento È inoltre possibile selezionare i brani girando la manopola selettrice I brani...

Page 53: ...spositivi USB 1 Tenere premuto il pulsante USB STOP finché l indicatore USB non cessa di lampeggiare Non rimuovere il dispositivo USB e non spegnere l unità quando l indi catore USB lampeggia I dati di gestione dell unità potrebbero essere eliminati Inoltre il dispositivo USB potrebbe divenire illeggibile Indicatore USB Pulsante USB STOP 2 Scollegare il dispositivo USB ...

Page 54: ...re utilizzate senza il consenso di chi detiene il copyright Quando si tratta con musica scaricata da Internet ecc la piena responsabilità che essa venga utilizzata secondo le modalità del con tratto col sito di scaricamento ricade sulla persona che ha scaricato tale musica Dati tecnici Adattatore di CA Alimentazione CA da 100 V a 240 V 50 Hz 60 Hz Corrente dichiarata 0 9 A Uscita dichiarata 12 V C...

Page 55: ...It 15 Italiano ...

Page 56: ...elektromagnetische ruis en interferentie wanneer het is verbonden met andere apparatuur via afgeschermde kabels en aansluitingen Gebruik uitsluitend de meegeleverde verbindingskabels D44 8 2_A1_Nl Opname apparatuur en auteursrechten Opname apparatuur mag uitsluitend worden gebruikt voor rechtmatig kopiëren en u wordt daarom geadviseerd om zorgvuldig te controleren wat rechtmatig kopiëren betekent ...

Page 57: ...oor zakelijke doeleinden of gebruik in een auto of boot en als gevolg hiervan defect zou raken zullen de reparaties in rekening gebracht worden ook als het apparaat nog in de garantieperiode is K041_A1_Nl WAARSCHUWING Berg kleine onderdelen op buiten het bereik van kinderen en peuters Raadpleeg onmiddellijk een arts indien kleine onderdelen per ongeluk worden ingeslikt D41 6 4_A1_Nl Nederlands ...

Page 58: ...ng ervan Zie Verkrijgen van de Handleiding van dit toestel blz 5 voor instruc ties over hoe u de handleiding kunt verkrijgen Alvorens te beginnen Kenmerken 5 Verkrijgen van de Handleiding van dit toestel 5 Inhoud van de doos 5 Bruikbare media 5 Benaming van de onderdelen Bovenpaneel 6 Aansluitingen Aansluiten van de in uitgangsaansluitingen 7 Aansluitvoorbeeld 8 Bediening Een demoproject afspelen ...

Page 59: ...TUTORIALS MANUALS 4 Klik op het pictogram TORAIZ SP 16 in de categorie PRODUCTION 5 Klik op de downloadpagina op de gewenste taal Inhoud van de doos Netstroomadapter Stroomsnoer USB kabel LAN kabel Garantie voor bepaalde regio s 1 Handleiding Snelstartgids dit document Kennisgeving softwarelicentie 1 De meegeleverde garantie is geldig voor de Europese regio Bruikbare media Dit toestel is compatibe...

Page 60: ...elaar 5 LOW PASS RESONANCE regelaar 6 HIGH PASS CUTOFF regelaar 7 ACTIVE knop 8 USB STOP WAKE UP knop 9 USB aansluitbus a USB aanduiding b HOME knop c BACK toets d Draaiknop e Aanraakscherm f Parameterafstelknoppen g SCENE knop h PATTERN knop i Display indicators voor weergavemaat j Maatselectietoetsen k d knop l g knop m k knop n SHIFT knop o 16 stappentoetsen p Selectieknop voor pad modus q Aanr...

Page 61: ...r enz Hoofdtelefoon a Met PRO DJ LINK compatibel DJ systeem 1 Snoerhaak Haak hier het snoer van de netstroomadapter omheen De geluidsweergave wordt onderbroken als het stroomsnoer van de netstroomadapter tijdens weergave losraakt van het toestel Gebruiken van de snoerhaak Haak het stroomsnoer van de netstroomadapter om de snoerhaak om het snoer op zijn plaats te houden Dit voorkomt dat het snoer p...

Page 62: ...9 OUT3 8 ASSIGNABLE OUT aansluitingen a OUT1 2 MASTER ASSIGNABLE OUT aansluitingen b PHONES aansluitingen Aansluitvoorbeeld Samples van een pc overdragen Computer USB kabel Samples van een USB apparaat importeren USB apparaten Met externe apparaten synchroniseren Audiokabel Synthesizer enz Audiokabel LAN kabel MIDI kabel Met PRO DJ LINK compatibel DJ systeem Opstarten en gebruiksklaar maken van di...

Page 63: ...ukt wordt het afspe len gestopt maar blijven nagalm en andere geluid behouden en gaat u terug naar het begin van het patroon Als u weer op de knop g drukt worden alle geluiden inclusief de nagalm gestopt 2 Druk op de toets PATTERN Het toestel gaat over naar de patroonoverschakelmodus en de knop PATTERN licht wit op De 16 stappentoetsen branden tijdens de patroonoverschakelmodus in de kleur van de ...

Page 64: ...e bewerken en echte analoge warmte toe te voegen 1 Druk op de toets ACTIVE Het analoge filtereffect wordt ingeschakeld geactiveerd In de actieve status licht de knop rood op 2 Draai aan de LOW PASS CUTOFF regelaar De grensfrequentie van het laagdoorlaatfilter wordt gewijzigd Als u de regelaar tegen de wijzers van de klok in draait wordt de grensfrequentie lager en als u hem met de wijzers van de k...

Page 65: ...n te voeren met een schermtoetsenbord 4 Voer de projectnaam in met het schermtoetsenbord en tik op OK Er wordt een nieuw project gemaakt en het hoofdscherm wordt geopend Een sample in een muziekstuk laden 1 Tik op het muziekstuk waarin u de sample wilt laden en tik er opnieuw op terwijl het geselecteerd is Het muziekstukmenuscherm verschijnt U kunt het muziekstukmenuscherm ook openen door de draai...

Page 66: ...oets waarnaar de trigger is ingevoerd licht op of knippert in de kleur van het muziekstuk Triggers programmeren stapopname 1 Tik op een muziekstuk voor stapopname De sequentie van het geselecteerde muziekstuk wordt aangegeven op de 16 stappentoetsen U kunt een muziekstuk ook selecteren door de draaiknop te draaien U kunt een muziekstuk ook selecteren door op een performance pad te tikken terwijl d...

Page 67: ...araten 1 Houd de knop USB STOP ingedrukt tot de USB aanduiding stopt met knipperen Verwijder het USB apparaat niet of schakel het apparaat niet uit terwijl de USB aanduiding knippert De beheergegevens in het apparaat kun nen verwijderd worden Het is ook mogelijk dat niet meer kan worden gelezen van het USB apparaat USB aanduiding USB STOP knop 2 Verwijder het USB apparaat ...

Page 68: ...auteursrechtwetten niet voor andere doeleinden worden gebruikt zonder toestemming van de auteursrechthouder Bij het behandelen van muziek die door downloaden van Internet e d is verkregen is het de volledige verantwoordelijkheid van de persoon die het downloaden heeft verricht er op toe te zien dat de muziek wordt gebruikt in overeenstemming met de voorwaarden van het download contract Specificati...

Page 69: ...Nl 15 Nederlands ...

Page 70: ...lectromagnético cuando se conecta a otro equipo por medio de cables y conectores blindados Use sólo los cables de conexión accesorios suministrados D44 8 2_A1_Es Equipo de grabación y derechos de autor El equipo de grabación deberá usarse solo para hacer copias legales y se le recomienda verificar cuidadosamente lo que es una copia legal en el país donde hace una copia La copia de material protegi...

Page 71: ...lazo para motivos de negocios en un restaurante o el uso en un coche o un barco y que necesita una reparación hará que cobrarla incluso durante el período de garantía K041_A1_Es ADVERTENCIA Guarde las piezas pequeñas fuera del alcance de los niños Si las ingirieran accidentalmente póngase de inmediato en contacto con un médico D41 6 4_A1_Es Español ...

Page 72: ...ra las instrucciones sobre cómo adquirir el manual de instrucciones vea Adquisición del Manual de instrucciones de esta unidad pág 5 Antes de empezar a usar la unidad Características 5 Adquisición del Manual de instrucciones de esta unidad 5 Contenido de la caja 5 Medio utilizable 5 Nombres de las partes Panel superior 6 Conexiones Conexión de los terminales de entrada salida 7 Ejemplo de conexion...

Page 73: ...icono FIND TUTORIALS MANUALS 4 Haga clic en el icono TORAIZ SP 16 de la categoría PRODUCTION 5 Haga clic en el idioma necesario de la página de descarga Contenido de la caja Adaptador de CA Cable de alimentación Cable USB Cable LAN Garantía para algunas regiones 1 Manual de instrucciones Guía de inicio rápido este documento Aviso sobre las licencias de software 1 La garantía incluida es para la re...

Page 74: ...ESONANCE 6 Control HIGH PASS CUTOFF 7 Botón ACTIVE 8 Botón USB STOP WAKE UP 9 Ranura de inserción de aparato USB a Indicador USB b Botón HOME c Botón BACK d Selector giratorio e Pantalla táctil f Controles de ajuste de parámetros g Botón SCENE h Botón PATTERN i Indicadores de visualización de la barra de reproducción j Teclas de selección de barra k Botón d l Botón g m Botón k n Botón SHIFT o Tecl...

Page 75: ...cuenciador externo etc Sintetizador etc 1 Gancho de cables Enganche aquí el cable de alimentación del adaptador de CA El sonido se interrumpirá si el cable de alimentación del adapta dor de CA se desconecta de la unidad durante la reproducción Uso del gancho de cable Enganche el cable de alimentación de CA en el gancho de cable para sujetarlo en su lugar Esto impide tirar del cable de alimentación...

Page 76: ...erminales OUT1 2 MASTER ASSIGNABLE OUT b Terminales PHONES Ejemplo de conexiones Cuando se transfieren muestras desde un PC Ordenador Cable USB Cuando se importan muestras desde un dispositivo USB Aparatos USB Cuando se sincroniza con dispositivos externos Cable de audio Cable de audio Cable LAN Cable MIDI Sintetizador etc Sistema DJ compatible con PRO DJ LINK Inicio y preparación de esta unidad 1...

Page 77: ...te la reproducción se detiene la reproducción se permite que continúen las reverberaciones y otros sonidos y se vuelve al principio del patrón Al volver a pulsar el botón g se detienen todos los sonidos incluidas las reverberaciones 2 Pulse el botón PATTERN La unidad entra en el modo de cambio de patrón y el botón PATTERN se ilumina de color blanco Las teclas de 16 pasos se iluminan en el color de...

Page 78: ...otón ACTIVE Se habilita el efecto del filtro analógico se activa En el estado activo el botón se ilumina en rojo 2 Gire el control LOW PASS CUTOFF La frecuencia de corte del filtro pasabajos cambia Al girar el control en el sentido contrario a las agujas del reloj se mueve la frecuencia de corte hacia las frecuencias más bajas y al girarlo en el sentido de las agujas del reloj se mueve la frecuenc...

Page 79: ...o con un teclado en pantalla 4 Introduzca el nombre del proyecto con el teclado en pantalla y toque OK Se creará un proyecto y aparecerá la pantalla principal Carga de una muestra en una pista 1 Toque la pista en la que desea cargar la muestra y después vuelva a tocar mientras la mantiene seleccionada Aparecerá la pantalla de menús de la pista También puede acceder a la pantalla de menús de la pis...

Page 80: ... La tecla de paso en la que se introdujo el disparador se ilumina o parpadea en el color de la pista Programación de disparadores grabación de pasos 1 Toque una pista para la grabación de paso La secuencia de la pista seleccionada se indica en las teclas de 16 pasos También se puede seleccionar una pista girando el selector giratorio También se puede seleccionar una pista golpeando el pad de actua...

Page 81: ...tos USB 1 Presione sin soltar el botón USB STOP hasta que el indicador USB deje de parpadear No quite el aparato USB ni desconecte la alimentación de la unidad mientras el indicador USB parpadea Si no sigue esta recomendación los datos de administración de la unidad pueden eliminarse Asimismo el dispositivo USB puede quedar inutilizable Indicador USB Botón USB STOP 2 Desconecte el aparato USB ...

Page 82: ... consenti miento del propietario de tales derechos Cuando maneje música descargada de Internet etc la persona que la haya descargado será la responsable de asegurar que ésta se use según el contrato concluido con el sitio de la descarga Especificaciones Adaptador de CA Alimentación CA 100 V a 240 V 50 Hz 60 Hz Corriente nominal 0 9 A Salida nominal CC 12 V 3 A Consumo de energía modo de espera 0 5...

Page 83: ...Es 15 Español ...

Page 84: ...Os consumidores dos Estados membros da UE da Suíça e da Noruega podem entregar equipamentos eletrónicos fora de uso em determinadas instalações de recolha ou a um retalhista se adquirirem um equipamento novo similar Nos países não mencionados acima informe se sobre o método de eliminação correto junto das autoridades locais Ao fazê lo estará a garantir que o produto que já não tem utilidade para s...

Page 85: ...ções sobre a aquisição das instruções de funcio namento consulte Adquirir o Manual de instruções desta unidade pág 4 Antes de começar Características 4 Adquirir o Manual de instruções desta unidade 4 Conteúdo da embalagem 4 Suportes que podem ser utilizados 4 Nome das peças Painel superior 5 Ligações Ligar os terminais de entrada saída 6 Exemplo de ligações 7 Funcionamento Reproduzir um projeto de...

Page 86: ... TUTORIALS MANUALS 4 Clique no ícone TORAIZ SP 16 na categoria PRODUCTION 5 Clique no idioma pretendido na página de transferência Conteúdo da embalagem Transformador de CA Cabo de alimentação Cabo USB Cabo LAN Garantia apenas para algumas regiões 1 Manual de instruções Guia de início rápido Este documento Aviso sobre a licença do software 1 A garantia incluída é para a região europeia Suportes qu...

Page 87: ...E 6 Controlo HIGH PASS CUTOFF 7 Botão ACTIVE 8 Botão USB STOP WAKE UP 9 Ranhura para a inserção de dispositivos USB a Indicador USB b Botão HOME c Botão BACK d Seletor rotativo e Ecrã tátil f Manípulos de ajuste dos parâmetros g Botão SCENE h Botão PATTERN i Indicadores de exibição das barras de reprodução j Teclas de seleção de barras k Botão d l Botão g m Botão k n Botão SHIFT o Teclas de 16 pas...

Page 88: ...adores a Sintetizador etc Sistema de DJ compatível com PRO DJ LINK 1 Gancho do cabo Prenda o cabo de alimentação do transformador de CA aqui O som será interrompido se o cabo de alimentação do transfor mador de CA for desligado durante a reprodução Utilizar o gancho do cabo Prenda o cabo de alimentação do transformador de CA no gancho do cabo para o fixar na posição correcta Isto evita que o cabo ...

Page 89: ...SSIGNABLE OUT a Terminais OUT1 2 MASTER ASSIGNABLE OUT b Terminais PHONES Exemplo de ligações Quando pretender transferir amostras de um computador Cabo USB Computador Quando pretender importar amostras de um dispositivo USB Dispositivos USB Quando pretender sincronizar com dispositivos externos Cabo de áudio Cabo de áudio Cabo LAN Cabo MIDI Sintetizador etc Sistema de DJ compatível com PRO DJ LIN...

Page 90: ...ção é interrompida mantendo reverberações e outros sons e regressa ao início do padrão Se premir novamente o botão g a reprodução de todos os sons incluindo das reverberações é interrompida 2 Prima o botão PATTERN A unidade entra no modo de alternância dos padrões e o botão PATTERN acende a branco As teclas de 16 passos permanecem ace sas na cor da cena atual durante o modo de alternância dos padr...

Page 91: ...ógico fica disponível ativado No estado ativo o botão permanece aceso a vermelho 2 Rode o controlo LOW PASS CUTOFF A frequência de corte do filtro de altas frequências muda Rodar o controlo no sentido contrário ao dos ponteiros do relógio move a frequência de corte na direção das frequências mais baixas e rodar no sentido dos ponteiros do relógio move a frequência de corte na direção das frequênci...

Page 92: ...a um nome ao projeto 4 Introduza o nome do projeto utilizando o teclado no ecrã e toque em OK É criado um novo projeto e o ecrã principal é exibido Carregar uma amostra para uma faixa 1 Toque na faixa para a qual pretende carregar a amostra e em seguida toque novamente enquanto seleciona O ecrã do menu de faixas é exibido Pode também aceder ao ecrã do menu de faixas rodando o seletor rotativo para...

Page 93: ...ado um acionador A tecla de passos à qual o acionador foi atribuído acende se ou pisca à cor da faixa Programar acionadores gravação de passos 1 Toque numa faixa para gravação do passo A sequência da faixa selecionada é indicada nas teclas de 16 passos É também possível selecionar uma faixa rodando o seletor rotativo Pode ainda selecionar uma faixa tocando num painel táctil de atua ções enquanto o...

Page 94: ...gar dispositivos USB 1 Mantenha premido o botão USB STOP até que o indicador USB pare de piscar Não remova o dispositivo USB nem desligue a unidade enquanto o indicador USB estiver a piscar Os dados de gestão da unidade poderão ser eliminados O dispositivo USB poderá também tornar se ilegível Indicador USB Botão USB STOP 2 Desligue o dispositivo USB Pt 12 ...

Page 95: ...ão para fruição pessoal e de acordo com as leis de direitos de autor não podem ser utilizadas sem o consentimento do detentor dos direitos de autor Ao manusear músicas transferidas a partir da Internet etc é da inteira responsabilidade da pessoa que transferiu a música garantir que é utilizada de acordo com o contrato celebrado com o site a partir do qual fez as transferências Especificações Trans...

Page 96: ...ванию через экранированные кабели и коннекторы Используйте только поставляемые кабели для подключения аксессуаров D44 8 2_A1_Ru Записывающее оборудование и авторские права Записывающее оборудование должно использоваться только для легального копирования поэтому рекомендуется внимательно проверить что подразумевается под легальным копированием в стране в которой выполняется копирование Копирование ...

Page 97: ...Ru 3 K041_A1_Ru ПРЕДУПРЕЖДЕНИЕ Храните небольшие детали вне доступа детей При случайном заглатывании немедленно обращайтесь к врачу D41 6 4_A1_Ru Русский ...

Page 98: ...устройства Подробнее о том как получить инструкции по эксплуатации смо трите Получение Инструкций по эксплуатации данного аппарата стр 5 До начала Свойства 5 Получение Инструкций по эксплуатации данного аппарата 5 Комплект поставки 5 Используемые носители 5 Названия частей Верхняя панель 6 Подключения Подключение входных выходных терминалов 7 Примеры подключений 8 Управление Воспроизведение демо п...

Page 99: ... в категории PRODUCTION 5 Щелкните по требуемому языку на странице загрузки Комплект поставки Адаптер переменного тока Силовой кабель USB кабель LAN кабель Гарантия для некоторых регионов 1 Инструкции по эксплуатации Краткое руководство пользова теля этот документ Уведомление по лицензии программного обеспечения 1 Прилагающаяся гарантия предназначена для Европейского региона Используемые носители ...

Page 100: ...IGH PASS CUTOFF 7 Кнопка ACTIVE 8 Кнопка USB STOP WAKE UP 9 Слот подключения устройства USB a Индикатор USB b Кнопка HOME c Кнопка BACK d Поворотный селектор e Сенсорный дисплей f Ручки регулировки параметров g Кнопка SCENE h Кнопка PATTERN i Индикаторы отображения шкалы воспроизведения j Клавиши выбора шкалы k Кнопка d l Кнопка g m Кнопка k n Кнопка SHIFT o Клавиши 16 шагового секвенсора p Кнопка...

Page 101: ...венсор и т п Синтезатор и т п DJ система с поддержкой PRO DJ LINK Наушники a 1 Крюк проводки Подвесьте сюда силовой кабель адаптера переменного тока Звучание будет прервано при отсоединении силового кабеля адаптера переменного тока от аппарата во время воспроизведения Использование крюка проводки Подвесьте силовой кабель адаптера переменного тока на крюк проводки для фиксации Это позволит предотвр...

Page 102: ...SIGNABLE OUT a Разъемы OUT1 2 MASTER ASSIGNABLE OUT b Терминалы PHONES Примеры подключений При переносе сэмплов с компьютера Компьютер USB кабель При импорте сэмплов с устройства USB Устройства USB При синхронизации с внешним устройством Аудиокабель Аудиокабель LAN кабель Кабель MIDI Синтезатор и т п DJ система с поддержкой PRO DJ LINK Запуск и подготовка данного аппарата 1 Подключите устройство у...

Page 103: ...берации и другие звуки и возвращает к началу шаблона При повтор ном нажатии на кнопку g останавливается воспроизведе ние всех звуков включая реверберации 2 Нажмите кнопку PATTERN Устройство перейдет в режим переключения шаблона а кнопка PATTERN будет подсвечена белым В режиме переключения шаблонов клавиши 16 шагового секвенсора будут подсвечиваться цветом текущей сцены Одна сцена может содержать 1...

Page 104: ...ойки чтобы придать звуку объем с помощью регуляторов Drive Cut Off и Resonance и создавайте настоящий эффект тепла и присутствия свойственный аналого вому звуку 1 Нажмите кнопку ACTIVE Аналоговый фильтр включен активирован Когда фильтр в актив ном состоянии эта кнопка подсвечивается красным 2 Вращайте ручку LOW PASS CUTOFF Изменится частота среза фильтра низких частот При повороте ручки против час...

Page 105: ...ом нужно указать название проекта с помощью экранной клавиатуры 4 Введите название проекта с помощью экранной клавиатуры и коснитесь OK Новый проект будет создан и откроется главный экран Загрузка сэмпла в дорожку 1 Коснитесь дорожки в которую необходимо загрузить сэмпл и затем коснитесь выбранной дорожки еще раз Отображается экран меню дорожки Открыть меню дорожки можно также повернув поворотный ...

Page 106: ...иггером клавиша шаблона будет подсвечена или будет мигать цветом дорожки Программирование триггеров пошаговая запись 1 Коснитесь дорожки для пошаговой записи Последовательность выбранной дорожки будет указана на клави шах 16 шагового секвенсора Дорожку можно также выбрать поворотом селектора Дорожку можно также выбрать коснувшись контактной пло щадки когда кнопка TRACK находится в положении ON 2 Н...

Page 107: ... Отсоединение устройств USB 1 Нажмите и удерживайте кнопку USB STOP пока индикатор USB не перестанет мигать Не извлекайте устройства USB и не выключайте питание оборудо вания пока мигает индикатор USB Данные менеджмента в обору довании могут быть удалены Кроме того устройства USB может стать не доступным Индикатор USB Кнопка USB STOP 2 Отсоедините устройство USB ...

Page 108: ...вторским правам Выполненные вами записи предназначены для вашего личного удовольствия и по законам о защите авторских прав не могут использоваться без согласия владельца авторских прав При обращении с музыкой загруженной с Интернета др загрузивший музыку человек несет полную ответственность за использование музыки в соответствии с контрактом заключен ным с сайтом загрузки Технические характеристик...

Page 109: ...15 Ru 15 Ru 15 Русский ...

Page 110: ...16 Ru 16 ...

Page 111: ... о месяце и годе производства Дата изготовления оборудования Год 2001 A 2002 B 2003 C 2004 D 2005 E 2006 F 2007 G 2008 H 2009 I 2010 J Символ 12 цифр 10 цифр 2 цифры Год 2011 K 2012 L 2013 M 2014 N 2015 O 2016 P 2017 Q 2018 R 2019 S 2020 T Символ P2 Месяц изготовления Месяц 1 A 2 B 3 C 4 D 5 E 6 F 7 G 8 H 9 I 10 J 11 K 12 L Символ D3 7 10 7_A1_Ru Информация для покупателей в ЕАЭС Уполномоченной ор...

Page 112: ...1_all 6F Yokohama i Mark Place 4 4 5 Minatomirai Nishi ku Yokohama Kanagawa 220 0012 JAPAN 220 0012 神奈川県横浜市西区みなとみらい4丁目4番5号 横浜アイマークプレイス6階 Корпорация Пайонир Диджей 6F Йокогама i Mark Place 4 4 5 Минатомирай Ниси ку Йокогама Канагава 220 0012 ЯПОНИЯ Anteros Building Odyssey Business Park West End Road South Ruislip Middlesex HA4 6QQ U K TEL 44 203 7617 220 2050 W 190th Street Suite 109 Torrance CA 9...

Reviews: