background image

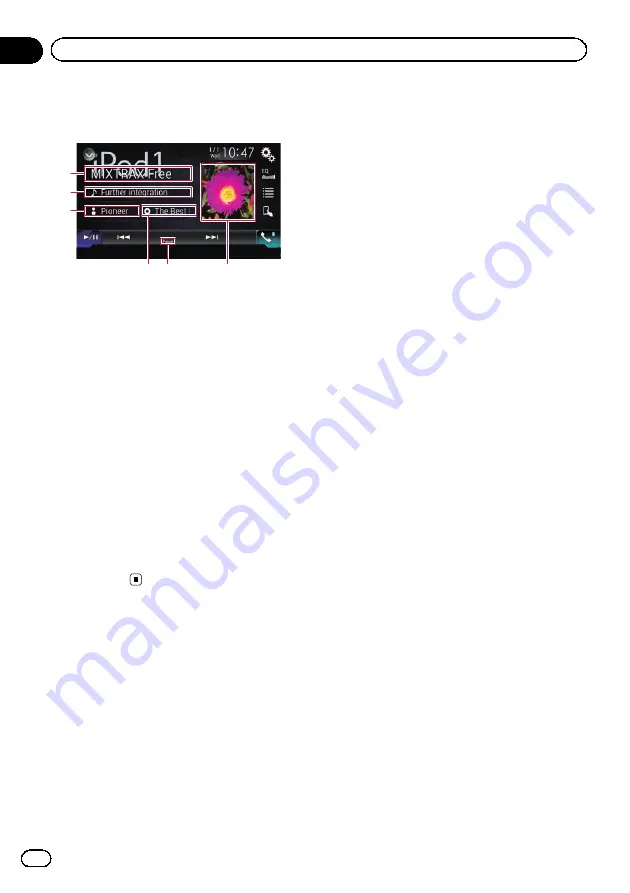
Reading the screen

1

2

3

4 5

6

1

App name

Shows the App name of the currently playing.

2

Song title

Shows the title of the song currently playing
(when available).

No Title

is displayed if

there is no corresponding information.

3

Artist name

Shows the artist name for the song currently
playing (when available).

No Name

is dis-

played if there is no corresponding informa-
tion.

4

Album title

Shows the title of the album of the current file
(when available).

No Title

is displayed if

there is no corresponding information.

5

Pause indicator

6

Album artwork

Album art of the current song is displayed if it
is available.

Engb

58

Chapter

10

Using an iPod

Summary of Contents for SPH-DA120

Page 1: ...l Smartphone Receiver SPH DA120 Be sure to read Important Information for the User first Important Information for the User includes the important information that you must understand before using this product English ...

Page 2: ...the screens 10 Switching screens using the touch panel keys 10 Switching screens using the buttons 11 Supported AV source 11 Displaying the AV operation screen 12 Selecting a front source on the AV source selection screen 12 Selecting a front source on the source list 12 Selecting a rear source 13 Turning off the AV source 13 Changing the display order of source icons 13 Changing the display order...

Page 3: ... touch panel keys 34 Reading the screen 34 Starting procedure 35 Selecting a band 35 Manual tuning 35 Seek tuning 35 Selecting a preset channel from the preset channel list 36 Storing broadcast frequencies 36 Storing the strongest broadcast frequencies 36 Tuning into strong frequencies 36 Receiving traffic announcements 37 Using news programme interruption 38 Tuning into alternative frequencies 38...

Page 4: ... Operating with the buttons 57 Playing back music from a music app other than iPod music as the iPod source 57 Using the touch panel keys 57 Reading the screen 58 Using your iPhone or smartphone applications Using AppRadio Mode 59 Using the touch panel keys App control side bar 59 Starting procedure 60 Using the keyboard 61 Adjusting the image size For smartphone users 62 Displaying the image of y...

Page 5: ...2 Selecting the system language 82 Setting the keyboard language with the application for iPhone 83 Setting the beep sound 83 Adjusting the picture 83 Displaying the firmware version 84 Updating firmware 84 Checking the connections of leads 85 Audio adjustments Using fader balance adjustment 86 Using balance adjustment 86 Switching sound muting attenuation 87 Adjusting source levels 87 Adjusting t...

Page 6: ...riever function 105 Changing the wide screen mode 105 Other functions Selecting the video for the rear display 107 Setting the anti theft function 107 Setting the password 107 Entering the password 108 Deleting the password 108 Forgotten password 109 Restoring this product to the default settings 109 Restoring the default settings 109 Appendix Troubleshooting 110 Error messages 111 Positioning tec...

Page 7: ...es and other notes are presented in the following for mat e g p If the home location has not been stored yet set the location first Functions of other keys on the same screen are indicated with at the beginning of the description e g If you touch OK the entry is deleted References are indicated like this e g For details of the operations refer to How to use the screens on page 10 Terms used in thi...

Page 8: ...en the MODE button is touched the display will turn off For details of the operations refer to How to use the screens on page 10 Touch and hold to turn the display off For details refer to Turning off the dis play on page 9 5 TRK button Touch to perform manual seek tuning fast forward reverse and track search controls Connecting media Connecting and disconnecting an iPod Connecting your iPod For d...

Page 9: ...uch the item you want to set For details refer to Information on the con nections and functions for each device on page 32 5 Touch the following key Displays the Top menu screen If you touch the display returns to the pre vious screen Regular startup Start the engine to boot up the system After a short pause the splash screen comes on for a few seconds p The screen shown will differ depending on t...

Page 10: ...How to use the screens Switching screens using the touch panel keys 1 2 3 4 7 8 9 5 6 Engb 10 Chapter 02 Basic operation ...

Page 11: ...an display the icons of frequently used sources by dragging the icons to the display area For details of the operation refer to Changing the display order of source icons on page 13 7 AV operation screen You can customise the settings for each source 8 Application operation screen You can control the iPhone or smartphone applications directly on this product p If applications are not available the...

Page 12: ... Setting menu screen 4 Recalls equaliser curves For details refer to Using the equaliser on page 93 5 Displays the Phone menu screen For details refer to Displaying the phone menu on page 22 Selecting a front source on the AV source selection screen 1 Touch the HOME button to display the Top menu screen 2 Touch the following key Displays the AV source selection screen 3 Touch the source icon you w...

Page 13: ...n screen p This function is available only when you stop your vehicle in a safe place and apply the handbrake 1 Touch the HOME button to display the Top menu screen 2 Touch the following key Displays the AV source selection screen 3 Touch and hold a source icon and drag the icon to the desired position p If the source icon is moved the order of the source list is also changed Changing the display ...

Page 14: ...evious screen 2 Closes the screen Operating list screens 3 1 2 1 Touching an item on the list allows you to nar row down the options and proceed to the next operation 2 Appears when all characters are not displayed on the display area If you touch the key the rest of the characters are scrolled for display 3 Appears when items cannot be displayed on a single page only Drag the scrubber bar to view...

Page 15: ...uching the keys enters the characters in the text box 4 Deletes the input text one letter at a time be ginning at the end of the text Continuing to touch the key deletes all of the text 5 Confirms the entry and allows you to proceed to the next step 6 You can leave spaces A space equivalent to the number of touches is inserted 7 Switches between alphabet and numbers symbols 8 You can switch betwee...

Page 16: ...tion p The Bluetooth connection will be termi nated if Apple CarPlay is turned on Registering your Bluetooth devices You need to register your devices featuring Bluetooth wireless technology when you con nect it to this product for the first time A total of three devices can be registered Two regis tration methods are available Searching for nearby Bluetooth devices Pairing from your Bluetooth dev...

Page 17: ...l lows Illuminates when your mobile de vice is successfully connected with the HFP Hands Free Profile Illuminates when your audio de vice is successfully connected with the A2DP Advanced Audio Distri bution Profile AVRCP Audio Video Remote Control Profile Illuminates when the Bluetooth connection is established with the SPP Serial Port Profile p After pairing the phone book registered in the devic...

Page 18: ... product will automatically be estab lished If connection fails Auto connection failed Retry appears Touch Yes to reconnect To turn automatic connection off touch Auto Connect again p Once the connection is established for the first time the connection with the device will be established automatically when the ignition switch is turned on from the next time Deleting a registered device When you ha...

Page 19: ...ing visibility This function sets whether or not to make this product visible to the other device 1 Touch the HOME button to display the Top menu screen 2 Touch the following keys in the follow ing order The Bluetooth screen appears 3 Touch Visibility repeatedly until the desired setting appears On default Turns the visibility on Off Turns the visibility off Entering the PIN code for Bluetooth wir...

Page 20: ...oduct with the latest Bluetooth software For details on Bluetooth software and updating refer to our website p The source is turned off and the Bluetooth connection is disconnected before the pro cess starts CAUTION Never turn this product off and never disconnect the phone while the software is being updated 1 Touch the HOME button to display the Top menu screen 2 Touch the following keys in the ...

Page 21: ...ing order The Bluetooth screen appears 3 Touch Bluetooth Version Information The version of this product s Bluetooth mod ule appears Engb 21 Chapter 03 Registering and connecting a Bluetooth device Registering and connecting a Bluetooth device ...

Page 22: ...ion screen On the App control side bar on the AppRadio Mode and MirrorLink screens Touch the following key Displays the Phone menu screen p The Phone Book screen appears when using this function for the first time The screen of the last used function appears from the next time p The Bluetooth icon on the key is not dis played when Apple CarPlay is on If touch ing the key when Apple CarPlay is on t...

Page 23: ...ollowing key Ends the call The call ends p You may hear a noise when you hang up the phone Calling a number in the phone book After finding the number you want to call in the phone book you can select the entry and make the call p The contacts on your phone will normally be transferred to this product automatically when the phone is connected If it is not use your phone menu to transfer the contac...

Page 24: ...wing key appears If you want to change the character touch the following key until the desired character repeatedly Changes the character 5 Touch the list to display the phone number list of the selected entry The details screen of the phone book appears If several phone numbers are included in an entry select one by touching the list 6 Touch the phone number you want to dial The dial screen appea...

Page 25: ...n 2 Touch the following keys in the follow ing order The Phone Book or History screen ap pears 3 Touch the following key Registers the phone number to the Preset Dial list Dialling from the preset dial list 1 Touch the HOME button to display the Top menu screen 2 Touch the following keys in the follow ing order The Preset Dial screen appears 3 Touch the desired entry on the list to make a call The...

Page 26: ...ing call The rejected call is recorded in the missed call history list For details refer to Dialling from the history on page 24 2 Touch the following key Ends the call The call ends Minimising the dial confirmation screen p The dial confirmation screen cannot be minimised on the AV operation screen p AV sources cannot be selected even if the dial confirm screen is minimised while talk ing on the ...

Page 27: ...in reverse order You can use this function to change the order back Inverting the names in the phone book 1 Touch the HOME button to display the Top menu screen 2 Touch the following keys in the follow ing order The Bluetooth screen appears 3 Touch Invert Name The confirmation screen appears 4 Touch Yes p If the inversion fails Invert Name Error appears In such cases try again from the beginning p...

Page 28: ...mobile phones featuring Bluetooth wireless technology is not guar anteed The line of sight distance between this pro duct and your mobile phone must be 10 metres or less when sending and receiv ing voice and data via Bluetooth technol ogy However the actual transmission distance may be shorter than the estimated distance depending on the usage environ ment With some mobile phones the ring sound ma...

Page 29: ...ppears The received call and the dialled number histories You cannot make a call to the entry of an unknown user no phone number in the re ceived call history If calls are made by operating your mobile phone no history data will be recorded in this product Phone book transfers If there are more than 800 phone book en tries on your mobile phone not all entries may download completely With some mobi...

Page 30: ...screen appears 5 Touch the following settings Device Select the device to be connected Connection Select the connection meth od Apple CarPlay Set to On to use Apple CarPlay p Configure the settings correctly according to the device to be connected and the con nection method to be used For details refer to Information on the connections and functions for each de vice on page 32 p If you change the ...

Page 31: ...iPod nano 3rd generation iPod with Lightning connector iPhone 5s iPhone 5c iPhone 5 iPod touch 5th generation iPod nano 7th generation Android device compatibility p Operation methods may vary depending on the Android device and the software ver sion of the Android OS p Depending on the version of the Android OS it may not be compatible with this pro duct p Compatibility with all Android devices i...

Page 32: ...adio Mode Available source iPod audio 1 1 iPod video 1 1 AppRadio Mode 1 iPod iPhone with a Lightning connector Required cable sold separately Cable connection is not required CD IU52 CD IH202 CD IU52 Lightning Digital AV Adapter Smartphone Setup Device iPhone iPod iPhone iPod iPhone iPod Connection Wireless via BT USB Digital AV adapter Apple CarPlay On Off Bluetooth connection Connect to USB por...

Page 33: ...refer to the information on our website Refer to the CarMediaPlayer manual for more information Android MirrorLink device Required cable sold separately Cable connection is not required CD MU200 CD AH200 Smartphone Setup Device Others Others Others Connection Wireless via BT USB HDMI Bluetooth connection Bluetooth connec tion is required Connection requirement Connect to USB port 2 Connect to USB ...

Page 34: ...refer to Seek tuning on page 35 9 Displays the preset channels For details refer to Selecting a preset channel from the preset channel list on page 36 a Recalls the preset channel stored to a key from memory with a single touch of the key Stores the current broadcast frequency to a key for later recall by continuing to touch the key For details refer to Storing broadcast fre quencies on page 36 Re...

Page 35: ...n the AV source selec tion screen The Radio screen appears 3 Use the touch panel keys on the screen to control the radio For details refer to Using the touch panel keys on page 34 Selecting a band Touch the following key repeatedly until the desired band appears Switches between the following FM bands FM1 FM2 and FM3 Switches between the following MW LW bands MW and LW p This function is convenien...

Page 36: ...ee FM bands as well as six MW LW sta tions can be stored in memory Storing the strongest broadcast frequencies BSM best stations memory function automa tically stores the six strongest broadcast fre quencies under the preset tuning keys 1 to 6 and once stored there you can tune into them with the touch of a key p Storing broadcast frequencies with BSM may replace broadcast frequencies you have alr...

Page 37: ... standby lets you re ceive traffic announcements automatically no matter what source you are listening to TA can be activated for both a TP station a sta tion that broadcasts traffic information or an other enhanced network s TP station a station carrying information that cross references TP stations 1 Touch the HOME button to display the Top menu screen 2 Touch the following keys in the follow in...

Page 38: ...sed on the FM band If you are listening to a broadcast and the re ception becomes weak or there are other pro blems this product will automatically search for a different station in the same network that is broadcasting a stronger signal 1 Touch the HOME button to display the Top menu screen 2 Touch the following keys in the follow ing order The System screen appears 3 Touch AV Source Settings 4 T...

Page 39: ...f independently for each FM band Switching Auto PI seek If this product fails to find a suitable alterna tive frequency or if you are listening to a broadcast and the reception becomes weak this product will automatically search for a dif ferent station with the same programming Activating the Auto PI seek for preset stations This product can automatically search for a different station with the s...

Page 40: ...s Stable Switches to settings that prioritise noise prevention Hi Fi Switches to the settings that give priority to the sound quality Storing song information to an iPod iTunes Tagging p For details refer to Storing song information to an iPod iTunes Tagging on page 104 Operating with the buttons Touch the TRK button You can move the preset channels up or down Touch and hold the TRK button You can...

Page 41: ... between tag in formation and file folder information For details refer to Reading the screen on page 42 For details refer to Switching the browse mode on page 43 8 Displays the Phone menu screen For details refer to Displaying the phone menu on page 22 9 Switches to the next or previous page of touch panel keys a Skips files forward or backward b Changes the playback point by dragging the key For...

Page 42: ...of the file currently playing Folder name Shows the name of the folder contain ing the file currently playing 2 Current time and date 3 Album artwork Album art of the current song is displayed if it is available 4 Playback condition indicator Indicates the current playback condition Playing files in random order Indicator Meaning Does not play files in random order Plays all files within the repea...

Page 43: ...le information display area on the AV operation screen Select when you want to search for music files in the list screen or folders on the list screen p You can switch between the browse modes for file search by touching the tabs on the list screen Touch the following key repeatedly until the desired setting appears Switches the display between Music Browse mode and Folder Browse mode Selecting fi...

Page 44: ...in the USB storage device can be played at random by only touching a single key Touch the following key repeatedly until the desired setting appears Turns random play on or off default Does not play files in random order Plays all audio files in the current repeat play range in random order p If you turn random play on when the re peat play range is set to the current file the repeat play range ch...

Page 45: ...hoto Switches the media file type to still image JPEG data Operating with the buttons Touch the TRK button You can skip files forward or backward Touch and hold the TRK button You can perform fast reverse or fast for ward Engb 45 Chapter 07 Playing compressed audio files Playing compressed audio files ...

Page 46: ...ets a repeat play range For details refer to Setting a repeat play range on page 47 8 Switches the subtitle language With DivX featuring multi subtitle recordings you can switch between subtitle languages during playback 9 Displays the Phone menu screen For details refer to Displaying the phone menu on page 22 a Skips files forward or backward b Switches the audio language With DivX files that pro...

Page 47: ...using the file name list which is a list of the files stored in the USB storage device 1 Touch the following key Displays the list of the files or folders stored in the USB storage device 2 Touch a file on the list to play back p Files are played back in file number order and folders are skipped if they contain no files If folder 01 root folder contains no files playback commences with folder 02 p...

Page 48: ...ch between media file types to play 1 Touch the following key Displays the pop up menu for selecting a media file type to play in the USB sto rage device 2 Touch the item you want to set Music Switches the media file type to music com pressed audio Video Switches the media file type to video Photo Switches the media file type to still image JPEG data Operating with the buttons Touch the TRK button...

Page 49: ... this area hides the touch panel keys p Touch anywhere on the LCD screen to display the touch panel keys again 7 Plays files in random order For details refer to Playing files in ran dom order on page 50 8 Displays the Phone menu screen For details refer to Displaying the phone menu on page 22 9 Skips files forward or backward a Sets a repeat play range For details refer to Setting a repeat play r...

Page 50: ...iles If folder 01 root folder contains no files playback commences with folder 02 p Touching a folder on the list shows its con tents You can play a file on the list by touching it Playing files in random order All files in the USB storage device can be played at random by only touching a single key Touch the following key repeatedly until the desired setting appears Turns random play on or off de...

Page 51: ...enu appears 4 Touch the item you want to set 10sec default JPEG images switch at intervals of 10 sec onds 5sec JPEG images switch at intervals of 5 sec onds 15sec JPEG images switch at intervals of 15 sec onds Manual JPEG images can be switched manually Operating with the buttons Touch the TRK button You can skip files forward or backward Touch and hold the TRK button You can search 10 JPEG files ...

Page 52: ...e when an iPod with a Lightning connector is connected to this product with a interface cable CD IH202 sold se parately For details of the connections refer to the Installation Manual When you want to play audio and or video files on your iPod with a Lightning connec tor first install CarMediaPlayer on your iPod with a Lightning connector and then launch CarMediaPlayer while in AppRadio Mode For d...

Page 53: ...nk search on page 57 d Uses Sound Retriever function For details refer to Setting the Sound Retriever function on page 105 e Plays files in random order For details refer to Setting the shuffle play on page 55 f Sets a repeat play range For details refer to Setting a repeat play range on page 55 g Changes the audiobook speed For details refer to Changing the speed of audiobook playback on page 56 ...

Page 54: ...er 5 1 Display the AV source selection screen For details of the operations refer to Dis playing the AV operation screen on page 12 2 Connect your iPod p If the iPod is already connected touch iPod on the AV source selection screen p If connecting an iPhone or iPod touch quit applications before connecting p If an iPhone 5s iPhone 5c iPhone 5 or iPod touch 5th generation is connected the media lib...

Page 55: ...just the current song or video p The icon does not change when using this function with an iPhone 5s iPhone 5c iPhone 5 or iPod touch 5th generation The setting changes when the icon is touched even though the icon does not change p The no repeat setting is available only when an iPhone 5s iPhone 5c iPhone 5 or iPod touch 5th generation is connected to this product Selecting song or video sources ...

Page 56: ...ode The application screen of the iPod can be displayed on this product and the music files and video files in the iPod can be played back with this product p This function is not available when using iPod function with an iPhone 5s iPhone 5c iPhone 5 or iPod touch 5th genera tion p While this function is in use the iPod will not turn off even if the ignition key is turned off Operate the iPod to ...

Page 57: ...ackward Touch and hold the TRK button You can perform fast reverse or fast for ward Playing back music from a music app other than iPod music as the iPod source The app name and the song information are also displayed Using the touch panel keys 9 8 8 1 3 2 4 5 6 7 1 Displays the source list For details refer to Selecting a front source on the source list on page 12 2 Displays the Time and date set...

Page 58: ...tion 3 Artist name Shows the artist name for the song currently playing when available No Name is dis played if there is no corresponding informa tion 4 Album title Shows the title of the album of the current file when available No Title is displayed if there is no corresponding information 5 Pause indicator 6 Album artwork Album art of the current song is displayed if it is available Engb 58 Chap...

Page 59: ...oduct For details about the AppRadio app visit the following site http www pioneer eu AppRadioMode p Be sure to read Important Information for the User a separate manual before you perform this operation Pioneer is not liable for any issues that may arise from incorrect or flawed app based content The content and functionality of the sup ported applications are the responsibility of the App provid...

Page 60: ...ation is already running the application operation screen will appear on this product 6 Touch the desired application icon The desired application is launched and the application operation screen appears 7 Operate the application 8 Touch the HOME button to return to the Top menu screen For iPhone with a Lightning connector users 1 Register your iPhone and connect it to this product via Bluetooth w...

Page 61: ...handbrake is engaged p This function is only available in AppRadio Mode on the iPhone When you tap the text input area of an applica tion for iPhone a keyboard will be displayed on the screen You can input the desired text directly from this product p The language preference for the keyboard of this product should be same as the set ting on your iPhone If the settings for this product and the iPho...

Page 62: ...e HOME button to display the Top menu screen 2 Touch the following keys in the follow ing order The System screen appears 3 Touch Input Output Settings 4 Touch AppRadio Video Adjustment The confirmation screen appears 5 Touch OK 6 Touch the following keys to adjust the line to fit smartphone image size Moves the line to the left Moves the line to the right Moves the line upward Moves the line down...

Page 63: ...ner of the screen 1 Connect your iPhone p The cable connection method varies de pending on your device For details of the connections refer to the Installation Manual 2 Touch the HOME button to display the Top menu screen 3 Touch APPS The image in your iPhone appears on the screen 4 Launch an application on your iPhone An image of the application appears on the screen 5 Touch the HOME button to re...

Page 64: ...p to On beforehand For details refer to Setting the device con nection method on page 30 Pioneer is not liable for any issues that may arise from incorrect or flawed app based content The content and functionality of the sup ported applications are the responsibility of the App providers In Apple CarPlay functionality through the product is limited while driving with avail able functions determine...

Page 65: ...ication menu is dis played on the right hand side of the screen The setting will be applied when the Apple CarPlay compatible device is connected to this product next time Adjusting the volume You can adjust the guidance volume alert sound volume separately from the main sound volume Touch the VOL button 1 2 3 Apple CarPlay 1 Touch to mute Touch again to unmute 2 Displays the main sound volume 3 A...

Page 66: ...ct your MirrorLink device to this product via the separately sold USB inter face cable for use with MirrorLink devices CD MU200 p The cable connection method varies de pending on your device For details of the connections refer to the Installation Manual 3 Touch the HOME button to display the Top menu screen 4 Touch APPS If the launcher application is installed in the MirrorLink device the applica...

Page 67: ... audio volume Each touch of or increases or de creases the volume level p The AV operation screen and the Applica tion screen can be switched by touching the MODE button p You cannot adjust the volume of the main sound on the screen Touch the VOL button to adjust the volume of the main sound p The audio mix menu is displayed for four seconds If the screen disappears touch the VOL button again The ...

Page 68: ... to another source while listening to a song on your Bluetooth audio player song playback may continues p Depending on the Bluetooth audio player you connected to this product operations on this product to control the player may differ from those explained in this manual p When you are talking on a mobile phone connected to this product via Bluetooth wireless technology song playback from your Blu...

Page 69: ...only be displayed after a file starts or resumes playing You connect a Bluetooth audio player compatible with AVRCP1 3 and op erate the player to start playing You select another file when play back is paused Starting procedure 1 Pull out the connecting cable for using AppRadio Mode p You cannot use Bluetooth audio player when the connecting cable for using AppRadio Mode is connected p You cannot ...

Page 70: ... single key p This function is only available when the connected Bluetooth audio player supports AVRCP 1 3 Touch the following key repeatedly until the desired setting appears Turns random play on or off Setting a repeat play range The repeat play range can be changed by only touching a single key p This function is only available when the connected Bluetooth audio player supports AVRCP 1 3 Touch ...

Page 71: ... Setting menu screen 4 Recalls equaliser curves For details refer to Using the equaliser on page 93 5 Hides the touch panel keys Touching this area hides the touch panel keys p Touch anywhere on the LCD screen to display the touch panel keys again 6 Displays the Phone menu screen For details refer to Displaying the phone menu on page 22 7 Changes the wide screen mode For details refer to Changing ...

Page 72: ...aliser on page 93 5 Hides the touch panel keys Touching this area hides the touch panel keys p Touch anywhere on the LCD screen to display the touch panel keys again 6 Displays the Phone menu screen For details refer to Displaying the phone menu on page 22 7 Switches the operation screen For details refer to Switching the opera tion screen on page 73 8 Changes the wide screen mode For details refe...

Page 73: ...ch AUX The pop up menu appears 5 Touch the item you want to set Auto default Adjusts the video signal setting automati cally PAL Sets the video signal to PAL NTSC Sets the video signal to NTSC PAL M Sets the video signal to PAL M PAL N Sets the video signal to PAL N SECAM Sets the video signal to SECAM Switching the operation screen You can switch between the screen to operate music files and that...

Page 74: ...e on the LCD screen to display the touch panel keys again 6 Displays the Phone menu screen For details refer to Displaying the phone menu on page 22 7 Changes the wide screen mode For details refer to Changing the wide screen mode on page 105 Reading the screen 1 1 Current time and date Starting procedure 1 Touch the HOME button to display the Top menu screen 2 Touch the following keys in the foll...

Page 75: ... the following keys in the follow ing order The Video Setup screen appears 3 Touch Video Signal Setting 4 Touch AV The pop up menu appears 5 Touch the item you want to set Auto default Adjusts the video signal setting automati cally PAL Sets the video signal to PAL NTSC Sets the video signal to NTSC PAL M Sets the video signal to PAL M PAL N Sets the video signal to PAL N SECAM Sets the video sign...

Page 76: ...list screen For details of the operations refer to Se lecting songs not to be played on page 76 6 Sets to the original BPM Beats Per Minute 7 Specifies the playback portion For details of the operations refer to Specifying the playback portion on page 77 8 Touch to select a track Touch and hold to fast forward or rewind 9 Turns on or off the MIXTRAX original visual display a Pauses and starts play...

Page 77: ...lied when switching to the next song Setting the flash pattern The flashing colour changes with the changes in the sound and bass levels 1 Touch the HOME button to display the Top menu screen 2 Touch the following keys in the follow ing order The System screen appears 3 Touch AV Source Settings 4 Touch MIXTRAX Settings 5 Touch Flash Pattern The pop up menu appears 6 Touch the item you want to set ...

Page 78: ... keys in the follow ing order The System screen appears 3 Touch AV Source Settings 4 Touch Bluetooth Audio repeatedly until the desired setting appears On default Activates the Bluetooth audio source Off Deactivates the Bluetooth audio source Setting the ever scroll When Ever Scroll is set to On recorded text information scrolls continuously in the display Set to Off if you prefer the informa tion...

Page 79: ...ge will be displayed on the camera image after a little while Be sure to check the conditions around the vehicle even before the guidelines and the mes sage are displayed Camera for Camera View mode Camera View can be displayed at all times e g when monitoring an attached trailer etc Please note that with this setting the camera image is not resized to fit and that a portion of what is seen by the...

Page 80: ...o On p To set the rear view camera for Camera View mode Back Camera Input needs to be set to On For details refer to Setting rear view camera activation on page 79 1 Touch the HOME button to display the Top menu screen 2 Touch the following keys in the follow ing order The System screen appears 3 Touch Camera settings 4 Touch Camera View repeatedly until the desired setting appears Off default Tur...

Page 81: ...m and 2 m from the rear bumper Rear bumper 25 cm 50 cm 25 cm 2 m Markings Markings 3 Touch the HOME button to display the Top menu screen 4 Touch the following keys in the follow ing order The System screen appears 5 Touch Camera settings 6 Touch Parking Assist Guide Adjust 7 Set the guidelines by dragging the four points 8 Touch the following keys to adjust the position of the point if necessary ...

Page 82: ...Off Hides the demo screen Selecting the system language The system language can be selected The language can be changed for the fol lowing The Audio screen The System screen The Video Setup screen The Bluetooth screen Language for messages Some operations on this product are prohibited from use while driving or re quire careful attention when operated In such cases a caution message will appear on...

Page 83: ... each source and rear view camera CAUTION For safety reasons you cannot use some of these functions while your vehicle is in motion To en able these functions you must stop in a safe place and apply the handbrake Refer to Impor tant Information for the User a separate man ual 1 Display the screen you wish to adjust 2 Touch the HOME button to display the Top menu screen 3 Touch the following keys i...

Page 84: ...omatically only when the value of nighttime is lower than that of daytime p The picture adjustment may not be avail able with some rear view cameras p The setting contents can be memorised se parately for the following screens and video images AV and external camera USB Video USB JPEG and MirrorLink HDMI and AppRadio Mode HDMI MIXTRAX images output from the exter nal device Displaying the firmware...

Page 85: ... Antenna Indicates the connection status of the GPS aerial the reception sensitivity and from how many satellites the signal is received Colour Signal com munication Used in posi tioning Orange Yes Yes Yellow Yes No p When the GPS aerial is connected to this product OK is displayed When the GPS aerial is not connected to this product NOK is displayed p If reception is poor please change the instal...

Page 86: ...d Rear to 0 when using a dual speaker system 5 Touch the following keys to adjust the left right speaker balance Moves towards the left Moves towards the right Each time you touch the keys the left right speaker balance moves towards the left or right p Left25 to Right25 is displayed as the left right speaker balance moves from the left to right p The default setting is L R 0 p You can also set th...

Page 87: ...usting source levels The SLA source level adjustment function ad justs the volume level of each source to pre vent radical changes in volume when switching between sources p Settings are based on the FM tuner volume level which remains unchanged p This function is not available when the FM tuner is selected as the AV source 1 Compare the FM tuner volume level with the level of the source you want ...

Page 88: ...tically set to the same level as the USB port to which the device is connected The source level ad justment volume that is automatically set varies depending on whether the device is connected to USB port 1 or USB port 2 p When an iPod iPhone with a Lightning connector is connected to USB port 1 or USB port 2 using a USB interface cable for iPod iPhone CD IU52 sold separately the source level adju...

Page 89: ... setting is On 4 Touch Crossover The Cutoff screen appears 5 Touch the following keys to select Front or Rear Selects the adjustable previous speak er Selects the adjustable next speaker 6 Touch HPF to turn on 7 Drag the line graph horizontally to ad just the range of cut off frequency from 50 Hz to 200 Hz p The default setting is 100 Hz 8 Drag the tip of the slope to adjust the range of level bet...

Page 90: ...screen appears 3 Touch Listening Position The Listening Position screen appears 4 Touch the desired position Off default Changes the listening position setting to off Front Changes the listening position setting to front Front L Changes the listening position setting to front left Front R Changes the listening position setting to front right All Changes the listening position setting to all Adjust...

Page 91: ...r Rear Right Changes the speaker level of the rear right speaker Subwoofer Changes the speaker level of the subwoofer speaker If you touch Apply Auto EQ the result of A EQ TA Measurement will be applied to the speaker level setting p To use this function the vehicle s acoustics must be measured in advance Adjusting the time alignment By adjusting the distance from each speaker to the listening pos...

Page 92: ...ases the distance between the se lected speaker and the selected listen ing position p 0 0 cm to 500 0 cm is displayed as the distance to be corrected is increased or de creased Front Left Changes the distance between the front left speaker and the selected listening position Front Right Changes the distance between the front right speaker and the selected listening po sition Rear Left Changes the...

Page 93: ...and a set equaliser curve 1 Touch the HOME button to display the Top menu screen 2 Touch the following keys in the follow ing order The Audio screen appears 3 Touch Graphic EQ The Graphic EQ screen appears 4 Touch the equaliser you want Customising the equaliser curves You can adjust the currently selected equaliser curve setting as desired Adjustments can be made with a 13 band graphic equaliser ...

Page 94: ...ed For example when a rear speaker is connected as a subwoofer output When a speaker is connected to a power amp delivering output higher than the speaker s maximum input power capabil ity If a microphone for acoustical measurement sold separately is not placed in an appropri ate location the measurement tone may be come loud and measurement may take a long time resulting in battery drainage Be su...

Page 95: ...For details refer to Using the equali ser on page 93 The front and rear speakers will automa tically be adjusted to a high pass filter setting p Previous settings for Auto EQ will be over written CAUTION Do not turn off the engine while the measure ment is in progress 1 Stop the vehicle in a quiet place close all the doors windows and sun roof and then turn the engine off If the engine is left run...

Page 96: ...h connection is disconnected before the process starts 12 Exit the vehicle and keep the doors closed until the countdown finishes When the countdown finishes a measure ment tone noise is emitted from the speakers and the Auto EQ measurement begins 13 Wait until the measurement is com pleted When Auto EQ is completed a message is dis played indicating that the measurement is completed p If the vehi...

Page 97: ... 97 off Hides the background display Changing to the background display image stored on the USB storage device You can change the background display image to an image imported from the USB sto rage device p Background display image must be used within the following formats JPEG image files jpg or jpeg Allowable data size is 10 MB or smaller Allowable image size is 4 000 4 000 pixel or smaller CAUT...

Page 98: ... respectively Creating a user defined colour You can create a user defined colour The cre ated colour is stored and you can select the colour when setting the illumination colour the next time 1 Touch the HOME button to display the Top menu screen 2 Touch the following keys in the follow ing order The Theme screen appears 3 Touch Illumination p You can also change the screen for settings by touchi...

Page 99: ... touching Illumination Theme or Background on this screen 4 Touch the item you want to set Preset images Selects the desired preset clock image off Hides the clock display p You can preview the Top menu screen or the AV operation screen by touching Home or AV respectively Changing the preinstalled splash screen You can change the splash screen to other images preinstalled in this product 1 Touch t...

Page 100: ... Touch the following keys in the follow ing order The Theme screen appears 3 Touch Splash Screen 4 Touch the following key Displays the list of the splash screens stored on the USB storage device 5 Touch the desired external device 6 Touch the image to use as the splash screen from the list The image is set as the splash screen p You can delete the imported image and re store the setting on the sp...

Page 101: ...D provider Displaying your DivX VOD deregistration code A registration code registered with a deregis tration code can be deleted 1 Touch the HOME button to display the Top menu screen 2 Touch the following keys in the follow ing order The Video Setup screen appears 3 Touch DivX Setup 4 Touch DivX VOD The DivX VOD screen appears 5 Touch Deregistration Code Your eight digit deregistration code is d...

Page 102: ...ideo output format setting has no ef fect on AUX AV and iPod sources when the control mode is set to iPod p This function is available when nothing is output to the front screen and a source other than USB1 and USB2 is output to the rear display 1 Touch the HOME button to display the Top menu screen 2 Touch the following keys in the follow ing order The Video Setup screen appears 3 Touch Video Out...

Page 103: ...lected menu is filled in To cancel the registration touch the star icon in the menu column again Selecting a shortcut 1 Touch the HOME button to display the Top menu screen 2 Touch the following key The Favorites screen appears 3 Touch the desired item Removing a shortcut 1 Touch the HOME button to display the Top menu screen 2 Touch the following keys in the follow ing order The Favorites screen ...

Page 104: ... current song may also be stored Be sure to confirm the song before you purchase it p The iTunes Tagging function is available while digital broadcasts are being received p This function is available for the following iPod models iPhone 4s iPhone 4 iPhone 3GS iPhone 3G iPhone iPod touch 5th generation iPod touch 4th generation iPod touch 3rd generation iPod touch 2nd generation iPod touch 1st gene...

Page 105: ...ssfully com plete p While this product is storing song informa tion transfer to an iPod is not possible Setting the Sound Retriever function The Sound Retriever function automatically enhances compressed audio and restores rich sound Touch the following key repeatedly until the desired setting appears on the AV operation screen Sets the Sound Retriever function Mode1 default Activates the Sound Re...

Page 106: ...ontal to vertical ratio differs between the display and the image the image may be displayed partly cut off either at the top bottom or sides p This setting is for JPEG images only p You cannot operate this function while driv ing p Different settings can be stored for each video source p When a video is viewed in a wide screen mode that does not match its original as pect ratio it may appear diff...

Page 107: ...or iPod are output to the rear display The port that supports the rear display will only be USB port 1 Compatible file types are MPEG 4 H 264 WMV MKV and FLV only AV The video and sound of AV are output to the rear display The video image and sound are output only when AV has both video and sound The video image and sound are output only when the corresponding settings on AV Input is Source For de...

Page 108: ... ap pears Entering the password On the password input screen you must enter the current password 1 Enter the password 2 Touch Go When the correct password is entered this product will be unlocked Deleting the password The current password and password hint can be deleted 1 Touch the HOME button to display the Top menu screen 2 Touch the following keys in the follow ing order The System screen appe...

Page 109: ...able only when you stop your vehicle in a safe place and apply the handbrake CAUTION Do not turn off the engine while restoring the set tings 1 Touch the HOME button to display the Top menu screen 2 Touch the following keys in the follow ing order The System screen appears 3 Touch Restore Settings 4 Touch the item you want to initialise All Settings Audio Settings p This setting is available when ...

Page 110: ...here is no sound on fast reverse or forward The icon 9 is displayed and op eration is impossible The operation is not available The operation is not available The picture stops pauses and this product cannot be oper ated The reading of data is impossible during playback Stop playback once then restart iPod cannot be operated The iPod is frozen Reconnect the iPod with the USB interface cable for iP...

Page 111: ...e table below to identify the problem then take the suggested corrective action If the error persists record the error message and contact your dealer or your nearest Pioneer service centre Common Message Cause Action AMP Error This product fails to operate or the speaker connection is incorrect the protective circuit is activated Check the speaker connection If the mes sage fails to disappear eve...

Page 112: ...torage device is not supported by this product Disconnect your device and replace it with a compatible USB storage device Check USB The USB connector or USB cable is short circuited Check that the USB connector or USB cable is not caught in something or damaged The connected USB storage device consumes more than maximum al lowable current Disconnect the USB storage device and do not use it Turn th...

Page 113: ...untered an error Turn the ignition switch to OFF and then to ON Tag store failed Tag information cannot be stored in this product Try again Already stored This tag information is already stored in memory Tag information can only be saved once for any given song Tag information cannot be saved for the same song more than once Memory full Connect iPod The tag information is successfully stored The f...

Page 114: ...isplayed after per forming the above action please contact your dealer or an authorised Pioneer Service Sta tion There is no supported applica tion on your MirrorLink de vice No supported applications can be found Install MirrorLink compliant applications to your MirrorLink device Communication error oc curred There was a communication error Disconnect the cable from the smartphone and then connec...

Page 115: ...gnals can not be received from more than two GPS satellites In some driving conditions signals from GPS satellites may not reach your vehicle In this case it is impossible for the system to use GPS positioning In tunnels or en closed parking garages Under elevated roads or similar structures When driving among high build ings When driving through a dense forest or tall trees If a car phone or mobi...

Page 116: ... take a recently opened road that is not on the map If you drive in zigzags If the road has a series of hairpin bends If there is a loop or similar road configura tion If you take a ferry If you are driving on a long straight road or a gently curving road If you are on a steep mountain road with many height changes Engb 116 Appendix Appendix ...

Page 117: ...a traffic jam If you join the road after driving around a large car park When you drive around a roundabout When starting driving immediately after starting the engine Detailed information for playable media Compatibility Notes on USB storage device Do not leave the USB storage device in any location with high temperatures Depending on the kind of the USB storage device you use this product may no...

Page 118: ...X files Only DivX files downloaded from DivX part ner sites are guaranteed for proper opera tion Unauthorised DivX files may not operate properly DRM rental files cannot be operated until playing back is started This product corresponds to a DivX file dis play of up to 1 590 minutes 43 seconds Search operations beyond this time limit are prohibited DivX VOD file playback requires supplying the ID ...

Page 119: ...be displayed correctly if the displayed characters in the subtitle file include control code For materials that use a high transfer rate the subtitles and video may not be comple tely synchronised If multiple subtitles are programmed to dis play within a very short time frame such as 0 1 seconds the subtitles may not be dis played at the correct time Engb 119 Appendix Appendix Appendix ...

Page 120: ...m playback time of audio file stored on a USB storage device 7 5 h 450 minutes MP3 compatibility Media USB storage device File extension mp2 mp3 m2a mka Bit rate 8 kbps to 320 kbps CBR VBR Sampling frequency 8 kHz to 48 kHz ID3 tag ID3 tag Ver 1 0 1 1 2 2 2 3 2 4 Notes Ver 2 x of ID3 tag is prioritised when both Ver 1 x and Ver 2 x exist This product is not compatible with the following MP3i MP3 i...

Page 121: ...atibility Media USB storage device File extension wav Format Linear PCM LPCM Sampling frequency 16 kHz to 48 kHz Quantisation bits 8 bits and 16 bits Note The sampling frequency shown in the display may be rounded AAC compatibility Media USB storage device File extension aac adts mka m4a Bit rate 8 kbps to 320 kbps CBR Sampling frequency 8 kHz to 48 kHz Note This product plays back AAC files encod...

Page 122: ...kHz 32 kHz 44 1 kHz 48 kHz for em phasis Maximum image size 720 pixels 576 pixels Maximum file size 4 GB Notes This product is not compatible with the following DivX Ultra format DivX files without video data DivX files encoded with LPCM Linear PCM audio codec If a file contains more than 4 GB playback stops before the end Some special operations may be prohibited because of the composition of Div...

Page 123: ...ed to encode the files This product may not operate correctly de pending on the application used to encode WMA files Depending on the version of Windows Media Player used to encode WMA files album names and other text information may not be correctly displayed There may be a slight delay when starting playback of audio files encoded with image data This product is not compatible with packet write ...

Page 124: ...back Folder File 1 2 3 4 5 6 Level 1 Level 2 Level 3 Level 4 Notes This product assigns folder numbers The user cannot assign folder numbers If there is a folder that does not contain any playable file the folder itself will display in the folder list but you cannot check any files in the folder A blank list will appear Also these folders will be skipped without display ing the folder number Engb ...

Page 125: ... 38 39 37 38 39 Tag Forwarding 104 Bluetooth Audio 78 Ever Scroll 78 Input Output Settings Smartphone Setup 30 AV Input 78 AUX Input 72 AppRadio Video Adjustment 62 Camera settings Camera View 80 Back Camera Input 79 Camera Polarity 80 Parking Assist Guide 80 Parking Assist Guide Adjust 81 Apple CarPlay settings Driving Position 65 Safe Mode 82 Demo Mode 82 Engb 125 Appendix Appendix Appendix ...

Page 126: ... 109 Keyboard 83 Beep Tone 83 Picture Adjustment 83 System Information Firmware Information 84 Firmware Update 84 Connection Status 85 Theme menu Page Background 97 Illumination 98 Theme 98 Clock 99 Splash Screen 99 Engb 126 Appendix Appendix ...

Page 127: ...ubwoofer 89 Speaker Level 90 Crossover 89 Subwoofer Settings 89 Listening Position 90 Time Alignment 91 Auto EQ TA 93 A EQ TA Measurement 94 Video Setup menu Page DivX Setup DivX VOD 101 Time Per Photo Slide 51 Video Signal Setting AV 75 AUX 73 Camera 101 Video Output Format 102 Engb 127 Appendix Appendix Appendix ...

Page 128: ...tion 16 Auto Connect 18 Visibility 19 PIN Code Input 19 Device Information 20 Auto Answer 26 Ring Tone 27 Invert Name 27 Bluetooth Memory Clear 20 BT Software Update 20 Bluetooth Version Information 20 Engb 128 Appendix Appendix ...

Page 129: ...Engb 129 Appendix Appendix Appendix ...

Page 130: ...Engb 130 ...

Page 131: ...Engb 131 ...

Page 132: ... 1540 U S A TEL 800 421 1404 PIONEER ELECTRONICS OF CANADA INC 340 Ferrier Street Unit 2 Markham Ontario L3R 2Z5 Canada TEL 1 877 283 5901 TEL 905 479 4411 PIONEER ELECTRONICS ASIACENTRE PTE LTD 253 Alexandra Road 04 01 Singapore 159936 TEL 65 6472 7555 PIONEER ELECTRONICS DE MEXICO S A de C V Blvd Manuel Avila Camacho 138 10 piso Col Lomas de Chapultepec Mexico D F 11000 TEL 55 9178 4270 先鋒股份有限公司...

Reviews: