background image

160

If a party goes out of the communication range, a message appears to notify that 

the rider has gone out of range. 

If the rider comes closer after that, a message appears to notify that the rider has 

come in range.

Option Settings of the Live Partner Function

Adding a Partner

A partner can be added by a coach. 

Registering a partner requires the setting to add a coach to be set on the partner's 

cyclocomputer at the same time. 

For details, refer to the following.

Adding a Coach

1

  Press the [Menu] button.

2

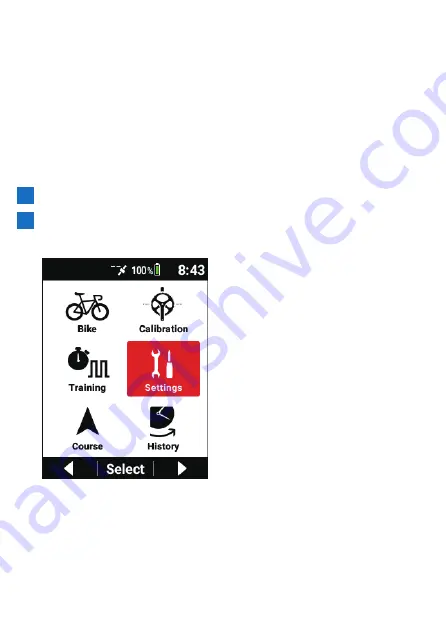
  Use the [←]/[→] buttons to select [Settings] and then press 

the [Confirm] button.

Summary of Contents for SGX-CA600

Page 1: ...ations Training Using the Alert Notification Function Using the Strava Live Segment Function Using the Live Partner Function Analyzing Log Data Navigation Pedaling Monitor Bike and Sensor Settings Advanced Settings Linking with External Services Frequently Asked Questions Appendix English ...

Page 2: ...7 Switching to Sleep Mode 30 Switching to the sleep state automatically if no operation is performed within a set time 31 Initial Setup 36 Performing the Initial Setup by Operating the Device 37 Configuring the Settings in the App 40 Configuring the Settings on the Device 41 User Settings 41 Bike Settings 41 Sensor Settings 41 Wi Fi Settings 41 Page Settings 41 Map Download 41 Basic Operations 42 ...

Page 3: ...6 Selecting an Original Menu 106 Editing an Original Menu 109 Creating an Original Menu 111 Measuring Your FTP 114 Performing Training Based on Your MMP Data 121 Types of Threshold Training 121 Setting the MMP 122 Automatically Switching to the Screen That Matches the Training Menu 134 Setting the Countdown Timer 135 Using the Alert Notification Function 138 Configuring the Basic Settings of Alert...

Page 4: ...ith GPS Setup 193 Strava Setup 193 Transferring from a Smartphone App 193 Transferring Course Files Using a PC 193 Selecting a Course 194 Selecting from the Transfer Folder 194 Selecting from past Log Data 197 Checking a Course 200 Navigation Settings 205 Starting and Stopping Navigation 206 Simulation 208 Smart Trainer Setting 208 Starting and Stopping 209 Simulation Player 211 Map Download 213 C...

Page 5: ...ith GPS 328 TrainingPeaks 328 ZWIFT 328 Smartphone Notification Function 328 A GPS Function 329 Frequently Asked Questions 330 Q How can I return the language setting to English 330 Q The vectors of the pedaling graph are not displayed Is there a problem with the display 330 Q Error 13 occurred during zero calibration What does this error mean 330 Q The operation buttons have become completely ino...

Page 6: ...6 Introduction Checking Accessories This product contains the following parts Main unit Bracket ...

Page 7: ...ds or more while logging is stopped to switch to the screen to save the log data Performing Logging 3 Power Logging button Press and hold this button for 2 seconds or more when the power of the device is off to turn the power on Press and hold this button for 2 seconds or more when the device is running to display the power off sleep confirmation screen Press this button to start or stop logging ...

Page 8: ...irm Enlarge buttons Press this button when the main menu screen is displayed to confirm an item Press this button when the meter screen is displayed to display the data field at the top left enlarged However large data fields such as the course display are enlarged first because they are given priority When this button is pressed during enlarged display the next data field is displayed enlarged Af...

Page 9: ...hen there is an alert or button operation 4Air pressure sensor Do not block this sensor or the device will not operate properly 5Bracket installation slot Use the bracket installation slot to attach the device on the bracket fixed to the bike Name of Each Screen Meter screen This is the main screen of the device for displaying the trip data of your bike When you turn on the device the meter screen...

Page 10: ...10 Main menu screen This is the main screen of the device for displaying various menus Operating the Main Menu Screen ...

Page 11: ...The functions of the main unit buttons differ depending on the displayed screen Operation in the menu screen button Selects an item or value button Confirm button Confirms an item or value Menu button Returns to the previous screen Pressing and holding this button returns to the meter screen ...

Page 12: ...ess and hold to display the status screen Press and hold during enlarged display to display the data field of the settings screen Menu button Press this button during enlarged display to return to the meter screen Lap button and Power Logging button The Lap button and Power Logging button can be operated in any screen ...

Page 13: ...stops resumes logging Press and hold to turn off the power or switch to the sleep state Screen hierarchy Enlarged Display Status Screen Meter Screen Main Menu Screen Bike Screen Calibration Scren Training Screen Settings Screen Course Screen History Screen Viewing the Meter Screen The meter screen consists of data fields to display various measurement data and pages to lay out and display the data...

Page 14: ...ield Page The number of data fields to display on a page and the layout can be customized Setting Data Fields Page set A combination of multiple pages is called a page set Multiple page sets can be registered and accessed Setting Data Fields PageSet1 PageSet2 Page3 Page2 Page1 Page1 Page2 Page3 ...

Page 15: ...n Installing the device Mount the device to your bike Caution When mounting the device make sure your bike is in a stable position to prevent it from falling 1 Remove the bolt from the bracket Remove the bolt from the bracket using a 3 mm hex wrench 1 1Hex wrench Be careful not to lose the removed bolt ...

Page 16: ... mounting the bracket on the bike 3 Secure the bracket with the bolt Apply an anti seize compound like grease to the bolt Adjust the bracket horizontally from the stem insert the bolt into the hole and tighten lightly 4 Attach the strap to the device Lace the strap through the strap holes of the device ...

Page 17: ...he strap to the handlebars orient the device as shown in the figure and align the bracket installation slot on the back of the device with the groove in the bracket Turn the device clockwise until the device and bracket are securely fixed together ...

Page 18: ...e center of the handlebars or horizontal to the stem loosen the bracket bolt and adjust it After adjusting the angle secure the bracket by tightening the bolt that you tightened lightly Use a tool that can measure the torque to tighten the bolt Tightening torque 0 6 N m Front view Side view ...

Page 19: ...compatible with ANT sensors mounted on your bike Refer to the user s manual of your ANT sensors for mounting instructions After mounting a sensor perform pairing with the device For details refer to Connecting Sensors This product is ANT certified Visit http www thisisant com directory for a list of compatible products and apps ...

Page 20: ...e device using the provided USB cable before using it Charging the device 1 Open the USB connector cover 2 Connect the provided USB cable to the USB connector of the device 3 Turn your PC on and connect the USB cable to an open USB port on your PC The device starts charging When the device is off ...

Page 21: ...g The charging time is shorter if the power is turned off Charging icons Charging Fully charged Note The device takes about 4 hours to fully charge when the power is off or normal charging When the device is turned off the screen turns dark after 5 seconds To check the charge state and battery level press the Power button ...

Page 22: ... that the USB output of your PC is compatible with 5 V 500 mA Do not unplug the USB cable shut down the PC or put it to sleep sus pend the power supply to the USB etc during access between the device and PC as there is a risk of corrupting data in the device 4 Unplug the USB cable from the USB port Once data transfer or charging is complete disconnect the USB cable from the PC first and then from ...

Page 23: ...de auto power off and auto sleep Low Energy Mode Auto Power Off Auto Sleep You can also check the battery level on the device settings screen An estimate of the remaining possible operating time is also displayed Device Settings Estimate of possible operating time This device can be used for approximately 12 hours with a fully charged battery In case of screen brightness 3 Note The possible operat...

Page 24: ...eplaced For details please visit our website http www pioneerelectronics com http www pioneerelectronics ca www pioneer car eu Turning Power On Off Turning power on 1 Press and hold the Power button for 2 seconds or more An opening message appears and then the meter screen is displayed automatically ...

Page 25: ...25 ...

Page 26: ...26 Turning power off 1 Press and hold the Power button for 2 seconds or more 2 Press the Confirm button A shutdown message will appear and the power turns off ...

Page 27: ...if no operation is performed within a set time You can set the device to turn off automatically if no operation is performed within a set time 1 Press the Menu button 2 Use the buttons to select Settings and then press the Confirm button ...

Page 28: ...28 3 Use the buttons to select Device and then press the Confirm button 4 Use the buttons to select Auto Power Off and then press the Confirm button ...

Page 29: ...29 5 Press the Confirm button to select the Enable check box 6 Use the buttons to select Power Off Time and then press the Confirm button ...

Page 30: ...e power on state immediately by pressing any button other than the buttons Use this feature when for example you take a lunch or other break or when your bike is standing by for the transition from swimming to cycling during a triathlon Note If a Pedaling Monitor Power Meter or Smart Trainer in the Sensor List of the currently selected bike are enabled apply over 5 watts of power or produce a cade...

Page 31: ... button A message is displayed and the device switches to sleep state Switching to the sleep state automatically if no operation is performed within a set time You can set the device to switch to the sleep state automatically if no operation is performed within a set time ...

Page 32: ...32 This is set to 30 min by default 1 Press the Menu button 2 Use the buttons to select Settings and then press the Confirm button ...

Page 33: ...33 3 Use the buttons to select Device and then press the Confirm button 4 Use the buttons to select Auto Sleep and then press the Confirm button ...

Page 34: ...34 5 Press the Confirm button to select the Enable check box 6 Use the buttons to select Auto Sleep Time and then press the Confirm button ...

Page 35: ... 7 Press the buttons and Confirm button to set the time to wait until switching to the sleep state 8 Press the Confirm button Note Sleep state will not engage during logging even if no operation continues ...

Page 36: ...r Android device and then per forming the initial setup in the app In this case the initial setup procedure on this device will not be nec essary because the meter screen will be displayed when synchroni zation with the device is confirmed To perform the initial setup by operating the device press the button to go to the next screen There are a total of three pages in the initial setup language se...

Page 37: ...perating the Device Set the desired display language for the device The following languages can be selected English 日本語 Français Español 繁體中文 Nederlands Deutsch Italiano The language is set to English by default 1 Press the Confirm button ...

Page 38: ...38 2 Use the buttons to select a language and then press the Confirm button The selected language is confirmed Press the button to go to the next screen 3 Press the Confirm button ...

Page 39: ... is saved If the time zone setting is incorrect the time may be off by the time zone amount after a GPS automatic update even when the time has been set If logging is started in the factory default state the The Date Time are incorrect message will be displayed If logging is started while the date is incorrect you can change the date and time in the history after the log data is saved The format s...

Page 40: ...the button The initial setup completion message appears To complete the initial setup press the Confirm button The device starts and the meter screen appears To redo the initial setup press the button Configuring the Settings in the App Configuration of the settings is simpler if you use the Cyclo Sphere Control App which is an app for smartphones The settings can be automatically synchronized wit...

Page 41: ...power level and heart rate and other information User Settings Bike Settings Register information related to each of your bikes Bike and Sensor Settings Sensor Settings Configure various settings related to sensors Bike and Sensor Settings Wi Fi Settings Configure settings related to Wi Fi such as switching the Wi Fi connection and adding an access point Wi Fi Settings Page Settings The page layou...

Page 42: ...Screen The meter screen is the main screen of the device for displaying trip data When you turn on the device the meter screen is displayed first Note To display the meter screen from the main menu screen press the Menu button Viewing Pages The meter screen consists of multiple pages and data fields Various information is displayed on the pages on a data field basis Data field A data field shows t...

Page 43: ...ation is possible depending on the data type and display type Example Numerical type 1Label 2Unit 3Sub label Page A screen on which data fields are placed The number of data fields to display and the layout on each page can be edited as desired to match the purpose of use Setting Data Fields Changing the Page Change the page to display 1 Press the buttons Each press changes the page ...

Page 44: ...44 Enlarging the Display of a Data Field Enlarge the display of a data field displayed on a page 1 Press the Confirm button The data field is displayed enlarged ...

Page 45: ...e layout will be displayed at the top left for the first 2 seconds The place focused in red is the data field currently displayed enlarged When the Confirm button is pressed during enlarged display enlarged display continues and the next data field is displayed ...

Page 46: ...g the Confirm Enlarge button when the last data field is dis played ends the zoom feature and returns the screen to normal display If no operation is performed normal display returns after approximately 5 seconds ...

Page 47: ...7 Changing the Display Type of a Data Field You can change the category unit type and other settings for the data displayed in a data field 1 Press the Confirm button The data field is displayed enlarged ...

Page 48: ...Confirm button until the data field for which you wish to change the display type appears and then press and hold the Confirm button Use the buttons to select the desired display type and then press the Confirm button ...

Page 49: ...rn to the meter screen Displaying the Status In the status display you can set the screen brightness and GPS settings The sensor connection status is displayed below these settings 1 Press and hold the Confirm button for 2 seconds or more The status screen appears ...

Page 50: ...perating the Main Menu Screen You can configure various settings of the device in the main menu screen 1 Press the Menu button 2 Use the buttons to select a main menu item and then press the Confirm button ...

Page 51: ...onfigure settings and perform operations related to training such as creating a training menu and starting training For details refer to Training Configure various settings related to Wi Fi Cyclo Sphere and the device For details refer to Advanced Settings Configure settings and perform operations related to courses such as selecting a course and downloading a map For details refer to Transferring...

Page 52: ...tection status 3ANT Bluetooth power transmission status ANT when ANT power transmission is enabled BT when Bluetooth power transmission is enabled ANT BT when both are enabled is displayed 4GPS reception status 5Battery status 6Current time Operation in the Spin Screen A screen for selecting the current value from predetermined items such as dates is called a spin screen ...

Page 53: ...nd each press of the Confirm button changes the selected item Operation in the Text Input Screen Text input operation on the device is performed by first selecting the character type in the type selection screen and then entering text by selecting the desired text in the displayed text input screen ...

Page 54: ...creen uppercase a Displays the alphabet letter list screen lowercase 1 Displays the number list screen Displays the symbol and other character list screen SP Enters a space BS Deletes one character at a time Moves the text input cursor position to the left Moves the text input cursor position to the right Set Saves the entered text and ends text input ...

Page 55: ...t is discarded returns to the state before input and text input ends If you press the Menu button in the text input screen the entered text is saved and the type selection screen reappears Performing Logging Recording information such as the elapsed time various sensor information and GPS position information is called logging Timer Resetting Lap Lap Lap Lap Stop Stop Lap1 Lap2 Lap3 Lap3 Lap4 Lap5...

Page 56: ...ion message appears If you press the Confirm button the log data is saved and the meter screen reappears If you press the button the message closes and the meter screen reappears while logging remains in the stopped state When you wish to start logging press the Logging button again ...

Page 57: ...l The device saves the various data during logging at a set interval Select from Auto 1 sec 3 sec 5 sec and 10 sec for the setting If the interval is set to Auto the logging interval becomes shorter when the riding speed of the bike increases and longer when the riding speed decreases Factory default setting Note The maximum file size for log data that can be analyzed in Cyclo Sphere is 16 MB The ...

Page 58: ...58 2 Use the buttons to select Settings and then press the Confirm button 3 Use the buttons to select Logging and then press the Confirm button ...

Page 59: ...59 4 Use the buttons to select Logging Interval and then press the Confirm button 5 Use the buttons to select the desired setting and then press the Confirm button ...

Page 60: ...hed during logging For example if you wish to automatically pause logging when the ride speed decreases to 3 km h or slower and resume logging when the ride speed becomes faster than 3 km h enable Auto Pause Resume and set Trigger Threshold to 3 0 Factory default setting Setting the Auto Pause function 1 Press the Menu button 2 Use the buttons to select Settings and then press the Confirm button ...

Page 61: ...61 3 Use the buttons to select Logging and then press the Confirm button 4 Use the buttons to select Auto Pause Resume and then press the Confirm button ...

Page 62: ... the buttons to select Enable and then press the Confirm button The Enable check box is selected and the Auto Pause Resume func tion turns on To turn it off press the Confirm button again to clear the check box ...

Page 63: ...63 6 Use the buttons to select Trigger Threshold and then press the Confirm button 7 Use the buttons to set the speed at which the Auto Pause function works and then press the Confirm button ...

Page 64: ...g Set the operation interval of the Reminder function as desired Select from 10 sec 30 sec and 1 min for the setting Factory default setting Note The Reminder function reminds you not only before logging starts but also when you resume a ride from the logging stopped state The Reminder function determines you are riding by one of the values of speed cadence or power It may not operate depending on...

Page 65: ...65 2 Use the buttons to select Settings and then press the Confirm button 3 Use the buttons to select Logging and then press the Confirm button ...

Page 66: ... Use the buttons to select Reminder and then press the Confirm button 5 Use the buttons to select Enable and then press the Confirm button The Enable check box is selected and the Reminder function turns on ...

Page 67: ...nfirm button again to clear the check box 6 Use the buttons to select Reminder Interval and then press the Confirm button 7 Use the buttons to select the operation interval of the Reminder function and then press the Confirm button ...

Page 68: ...a PC Upload via the Cyclo Sphere Control App Uploading via Cyclo Sphere Control App About Cyclo Sphere This is a free web service to upload the log data of the device and then perform detailed data analysis The service can be accessed with a web browser or dedicated application Recommended web browsers Windows Google Chrome Mozilla Firefox Macintosh Google Chrome Mozilla Firefox Apple Safari Recom...

Page 69: ...of Cyclo Sphere for uploading the log data via Wi Fi If you are using Google etc for the account configure the account settings from the Cyclo Sphere Control App on your iPhone or Android device Only account settings using an e mail address can be set on the device 1 Press the Menu button 2 Use the buttons to select Settings and then press the Confirm button ...

Page 70: ...70 3 Use the buttons to select Cyclo Sphere and then press the Confirm button 4 Use the buttons to select Account and then press the Confirm button ...

Page 71: ...71 5 Use the buttons to select Email Address and then press the Confirm button 6 Use the Confirm buttons to enter an e mail address ...

Page 72: ...d and then press the Confirm button to return to the previous screen Operation in the Text Input Screen 9 Use the buttons to select Login and then press the Confirm button If login is successful your user name is displayed and the logout button is displayed To change the user press the logout button If Wi Fi setup has not been performed the screen changes to the Wi Fi setup screen after you press ...

Page 73: ...o upload uploaded automatically After setting up Wi Fi perform either Uploading the log data manually or Uploading the log data automatically Wi Fi Settings Uploading the log data manually Select the log data to upload to Cyclo Sphere from the list of log data and then upload the log data 1 Press the Menu button 2 Use the buttons to select Settings and then press the Confirm button ...

Page 74: ...74 3 Use the buttons to select Cyclo Sphere and then press the Confirm button 4 Use the buttons to select Manual Upload and then press the Confirm button ...

Page 75: ...ns to select the log data you wish to upload and then press the Confirm button Repeat step 5 to add check marks for all the log data you wish to upload 6 Use the buttons to select Upload and then press the Confirm button ...

Page 76: ...ransfer log data to your iPhone or Android device when uploading log data via the Cyclo Sphere Control App Bluetooth is displayed Both Wi Fi and Bluetooth may be displayed Uploading only the log data that is different from the already uploaded log data Upload all log data that has not been uploaded to Cyclo Sphere 1 Press the Menu button 2 Use the buttons to select Settings and then press the Conf...

Page 77: ...77 3 Use the buttons to select Cyclo Sphere and then press the Confirm button 4 Use the buttons to select Difference Upload and then press the Confirm button ...

Page 78: ...load the log data to Cyclo Sphere when logging stops and the log data is saved If there is log data that has not been uploaded to Cyclo Sphere before log ging starts or after the log data is saved the device periodically checks for a Wi Fi connection and if a connection can be established it uploads the log data to Cyclo Sphere in the background 1 Press the Menu button 2 Use the buttons to select ...

Page 79: ...9 3 Use the buttons to select Cyclo Sphere and then press the Confirm button 4 Use the buttons to select Auto Upload and then press the Confirm button The check box is selected and auto upload is enabled ...

Page 80: ...onnect the device to your PC with the provided USB cable after the device has started up completely The device is recognized as an MTP device on the PC The mode will be charging mode if you connect the USB cable while the power of the device is off For details on connecting the device and PC refer to Charging the device Note For MTP connection with Macintosh please refer to the following URL for e...

Page 81: ...sis may take a while due to server congestion You can check the analysis state if you leave the pop up displayed If you closed the pop up the analysis state is displayed at the top right of the workout list window You can check the progress by placing the mouse over it When the indication at the top right disappears analysis is complete and the data has been added to the workout list For details r...

Page 82: ...ter the saving of log data while the device and Cyclo Sphere Control App are linked the log data is transferred to the Cyclo Sphere Control App via Bluetooth automatically Transferred log data is transferred from the Cyclo Sphere Control Appto Cyclo Sphere automatically using the phone line or Wi Fi connection To turn off automatic transfer from the Cyclo Sphere Control App using the phone line in...

Page 83: ...e transferred via Wi Fi if the auto upload function is enabled If log data was uploaded via the Cyclo Sphere Control App Bluetooth is displayed below the log data name on the log data selection screen If log data was uploaded via Wi Fi Wi Fi is displayed below the log data name on the log data selection screen Both Wi Fi and Bluetooth may be displayed ...

Page 84: ... other people are fun but riding with other people is more tiring than I expected and I do not want to be a burden on other people I normally ride hard but there are situations where I can not keep up with other people I want to get faster The best thing to do is to plan training that will help you overcome these issues Riders who wish to do well in road races The key is to clarify the areas you w...

Page 85: ...Types of Training Menus Basically you can use the following five methods to handle your training menus on the device Link menu Send a training menu workout created in the TrainingPeaks service using the Cyclo Sphere Control App on your iPhone or Android device and import and link it on your device Training assistance You can use the Wi Fi function of the device to download the training menus you c...

Page 86: ... ride for 20 minutes and measure your func tional threshold power FTP MMP challenge This is a training menu based on your mean maximal power MMP data You can customize the target FTP and target power for the FTP 20 minute test and MMP challenge training menus ...

Page 87: ...ata by lap Training Start Training Stop Warm Up Cool Down Cadence focus Pedaling focus Lap1 Lap2 Lap3 If not separated by lap Data that has been averaged overall is collected so analysis cannot be performed properly later It is difficult to know during training from where the ride method needs to be changed Laying out an Appropriate Display for a Lap The device allows you to select which numerical...

Page 88: ... switched automatically to the layout recommended for the training details This saves you the trouble of having to manually press laps and select pages You can also manually operate laps and change pages Cyclo Sphere Analysis App comes with 28 types of training menus The following describes an example of creating B7 Interval Training Using a Power Meter 1 Install the Cyclo Sphere Analysis App for ...

Page 89: ... Wi Fi refer to the following Wi Fi Settings Importing a Training Menu This section describes how to import a training menu created in the Cyclo Sphere Analysis App to the device so that you can display it as a training menu on the device Note Configure the account settings in advance Creating a Cyclo Sphere account 1 Press the Menu button 2 Use the buttons to select Settings and then press the Co...

Page 90: ...90 3 Use the buttons to select Cyclo Sphere and then press the Confirm button 4 Check that the check box is selected for Training Menu Sync ...

Page 91: ...n press the Confirm button 5 Use the buttons to select Sync Now and then press the Confirm button Wait until the synchronization finishes 6 When the synchronization finishes press the Menu button to return to the main menu screen Selecting an Imported Training Menu 1 Press the Menu button ...

Page 92: ...92 2 Use the buttons to select Training and then press the Confirm button 3 Use the buttons to select Training Menu and then press the Confirm button ...

Page 93: ...lected training menu is displayed in the Training Menu item 4 Use the buttons to select Training Assist and then press the Confirm button 5 Use the buttons to select the training item you wish to use and then press the Confirm button ...

Page 94: ...94 6 Check the training details and then press the Confirm button The name of the selected training menu is displayed in the Training Menu item ...

Page 95: ...95 Starting Ending a Training Menu 1 Press the Menu button 2 Use the buttons to select Training and then press the Confirm button ...

Page 96: ...ning menu will be separated by laps and the first interval segment will start If logging is not started logging will start simultaneously with the start of the training menu If you press the Logging button the training menu pauses Press the Logging button again to resume the training menu 4 Start training in accordance with the instructions on the screen The instructions for the first interval seg...

Page 97: ...ss the Logging button again If you press the button the log data deletion confirmation message appears If you press the Confirm button the log data is deleted and the screen displayed before you started logging reappears Note You can also save the log data by pressing and holding the Lap button for 2 seconds or more in the logging stopped state When the capture function is enabled the function to ...

Page 98: ...98 2 Use the buttons to select Training and then press the Confirm button 3 Use the buttons to select Training Stop and then press the Confirm button ...

Page 99: ...sage and save the log data Deleting a Training Menu You can delete a training menu that was imported to the device or a training menu that was created on the device Note You can delete only the training menus that were created from Linked Menu Training Assist and Original Menu 1 Press the Menu button 2 Use the buttons to select Training and then press the Confirm button ...

Page 100: ...100 3 Use the buttons to select Training Menu and then press the Confirm button 4 Use the buttons to select the training item you wish to delete and then press the Confirm button ...

Page 101: ...r to Selecting an Imported Training Menu and then select the training menu you wish to delete 5 Check that the training menu you wish to delete is dis played and then press the button 6 Press the Confirm button ...

Page 102: ...phere Control App and your device Operate the Cyclo Sphere Control App to display your device from Add a new device and then configure the link setting 4 Select the following in order in the Cyclo Sphere Control App Others Cooperation with other services 5 Tap Training Peaks Authentication in the Cyclo Sphere Control App The authentication screen of TrainingPeaks appears 6 Perform authentication i...

Page 103: ...103 9 Use the buttons to select Training and then press the Confirm button 10 Use the buttons to select Training Menu and then press the Confirm button ...

Page 104: ...elected training menu is displayed in the Training Menu item 11 Use the buttons to select Linked Menu and then press the Confirm button 12 Use the buttons to select the training item you wish to use and then press the Confirm button ...

Page 105: ...105 13 Check the training details and then press the Confirm button The name of the selected training menu is displayed in the Training Menu item ...

Page 106: ... with operation only on the device and then use it for training There is the method of selecting from three original menus provided on the device in advance the method of editing a selected original menu to match your prefer ences and the method of creating a new original menu Selecting an Original Menu 1 Press the Menu button 2 Use the buttons to select Training and then press the Confirm button ...

Page 107: ...107 3 Use the buttons to select Training Menu and then press the Confirm button 4 Use the buttons to select Original Menu and then press the Confirm button ...

Page 108: ...108 5 Use the buttons to select a menu and then press the Confirm button 6 Press the Confirm button The selected original menu is set as the training menu and the screen of step 3 reappears ...

Page 109: ...109 Editing an Original Menu 1 Press the Menu button 2 Use the buttons to select Training and then press the Confirm button ...

Page 110: ...ttons to select Edit and then press the Confirm button Check that the name of an original menu is displayed in Training Menu 4 Use the buttons to select each item and then press the Confirm button Setting item details ...

Page 111: ...press the Confirm button The edited training menu is saved or copied to the cyclocomputer and set as the training menu to use Note If you select Add New _copy is automatically added to the end of the menu name Creating an Original Menu 1 Press the Menu button ...

Page 112: ...112 2 Use the buttons to select Training and then press the Confirm button 3 Use the buttons to select Create and then press the Confirm button ...

Page 113: ...113 4 Use the buttons to select each item and then press the Confirm button Setting item details 5 Use the buttons to select Save and then press the Confirm button ...

Page 114: ...every next interval segment after that set this to 5 W Rest Time Set the time for taking a rest between the previous inter val and next interval Rest Target Set the target power value target output value for taking a rest Interval Set Set the number of interval segments to include If the number of intervals is set to only 1 the settings of Rest Time and Rest Target will be disabled because there w...

Page 115: ... min 1 5 5 5 10 20 15 Time Rest Rest Cool down 5 min max 20 min max 1 min 100 rpm Rest 1 min 3 set Training Start Training End 1 Press the Menu button 2 Use the buttons to select Training and then press the Confirm button ...

Page 116: ...to select Training Menu and then press the Confirm button The name of the currently selected training menu is displayed in the Training Menu item 4 Use the buttons to select FTP 20 min Test and then press the Confirm button ...

Page 117: ...117 5 Use the buttons to select Target FTP and then press the Confirm button 6 Use the buttons to enter the target FTP value and then press the Confirm button Adjust the target FTP value as necessary ...

Page 118: ...he buttons to select Set and then press the Confirm button FTP 20 min Test is displayed for the Training Menu item Note A numerical value that is approximately 5 higher than the target FTP becomes the target power ...

Page 119: ...119 8 Use the buttons to select Training Start and then press the Confirm button 9 Press the Confirm button The warm up starts ...

Page 120: ...essage appears If you press the Confirm button the log data is saved and the Update your FTP data message appears If you press the Confirm button the FTP value in the user settings is updated with the new FTP measurement result If multiple FTP measurement results are recorded in the log data you can select the measurement result by pressing the button If you press the button the message closes and...

Page 121: ...aximal power MMP is the maximum power that you can output on aver age for a given period of time For example MMP includes data such as an average of 280 W for 5 minutes which means that this is the maximum value within the arbitrary period most recent month or year for that data Performing training based on this MMP data allows you to perform training with updating the mean maximal power as your g...

Page 122: ...chronizing the MMP with Cyclo Sphere Entering the MMP manually Note When you synchronize the MMP with Cyclo Sphere there needs to be a certain amount of riding data in Cyclo Sphere and it must contain MMP values Synchronizing the MMP with Cyclo Sphere 1 Press the Menu button 2 Use the buttons to select Settings and then press the Confirm button ...

Page 123: ...123 3 Use the buttons to select Cyclo Sphere and then press the Confirm button 4 Check that the Parameter Sync check box is selected use the buttons to select Sync Now and then press the Confirm button ...

Page 124: ...hes the MMP data for the most recent three months in Cyclo Sphere is reflected on the device Entering the MMP manually Manually set the MMP value required in the Threshold Training 1 Press the Menu button 2 Use the buttons to select Settings and then press the Confirm button ...

Page 125: ...125 3 Use the buttons to select User Settings and then press the Confirm button 4 Use the buttons to select MMP and then press the Confirm button ...

Page 126: ...126 5 Use the buttons to select the item to use for train ing and then press the Confirm button 6 Use the buttons to select the numerical value you wish to set and then press the Confirm button ...

Page 127: ... 7 Enter the other items in the same way as necessary You can also end input after entering only the item to be used in the Threshold Training Starting an Threshold Training 1 Press the Menu button 2 Use the buttons to select Training and then press the Confirm button 3 Use the buttons to select Training Menu and then press the Confirm button The name of the currently selected training menu is dis...

Page 128: ...128 4 Use the buttons to select Threshold Training and then press the Confirm button ...

Page 129: ...129 5 Use the buttons to select Challenge Menu and then press the Confirm button 6 Use the buttons to select the item you wish to set and then press the Confirm button ...

Page 130: ...130 7 Use the buttons to select Target Power and then press the Confirm button 8 Use the buttons to enter the target power you wish to set as a goal and then press the Confirm button ...

Page 131: ...numerical value is confirmed and the previous screen reappears Adjust the target power as necessary Note A numerical value that is approximately 2 higher than the MMP value displayed in the Current Record field becomes the target power 9 Use the buttons to select Set and then press the Confirm button The value selected in step 6 is displayed for the Training Menu item ...

Page 132: ...132 10 Use the buttons to select Training Start and then press the Confirm button 11 Press the Confirm button The warm up starts ...

Page 133: ...p button the next interval segment will start 12 Press the Logging button Logging stops and the save confirmation message appears If you press the Confirm button the log data is saved If you press the button the message closes and the previous screen reappears while logging remains in the stopped state When you wish to restart logging press the Logging button again If you press the button the log ...

Page 134: ... logging is stopped will not work Automatically Switching to the Screen That Matches the Training Menu If the Auto Page Transition check box is selected the data field display will switch automatically to the layout recommended for the training menu when the training menu starts Note You can edit the data fields even when the layout is the recommended layout 1 Press the Menu button 2 Use the butto...

Page 135: ...heck box is selected the Auto Page Transition function is enabled Setting the Countdown Timer While a training menu is in progress a countdown to the next interval is displayed to urge you to prepare for the next interval You can set the number of seconds for that countdown 1 Press the Menu button ...

Page 136: ...e the buttons to select Training and then press the Confirm button 3 Use the buttons to select Count Down Seconds and then press the Confirm button The countdown is performed with the selected number of seconds ...

Page 137: ... the countdown time from 3 sec 5 sec and 10 sec Factory default setting Note If 10 sec is selected and the current interval time is less than 10 sec the countdown will be from an interval time of less than 10 sec ...

Page 138: ...rt function operates only during logging It does not operate when logging is stopped Configuring the Basic Settings of Alerts Setting the Message and Sound Set whether or not to display a message and whether or not to output a sound for various alerts 1 Press the Menu button 2 Use the buttons to select Training and then press the Confirm button ...

Page 139: ...a notification Clear this check box to not display a message Sound Select this check box to output a sound when there is a notification Clear this check box to not output a sound Power Heart Rate and Cadence Set the upper limit and lower limit for power heart rate and cadence The following explains how to set the Power Alert as an example 1 Press the Menu button ...

Page 140: ...140 2 Use the buttons to select Training and then press the Confirm button 3 Use the buttons to select Alerts and then press the Confirm button ...

Page 141: ...141 4 Use the buttons to select Power Alert and then press the Confirm button Setting item Description ...

Page 142: ... you will be notified with a power alert Note If two or more types go outside the ranges at the same time you only receive the alert for one type with the priority given in the order of power heart rate and cadence 5 Press the Menu button 6 Set each item of Heart Rate Alert and Cadence Alert Using the Auto Target Alert Function When a training menu is in progress this function alerts you when the ...

Page 143: ...143 2 Use the buttons to select Training and then press the Confirm button 3 Use the buttons to select Alerts and then press the Confirm button ...

Page 144: ...144 4 Use the buttons to select Auto Target Alert and then press the Confirm button Setting item Description Power Select this check box to enable alerts Clear this check box to not be notified ...

Page 145: ... check box to not be notified Target Cadence When the cadence goes above or below the range set here with respect to the value set for the target cadence of the corresponding training menu you will be notified Note If two or more types go outside the ranges at exactly the same time you only receive the alert for one type with the priority given in the order of power heart rate and cadence Using th...

Page 146: ...146 2 Use the buttons to select Training and then press the Confirm button 3 Use the buttons to select Alerts and then press the Confirm button ...

Page 147: ...147 4 Use the buttons to select Intensity Alert and then press the Confirm button Setting item Description ...

Page 148: ...hreshold2 Enable Threshold3 Enable Select a check box to enable the corresponding thresh old value Clear this check box to not be notified Threshold1 Threshold2 Threshold3 Notify when the intensity exceeds the values set here ...

Page 149: ...urthermore your activity at this time is also reflected as Strava data so you can also review your ride later For details on Strava refer to the following URL https www strava com features Transferring a Strava Live Segment Note To use the Strava Live Segment function you need to register for a paid account Summit in Strava You need to register the segments you wish to transfer as favorite seg men...

Page 150: ...omatically transferred to the device The segments that have been automatically transferred can be checked in Menu Settings Strava Live Segment Segment List Using a Strava Live Segment While Riding When the Strava live segments have been transferred to the device configure a setting on the device and then ride to the start point of a segment 1 Press the Menu button 2 Use the buttons to select Setti...

Page 151: ...151 3 Use the buttons to select Strava Live Segment and then press the Confirm button 4 Use the buttons to select Enable and then press the Confirm button to select the check box ...

Page 152: ...the Segments The display changes in stages as you get nearer to the segment For example the display becomes as follows when you are within 1 km of the seg ment and farther than 200 m When you reach the start point of the segment the display becomes as follows and the live segment starts automatically ...

Page 153: ... in a seg ment the current segment will not end Riding to the End Point of the Segment When you arrive at the end point the time difference from the KOM or PR and the elapsed time when you reached the goal are displayed When you ride more than 200 m away from the course of the segment you are notified that you have left the segment and the live segment stops Disabling the Live Segment Function You...

Page 154: ...to select Strava Live Segment and then press the Confirm button 4 Use the buttons to select Enable and then press the Confirm button to clear the check box When the check box is cleared the Live Segment function is disabled ...

Page 155: ...the Auto Page Transition check box is selected the page will switch automat ically to a page with data fields including the segment when you approach within 200 m of the segment 1 Press the Menu button 2 Use the buttons to select Settings and then press the Confirm button ...

Page 156: ...156 3 Use the buttons to select Strava Live Segment and then press the Confirm button 4 Use the buttons to select Auto Page Transition and then press the Confirm button to select the check box ...

Page 157: ...ntil a segment or of the start and end of a segment at the following timing When a segment within 1 km is found 200m 656mile or less number distance will show When you have reached a segment start point Segment Start is displayed When you have reached a segment end point Segment Complete is displayed 1 Press the Menu button 2 Use the buttons to select Settings and then press the Confirm button ...

Page 158: ...elect Strava Live Segment and then press the Confirm button 4 Use the buttons to select Segment Alert and then press the Confirm button to select the check box When the check box is selected the Segment Alert function is enabled ...

Page 159: ...terns A maximum of three devices CH1 to CH3 can be connected both on the receiving side and on the sending side When you will be the coach and you wish to select three partners set CH1 to partner 1 CH2 to partner 2 and CH3 to partner 3 Then get the partners to set you as the coach for one of CH1 to CH3 Example One coach and multiple partners The coach can ride while viewing the riding state of par...

Page 160: ...t the rider has come in range Option Settings of the Live Partner Function Adding a Partner A partner can be added by a coach Registering a partner requires the setting to add a coach to be set on the partner s cyclocomputer at the same time For details refer to the following Adding a Coach 1 Press the Menu button 2 Use the buttons to select Settings and then press the Confirm button ...

Page 161: ...161 3 Use the buttons to select Live Partner and then press the Confirm button 4 Use the buttons to select one of CH1 CH2 CH3 and then press the Confirm button ...

Page 162: ...select Add Partner and then press the Confirm button The Add Partner Searching message appears and a search for part ners that can be connected in the surrounding area starts A list of device numbers are displayed as connection candidates for the found partners Search may take more than 1 minute Note The procedure of Add Coach needs to be performed on the partner s cyclocomputer For details refer ...

Page 163: ...the buttons to select the partner you wish to register and then press the Confirm button Note If the partner you wish to add is not displayed in the list return to the previous screen and select Add Partner again ...

Page 164: ...partner the Add Coach Your device num ber is message appears When an addition approval request is sent from a coach the Add Coach Device Number User Name Add to coach message appears on the partner side If you press the Confirm button addition approval is sent The coach side will be in the wait state until a response to the connection approval request is received If you press the Menu button or Co...

Page 165: ...number Adding a Coach A coach can be added by a partner Registering a coach requires the setting to add a partner to be set on the coach s cyclocomputer at the same time For details refer to the following Adding a Partner 1 Press the Menu button 2 Use the buttons to select Settings and then press the Confirm button ...

Page 166: ...166 3 Use the buttons to select Live Partner and then press the Confirm button 4 Use the buttons to select one of CH1 CH2 CH3 and then press the Confirm button ...

Page 167: ...egistered partner or coach 5 Use the buttons to select Add Coach and then press the Confirm button A search for cyclocomputers that can be connected in the surrounding area starts Search may take more than 1 minute When the partner addition approval request is sent by a coach one candidate is displayed automatically and the Add to coach message appears ...

Page 168: ...ation on partner side to notify that a connection has been established Note To not add the coach press the button If the cyclocomputer you wish to add is not displayed in the list return to the previous screen and select Add Coach again 7 Check the status displayed for the coach added to the spec ified channel number Note The partner side will be in the wait state until a response to the sent conn...

Page 169: ...he connection is not permitted Viewing the partner information screen This section describes how to view the information screen of a party registered as a partner 1 Press the Menu button 2 Use the buttons to select Settings and then press the Confirm button ...

Page 170: ...elect the channel number of the registered partner for which you wish to view the informa tion screen and then press the Confirm button The partner number connection status device number and user name are displayed for the corresponding channel If a coach is connected the coach number is not displayed ...

Page 171: ...171 You can check the following items by using the buttons to switch the item Status Device number User name 3 second average power Lap average power ...

Page 172: ...nd pedaling monitor connections on the partner side not being enabled or the device searching for the partner because for example you have moved out of range is displayed Deleting a Partner or Coach Delete a registered partner or coach 1 Press the Menu button 2 Use the buttons to select Settings and then press the Confirm button ...

Page 173: ...73 3 Use the buttons to select Live Partner and then press the Confirm button 4 Use the buttons to select the channel number to which the partner or coach is registered and then press the Confirm button ...

Page 174: ...174 5 Use the buttons to select Delete and then press the Confirm button 6 Press the Confirm button ...

Page 175: ...en that is displayed on the coach side Switch to the page containing the partner information you wish to display There are two kinds of partner information a graph type and numerical value type The graph type displays multiple information such as the user name of the partner and intensity graph all together The displayed information differs depending on the size of the data field The numerical val...

Page 176: ... because for example you have moved out of range is displayed for the 3 second average power and intensity If the partner has a heart rate sensor connected when a power meter and pedaling monitor are not connected the heart rate is displayed in the place of the 3 second average power and the maximum percentage heart rate is displayed in the place of the intensity graph Changing a partner number Yo...

Page 177: ...177 2 Use the buttons to select Settings and then press the Confirm button 3 Use the buttons to select Live Partner and then press the Confirm button ...

Page 178: ...178 4 Use the buttons to select the channel number to which the partner or coach is registered and then press the Confirm button 5 Use the buttons to select Change and then press the Confirm button ...

Page 179: ...179 6 Use the buttons to select a partner number and then press the Confirm button The partner number is changed Option Settings of the Live Partner Function 1 Press the Menu button ...

Page 180: ...180 2 Use the buttons to select Settings and then press the Confirm button 3 Use the buttons to select Live Partner and then press the Confirm button Setting item Description ...

Page 181: ...connection is reestablished Intensity Alert 90 Intensity Alert 80 Intensity Alert 70 Select this check box to be notified when the partner s intensity during riding exceeds the set percentage Clear this check box to not be notified The function operates only in the following cases When the connected partner has a power meter pedaling monitor or smart trainer connected When the MMP setting is enabl...

Page 182: ...fter it is saved 1 Press the Menu button 2 Use the buttons to select History and then press the Confirm button 3 Use the buttons to select Log Data and then press the Confirm button When the data is separated by one or more laps during logging the current log data is selected The most recent log data is selected before logging starts or after log ging is saved ...

Page 183: ...183 4 Use the buttons to select the log data you wish to display and then press the Confirm button ...

Page 184: ...s to select Lap and then press the Confirm button 6 Use the buttons to select the interval between laps you wish to display and then press the Confirm button The log data for the selected interval between laps is selected ...

Page 185: ...e buttons to select the item you wish to view Editing Log Data You can edit some log data on the device Editing the Date and Time of Log Data 1 Display the log data you wish to edit Displaying Log Data 2 Use the buttons to select Edit Date Time and then press the Confirm button ...

Page 186: ...186 3 Use the buttons to select Date and then press the Confirm button 4 Use the buttons to enter the date you wish to set and then press the Confirm button ...

Page 187: ...vious screen reappears 5 Use the buttons to select Time and then press the Confirm button 6 Use the buttons to enter the time you wish to set and then press the Confirm button Each press of the Confirm button moves the cursor in the order of hour minute and second If you press the Confirm button after the cursor has been moved to second the time is confirmed and the previous screen reappears ...

Page 188: ...buttons to select Save and then press the Confirm button The changes to the date and time are confirmed and the previous screen reappears Deleting Log Data 1 Display the log data you wish to edit Displaying Log Data ...

Page 189: ...189 2 Use the buttons to select Delete and then press the Confirm button 3 Press the Confirm button The selected log data is deleted If you press the button deletion is canceled ...

Page 190: ... This website allows you to use everything except the segment function of the Cyclo Sphere Analysis App PC Version of the Cyclo Sphere Website https cyclo sphere com app This website allows you to view detailed analysis results in a large window The window can also be customized so you can arrange the items you wish to analyze into an easy to view layout Access the Cyclo Sphere website from the fo...

Page 191: ...here and Strava are being linked Note If you select the Automatically transfer ride log data to STRAVA after uploading check box the log data uploaded from the device will also be transferred automatically to Strava If you wish to make the log data of Cyclo Sphere public in Strava select the Log files transferred to STRAVA will be made public on STRAVA check box Since analysis is performed in Cycl...

Page 192: ...lo Sphere to access TrainingPeaks is given and the previous screen reappears If Link is not active Cyclo Sphere and TrainingPeaks are being linked Note If you select the Automatically transfer ride log data to TrainingPeaks after uploading check box the log data uploaded from the device will also be transferred automatically to Strava If you wish to make log data in Cyclo Sphere public select the ...

Page 193: ...Ride with GPS and Strava in the Cyclo Sphere Control App in the same way as training menu synchronization TrainingPeaks Create routes in Ride with GPS and then save them to MyRoutes Save routes to MyRoutes in Strava and then add stars to the routes you wish to transfer When the device and Cyclo Sphere Control App are connected the course files are automatically synchronized from each of the web se...

Page 194: ... FIT format 4 Save the course files you downloaded to the PC to the device Save the course files directly under CA600 Internal storage Pioneer Course sdcard Pioneer Course LOG_2019_01_01_08_20 db LOG_2019_01_01_09_20 db Selecting a Course Select a course file that you transferred from your PC iPhone or Android device to this device as a course Selecting from the Transfer Folder Select a course fil...

Page 195: ...195 2 Use the buttons to select Course and then press the Confirm button 3 Use the buttons to select Course Select and then press the Confirm button ...

Page 196: ...to select Course Folder and then press the Confirm button A list of the courses that were transferred to the device appears 5 Use the buttons to select the name of the course you wish to set and then press the Confirm button ...

Page 197: ...isplays the elevation information for the course 7 Press the Confirm button The course is set If you press the button setting is canceled and the course list screen reappears Selecting from past Log Data Select log data that was saved in the past to the device as a course 1 Press the Menu button ...

Page 198: ...198 2 Use the buttons to select Course and then press the Confirm button 3 Use the buttons to select Course Select and then press the Confirm button ...

Page 199: ...o select Log Data Folder and then press the Confirm button A list of the courses of the log data that was saved to the device appears 5 Use the buttons to select the log data you wish to set and then press the Confirm button ...

Page 200: ...evation information for the course 7 Press the Confirm button The course is set If you press the button setting is canceled and the course list screen reappears Checking a Course You can check the information of the selected course Cue sheet Display the cue sheet for the selected course 1 Press the Menu button ...

Page 201: ...201 2 Use the buttons to select Course and then press the Confirm button 3 Use the buttons to select Cue Sheet and then press the Confirm button ...

Page 202: ...202 Course profile Display the elevation graph for the selected course 1 Press the Menu button 2 Use the buttons to select Course and then press the Confirm button ...

Page 203: ...203 3 Use the buttons to select Course Profile and then press the Confirm button Cancel the course Clear the set course 1 Press the Menu button ...

Page 204: ...204 2 Use the buttons to select Course and then press the Confirm button 3 Use the buttons to select Course Clear and then press the Confirm button ...

Page 205: ...205 Navigation Settings You can set the course navigation information 1 Press the Menu button 2 Use the buttons to select Course and then press the Confirm button ...

Page 206: ...e point from the scale set for the course of a graph part Clear this check box to not enlarge the scale North Up Select this check box to set the map orientation for the course to always orient the top of the map as North With north up display place names and icons are displayed on the map and your bike position changes depending on the direction of travel If you clear this check box to set headin...

Page 207: ...207 2 Use the buttons to select Course and then press the Confirm button 3 Use the buttons to select Navigation Start and then press the Confirm button The meter screen reappears and navigation starts ...

Page 208: ...ate a course using a smart trainer rollers A course can be simulated by using a course file or past log data When you are using a smart trainer simulation where the load automatically changes to match the gradient of the course is possible Smart Trainer Setting Enable the smart trainer setting on the device 1 Press the Menu button 2 Use the buttons to select Bike and then press the Confirm button ...

Page 209: ...ons to select Sensor and then press the Confirm button Enable Course Link in the sensor information of the smart trainer Starting and Stopping You can start and stop simulation for the set course 1 Press the Menu button ...

Page 210: ...210 2 Use the buttons to select Course and then press the Confirm button 3 Use the buttons to select Simulation Start and then press the Confirm button The meter screen reappears and simulation starts ...

Page 211: ...nd then press the Confirm button to stop simulation Simulation cannot be used during navigation Simulation Player Check the current position information and change the position during simulation 1 Press the Menu button 2 Use the buttons to select Course and then press the Confirm button ...

Page 212: ... to select Simulation Player and then press the Confirm button 4 Check the simulation conditions Each press of the button moves forward by a distance of 10 and each press of the Confirm button moves back by a distance of 5 ...

Page 213: ...a from a map data server via Wi Fi Note The device has a map of some areas stored in it by default When initializing this device the default map will be deleted 1 Enable Wi Fi Wi Fi Settings 2 Press the Menu button 3 Use the buttons to select Course and then press the Confirm button ...

Page 214: ...214 4 Use the buttons to select Map Download and then press the Confirm button 5 Use the buttons to select Add Map and then press the Confirm button ...

Page 215: ...215 6 Use the buttons to select the area of the map you wish to add and then press the Confirm button 7 Use the buttons to select the region of the map you wish to add and then press the Confirm button ...

Page 216: ...tart the system automati cally after adding of the map completes If you press the button adding of the map is canceled Note If logging is started during downloading of a map adding of the map is canceled Checking Map Information You can check the information of a map downloaded via Wi Fi 1 Press the Menu button 2 Use the buttons to select Course and then press the Confirm button ...

Page 217: ...217 3 Use the buttons to select Map Download and then press the Confirm button 4 Use the buttons to select the name of a saved map and then press the Confirm button ...

Page 218: ... If you press the Confirm button in the deletion confirmation screen the selected map is deleted and the device restarts The device restarts the system after an update finishes When an update is started the current map data is deleted If an update fails the device restarts automatically so add the map data again To add a new map select Add Map select an area select a region and download the map ...

Page 219: ...ro point calibration Connecting Connect the pedaling monitor sensors to the device 1 Turn the crankset of the bike at least three times to start the left and right transmitters Refer to the user s guide of your sensors for mounting instructions 2 Press the Menu button 3 Use the buttons to select Bike and then press the Confirm button ...

Page 220: ...220 4 Use the buttons to select Sensor and then press the Confirm button 5 Use the buttons to select Add Sensor and then press the Confirm button ...

Page 221: ...connectable sensors is performed and the found sensors are listed 6 Use the buttons to select the sensors to add and then press the Confirm button Select the check boxes for the left pedaling monitor and right pedaling monitor ...

Page 222: ...e settings of the pedaling monitor sensors can be configured in Cyclo Sphere Control App Configuring the Settings on the Device You can configure the settings of the pedaling monitor sensors on the device Changing the mode Set the mode of pedaling monitor sensors to any of the following three modes 1Pedaling monitor mode This mode can measure for example pedaling efficiency and cadence and allows ...

Page 223: ...tted 3Single power meter mode Use this mode when connecting as the single model of the ANT power meter The power value of the left or right sensor is doubled and then transmitted The torque effect pedal smoothness cadence value and other values are also transmitted 1 Press the Menu button 2 Use the buttons to select Bike and then press the Confirm button ...

Page 224: ...224 3 Use the buttons to select Tools and then press the Confirm button 4 Use the buttons to select Pedaling Settings and then press the Confirm button ...

Page 225: ...onfirm button Check that the device numbers are those of the pedaling monitor sen sors being used If they differ newly enter them Clear any sensor for which to not change the mode When changing to dual power select the check boxes for both the left and right sensors ...

Page 226: ...226 6 Use the buttons to select Device Number and then press the Confirm button 7 Use the buttons to enter the device numbers and then press the Confirm button ...

Page 227: ...alue is confirmed and the previous screen reappears 8 Turn the crankset of the bike at least three times to start the left and right transmitters Once the transmitters are started connect them with the device within 5 minutes 9 Use the buttons to select the mode to which to change and then press the Confirm button A sensor search starts The search may take longer than one minute ...

Page 228: ...ds If Success is not displayed Timeout Communication conditions are poor Check that the sensors to be connected are running and then bring the device near to the sensors and perform the connection operation again If the problem is still not resolved move sufficiently away from devices such as a Wi Fi or other wireless LAN device or a microwave oven and then try the connection operation again Batte...

Page 229: ... the magnet Note We recommend that the place of purchase perform magnet calibration 1 Ensure the bike is horizontal by using rollers or the like so that the heights of the front and back wheels are the same 2 Press the Menu button 3 Use the buttons to select Bike and then press the Confirm button ...

Page 230: ...230 4 Use the buttons to select Tools and then press the Confirm button 5 Use the buttons to select Pedaling Settings and then press the Confirm button ...

Page 231: ...e the buttons to select Magnet Calibration and then press the Confirm button 7 Turn the crank slowly in the normal direction and check that the counter is incremented once for every turn by one count at a time ...

Page 232: ... incremented readjust the magnet position 8 Use the buttons to select Start Calibration and then press the Confirm button 9 Turn the crank slowly in the normal direction at a speed of about 30 rpm until the counter reaches 5 5 ...

Page 233: ...233 10 Use the buttons to select Save and then press the Confirm button 11 Check that Success is displayed and then press the Confirm button ...

Page 234: ...r the battery has run out of power values can be displayed on the device and recorded as log data by copying the values of the pedaling monitor on the other side This enables your training to be recorded even in an emergency 1 Press the Menu button 2 Use the buttons to select Bike and then press the Confirm button ...

Page 235: ...235 3 Use the buttons to select Tools and then press the Confirm button 4 Use the buttons to select Pedaling Settings and then press the Confirm button ...

Page 236: ...5 Use the buttons to select Pedaling Copy and then press the Confirm button 6 Use the buttons to select the copy method and then press the Confirm button Select from Auto Copy L to R Copy R to L and Disable ...

Page 237: ... the side for which the connec tion is enabled are automatically reflected as the power values on the side for which the connection is disconnected Factory default setting 7 Use the buttons to select L R Balance and then press the Confirm button ...

Page 238: ...nt Calibration You can set zero point calibration to be performed automatically before the device enters sleep mode when the crank arm is placed vertical to the ground after the bike has been ridden for at least 20 minutes in an environment with a stable tem perature before stopping This allows you to significantly reduce the frequency of performing zero point cali bration before training 1 Press ...

Page 239: ...239 2 Use the buttons to select Bike and then press the Confirm button 3 Use the buttons to select Sensor and then press the Confirm button ...

Page 240: ...to select the sensor name and then press the Confirm button 5 Use the buttons to select Auto Zero Calibration and then press the Confirm button If the check box is selected the Auto Zero Point Calibration function is enabled ...

Page 241: ...241 Torque Assistance You can finely adjust the torque value measured with the pedaling monitor sensors 1 Press the Menu button 2 Use the buttons to select Bike and then press the Confirm button ...

Page 242: ...242 3 Use the buttons to select Sensor and then press the Confirm button 4 Use the buttons to select the sensor name and then press the Confirm button ...

Page 243: ...the buttons to select Torque Adjustment and then press the Confirm button 6 Use the buttons to set the torque adjustment value and then press the Confirm button Adjustment within the range of 10 to 10 is possible ...

Page 244: ... the device will begin recording riding data for 1 minute before and after at a 0 5 second interval which is double the normal frequency The mean maximal power of 10 seconds or 30 seconds is displayed when sprinting is detected The saved data can be checked in the PC version of Cyclo Sphere 1 Press the Menu button 2 Use the buttons to select Settings and then press the Confirm button ...

Page 245: ...245 3 Use the buttons to select Logging and then press the Confirm button 4 Use the buttons to select Sprint Detection and then press the Confirm button ...

Page 246: ...246 5 Use the buttons to select Enable and then press the Confirm button 6 Check the message and then press the Confirm button ...

Page 247: ... box Zero Point Calibration Perform zero point calibration of the pedaling monitor sensor Aim to perform this once every month and when the air temperature changes by at least 4 C 1 Fix the bike in place using rollers or the like 2 Turn the crankset of the bike at least three times to start the left and right transmitters ...

Page 248: ...248 3 Stop the crank arm in the vertical position 4 Press the Menu button 5 Use the buttons to select Calibration and then press the Confirm button ...

Page 249: ... or Right Zero Calibration and then press the Confirm button Calibration starts If you select LR Zero Calibration calibration is performed for both the left and right pedaling monitor sensors Calibration is performed even if only one of the left and right sides is connected ...

Page 250: ...en press the Confirm button If Failure is displayed calibration may have been performed when the crank is in an unstable state such as when it was moving Perform zero point calibration again when the crank is still 8 Check the calibration results ...

Page 251: ... Good state OK Normal Low Low Critical Cannot be used Note If a value is outside of the range zero point calibration may have been performed when the crank is in an unstable state such as when it was moving Perform zero point calibration again when the crank is still If the battery status is low or critical replace the batteries of the both the left and right sensors at the same time ...

Page 252: ...252 Bike and Sensor Settings Changing the Bike Change the bike to use 1 Press the Menu button 2 Use the buttons to select Bike and then press the Confirm button ...

Page 253: ...253 3 Use the buttons to select Select Bike and then press the Confirm button Setting item Description Auto Select Enable or disable the function to automatically change the bike selection ...

Page 254: ...d set tings and other settings regardless of whether the bike was changed automatically or manually Check that the sensors are connected correctly to the device when the bike is changed Connecting Sensors You can connect commercially available ANT sensors and Bluetooth heart rate sensors to this device Mount the sensors to the bike and then check that they are running before you begin to connect t...

Page 255: ...umference It is set to 2 096 mm by default To connect to the Bluetooth heart rate sensor configuration of the Bluetooth setting on the device is required Adding a Sensor A search for all nearby connectable sensors is performed and the found sensors are listed as connection candidates 1 Press the Menu button 2 Use the buttons to select Bike and then press the Confirm button ...

Page 256: ...uttons to select Sensor and then press the Confirm button 4 Use the buttons to select Add Sensor and then press the Confirm button The Searching message appears and then a list of sensors that can be connected appears ...

Page 257: ... heartbeat sensor is temporarily disconnected 5 Use the buttons to select the check box of the sen sor you wish to connect The sensors with check boxes selected are added to the sensor list Clear the check mark for any sensor that does not need to be added to the sensor list in advance ...

Page 258: ... order of pedaling moniter sensor ANT cadence sensor ANT S C speed and cadence sensor ANT power meter If the same type of sensor is already connected it will be deleted from the sensor list automatically and the newly added sensor will be added to the sensor list When a sensor search is performed it may take longer than one minute If an ANT power meter is added or enabled when the ANT power transm...

Page 259: ...hecking the Settings of Added Sensors You can check the settings for each added sensor A sensor can also be deleted 1 Press the Menu button 2 Use the buttons to select Bike and then press the Confirm button ...

Page 260: ... the buttons to select Sensor and then press the Confirm button 4 Use the buttons to select the name of the sensor for which you wish to check the settings or you wish to delete and then press the Confirm button ...

Page 261: ...e of the sensor This item is not displayed for a sensor that does not support display Delete Delete this sensor from the sensor list When ANT power meter is connected Setting item Description Zero Calibration Perform zero point calibration The status result and data are displayed When a ANT power meter that supports auto zero point calibration is connected the auto zero point check box can be sele...

Page 262: ... status of the right shifter System Derailleur Display the battery level and status of the system derailleur ANT smart trainer If you connect a ANT smart trainer that supports load control you can link the load with training and simulation functions Setting item Description Training Link Select this check box to link the target power value during training to the load of the ANT smart trainer Simul...

Page 263: ... values of the ANT power meter This enables power values or cadence values to be transmitted to for example the ZWIFT PC application or another manufacturer s cyclocomputer If you enable this function the connection of an ANT power meter will be disabled 1 Press the Menu button 2 Use the buttons to select Bike and then press the Confirm button ...

Page 264: ...264 3 Use the buttons to select Tools and then press the Confirm button 4 Use the buttons to select ANT Power Transfer and then press the Confirm button ...

Page 265: ...le this function to transmit the received power values of the pedaling monitor sensors or the power values of the ANT power meter as power values of the Bluetooth power meter This enables power values to be transmitted to for example the ZWIFT app If both the pedaling monitor sensors and ANT power meter are connected priority is given to the pedaling monitor sensors Configuration of the Bluetooth ...

Page 266: ...266 2 Use the buttons to select Bike and then press the Confirm button 3 Use the buttons to select Tools and then press the Confirm button ...

Page 267: ...267 4 Use the buttons to select Bluetooth Power Transfer and then press the Confirm button Setting item Description Enable Enable or disable the Bluetooth Power Transmission function ...

Page 268: ...Remote Switch Setting When components compatible with the remote switches of Shimano Di2 D FLY are connected assign the operations of the left and right remote switches to the func tions of this device or an external sensor control 1 Press the Menu button 2 Use the buttons to select Bike and then press the Confirm button ...

Page 269: ...269 3 Use the buttons to select Tools and then press the Confirm button 4 Use the buttons to select Di2 Remote Switch and then press the Confirm button ...

Page 270: ...o point calibration is performed for the connected pedaling monitor sensors or ANT power meter If both the pedaling monitor sensors and ANT power meter are con nected priority is given to the pedaling monitor sensors Speed Priority Level Settings Set the priority level of sensors for displaying and recording speed values Select from ANT speed sensor ANT S C sensor ANT power meter ANT smart trainer...

Page 271: ...271 2 Use the buttons to select Bike and then press the Confirm button 3 Use the buttons to select Tools and then press the Confirm button ...

Page 272: ...272 4 Use the buttons to select Speed Priority and then press the Confirm button 5 Use the buttons to select one of Speed Priority1 to Speed Priority4 and then press the Confirm button ...

Page 273: ...lect the item you wish to set for the speed priority level and then press the Confirm button GPS Setup Configure the settings related to the GPS function The settings are saved linked to the selected bike 1 Press the Menu button ...

Page 274: ...274 2 Use the buttons to select Bike and then press the Confirm button 3 Use the buttons to select GPS and then press the Confirm button ...

Page 275: ...ed This can be selected only when GPS is enabled Errors may be generated between the displayed values and actual positions depending on the signal conditions GPS Status Display the GPS positioning status OFF 2D 3D Furthermore the satellites for which signals were cap tured are indicated by a number and the satellite numbers with an mark were those used for GPS positioning Factory default setting D...

Page 276: ...276 2 Use the buttons to select Bike and then press the Confirm button 3 Use the buttons to select Display and then press the Confirm button ...

Page 277: ...onds or more from the meter screen Back Light Timer Switch the backlight lighting duration to Always On 15 sec 30 sec or 1 min When other than Always On is selected the backlight turns off after the selected time elapses after the last operation is performed on the device Factory default setting Speaker Settings Configure the settings related to sound The settings are saved linked to the selected ...

Page 278: ...278 2 Use the buttons to select Bike and then press the Confirm button 3 Use the buttons to select Sound and then press the Confirm button ...

Page 279: ...e of the device speaker to any of 6 lev els 3 Operation Sound Turn on or off the sound that is output when a button is pressed Factory default setting Bike Distance and Time Settings Set the total bike distance and total bike time 1 Press the Menu button ...

Page 280: ...280 2 Use the buttons to select Bike and then press the Confirm button 3 Use the buttons to select Bike Distance and then press the Confirm button ...

Page 281: ...d then press the Confirm button Each press of the Confirm button moves the cursor to the next digit place down If you press the Confirm button after the cursor has been moved to the ones place the numerical value is confirmed and the previous screen reappears ...

Page 282: ...282 5 Use the buttons to select Bike Time and then press the Confirm button 6 Use the buttons to enter the total bike time and then press the Confirm button ...

Page 283: ...of the Confirm button moves the cursor to the next digit place down If you press the Confirm button after the cursor has been moved to the ones place the numerical value is confirmed and the previous screen reappears ...

Page 284: ...r smartphones The settings can be automatically synchronized with the device For details refer to the following website https cyclo sphere com app Setting Data Fields Set the display content of the data fields displayed on each page 1 Press the Menu button 2 Use the buttons to select Settings and then press the Confirm button ...

Page 285: ...285 3 Use the buttons to select Data Fields and then press the Confirm button Setting item Description Page Set Select Select the page set to which you wish to switch from the page set list ...

Page 286: ...en set any display content for each data field num ber depending on the corresponding layout Set each of the data field type data category data type and display type If there is one setting value the setting cannot be changed Page Set Initialize Initialize the page set to factory default settings Layout Pattern List You can set a numerical value type in white data fields numerical value and graph ...

Page 287: ...287 4Number of data fields 6 5Number of data fields 7 6Number of data fields 8 7Number of data fields 9 ...

Page 288: ...288 8Number of data fields 10 9Number of data fields 11 aNumber of data fields 15 Data Field Setting Details Numerical type The following items can be set for a numerical type data field ...

Page 289: ...st Last lap ride time Fastest Lap BestLap Fastest ride time out of the ride times for individual laps Elapsed Time hh mm ss hh mm Auto Elapsed Time elapsed from the log data start to now including during auto pause or when logging is stopped Total Time Bike d h h m TotalTime Bike Total ride time per bike Total Time User Total ride time of all bikes Distance Distance km or mile Dist Current ride di...

Page 290: ...g 5 s Avg 10 s Avg 30 s Avg 60 s Avg Ns Average number of revolutions of the crank for a fixed period Cadence Max rpm Mx Maximum number of revolutions of the crank Cadence Lap Max LapMx Maximum number of revolutions of the crank per lap Cadence Last Lap Avg LstAv Average number of revolutions of the crank for last lap Cadence Last Lap Max LstMx Maximum number of revolutions of the crank for last l...

Page 291: ... 20 min Intensity Ns Nmin Exercise intensity for fixed period Ratio of MMP to average power for fixed peri od Auto displays the period when the ratio is the highest IF and TSS are not displayed correctly if FTP is not entered correctly on the SGX CA600 The FTP value needs to be set for each of the SGX CA600 and Cyclo Sphere Set the FTP value in Settings User Settings FTP Intensity is an index to d...

Page 292: ...or smart trainer is not connected when a pedaling monitor sensor is con nected this indicates the power value of the pedaling monitor sensor Power Avg Av Average Output Power Lap Avg LapAv Output per lap Power n sec Avg 3 s Avg 5 s Avg 10 s Avg 30 s Avg 60 s Avg Ns Average output for fixed period Power Max Watt FTP CP LEVEL W kg or W lb Mx Maximum output Power Lap Max LapMx Maximum output per lap ...

Page 293: ...side Torque L n sec Avg 3 s Avg 5 s Avg 10 s Avg 30 s Avg 60 s Avg Ns Average torque of fixed period for left side Torque L Max N m Mx Maximum torque for left side Torque L Lap Max LapMx Maximum torque per lap for left side Torque L Last Lap Avg LstAv Average torque for last lap for left side Torque L Last Lap Max LstMx Maximum torque for last lap for left side Torque R Torque R N m Torque R Curre...

Page 294: ...n a pedaling monitor sensor is connected this indicates the torque for the left and right sides of the pedaling monitor sensor Torque LR Avg Av Average torque for left and right sides Torque LR Lap Avg LapAv Average torque per lap for left and right sides Torque LR n sec Avg 3 s Avg 5 s Avg 10 s Avg 30 s Avg 60 s Avg Ns Average torque of fixed period for left and right sides Torque LR Max N m Mx M...

Page 295: ...of maximum torque with respect to the average torque for the left side GPR L Watt GPR L Positive power value for the left side GPA L GPA L Negative power value for the left side KI L KI L Inverse of the pedal smoothness for the left side Torque Effect R TE R Ratio of positive torque with respect to the total torque for the right side Pedal Smoothness R PS R Ratio of maximum torque with respect to ...

Page 296: ...tion Efficiency L Avg Av Average pedaling efficiency for the pedal ing monitor on the left side Efficiency L Lap Avg LapAv Average pedaling efficiency per lap for the pedaling monitor on the left side Pedaling Efficiency L n sec Avg 3 s Avg 5 s Avg 10 s Avg 30 s Avg 60 s Avg Ns Average pedaling efficiency for fixed period for the pedaling monitor on the left side Pedaling Loss L Loss L Ratio of th...

Page 297: ...the pedaling monitor on the right side Pedaling Efficiency R Pedaling Efficiency R Eff R Ratio of the total sum of the force in the rotation direction with respect to the total sum of the resultant force of the force in the rotation direction tangential direction and the force in the vertical direction normal direction in the rotation direction for one revolution of the crank for the pedaling moni...

Page 298: ...rage output of the pedaling monitors on the left and right sides Power LR Lap Avg LapAv Average output per lap for the pedaling monitors on the left and right sides Power LR n sec Avg 3 s Avg 5 s Avg 10 s Avg 30 s Avg 60 s Avg Ns Average output for fixed period for the pedaling monitors on the left and right sides Power LR Max Watt FTP CP LEVEL W kg or W lb Mx Maximum output of the pedaling monito...

Page 299: ...des Power Bal Last Lap Avg LstAv Average left right ratio for the last lap for the pedaling monitors on the left and right sides Pedaling Efficiency LR Pedaling Efficiency LR Eff LR Ratio of the total sum of the force in the rotation direction with respect to the total sum of the resultant force of the force in the rotation direction tangential direction and the force in the vertical direction nor...

Page 300: ...cy LR Last Lap Avg LstAv Displays the left and right average pedaling efficiency for the last lap for the pedaling monitors on the left and right sides separately Pedaling Loss LR LossLR Ratio of the total sum of the force in the rotation direction and vertical direction with respect to the total sum of the resultant force of the force in the rotation direction tangential direction and the force i...

Page 301: ...ition Gear Front Rear Gear Position Teeth Gear F R Displays gear position and number of teeth for the front and rear Front Gear Position Position Max Teeth Front Displays gear position and number of teeth for the front Rear Gear Position Position Max Teeth Rear Displays gear position and number of teeth for the rear Gear Ratio Ratio Ratio Displays gear ratio for the front and rear Battery Main Uni...

Page 302: ...er Name Partner 1 Partner 2 Partner 3 Partner User name of live partner 3 second Av erage Power 3s 3 second average output of live partner 3 second Av erage Power Body Weight Ratio 3sW kg 3 second average output of live partner body weight ratio Power Avg Av Average output of live partner Power Lap Avg LapAv Average output per lap of live partner Pedaling Efficiency LR Eff Left and right pedaling ...

Page 303: ... Personal Record PR Personal record for the segment Remaining Distance km or mile Remain Remaining distance of the segment Time Ahead behind KOM Auto KOM Diff When you select Settings User Settings Gender Female QOM is displayed Time Ahead behind PR PR Diff Time ahead behind personal record ratio for the segment Elapsed Time Elapsed Time elapsed from the start of the seg ment until now Please modi...

Page 304: ...Vector display Torque display Left Right Left and right Power Watt Power n sec Avg 3 s Avg 5 s Avg 10 s Avg Pedaling Efficiency Pedaling Efficiency n sec Avg 3 s Avg 5 s Avg 10 s Avg Gear graph Drawing mode Display type Gear position Front Rear Front rear ...

Page 305: ...305 Training Drawing mode Display type Training Timer 5 min 10 min 20 min 60 min TSS Drawing mode Display type ...

Page 306: ...306 MMP Drawing mode Display type Intensity Drawing mode Display type ...

Page 307: ...307 Level Drawing mode Display type Balance Drawing mode Display type ...

Page 308: ...308 Pedaling efficiency Drawing mode Display type Course Drawing mode Display type Course Enable Disable Ride history Enable Disable ...

Page 309: ...309 Profile Drawing mode Display type Distance 1 0 km 5 km 10 km 50 km 100 km 200 km 500 km or 0 6 mi 3 mi 6 mi 30 mi 60 mi 120 mi 300 mi ...

Page 310: ...310 Partner Drawing mode Display type Partner Partner 1 Partner 2 Partner 3 Cue sheet Drawing mode Display type ...

Page 311: ...va Live segment Drawing mode Display type Segment profile Drawing mode Display type User Settings Register and set the user information Set the user information correctly to ensure accurate data can be acquired ...

Page 312: ...312 1 Press the Menu button 2 Use the buttons to select Settings and then press the Confirm button 3 Use the buttons to select User Settings and then press the Confirm button ...

Page 313: ... Heart Rate Max Enter your maximum heart rate Heart Rate Min Enter your resting heart rate Heart Rate Zone Check your heart rate zone Z1 to Z5 based on your maximum heart rate and your resting heart rate VO2MAX Enter your maximum oxygen intake Use this value and your heart rate to calculate the calories Gender Set any of Male Female and N A Birthday Set your date of birth The order of the year mon...

Page 314: ...314 System Settings Configure settings related to the general system of the device 1 Press the Menu button 2 Use the buttons to select Settings and then press the Confirm button ...

Page 315: ...315 3 Use the buttons to select System and then press the Confirm button ...

Page 316: ...zation Making a Backup Performing Restoration Firmware Update Update the firmware of the device Firmware Version Check the system version of the device Serial Number Check the serial number of the device Wi Fi MAC address Check the Wi Fi MAC address of the device License Display the open source license for the software installed on the device and the trademark information and authentication inform...

Page 317: ...emory may not be able to be displayed or updated Updating will occur if you disconnect and then reconnect the USB cable If this device is performing logging stop logging and save the log data When initialization is performed the system data is lost Save the backup data to the storage media of a PC or other device before the initialization Making a Backup Initialized data The settings target for in...

Page 318: ... CA600 Pioneer Setting Backup zip by selecting Initialize Back Up Restore in the system settings described in the previous section When restoration completes a message appears and the device restarts automatically Note If this device is performing logging stop logging and save the log data before performing the restoration Restored data The settings target for restoration are the system settings e...

Page 319: ...nction of the device needs to be enabled in advance Even if you have already set Wi Fi press the Confirm button to go to the Wi Fi setting screen if a connection via Wi Fi is not possible Wi Fi Settings Device Settings Check the battery status and configure the settings of the device 1 Press the Menu button 2 Use the buttons to select Settings and then press the Confirm button ...

Page 320: ...320 3 Use the buttons to select Device and then press the Confirm button Setting item Description Battery You can check the battery level ...

Page 321: ... auto pause a message appears and then the device sleeps after approximately 10 seconds When the auto power off setting is enabled if the sleep state continues within the set time the power is automati cally turned off from the sleep state The device will wake up automatically when the power value or cadence value of the pedaling monitor ANT power meter or ANT smart trainer becomes valid When it b...

Page 322: ...enu appears If the power of the device is turned off the power saving mode will be enabled again Auto pause auto sleep and auto power off operate also in the power saving mode Even if auto power off is enabled the device does not power off while log data is being uploaded The device will power off after uploading ends When the GPS receives 3D positioning information before logging starts during au...

Page 323: ...323 2 Use the buttons to select Settings and then press the Confirm button 3 Use the buttons to select Wi Fi Settings and then press the Confirm button ...

Page 324: ... message appears To connect press the Confirm button The first time the device attempts to connect the screen switches to the password input screen If there is connection history the device will connect To delete the access point information press the button The password and other information of the access point are deleted Access Point Status Display the status of the connected access point Note ...

Page 325: ...cannot connect to an access point that requires entering the account information using a web browser Bluetooth Setting Set which items functions to use Bluetooth for Up to 4 Bluetooth connections are possible and the channels can be enabled or disabled according to the purpose of use The current Bluetooth connection status is also displayed 1 Press the Menu button 2 Use the buttons to select Setti...

Page 326: ...326 3 Use the buttons to select Bluetooth Setting and then press the Confirm button ...

Page 327: ... CH3 Enable or disable the items functions to be used Up to four items can be enabled Smartphone Connect HR Sensor are enabled by default The setting of Smartphone Connect is always valid and can not be changed Note If HR Sensor is disabled the Bluetooth heart rate sensor will not appear in the list when adding a sensor ...

Page 328: ...e the log data auto transfer function by using the Cyclo Sphere Analysis App or Cyclo Sphere of the web service ZWIFT You can enjoy rides in a virtual space in ZWIFT by connecting a power meter or speed sensor to the PC ZWIFT application or the iPhone or Android device ZWIFT application This device allows you to transmit the power values of pedaling monitor sensors to the ZWIFT application by usin...

Page 329: ...r acquiring GPS GLONASS and Michibiki satellite signals The time required to determine the position of your bike immediately after startup is significantly improved by transferring the satellite information via the Cyclo Sphere Control App to acquire satellite positions at high speed The A GPS function can be enabled or disabled from the Cyclo Sphere Control App ...

Page 330: ...rror mean A Sudden changes in the temperature are occurring Wait a while for the temperature to become stable and then perform zero point calibration again Q The operation buttons have become completely inoperable Why A Operation may have become impossible for some reason Try performing a forced reset by pressing and holding the Power Logging button and Lap button at the same time for 10 seconds o...

Page 331: ...hen upload the log data using your phone line or Wi Fi Uploading Log Data Q Can you tell me how the time is set A An automatic update is performed for the clock of the device when a GPS signal is received before logging starts or after log data is saved However if the time zone setting is incorrect the correct time may not be displayed The time zone and time can be set in Date Time of the system s...

Page 332: ...posing of the Device When disposing of the device remove the lithium ion battery and then dispose of the device in accordance with the rules and regulations of the local government where you live Do not dispose of the removed lithium ion battery but instead take it to a place that accepts rechargeable batteries for recycling Replacing the Lithium Ion Battery Do not replace the lithium ion battery ...

Page 333: ...he back cover When removing the screws of the USB connector cover take care not to deform the screw drive 2 Disconnect the cable of the lithium ion battery from the board and detach the entire board from the front When disconnecting the lithium ion battery cable please hold and pull the connector without pulling the cable part Pulling the cable part may cause a disconnection 3 Insert a finger from...

Page 334: ... the warranty card and then store it in a safe place Warranty period The warranty period of this product is one year from the date of purchase About repairs during the warranty period In the event that a failure occurs Pioneer will repair the product in accordance with the Pioneer warranty provisions described on the warranty card Consult with the store where you purchased the product If making a ...

Page 335: ...or a minimum of six years after the discontinuation of production Performance parts are parts that are required to maintain the functions of the product For questions or consultation regarding the device contact a Pioneer service cen ter or the place of purchase ...

Reviews: