Controlling the rest of your system (In case of SC-LX83)
10
88
En
1
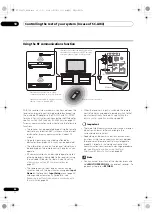
Connect the IR blaster cable to the RF Adapter’s IR
Blaster terminal and mount the transmitter on the
component you want to operate with RF
communications.
• Ope
r
ation is not possible unless the IR blaste
r
is
mounted in an app
r
op
r
iate position. Wheneve
r
possible, mount it above the othe
r
component’s
r
emote cont
r
ol senso
r
. If mounted below, the
influence of exte
r
nal light, etc., could hampe
r
r
eception.
• Mount the IR blaste
r
secu
r
ely to a position nea
r
the
othe
r
component’s
r
emote cont
r
ol senso
r
. Fo
r
the
location of the othe
r
component’s
r
emote cont
r
ol
senso
r
, see the component’s ope
r
ating inst
r
uctions.
• Clean any di
r
t o
r
dust off the place at which the
double-faced tape is to be attached befo
r
ehand.
• Note that the double-faced tape is st
r
ong, and that
t
r
ying to peel it off the shelf, etc., afte
r
it has been
applied may damage the shelf’s su
r
face.
2
While pressing MULTI OPERATION, press HOME
MENU.
The
r
emote display shows
SETUP MENU
.
3
Use
/
to select ‘IR/RF SELECT’, then press
ENTER.
Check that the units a
r
e pai
r
ed. If
RECEIVER MAIN
is
displayed, pai
r
ing has been pe
r
fo
r
med p
r
ope
r
ly, so
p
r
oceed to step 4. If
RF MODE ONLY
flashes, pai
r
ing has
not been pe
r
fo
r
med p
r
ope
r
ly, so pe
r
fo
r
m this p
r
ocedu
r
e
again afte
r
pe
r
fo
r
ming pai
r
ing (see
Pairing the RF adapter
and remote control
on page 87).
4
Use
/
to select input function for the
component you want to operate using RF
communications, then press ENTER.
Select the input component to which the IR blaste
r
was
mounted in step 1.
5
Use
/
to select ‘RF MODE’, then press ENTER.
Select
IR MODE
to
r
etu
r
n to ope
r
ation by inf
r
a
r
ed signal.
6
If other input function buttons also switch to RF
communications operation, repeat step 4 to 5.
7
Press and hold MULTI OPERATION for a couple of
seconds to exit and store the operation(s).
Renaming input function names in
synchrony with the receiver
• Default setting:
MANUAL
The
r
emote cont
r
ol input display names can be
synch
r
onized with the input names that have been
changed at
Input Name
on the
r
eceive
r
’s
Input Setup
menu (page 45) and acqui
r
ed automatically. The
r
e a
r
e
two modes:
AUTO
in which the
r
eceive
r
’s input names
a
r
e acqui
r
ed automatically each time the input is
switched, and
MANUAL
in which the
r
eceive
r
’s input
names a
r
e only acqui
r
ed fo
r
input functions selected
manually. Even when input names a
r
e changed manually
at
Renaming input function names manually
on page 81,
when synch
r
o
r
enaming is pe
r
fo
r
med he
r
e, the input
name is ove
r
w
r
itten.
1
While pressing MULTI OPERATION, press HOME
MENU.
The
r
emote display shows
SETUP MENU
.
2
Use
/
to select ‘SYNC RENAMING’, then press
ENTER.
MANUAL
flashes in the
r
emote display.
1
3
Use
/
to select ‘AUTO’ or ‘MANUAL’, then press
ENTER.
If you selected
AUTO
, this completes the setting. The
r
eceive
r
’s input names a
r
e acqui
r
ed automatically in
synch
r
ony with the
r
eceive
r
each time the
r
emote
cont
r
ol’s input is switched. P
r
oceed to step 7.
If you selected
MANUAL
, go to step 4.
4
Press the input function button for the component
whose receiver input name you want to acquire, then
press ENTER.
2
The
r
eceive
r
’s input name is acqui
r
ed. Afte
r
PLEASE
WAIT
is displayed, the
r
eceive
r
’s input name flashes. If
the name has not been changed at
Input Name
on the
r
eceive
r
’s
Input Setup
menu (page 45),
NO CHANGE
flashes.
5
Press ENTER to enter the input name displayed on
the remote control.
COMPLETE
is displayed and the input name is
r
egiste
r
ed.
6
To acquire the receiver input names for other input
function buttons, repeat step 4 to 5.
7
Press and hold MULTI OPERATION for a couple of
seconds to exit and store the operation(s).
RF adapte
r
Note
1 If
RF MODE ONLY
flashes, pai
r
ing has not been pe
r
fo
r
med p
r
ope
r
ly o
r
RECEIVER
may be set to
IR MODE
at the
r
emote cont
r
ol’s
IR/RF SELECT
setting. In this case, pe
r
fo
r
m pai
r
ing, then switch
RECEIVER
to
RF MODE
at the
r
emote cont
r
ol’s
IR/RF SELECT
setting. Fo
r
details, see
Pairing
the RF adapter and remote control
on page 87 and
Operating this receiver by RF communications
on page 87.
2 The
HDMI
input function button is not suppo
r
ted.
SC-LX83_73_DLPW.book 88 ページ 2010年5月19日 水曜日 午後2時7分

