


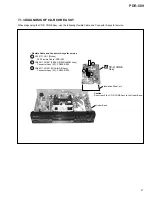


72
PDR-509
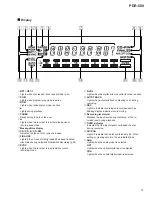
MONITOR
DIGITAL
REC LEVEL
ANALOG
REC LEVEL
INPUT
SELECTOR
TIME
REPEAT
3
8
a
p
;
o
s
2
4 5
7
9
q
6
1
u
i
d f
g
y
t
r
e
w
1
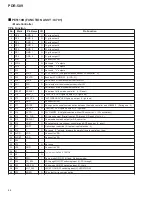
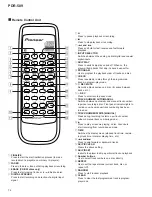
POWER switch
Switches power to the unit on and off.
2
INPUT SELECTOR
Switches between the analog, optical digital and coaxial
digital inputs.
3
MONITOR
Press to monitor the selected input and display digital
source information.
4
TIME
Switches the display mode (elapsed track time, remain-
ing track time, total disc playing time, etc.)
5
DISP OFF
Press to switch the character display off. The indicator
above the button lights to remind you that the display is
switched off.
6
Function indicator
Indicates the current function of the unit:
Lit – recording a
CD
-
R
/
CD
-
RW
, or erasing a
CD
–
RW
disc.
Blinking – record-mute and
PMA
-record modes.
7
OPEN/CLOSE
0
Press to open or close the disc tray.
8
RECORD
Press to enter record-pause mode.
9
REC MUTE
•
Records a blank section on a disc (for space between
tracks, etc.)
p
DIGITAL REC LEVEL /
4
¢
Turn the jog dail to set the digital recording level and
skip tracks.
Push the jog dial to: start playback (stop mode only) ;
input track number (during programming) ; display the
digital recording level (monitor, record, record-pause
modes).
q
ANALOG REC LEVEL
Sets the recording level for analog-input recording.
Outside ring controls left input level; inside dial controls
right input level.
w
TRACK NUMBER AUTO/MANUAL
Switches between automatic and manual track number-
ing when recording a disc. Indicator lights to remind you
when manual track numbering has been turned on.
e
TRACK NUMBER WRITE [MANUAL]
Press during recording to start a new track number
(when in manual track numbering mode).
r
FINALIZE
Press to start the disc finalization process (to make
recordable
CD
s playable on ordinary
CD
players).
t
ERASE (CD-RW discs only)
Press to start erasing tracks, or to re-initialize a disc.
y
Remote sensor
u
Character display
i
1
and
¡
Press and hold for fast-reverse and fast-forward
playback.
o
3
Press to play, or resume playing, a disc. Also use to
start recording from record-pause mode.
;
REPEAT
Use to set the repeat mode (current track, disc, or
repeat off).
a
8
Press to pause playback or recording.
s
7
Press to stop playback or recording.
d
DIGITAL SYNCHRO
Press to start recording on detection of a digital input
signal.
f
PHONES jack
Plug in a pair of stereo headphones for private listening
or monitoring.
g
LEVEL
Use to adjust the phones volume level.
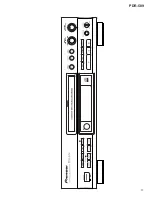
The illustration shows the U.S. model.
8. PANEL FACILITIES AND SPECIFICATIONS
8.1 PANEL FACILITIES
Front Panel
Summary of Contents for PDR-509
Page 19: ...PDR 509 19 A B C D 5 6 7 8 5 6 7 8 CDR SERVO AMP MULTI PLEXER A1 5 A4 5 A3 5 A1 5 1 3 5 A ...
Page 43: ...PDR 509 43 A B C D 5 6 7 8 5 6 7 8 PNP1466 A Q701 Q704 PNP1466 A CN51 J SIDE A SIDE B I ...
Page 45: ...PDR 509 45 A B C D 1 2 3 4 1 2 3 4 J K PNP1466 A POWER SUPPLY ASSY J REG ASSY K SIDE B ...
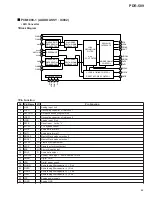
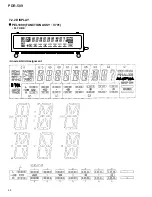
Page 68: ...68 PDR 509 FL TUBE 7 2 2 DISPLAY PEL1099 FUNCTION ASSY V701 Anode Grid Assignment 1 35 ...
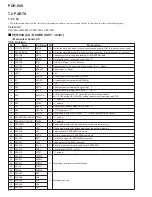
Page 69: ...69 PDR 509 Pin Assignment ...
Page 73: ...73 PDR 509 MONITOR DIGITAL REC LEVEL ANALOG REC LEVEL INPUT SELECTOR TIME REPEAT ...