


11
En
English
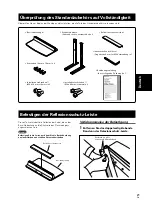
Attaching the Plasma Display
The weight of a Plasma Display is about 40 kg (88 lbs), they
have no depth, and are unstable. Therefore, at least two
people must assemble and install them.
Note
Insert the bolts in the holes vertically.
Place a sheet or protective cover to protect the display
from scratches or damage.
Assemble only with the Plasma Display lying flat on a
table or similar surface.
Move the stand so that the stand screw holes and the nuts
that connect the main display line up correctly.
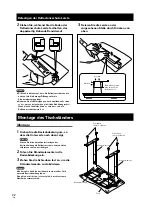
1
With the Plasma Display lying flat, insert
and secure the two Installation bolts
1
(M8 x 20 mm: black) in the holes "a"
located in center of the Plasma Display
housing.
At this point, tighten these bolts
1
only until the
threads are no longer visible when viewed from the side
(you will be unable to attach the display if the bolts are
screwed in completely).
Caution
Plasma Display
Installation
bolt
1
Plasma Display
housing
Stop screwing
down the bolt
when the threads
are no longer
visible.
Installation bolt
1
(M8 x 20 mm: black)
Sheet
Holes "a"
(holes in center
of Plasma
Display)
Note
When laying down the Plasma Display, be careful so as to
not scratch or damage it.
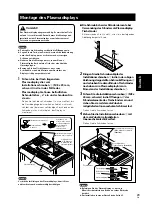
7
Regarding the stand pipe screw holes when the
stand is used as a desktop stand
Please use
A
and
A
’ in the following diagram.
A
´
A
A
´
A
2
As shown in the above diagram, hook the
stand pipe holes
A
onto the screw heads
of the installation bolts
1
, then slide the
stand upwards to the main Plasma Display
until it engages the installation bolts
1
.
3
Pass the installation bolts
2
(M8 x 40 mm:
black) through the stand pipe holes
A
’,
and then screw them into the main
Plasma Display with the accessory
hexagonal wrench.
Be sure to tighten the bolts securely.
4
Tighten the installation bolts
1
firmly
with the accessory hexagonal wrench.
Be sure to tighten the bolts securely.
Installation bolts
2
(M8 x 40 mm: black)
(Step 3)
Slide the stand
(Step 2)
Table top stand
Plasma Display
Light-blocking
shield
Table top stand
Note
Attach the Plasma Display so the light-blocking shield
touches the bottom of its back surface.
To install it in a rack etc. see Page 13.