background image

4

Using the remote control

Point the remote control in the direction of the front panel to 

operate.

  The remote control may not function properly in direct 

sunlight.

Important

  Do not store the remote control in high temperatures or 

direct sunlight.

  Do not let the remote control fall onto the floor, where it 

may become jammed under the brake or accelerator.

  Pioneer cannot guarantee compatibility with all USB mass 

storage devices and assumes no responsibility for any loss 
of data on media players, iPhone, smartphone, or other 
devices while using this product.

In case of trouble

Should this product fail to operate properly, contact your dealer 

or nearest authorized Pioneer Service Station.

Visit our website

Visit us at the following site:

http://www.pioneer-india.in

  We offer the latest information about PIONEER 

CORPORATION on our website.

  Pioneer regularly provides software updates to further 

improve it’s products. Please check the support section of 

the Pioneer website for all available software updates.

Protecting the LCD panel and 
screen

  Do not expose the LCD screen to direct sunlight when this 

product is not used. This may result in LCD screen malfunc-

tion due to the resulting high temperatures.

  When using a mobile phone, keep the aerial of the mobile 

phone away from the LCD screen to prevent disruption of the 

video in the form of spots, coloured stripes, etc.

  To protect the LCD screen from damage, be sure to touch the 

touch panel keys only with your finger and do so gently.

Notes on internal memory

Before removing the vehicle battery

  Some of the settings and recorded contents will not be reset.

Data subject to erasure

The information is erased by disconnecting the yellow lead from 

the battery (or removing the battery itself).

  Some of the settings and recorded contents will not be reset.

Resetting the microprocessor

CAUTION

Pressing the 

RESET

 button resets settings and recorded 

contents to the factory settings.

  Do not perform this operation when a device is connected 

to this product.

  Some of the settings and recorded contents will not be 

reset.

The microprocessor must be reset under the following 

conditions:

  Prior to using this product for the first time after installation.

  If this product fails to operate properly.

  If there appears to be problems with the operation of the 

system.

  If your vehicle position is shown on the map with a signifi-

cant positioning error.

1  Turn the ignition switch OFF.
2  Press the 

RESET

 button with a pen tip or other 

pointed implement.


Checking part names and functions

 on page 5

Settings and recorded contents are reset to the factory settings.

About this manual

This manual uses diagrams of actual screens to describe opera-

tions. However, the screens on some units may not match those 

shown in this manual depending on the model used.

Meanings of Symbols Used in This 

Manual

This indicates to touch an appropriate soft key 

on the touch screen.

HOLD

This indicates to touch and hold an appropriate 

soft key on the touch screen.

This indicates that there is a reference or 

supplementary for the key or screen.

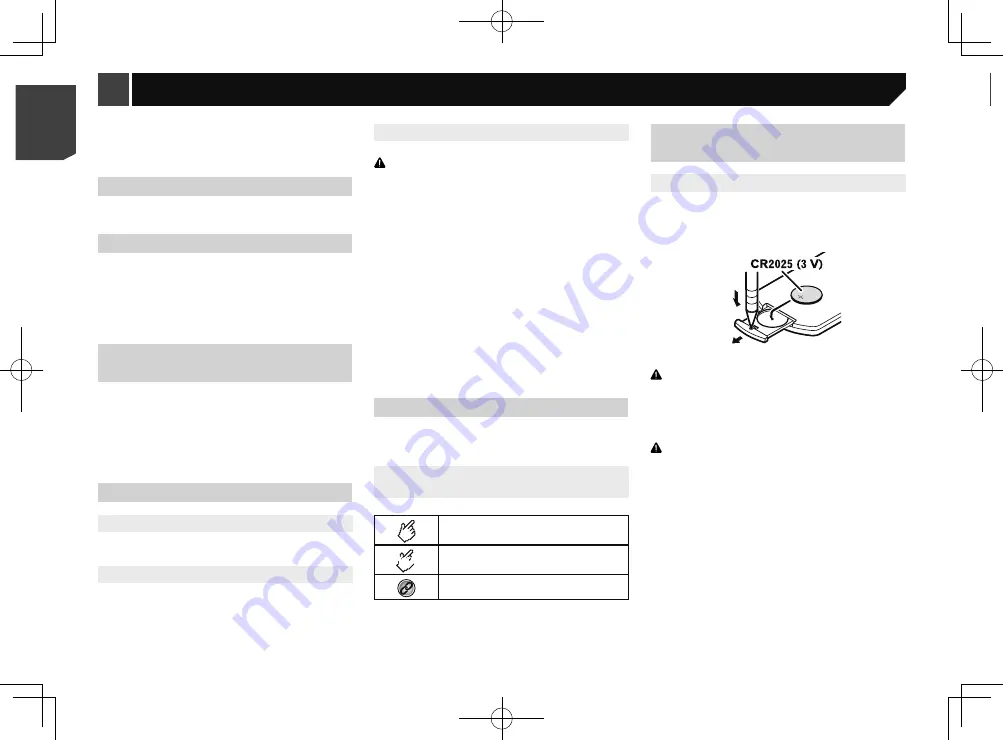
Use and care of the remote 
control

Installing the battery

Slide the tray on the back of the remote control out and insert the 

battery with the plus (+) and minus (–) poles aligned properly.

  When using for the first time, pull out the film protruding 

from the tray.

WARNING

  Keep the battery out of the reach of children. Should the 

battery be swallowed, consult a doctor immediately.

  Batteries (battery pack or batteries installed) must not be 

exposed to excessive heat such as sunshine, fire or the 
like.

CAUTION

  Remove the battery if the remote control is not used for a 

month or longer.

  There is a danger of explosion if the battery is incorrectly 

replaced. Replace only with the same or equivalent type.

  Do not handle the battery with metallic tools.

  Do not store the battery with metallic objects.

  If the battery leaks, wipe the remote control completely 

clean and install a new battery.

  When disposing of used batteries, comply with 

governmental regulations or environmental public 
institutions’ rules that apply in your country/area.

  “Perchlorate Material – special handling may apply. See 

www.dtsc.ca.gov/hazardouswaste/perchlorate. (Applicable 
to California, U.S.A.)”

4

< QRB3574-A >

< QRB3574-A >

Precaution

Precaution

Summary of Contents for MVH-AV189

Page 1: ...Owner s Manual MVH AV189 RDS AV RECEIVER English 1 QRB3574 A English ...

Page 2: ...iles from the file name list 13 Setting the slideshow interval 13 AUX source 13 Starting procedure 13 Setting the video signal 13 System settings 14 Displaying the System setting screen 14 Setting the steering wheel control 14 Setting the ever scroll 14 Setting the rear view camera 14 Setting the camera for Rear View mode 14 Selecting the system language 14 Setting the beep sound 15 Adjusting the ...

Page 3: ...i obstruct the driver s vision ii impair the performance of any of the vehicle s operating systems or safety features including air bags or hazard lamp buttons or iii impair the driver s ability to safely operate the vehicle Please remember to fasten your seat belt at all times while operating your vehicle If you are ever in an accident your injuries can be considerably more severe if your seat be...

Page 4: ...ter installation If this product fails to operate properly If there appears to be problems with the operation of the system If your vehicle position is shown on the map with a signifi cant positioning error 1 Turn the ignition switch OFF 2 Press the RESET button with a pen tip or other pointed implement Checking part names and functions on page 5 Settings and recorded contents are reset to the fac...

Page 5: ...a b c 1 2 3 7 8 9 5 1 Volume 2 MODE Press to turn the display on or off 3 SRC Press to cycle through all the available sources Press and hold to turn the source off 4 TOP MENU Not used 5 MENU Not used 6 Thumb pad Not used 7 MUTE Press to switch the mute setting to on or off 8 AUDIO SUBTITLE ANGLE Not used 9 BAND Selects the tuner band when tuner is selected as a source Cancels the control mode of ...

Page 6: ...e USB cable 2 1 1 USB cable 2 USB storage device Check that no data is being accessed before pulling out the USB storage device On first time startup 1 Start the engine to boot up the system After a short pause the splash screen comes on for a few seconds The Select Program Language screen appears p From the second time on the screen shown will differ depending on the previous conditions 2 Touch t...

Page 7: ... AUX OFF Month Date 12hour 24hour 10 6 2016 21 48 Time Format d m y m d y Top menu screen Time and date setting screen Setting menu screen AV source icons Current source By pressing the button on any screen you can display the Top menu screen 7 QRB3574 A Basic operation ...

Page 8: ...ars when all characters are not displayed on the display area If you touch the key the rest are scrolled for display 3 Appears when items cannot be displayed on a single page Touch or to view any hidden items Operating the time bar 9999 99 9999 99 1 1 You can change the playback point by dragging the key Switching the operation panel 1 Switches the operation panel of AV sources This key is not ava...

Page 9: ...ult Turns the seek tuning setting off Level1 to Level4 Sets the level of sensitivity for FM to Level1 to Level4 for AM Level1 or Level2 p The FM Level4 AM Level2 setting allows reception of only stations with the strongest signals Setting the FM or AM tuning step You can switch the tuning step for FM or AM band p For FM band the seek tuning step is fixed to 50 kHz p The tuning step remains at 50 k...

Page 10: ...ghi ABC 9999 99 9999 99 1 Skips files forward or backward Switches between playback and pause 2 Playback screen 1 Switches the current music information display Displays the artwork when the file with the artwork is being played The artwork file type needs to be JPEG and the file size should be less than 99 KB USB 48 21 6 10 Abcdefghi Abcdefghi ABC Plays files in random order Does not play files i...

Page 11: ...forms frame by frame playback Performs slow motion playback Hides the touch panel keys To display again the keys touch anywhere on the screen Sets a repeat play range Repeats all files Repeats the current file Repeats the current folder HOLD USB 48 21 Stop 9999 99 9999 99 Full Pause 6 10 Abcdefghi Abcdefghi Touch again to change the playback speed Performs fast reverse or fast forward 2 Switches b...

Page 12: ...otates the displayed picture 90 clockwise Hides the touch panel keys To display again the keys touch anywhere on the screen USB 48 21 Abcdefghi Abcdefghi 6 10 Full Skips files forward or backward Switches between playback and pause 2 1 Selects a file from the list Selecting files from the file name list on page 13 2 Switches the media file type Switching the media file type on page 11 p By pressin...

Page 13: ...vailable when there are both audio and video files on the auxiliary equipment p A Mini jack AV cable CD RM10 sold separately is required for connection External video component and the display on page 23 CAUTION For safety reasons video images cannot be viewed while your vehicle is in motion To view video images stop in a safe place and apply the handbrake Starting procedure You can display the vi...

Page 14: ...w camera function For details consult your dealer Rear view camera This product features a function that automatically switches to the full screen image of the rear view camera installed on your vehicle when the gearstick is in the REVERSE R position Camera for Rear View mode Rear View can be displayed at all times Please note that with this setting the camera image is not resized to fit and that ...

Page 15: ...screen on page 14 2 Touch Dimmer Settings 3 Touch Day Night to switch the following items Day default Turns the dimmer manually to off Night Turns the dimmer manually to on Setting the dimmer duration optional You can adjust the time that the dimmer is turned on or off p You can use this function when Dimmer Trigger is set to Time p This setting is available only when you stop your vehicle in a sa...

Page 16: ...is function is available when Rear Speaker Output and Preout are set to Subwoofer Settings 1 Display the Audio setting screen Displaying the Audio setting screen on page 16 2 Touch Balance 3 Touch or to adjust the left right speaker balance p Left15 to Right15 is displayed as the left right speaker balance moves from the left to right p The default setting is L R 0 You can also set the fader balan...

Page 17: ... easily recall at any time Here is a list of the equaliser curves S Bass is a curve in which only low pitched sound is boosted Powerful is a curve in which low and high pitched sounds are boosted Todoroki is a curve in which low and high pitched sounds are slightly boosted Vocal is a curve in which the midrange which is the human vocal range is boosted Flat is a flat curve in which nothing is boos...

Page 18: ...s screen 2 Touch the desired menu item Removing a shortcut 1 Display the Favorites screen 2 Touch and hold the favourite menu column you want to remove The selected menu item is removed from the Favorites screen You can also remove a shortcut by touching the star icon in the registered menu column AUX 48 21 Full 6 10 2 1 1 Clock display Displays the time and date setting screen Setting the time an...

Page 19: ...his function only for the video signal input into the AV input 1 Display the Video Setup screen 2 Touch Video Signal Setting 3 Touch Camera The pop up menu appears 4 Touch the item you want to set Auto default Adjusts the video signal setting automatically PAL Sets the video signal to PAL NTSC Sets the video signal to NTSC PAL M Sets the video signal to PAL M PAL N Sets the video signal to PAL N S...

Page 20: ...remely dangerous to allow cables to become wound around the steering column or gearstick Be sure to install this product its cables and wiring away in such so that they will not obstruct or hinder driving Make sure that the cables and wires will not interfere with or become caught in any of the vehicle s moving parts especially the steering wheel gearstick handbrake sliding seat tracks doors or an...

Page 21: ...N OFF 5 Orange white To lighting switch terminal 6 Black earth To vehicle metal body 7 Violet white Of the two lead wires connected to the back lamp connect the one in which the voltage changes when the gear shift is in the REVERSE R position This connection enables the unit to sense whether the car is moving forwardss or backwardss 8 Blue white Connect to system control terminal of the power amp ...

Page 22: ...utput Connect a cable according to the preout setting 5 Rear speaker or subwoofer 6 To Front output 7 Front speaker 8 Subwoofer You can change the RCA output of the subwoofer depending on your subwoofer system The subwoofer output of this product is monaural Camera About rear view camera When you use the rear view camera the rear view image is automatically switched from the video by moving the ge...

Page 23: ...he parts compatibility checked by your dealer If parts other than supplied or compatible ones are used they may damage internal parts of this product or they may work loose and the product may become detached Do not install this product where it may i obstruct the driver s vision ii impair the performance of any of the vehicle s operating systems or safety features including airbags hazard lamp bu...

Page 24: ... with this product Troubleshooting If you have problems operating this product refer to this section The most common problems are listed below along with likely causes and solutions If a solution to your problem cannot be found here contact your dealer or the nearest authorised Pioneer service facility Problems with the AV screen The screen is covered by a caution message and the video cannot be s...

Page 25: ...with high temperatures Depending on the kind of the USB storage device you use this product may not recognise the storage device or files may not be played back properly The text information of some audio and video files may not be correctly displayed File extensions must be used properly There may be a slight delay when starting playback of files on an USB storage device with complex folder hiera...

Page 26: ...f conditions and the following disclaimer 2 Redistributions in binary form must reproduce the above cop yright notice this list of conditions and the following disclaimer in the documentation and or other materials provided with the distribution 3 All advertising materials mentioning features or use of this software must display the following acknowledgement This product includes software develope...

Page 27: ...he product lifetime of the LED backlight is more than 10 000 hours However it may decrease if used in high temperatures If the LED backlight reaches the end of its product lifetime the screen will become dimmer and the image will no longer be visible In that case please consult your dealer or the nearest authorised Pioneer Service Station Specifications General Rated power source 14 4 V DC allowab...

Page 28: ...28 28 QRB3574 A ...

Page 29: ...29 29 QRB3574 A ...

Page 30: ...30 30 QRB3574 A ...

Page 31: ...31 31 QRB3574 A ...

Page 32: ...01 TEL 905 479 4411 PIONEER EUROPE NV Haven 1087 Keetberglaan 1 B 9120 Melsele Belgium Belgique TEL 0 3 570 05 11 PIONEER ELECTRONICS ASIACENTRE PTE LTD 2 Jalan Kilang Barat 07 01 Singapore 159346 TEL 65 6378 7888 PIONEER ELECTRONICS AUSTRALIA PTY LTD 5 Arco Lane Heatherton Victoria 3202 Australia TEL 03 9586 6300 PIONEER ELECTRONICS DE MEXICO S A DE C V Blvd Manuel Avila Camacho 138 10 piso Col L...

Reviews: