


HDMI-certified
cable
HDMI CONTROL
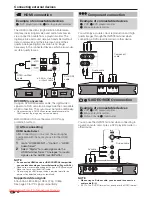
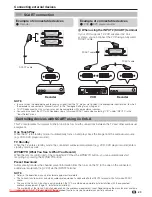
HDMI CONTROL connection
First connect the Pioneer AV Sound system or a Pioneer BD Player/Pioneer Recorder that supports the HDMI
CEC protocol.
NOTE
Refer to the operation manual of the device to be connected for further details.
After unplugging connection cables or changing the connection pattern, turn on the power of the TV after all relevant devices’
power have been turned on. Change the external input source by pressing
INPUT1–8
, select the appropriate external source
and verify the audiovisual output.
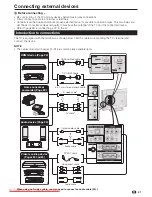
The cables illustrated in the following explanation are commercially available items.
•
•
•
HDMI CONTROL
Set to “On” to enable HDMI CEC functions. When
turning on the power while “HDMI CONTROL” is set
to “On”, the connected HDMI devises’ power will be
turned on in conjunction with the TV.
Press
h
and the “HOME MENU” screen displays.
Press
a
/
b
to select “Option”.
Press
a
/
b
to select “HDMI CONTROL Setup”,
and then press
ENTER
.
Press
a
/
b
to select “HDMI CONTROL”, and
then press
ENTER
.
Press
c
/
d
to select “On”, and then press
ENTER
.
Auto Power On
If this is activated, the One Touch Play function
is enabled. While the TV is in standby mode, it
automatically turns on and plays back the image from
the HDMI source.
1
2
3
4
5
HDMI CONTROL Setup
Repeat steps 1 to 3 in
HDMI CONTROL
.
Press
a
/
b
to select “Auto Power On”, and then
press
ENTER
.
Press
c
/
d
to select “On”, and then press
ENTER
.
NOTE
The factory default for this item is “Off”.
Selecting recorder
Here, you can select a recorder for the recording from
several connected recorders.
Repeat steps 1 to 3 in
HDMI CONTROL
.
Press
a
/
b
to select “Selecting Recorder”, and
then press
ENTER
.
Select the recorder, and then press
ENTER
.
NOTE
If you have connected the Pioneer AV Sound system
between the TV and a Pioneer Recorder, the external
source’s indication changes (e.g. from “INPUT5” to
“INPUT5 (Sub)”).
1
2
3
•
1
2
3
•
Connecting a Pioneer BD
Player/Pioneer Recorder only
Connecting a Pioneer BD Player/Pioneer Recorder via
the Pioneer AV Sound system
27
HDMI-certified cable
Pioneer AV Sound
system
HDMI-certified cable
Pioneer BD Player/
Pioneer Recorder
Optical audio
cable
Pioneer BD Player/
Pioneer Recorder
KRL3237V_GB.indd 27
KRL3237V_GB.indd 27
2008/06/13 14:50:14
2008/06/13 14:50:14
Downloaded From TV-Manual.com Manuals
Summary of Contents for KRL-32V
Page 49: ...Memo 47 Downloaded From TV Manual com Manuals ...
Page 50: ...Memo 48 Downloaded From TV Manual com Manuals ...
Page 97: ...Note 47 Downloaded From TV Manual com Manuals ...
Page 98: ...Note 48 Downloaded From TV Manual com Manuals ...
Page 145: ...Notizen 47 Downloaded From TV Manual com Manuals ...
Page 146: ...Notizen 48 Downloaded From TV Manual com Manuals ...
Page 193: ...Promemoria 47 Downloaded From TV Manual com Manuals ...
Page 194: ...Promemoria 48 Downloaded From TV Manual com Manuals ...
Page 241: ...Memo 47 Downloaded From TV Manual com Manuals ...
Page 242: ...Memo 48 Downloaded From TV Manual com Manuals ...
Page 289: ...Memorando 47 Downloaded From TV Manual com Manuals ...
Page 290: ...Memorando 48 Downloaded From TV Manual com Manuals ...
Page 337: ...Заметки 47 Downloaded From TV Manual com Manuals ...
Page 338: ...Заметки 48 Downloaded From TV Manual com Manuals ...