background image

En

4

About the AC adapter

Safety instructions

To ensure your personal safety and to maximize the full operating potential of your 
unit, read and follow these safety instructions.

Read & Retain Instructions

Read all operating and user information provided with this product.

Cleaning

Use a damp cloth to clean the exterior housing. Avoid using any fluids including 
liquid, aerosol or alcohol-based cleaning products.

Water or Moisture

Avoid operating or locating this product near water or other sources of fluid.

Accessories

Do not place this product on an unstable cart, stand, or table. The product may fall 
and be seriously damaged.

Ventilation

Do not block or cover this product in use. This unit should not be placed in a built-in 
installation unless properly ventilated.

Environment

Avoid placing this product in a location with exposure to large quantities of dust, 
high temperatures, high humidity, or subject to excessive vibrations or shocks.

Power Sources

Operate this product only from the recommended power sources. If you are unsure 
of the power source, consult an authorized Pioneer representative.

Power-Cord Protection

When unplugging the unit, pull on the plug – not on the cord. Do not handle the 
cord or plug with wet hands; doing so could cause an electric short or shock. Do not 
allow anything to pinch or rest on the power cord and do not place in a walkway.

Power

Turn OFF the system before installing this or any other hardware device.

Overloading

Avoid connecting too many devices to a single wall socket or power source as this 
can cause fires or short circuits.

Object & Liquid Entry

Never push inappropriate objects in to the device. Avoid spilling any liquids in to or 
on the outside of the drive.

Servicing

Opening or removing the cover exposes you to possible electrical shock or other 
danger. Contact a Pioneer authorized service representative for repairing this prod-
uct (refer to the enclosed Service & Support Card).

Damage Requiring Service

Unplug the unit and refer servicing to qualified service personnel in the following 
situations:

%

  When the power cord, plug, or chassis is damaged.

%

  If liquid has been spilled, or objects have fallen into the product.

%

  If the product has been exposed to rain or water.

%

  If the product does not operate normally when the operating instructions are 

followed. Adjust only those controls that are covered by the operating instructions. 
Improper adjustment of other controls may result in damage and can require 
extensive work by a qualified technician to restore the unit to its normal operation.

%

  When the product exhibits a distinct change in performance – this indicates a 

need for service.

Check that there are no irregularities with the AC adapter or power plug, then insert 
the power plug into the specified position of the AC adapter using the specified pro-
cedure until a click is heard. For details, see 

Mounting the power plug

 on page  4 .

If there are irregularities with the AC adapter or power plug, ask your nearest 
Pioneer authorized service center or your dealer to carry out repair work.

Cautions on use

!

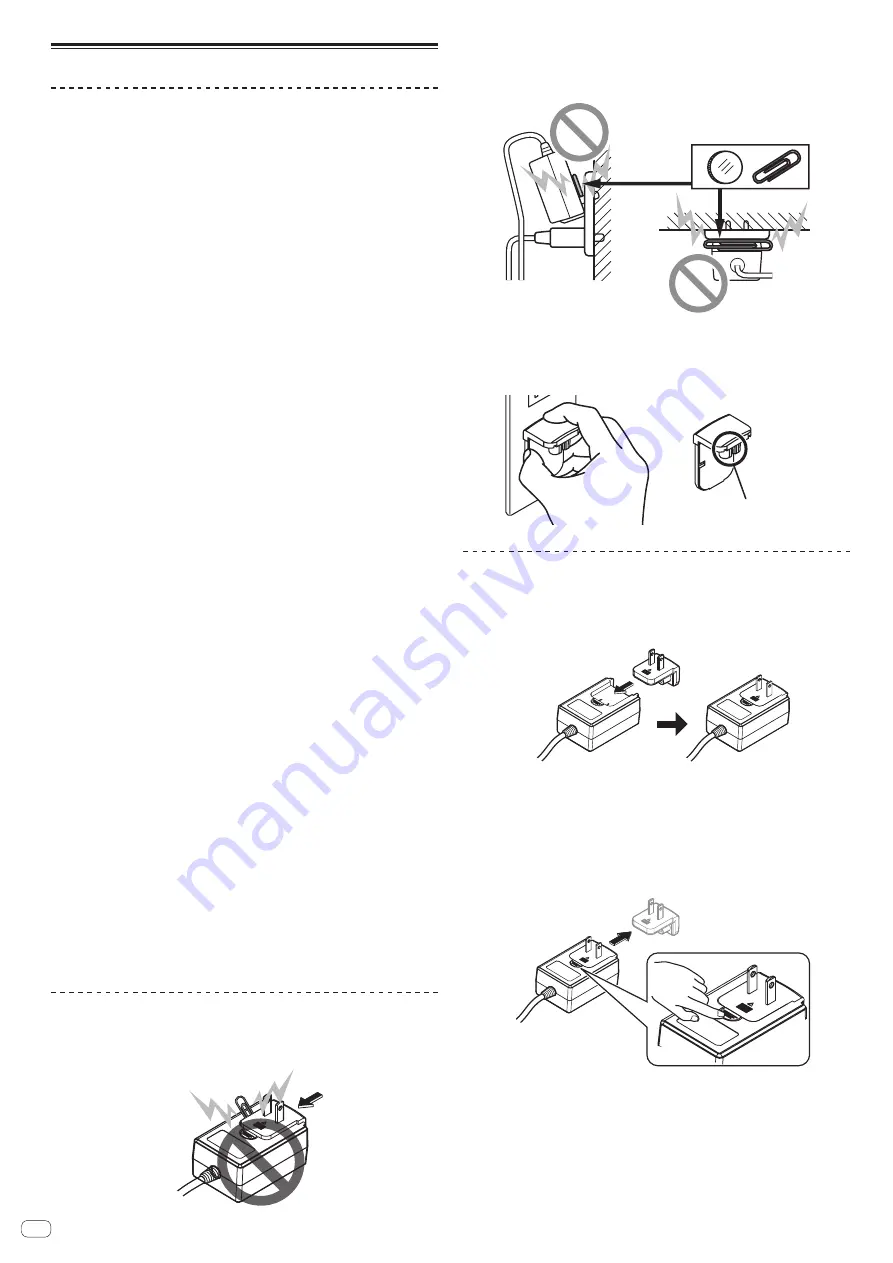
  Do not use this unit with a coin, paper clip or other metal object stuck between 

the AC adapter and power plug. Doing so could cause a short circuit, leading to 
fire or electric shock.

!

  When mounting the AC adapter on a wall outlet, make sure there is no space 

between the AC adapter and the wall outlet. Faulty contact or a coin, paper clip 
or other metal object getting stuck in the space could cause a short circuit, lead-
ing to fire or electric shock.

Coin, paper clip or other metal object

Top

Side

!

  The power plug could come detached from the AC adapter and remain in the 

power outlet if someone trips on the AC adapter’s power cord or if something 
hits the AC adapter. If this happens, remove the power plug remaining in the 
outlet with dry hands, holding it as shown on the diagram below and without 
touching metal parts. Do not use any tools to remove it.

Do not touch.

Mounting the power plug

Slide the power plug along the guide rails in the AC adapter 
unit as shown on the diagram below, then press in until a click 
is heard.


Removing the power plug

While pressing the [PUSH] button on the AC adapter unit, 
slide the power plug away from the adapter as shown on the 
diagram below to remove it.

Once the power plug is mounted, there is no need to remove it.

Summary of Contents for DDJ-RX

Page 1: ...DJ site shown above offers FAQs information on software and various other types of information and services to allow you to use your product in greater comfort http rekordbox com For the latest version of the rekordbox software access rekordbox com and download the software from there ...

Page 2: ...is manual This manual consists mainly of explanations of functions of this unit as hardware For detailed instructions on operating rekordbox dj see the rekordbox soft ware s manual Before start Features 3 What s in the box 3 About the AC adapter 4 Installing the software 5 About the driver software and the ASIO settings utility software 6 Connections and part names Connections 7 Part names and fun...

Page 3: ... NOISE CRUSH PITCH and FILTER for achieving a wide range of musical arrangements By simply turning the control it is possible to create the effect you want and a vari ety of remix can be achieved such as adding original arrangements to the music Creative effect performances are also made possible by assigning your favorite SOUND COLOR FX included in rekordbox dj PLUG AND PLAY The sound cards of th...

Page 4: ...hen the power cord plug or chassis is damaged If liquid has been spilled or objects have fallen into the product If the product has been exposed to rain or water If the product does not operate normally when the operating instructions are followed Adjust only those controls that are covered by the operating instructions Improper adjustment of other controls may result in damage and can require ext...

Page 5: ...environment conditions indicated here are fulfilled Depending on the computer s power saving settings etc the CPU and hard disk may not provide sufficient processing capabilities For notebook computers in particular make sure the computer is in the proper conditions to provide constant high performance for example by keeping the AC power connected when using rekordbox Use of the Internet requires ...

Page 6: ...lay latency of the audio data while increas ing the value reduces the tendency for dropouts breaks in the sound to occur in the audio data the default setting of Buffer Size is 256 samples 5 ms and Kernel Buffers is 3 If the Buffer Size or Kernel Buffers number is made large drops in the data breaks in the sound etc occur less easily but the time lag due to transmis sion delays in the audio data l...

Page 7: ... output the microphone sound Setting the microphone output of the booth monitor p 27 4 MIC2 terminal Connects a microphone here The INPUT SELECT switch on the main unit s front panel must be set to MIC2 5 CD terminals Connect to a DJ player or other line level device The INPUT SELECT switch on the main unit s front panel must be set to CD 6 PHONO LINE input terminals Connect to a phono level for M...

Page 8: ...inal CD Select this to use a line level output device DJ player etc connected to the CD terminals 5 INPUT SELECT switch Selects the input source of each channel from the components connected to this unit PC Select this to use the track loaded in the rekordbox dj deck PHONO Selected when using an phono level for MM cartridge output device such as an analog turntable connected to the PHONO LINE inpu...

Page 9: ...ng the track is played from the same position Instant Doubles SHIFT press The library s track list is sorted when one of the LOAD buttons is pressed Sorts by track number Sorts by BPM Sorts by track title in alphabetical order Sorts by artist 2 Rotary selector Turn Moves up or down the cursor in the tree view or track list Press Moves the cursor between the tree view and track list each time the r...

Page 10: ...playback the loop set closest to the playback position among the loops saved in the track will be active If the button is pressed while pressing the SHIFT button when a loop saved in the track is called out the loop will be active or inactive 7 LOOP 1 2X button Press Selects a beat for auto beat loop Halves the loop playback length SHIFT press During loop playback moves the loop to the left by the...

Page 11: ... DECK mode on the left deck Pressing the DECK4 button while holding down the DECK2 button or press ing the DECK2 button while holding down the DECK4 button Turns on DUAL DECK mode on the right deck p GRID ADJUST button Press When the jog dial is turned while pressing the GRID ADJUST button the beat grid interval can be adjusted SHIFT press The BPM value is divided by 1 2 doubling the beat grid s s...

Page 12: ...again monitoring is canceled SHIFT press The track s tempo can be set by tapping the button Tap function 9 Channel fader Move Adjusts the level of audio signals output in each channel SHIFT move Use the channel fader start function Using the channel fader start function p 22 a Crossfader Assign Switch Assigns the channel output to the crossfader A Assigns to A left of the crossfader B Assigns to B...

Page 13: ...nchronizing the beat FX effect sound each time the button is pressed SHIFT press Sets the beat FX tempo mode to the BPM tap mode The BPM value used as the basis for beat FX is calculated by the interval at which the button is tapped To monitor the effect sounds Depending on the effect type the effect sounds of rekordbox dj are not output to the channel whose headphones CUE button is pressed when t...

Page 14: ...this unit s rear panel to turn this unit s power on Turn on the power of this unit For Windows users The message Installing device driver software may appear when this unit is first connected to the computer or when it is connected to a different USB port on the computer Wait a while until the message Your devices are ready for use appears For Mac OS X users When this unit is connected to a comput...

Page 15: ... click the rekordbox X X X icon For Mac OS X Open the Applications folder in Finder then click the rekordbox icon The screen displayed immediately after the rekordbox software is started on the computer the screen on the right shows the EXPORT mode in which the operations equivalent to the previous rekordbox 3 are possible A A C B A D C D Computer screen when a track is loaded in rekordbox dj Sele...

Page 16: ... on the computer screen then turn the rotary selector and select a track a a b b a Track list b Tree View 3 Press the LOAD button to load the selected track onto the deck Playing tracks and outputting the sound The following describes the procedure for outputting the channel 1 sound as an example Set the volume of the devices power amplifier powered speakers etc con nected to the MASTER OUT 1 and ...

Page 17: ...HONES MIX control Center HEADPHONES LEVEL control Turned fully counterclockwise 1 Press the headphones CUE button for the channel 1 2 Turn the HEADPHONES LEVEL control Adjust the sound level output from the headphones to an appropriate level Note This unit and rekordbox dj are equipped with variety of functions to allow for more individualistic DJ performances For each function see the rekordbox s...

Page 18: ...ances are possible with just the simple operation of pressing and releasing performance pads 1 Press the PAD FX 1 mode button The mode switches to pad FX mode 1 Effects are assigned to the performance pads as shown below Effect A Effect A Effect A Effect B Effect C Effect D Effect A Release FX A If the PAD FX 1 mode button is pressed while pressing the SHIFT button the mode changes to pad FX mode ...

Page 19: ...n A track loop and slicer target area can be loaded in sampler slots Load the track in a sampler slot 1 Press the SAMPLER mode button Switches to the sampler mode 2 Press the rotary selector or BACK button to move the cursor to the track list 3 Turn the rotary selector Select the track you wish to load in a sampler slot 4 Press the performance pad while pressing the SHIFT button The selected track...

Page 20: ...itches to the sampler mode Recording a sequence 1 Press the PARAMETERc or PARAMETERd button Select the bank of the sampler to be used for the performance 2 Click the part indicated as 1 Bar on the sampler panel of rekordbox dj Select a length for recording the sequence from 1 bar 2 bars and 4 bars in the pull down menu that appears 3 Press the SEQUENCER START button while pressing the SHIFT button...

Page 21: ...eled and playback starts from the position reached in the background To cancel the slip mode press the SLIP button again Manual slip looping 1 Press the SLIP button The mode switches to the slip mode 2 Press the LOOP IN button during playback and then press the LOOP OUT button Loop playback starts Normal playback continues in the background even during loop playback 3 Press the LOOP OUT button whi...

Page 22: ...ordbox regardless of the strength that the performance pads are tapped with Turning the velocity sampler mode on When the SAMPLER mode button is pressed while pressing the SHIFT button the velocity sampler mode is turned on Turning the velocity sampler mode off When the SAMPLER mode button is pressed the mode is changed to the usual sampler mode velocity sampler mode is turned off The velocity cur...

Page 23: ... the SHIFT button Switching the effect s tempo mode p 24 Operating beat FX in the single mode 1 Press the RELEASE FX control while pressing the SHIFT button to switch the FX mode of rekordbox dj to the single mode The mode switches between the multi mode and single mode each time the buttons are operated 2 Press the FX1 button or FX2 button of channel 1 to select the effect unit to assign The numb...

Page 24: ...Press the flashing SOUND COLOR FX button The effect is canceled Types of SOUND COLOR FX effects Effect Name Descriptions COLOR control NOISE Mixes white noise with the sound of the channel via the filter and output Turn counterclockwise The cut off fre quency of the filter through which the white noise passes gradually descends Turn clockwise The cut off frequency of the filter through which the w...

Page 25: ...OR FX can be applied using the COLOR control The sound volume of channels for which the INPUT SELECT switch is set to MIC1 or MIC2 does not change even when the crossfader is moved Mixing the sound of a DJ player etc 1 Connect the DJ player or other line level output device to the CD or PHONO LINE terminals 2 Set the INPUT SELECT switch to CD or LINE 3 Operate the TRIM control and channel fader to...

Page 26: ...art function is enabled Effect parameter 2 button lit The channel fader start function is disabled Changing the crossfader start setting The crossfader start function settings can be changed The crossfader start function is enabled by default Press the effect parameter 1 or effect parameter 2 button on the right deck Effect parameter 1 button lit The crossfader start function is enabled Effect par...

Page 27: ...to 52 is displayed by the lit condition of the channel level indicator Number of lit segments of the CH3 channel level indicator Ten s place Number of lit segments of the CH1 channel level indicator One s place Setting the microphone output of the booth monitor By default it is set to output microphone sound from the BOOTH OUT terminal Press the SAMPLER mode button on the right deck SAMPLER button...

Page 28: ...I messages can be disabled By default optimization of crossfader MIDI messages is enabled Optimization of crossfader MIDI messages is performed only when the CROSS FADER CURVE selector control is turned all the way clockwise If optimization of crossfader MIDI messages is enabled the crossfader position on the rekordbox dj mixer panel may not match the crossfader position on this unit Press the MAS...

Page 29: ...mputer using the USB cable again the DDJ RX icon appears The jog dial does not respond to touching Is the jog dial dirty An electrostatic system is used as the detection method in the jog dial of this unit Therefore if the jog dial is dirty or the user has hand cream on their hands detection may not respond When cleaning the jog dial dry wipe with a soft cloth If it is very dirty prepare a 5 1 or ...

Page 30: ... Click the area indicated by EXPORT at the upper left of the screen and then select PERFORMANCE Has rekordbox dj been activated Enter the rekordbox dj license key included with this unit on the Preferences License screen of rekordbox For details on the activation see the rekordbox software s manual There is not change even if a perfor mance pad is pressed while pressing the CAPTURE button Is any l...

Page 31: ...ur Authorized Use and c To make one copy of the Program solely for backup purposes provided that all titles and trademark copyright and restricted rights notices are reproduced on the copy 2 Restrictions You will not copy or use the Program or Documentation except as expressly permitted by this Agreement You will not transfer sublicense rent lease or lend the Program or use it for third party trai...

Page 32: ...herwise dispose of this Agreement or any rights or obligations under it whether voluntarily or involuntarily by operation of law or otherwise without Pioneer DJ s prior written consent Any purported assignment transfer or delegation by You will be null and void Subject to the foregoing this Agreement will be binding upon and will inure to the benefit of the parties and their respective successors ...

Reviews: