background image

21

En

En
g

lis

h

You can play a normal music CD, Video-CD, or DVD-Video using the built-in drive of this 
product.

 WARNING

Keep hands and fingers clear of this product when opening, closing, or adjusting the LCD panel. Be 
especially cautious of children’s hands and fingers.

 CAUTION

Do not insert anything other than a disc into the disc-loading slot.

1

Press .

2

Touch 

 to open the LCD panel.

3

Insert a disc into the disc-loading slot.

The source changes and then playback will start.

NOTE

If the disc is already set, select [Disc] as the playing source.

1

Press .

2

Touch 

 to open the LCD panel.

3

Remove the disc and press 

.

TIPS

By pressing 

 then touch 

 or 

, you can also skip files/chapters forwards or backwards.

By pressing 

 then touch and hold 

 or 

, you can also perform fast reverse or fast forwards.

If a Video-CD with PBC (playback control) On is being played, 

 appears.

You can set the screen size for the video image (page 49).

Disc

Inserting and ejecting a disc

Inserting a disc

Ejecting a disc

Basic operation

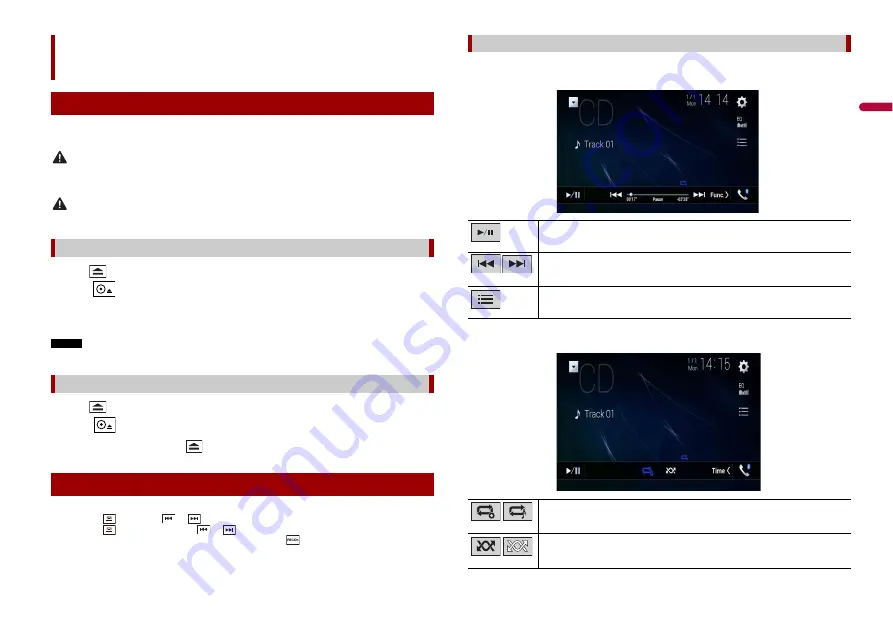
Audio source screen 1

Audio source screen 2

Audio source

Switches between playback and pause.

Skips files forwards or backwards.

Selects a track from the list.

Touch a track on the list to play back.

Sets a repeat play for the current disc/the current track.

Plays or does not play tracks in random order.

Summary of Contents for AVH-Z9290BT

Page 1: ...English AVH Z9290BT MONITOR RDS AV RECEIVER Owner s Manual ...

Page 2: ... for performance and function improvements Basic operation 27 WebLink 29 Using WebLink 29 Starting procedure 29 Using the audio mix function 30 Apple CarPlay 31 Using Apple CarPlay 31 Setting the driving position 31 Starting procedure 31 Adjusting the volume 32 Android Auto 32 Using Android Auto 32 Setting the driving position 32 Starting procedure 33 Adjusting the volume 33 Setting the auto launc...

Page 3: ...d result Also damage to the product smoke and overheating could result from contact with liquids If liquid or foreign matter should get inside this product park your vehicle in a safe place turn the ignition switch off ACC OFF immediately and consult your dealer or the nearest authorised Pioneer Service Station Do not use this product in this condition because doing so may result in a fire electri...

Page 4: ... THIS LEAD MAY VIOLATE APPLICABLE LAW AND MAY RESULT IN SERIOUS INJURY OR DAMAGE Do not take any steps to tamper with or disable the handbrake interlock system which is in place for your protection Tampering with or disabling the handbrake interlock system could result in serious injury or death To avoid the risk of damage and injury and the potential violation of applicable laws this product is n...

Page 5: ...ble software updates Do not expose the LCD screen to direct sunlight when this product is not used This may result in LCD screen malfunction due to the resulting high temperatures When using a mobile phone keep the aerial of the mobile phone away from the LCD screen to prevent disruption of the video in the form of spots coloured stripes etc To protect the LCD screen from damage be sure to touch t...

Page 6: ...fer to Inserting and ejecting an SD memory card page 23 Auto EQ microphone input jack Use to connect a microphone for acoustical measurement Disc loading slot Refer to Inserting and ejecting a disc page 21 Remote Control VOLUME REAR SRC Press to cycle through all the available rear sources Press and hold to turn the rear source off SRC Press to cycle through all the available sources Press and hol...

Page 7: ...N Do not open or close the LCD panel forcefully It may cause a malfunction Do not operate this product until the LCD panel has completely opened or closed If this product is operated while the LCD panel is opening or closing the LCD panel may stop at that angle for safety Do not place glass or can on the open LCD panel 1 Press 2 Touch or to adjust the angle of the LCD panel 3 Touch Returns to the ...

Page 8: ...e remote control Using the remote control How to replace the battery Insert the CR2025 3 V battery with the plus and minus poles orientated properly Important Do not store the remote control in high temperatures or direct sunlight Do not let the remote control fall onto the floor where it may become jammed under the brake or accelerator 1 Start the engine to boot up the system The Select Program L...

Page 9: ...s function is available only when you stop your vehicle in a safe place and apply the handbrake Appears when items cannot be displayed on a single page Drag the side bar the initial search bar or the list to view any hidden items 1 Press The menu bar pops up on the screen NOTE The menu bar availability may vary depending on the activating source 1 Touch Operating the time bar You can change the pl...

Page 10: ...al and lower case letters Top menu screen Favourite source icons TIPS When you connect the external navigation system to this unit the navigation mode key is displayed at the middle of the right side of the display If you select Power OFF you can turn off almost all functions The Power OFF mode is released in the following cases An incoming call is received only for hands free phoning via Bluetoot...

Page 11: ...tooth function on the device 2 Press 3 Touch then The Bluetooth screen appears 4 Touch Connection 5 Touch The unit starts to search for available devices then displays them in the device list 6 Touch the Bluetooth device name After the device is successfully registered a Bluetooth connection is established by the system Once the connection is established the device name is displayed on the list NO...

Page 12: ...ff Select On to make this product visible to the other device PIN Code Input Change the PIN code for Bluetooth connection The default PIN code is 0000 1 Touch 0 to 9 to input the pin code up to 8 digits 2 Touch Device Information Displaying the device name and address of this product Bluetooth Memory Clear Touch Clear then OK to clear the Bluetooth memory Hands free phoning Making a phone call To ...

Page 13: ...martphone the device must be compatible with Android Auto For using the voice recognition function with a smartphone launch Android Auto beforehand 1 Press 2 Touch 3 Touch The voice recognition function launches and the voice control screen appears TIP You can also launch the voice recognition function by pressing 1 Touch TIP To display the dial confirmation screen touch again NOTES The dial confi...

Page 14: ...nown user no phone number in the received call history If calls are made by operating your mobile phone no history data will be recorded in this product Phone book transfers If there are more than 1 000 phone book entries on your mobile phone not all entries may download completely Depending on the phone this product may not display the phone book correctly Adjusting the other party s listening vo...

Page 15: ...eat play range Plays files in random order You can connect your Wi Fi certfied mobile device to this product via Wi Fi connection 1 Turn on the Wi Fi function on the device 2 Press 3 Touch then 4 Touch Wi Fi Settings 5 Set Wi Fi to ON 6 Touch Device Information 7 Connect this product with the dislayed network name in Device Information from the mobile device 1 Press 2 Touch then 3 Touch Wi Fi Sett...

Page 16: ...e CarPlay operation is same as the iPod source function For details of the operation refer to the iPod operation page 27 Wi Fi audio Basic operation You can play or use the following sources with this product Radio CD ROM compressed audio or video files on discs DVD Video Video CD The following sources can be played back or used by connecting an auxiliary device USB SD iPod Bluetooth audio Wi Fi a...

Page 17: ...n key 2 Touch 3 Touch 4 Drag the source key to the desired position Recalls equaliser curves page 43 Selecting a source Source on the AV source selection screen Source on the source list Changing the display order of source Changing the display order of source icons Changing the display order of source keys NOTE This function is available only when you stop your vehicle in a safe place and apply t...

Page 18: ...odels iPhone 7 iPhone 7 Plus iPhone SE iPhone 6s iPhone 6s Plus iPhone 6 iPhone 6 Plus iPhone 5s iPhone 5c iPhone 5 iPod touch 6th generation iPod touch 5th generation iPod nano 7th generation Depending on the iPod models it may not be compatible with some AV sources For details about iPod iPhone compatibility with this product refer to the information on our website 1 Press 2 Touch then Setup for...

Page 19: ...on information NOTE This function is available when the FM tuner is selected 1 Touch 2 Touch or to select the item The following items are available News Info Popular Classics Others 3 Touch to start searching TIP If you touch Cancel the searching process is cancelled The BSM best stations memory function automatically stores the six strongest broadcast frequencies under the preset channel keys 1 ...

Page 20: ...step is fixed to 50 kHz Regional 2 On Off Switches whether the area code is checked during the Auto PI search Alternative FREQ 2 On Off Allow the unit to retune to a different frequency providing the same station Auto PI 1 On Off Searches for the same PI Programme Identification code broadcast station from all frequency bands automatically when the broadcasting station contains RDS data NOTE Even ...

Page 21: ...ess 2 Touch to open the LCD panel 3 Remove the disc and press TIPS By pressing then touch or you can also skip files chapters forwards or backwards By pressing then touch and hold or you can also perform fast reverse or fast forwards If a Video CD with PBC playback control On is being played appears You can set the screen size for the video image page 49 Disc Inserting and ejecting a disc Insertin...

Page 22: ...t case use touch panel keys to operate the DVD menu Switches the audio subtitle language PBC playback control only Video source screen 2 Searches for the part you want to play Touch Title Chapter 10key or Track then input the desired number from 0 to 9 To start playback from the number you registered touch TIPS To cancel an input number touch C For DVD Videos you can select Title Chapter or 10Key ...

Page 23: ...d fingers clear of this product when opening closing or adjusting the LCD panel Be especially cautious of children s hands and fingers CAUTION Do not insert anything other than a disc into the disc loading slot Do not insert anything other than SD memory cards into the SD card slot Ejecting an SD memory card during data transfer can damage the SD memory card Be sure to eject the SD memory card by ...

Page 24: ...the USB cable NOTES Check that no data is being accessed before pulling out the USB storage device Turn off ACC OFF the ignition switch before unplugging the USB storage device 1 Insert the disc page 23 TIP If the disc is already set select Disc as the playing source 1 Insert the SD memory card into the SD card slot or plug the USB storage device into the USB connector 2 Press then touch 3 Touch U...

Page 25: ... stored in an external storage device USB SD you can search for a file using Music Browse page 25 Audio source screen 2 Example USB Selecting a file using Music Browse mode You can select files to play back using the category list if the files contain tag information NOTES This function is available for the external storage device USB SD only Music Browse mode cannot be held once the power is turn...

Page 26: ...t reverse or fast forwards Touch again to change the playback speed Stops playback Performs frame by frame playback Performs slow motion playback TIPS Image files are not displayed in the rear display By pressing then touch and hold or on the still image file you can search through 10 image files at a time If the file currently being played is the first or last file in the folder the search is not...

Page 27: ...d to this product the settings are automatically configured according to the device to be connected NOTES Depending on the generation or version of the iPod some functions may not be available Do not delete the Apple Music app from your iPod since some functions may not be available When connecting an iPhone or iPod touch quit all applications before connecting the device 1 Connect your iPod via U...

Page 28: ...ng on the generation or version of the iPod some functions may not be available Only 16 000 songs in the iPod are available in the list if the iPod has more than 16 000 songs Available songs depend on the iPod Audio source screen 2 Important Apple Music Radio may not be available in your country or region For details about Apple Music Radio visit the following site http www apple com music NOTE Th...

Page 29: ...rtain uses of the iPhone or smartphone may not be legal while driving in your jurisdiction so you must be aware of and obey any such restrictions If in doubt as to a particular function only perform it while the car is parked No feature should be used unless it is safe to do so under the driving conditions you are experiencing Important Pioneer is not liable for any issues that may arise from inco...

Page 30: ... WebLink source screen For iPhone users For smartphone Android users You can output the audio mixing AV source and an application for iPhone or smartphone when WebLink is used NOTE Depending on the application or AV source this function may not be available 1 Start up the WebLink 2 Press VOL The audio mix menu will be displayed on the screen Android iOS Using the audio mix function Touch to mute T...

Page 31: ...WITHOUT LIMITATION ANY INACCURACIES OR INCOMPLETE INFORMATION To achieve optimum usability of Apple CarPlay set the driving position setting correctly according to the vehicle The setting will be applied the next time an Apple CarPlay compatible device is connected to this product 1 Press 2 Touch then The system setting screen appears Apple CarPlay Using Apple CarPlay Setting the driving position ...

Page 32: ...ain sound volume press VOL on the unit You can operate Android applications with finger gestures such as tapping dragging scrolling or flicking on the screen of this product Compatible Android devices For details about compatibility of Android models refer to the following website https support google com androidauto NOTE The compatible finger gestures vary depending on the application for the sma...

Page 33: ...ce on the screen The unit configures the connection then start the application TIP You can use voice recognition function by pressing once Android Auto is activated NOTES For details on USB connection refer to Connecting via the USB port page 55 If twenty devices are already paired the message confirming whether to delete the registered device is displayed If you want to delete the device touch Ag...

Page 34: ...e viewed while your vehicle is in motion To view video images stop in a safe place and apply the handbrake NOTE A High Speed HDMI Cable sold separately is required for connection For details refer to Using an HDMI input page 56 1 Press then touch 2 Touch HDMI The HDMI source screen appears HDMI source screen HDMI Starting procedure Basic operation Hides the touch panel keys To display the keys aga...

Page 35: ... for connection For details refer to Using an AUX input page 55 You can set the screen size for the video image page 49 1 Press 2 Touch then 3 Touch Input Output Settings 4 Confirm that AUX Input is turned on 5 Press then touch 6 Touch AUX The AUX screen appears AUX Starting procedure AUX screen Basic operation Hides the touch panel keys To display the keys again touch anywhere on the screen TIP Y...

Page 36: ... and apply the handbrake 1 Press 2 Touch then 3 Touch Input Output Settings 4 Touch AV Input 5 Touch Source for AV source or Camera for camera 6 Press then touch 7 Touch AV for AV source or Camera View for camera The image is displayed on the screen NOTE If Source is selected 2nd Camera Input is automatically set to Off page 39 AV input Starting procedure AV source screen Basic operation Hides the...

Page 37: ...ction is configured then the instruction message appears on the display NOTES When Apple CarPlay or Android Auto with wireless connection is activated the connection swtiching confirmation screen appears Touch OK to proceed to Wireless Mirroring When the Wi Fi connection is set to OFF the connection confirmation screen appears Touch Start to make the connection 7 Make a Wireless Mirroring connecti...

Page 38: ... position Camera View mode also allows you to check what is behind you while driving Camera for Camera View mode Camera View can be displayed at all times Note that with this setting the camera image is not resized to fit and that a portion of what is seen by the camera is not viewable To display the camera image touch Camera View on the AV source selection screen page 17 NOTES To set the rear vie...

Page 39: ...The polarity of the connected lead is positive Ground The polarity of the connected lead is negative NOTE If the camera polarity setting is wrong or wrong camera setting is made press and hold to release the rear view camera screen and then change the camera polarity setting to Battery Parking Assist Guide On Off You can set whether to display the parking assist guidelines on the rear view camera ...

Page 40: ...se a PIONEER wiring harness for each car model when With Adapter mode is engaged otherwise select W o Adapter Restore Settings NOTE This setting is available only when you stop your vehicle in a safe place and apply the handbrake Menu Item Description All Settings Almost all settings or recorded content returns to the default Audio Settings Restore to default Audio settings NOTE This setting is av...

Page 41: ...h some pictures you cannot adjust Hue and Colour NOTES The adjustments of Brightness Contrast and Dimmer Level are stored separately when your vehicle s headlights are off daytime and on nighttime Brightness and Contrast are switched automatically depending on the setting of Dimmer Settings Dimmer Level can be changed the setting or the time to switch it to on or off page 40 The picture adjustment...

Page 42: ...ll lamps of the vehicle Back Signal When the gearstick is gearchanged to R reverse position the signal switches to High or Low The signal displayed varies depending on the vehicle Menu Item Description CAUTION Do not turn off the engine while importing an image from the external storage device The menu items vary according to the source Theme settings Menu Item Description Background Home AV Selec...

Page 43: ...ges Selects the desired preset splash screen image custom Displays the splash screen image imported from the external storage device To set the image from an external device touch then select the desired image by touching the desired external storage device after connecting the device Replicating the settings Menu Item Description 5 Touch the item you want export Illumination Theme Splash Screen S...

Page 44: ...t Subwoofer Network Mode 3 High Left High Right Mid Left Mid Right Subwoofer Speaker output level 24 to 10 Adjust the speaker output level of the listening position 1 Touch or to select the listening position then select the output speaker 2 Touch or to adjust the selected speaker output level Crossover Select a speaker unit filter to adjust the HPF or LPF cutoff frequency and the slope for each s...

Page 45: ...acoustics the equaliser curve can be adjusted automatically to suit the vehicle interior WARNING A loud tone noise may be emitted from the speakers when measuring the vehicle s acoustics Never perform Auto EQ measurement while driving CAUTION Thoroughly check the conditions before performing Auto EQ as the speakers may be damaged if this is performed under the following conditions When the speaker...

Page 46: ...10Touch Front Left or Front Right to select the current listening position 11Touch Start A 10 second countdown starts NOTE The Bluetooth connection is disconnected before the process starts 12Exit the vehicle and keep the doors closed until the countdown finishes When the countdown finishes a measurement tone noise is emitted from the speakers and Auto EQ measurement begins 13Wait until the measur...

Page 47: ...reen Pan Scan Cuts the image short on the right and left sides of the screen Parental Set restrictions so that children cannot watch violent or adult oriented scenes You can set the parental lock level in steps as desired 1 Touch 0 to 9 to input a four digit code number 2 Touch Registers the code number and you can now set the level 3 Touch any number between 1 to 8 to select the desired level The...

Page 48: ...ng when you connect this product to an AUX equipment Camera Auto PAL NTSC PAL M PAL N SECAM Select the suitable video signal setting when you connect this product to a rear view camera Video Output Format Menu Item Description Video Output Format PAL NTSC Switches the video output format of the rear display between PAL and NTSC Menu Item Description Registering your favourite menu items in shortcu...

Page 49: ... your vehicle in a safe place and apply the handbrake You can choose either to show the same image as the front screen or to show the selected source on the rear display NOTES Video files on the external storage device are not available as a source for the rear display when Apple CarPlay is activated Video files on the external storage device are not available as a source for the rear display when...

Page 50: ... display NOTE The video image and sound are output only when AV Input is set to Source page 36 Source OFF Nothing is output to the rear display Setting the anti theft function Setting the password Up to 40 characters can be entered for a hint 8 Touch Go If you want to change the password currently set enter the current password and then enter the new one 9 Check the password and then touch OK The ...

Page 51: ... at the point where the wire passes from the passenger compartment into the engine compartment If the yellow lead s insulation tears as a result of contact with metal parts short circuiting can occur resulting in considerable danger It is extremely dangerous to allow cables to become wound around the steering column or gearstick Be sure to install this product its cables and wiring away in such so...

Page 52: ...icrophone 3 m This product Aerial jack AV cable IN OUT Power supply Fuse 10 A Wired remote cable Hard wired remote control adapter can be connected sold separately WARNING IMPROPER CONNECTION MAY RESULT IN SERIOUS DAMAGE OR INJURY INCLUDING ELECTRICAL SHOCK AND INTERFERENCE WITH THE OPERATION Notice for the blue white lead ACC position No ACC position Rear panel main terminals Power cord OF THE VE...

Page 53: ...en a subwoofer is connected to this product instead of a rear speaker change the rear output setting in the initial setting The subwoofer output of this product is monaural For details refer to Rear Speaker Output page 45 With a two speaker system do not connect anything to the speaker leads that are not connected to speakers Important The speaker leads are not used when this connection is in use ...

Page 54: ...nnection operations and compatibility of the iPhone refer to the chapter of each source or application For details concerning the connection and operations of the smartphone refer to the chapter of each source or application Attach identification labels to USB cables supplied and sold separately before installing this product in a vehicle 1 Connect USB cables to the USB port 1 and 2 on the rear of...

Page 55: ...ply Power cord Violet white REVERSE GEAR SIGNAL INPUT Brown REAR VIEW CAMERA IN 23 cm Yellow VIDEO INPUT 23 cm Rear view camera ND BC8 sold separately To video output RCA cable supplied with ND BC8 RCA cable sold separately View camera sold separately NOTES Connect only the rear view camera to brown cable Do not connect any other equipment Smartphone Android device Connecting via the USB port Came...

Page 56: ...e HDMI port 2 Wrap the lock tie around the hook above the HDMI port and the High Speed HDMI Cable and then tighten it to secure the High Speed HDMI Cable Hook Lock tie High Speed HDMI Cable CAUTION Do not tighten up the lock tie more than necessary Using an HDMI input L Left audio White R Right audio Red V Video Yellow G Earth Securing the High Speed HDMI This product Rear audio output R AUDIO OUT...

Page 57: ... product temporarily connect the wiring to confirm that the connections are correct and the system works properly Do not install this product in a position where the opening of the LCD panel is obstructed by any obstacles such as the gearstick Before installing this product be sure to leave sufficient space so that the LCD panel does not obstruct the gearstick when it is fully opened This may caus...

Page 58: ... install the GPS aerial over any sensors or vents on the dashboard of the vehicle as doing so may interfere with the proper functioning of such sensors or vents and may compromise the ability of the metal sheet under the GPS aerial to properly and securely affix to the dashboard GPS aerial Metal sheet Peel off the protective sheet on the rear Double sided tape Clamps Use clamps to secure the lead ...

Page 59: ...ely sold clamps to secure the lead where necessary inside the vehicle Install the microphone on the sun visor when it is in the up position It cannot recognise the driver s voice if the sun visor is in the down position 1 Detach the microphone base from the microphone clip by sliding the microphone base while pressing the tab Tab Microphone base 2 Mount the microphone on the steering column Instal...

Page 60: ...peration is not possible For example the DVD playing does not feature that angle audio system subtitle language etc The picture stops pauses and this product cannot be operated The reading of data is impossible during disc playback Stop playback once then restart The picture is stretched with an incorrect aspect ratio The aspect setting is incorrect for the display Select the appropriate setting f...

Page 61: ...matically in 1 minute Re cycle the ignition to restart the product If this message keeps showing please contact your dealer or local service centre The temperature is too high for this product to operate Follow the instructions displayed on the screen If this does not solve the Problems with Application screen Error messages Common problem contact your dealer or an authorised Pioneer Station for a...

Page 62: ...and then connect a compliant USB storage device The USB interface cable for iPod iPhone is short circuited Confirm that the USB interface cable for iPod iPhone or USB cable is not caught in something or damaged Audio Format not supported This type of file is not supported on this product Select a file that can be played Error 02 6X 9X DX iPod failure Disconnect the cable from the iPod Once the iPo...

Page 63: ...e ejected DualDiscs are two sided discs that have a recordable CD for audio on one side and a recordable DVD for video on the other Playback of the DVD side is possible with this product However since the CD side of DualDiscs is not physically compatible with the general CD standard it may not be possible to play the CD side with this product Frequent loading and ejecting of a DualDisc may result ...

Page 64: ...of audio files encoded with image data Some USB storage devices connected to this product may generate noise on the radio Do not connect anything other than the USB storage device Common notes about DivX files Only DivX files downloaded from DivX partner sites are guaranteed for proper operation Unauthorised DivX files may not operate properly DRM rental files cannot be operated until playing back...

Page 65: ... 48 kHz Disc 8 kHz to 48 kHz WAV compatibility The sampling frequency shown in the display may be rounded WAV files on the CD R RW DVD R RW R SL R DL cannot be played AAC compatibility This product plays back AAC files encoded by iTunes FLAC compatibility FLAC files on the CD R RW DVD R RW R SL R DL cannot be played DivX compatibility This product is not compatible with the following DivX Ultra fo...

Page 66: ...ocumentation and or other materials provided with the distribution Neither the name of the Xiph org Foundation nor the names of its contributors may be used to endorse or promote products derived from this software without specific prior written permission THIS SOFTWARE IS PROVIDED BY THE COPYRIGHT HOLDERS AND CONTRIBUTORS AS IS AND ANY EXPRESS OR IMPLIED WARRANTIES INCLUDING BUT NOT LIMITED TO TH...

Page 67: ...h the microphone Important Requirements to access app based connected content services using this product Latest version of the Pioneer compatible connected content application s for the smartphone available from the service provider downloaded to your smartphone A current account with the content service provider Smartphone Data Plan Note if the Data Plan for your smartphone does not provide for ...

Page 68: ... force as this may scratch it Never touch the LCD screen with anything besides your finger when operating the touch panel functions The LCD screen can scratch easily If the LCD screen is near the vent of an air conditioner make sure that air from the air conditioner is not blowing on it Heat from the heater may break the LCD screen and cool air from the cooler may cause moisture to form inside thi...

Page 69: ...al Reverse Time alignment 0 to 140 step 2 5 cm step Bass boost Gain 12 dB to 0 dB 2 dB step Speaker level 10 dB to 24 dB 1 dB step DVD drive System DVD V VCD CD MP3 WMA AAC DivX MPEG player Usable discs DVD VIDEO VIDEO CD CD CD R CD RW DVD R DVD RW DVD R DL Region number 5 Frequency response 5 Hz to 44 000 Hz with DVD at sampling frequency 96 kHz Signal to noise ratio 96 dB 1 kHz IEC A network RCA...

Page 70: ...tuner Frequency range 531 kHz to 1 602 kHz 9 kHz Frequency range 530 kHz to 1 640 kHz 10 kHz Usable sensitivity 28 μV S N 20 dB Signal to noise ratio 62 dB IEC A network Wi Fi Frequency channel 1 6 11 ch 2 4 GHz 149 151 155 ch 5 GHz Security WPA 2 personal Output power 16 dBm Max 2 4 GHz 13 dBm Max 5 GHz GPS GNSS receiver System GPS L1C Ac SBAS L1C A GLONASS L1OF SPS Standard Positioning Service R...

Page 71: ...71 En English ...

Page 72: ... 2019 PIONEER CORPORATION All rights reserved QRB3811 A ID ...

Reviews: