background image


4.2.2. Using DHCP (Dynamic Host Configuration Protocol) 

Photron high-speed cameras are DHCP compatible. In an environment where DHCP is used, the 

high-speed camera's IP address can be acquired from the DHCP server. 


Configuration procedure


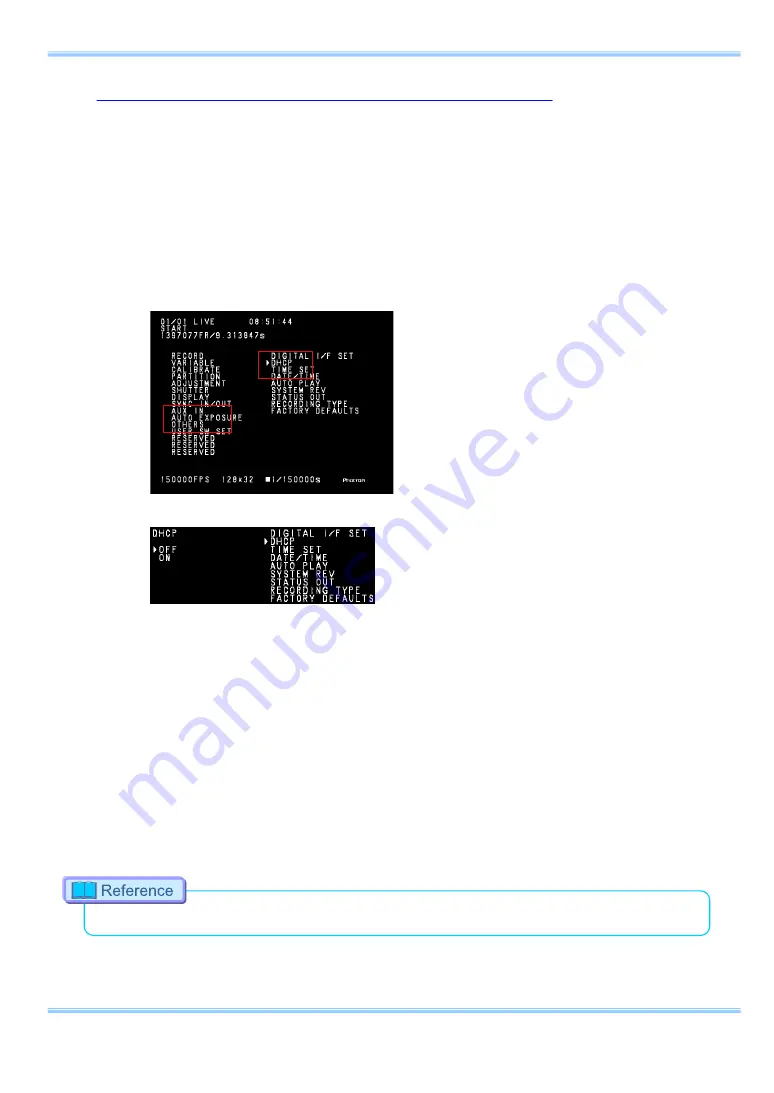
Press the remote controller's MENU key to display the menu list. 


Select DHCP from the OTHERS submenu with the remote controller's ARROW keys and press the 
ENTER key. 


Select ON/OFF with the ARROW keys. 


Press the ENTER key to confirm. 


When OFF is selected, the IP address specified in the previous section "4.2.1. Setting the IP 
Address" is valid.  


When ON is selected, the IP address is acquired from the DHCP server and that acquired IP 
address is valid. If the camera is not connected to a DHCP server, the IP address is acquired when 
a connection is made to the server. You can verify the acquired IP address with the DIGITAL I/F 
SET menu. In this situation, the IP address cannot be changed. 


When using the camera with DHCP on, set the IP address in PFV to "Auto detection".  


 For details, refer to the "Photron FASTCAM Viewer User's Manual". 


55


  Remote Controller User’s Manual


Summary of Contents for Revision 1.03E

Page 1: ...R Re em mo ot te e C Co on nt tr ro ol ll le er r ...

Page 2: ...ng every possible measure to ensure the accuracy of its contents However if you find a section which is unclear a mistake or an omission please contact Photron LIMITED using the contact information provided at the end of the manual Photron LIMITED is not responsible for the aftermath of the results of using the product or from following the instructions in this manual ...

Page 3: ...inish reading the manual store it in a safe place along with the warranty card and refer back to it when necessary Manual Notation The following icons and symbols are used in the explanations in this manual Icon symbol Explanation This symbol indicates content that should always be read This symbol indicates instructions to follow in the operation of the camera and items to be careful of This symb...

Page 4: ...t should be checked before using it Chapter 3 Recording Playback Operations This chapter explains about operations related to recording and playback Chapter 4 System Settings This chapter explains the settings related to recording and displaying content and other detailed system settings Chapter 5 Product Specifications This chapter lists the product s specifications Chapter 6 Warranty This chapte...

Page 5: ...Please pay careful attention to the content of the safety precautions when using the product This symbol indicates actions that carry the risk that a person could receive a serious injury This symbol indicates actions that carry the risk that a person could receive a moderate injury or that damage to physical property might occur The safety precautions to observe are explained with the following s...

Page 6: ...product There are high voltages inside the product that can cause electric shock Do not plug in or unplug the power cord with wet hands Doing so can cause electric shock Completely insert the plug until it locks into the connector Not fully inserting the plug can cause fire from electric shock or heat When a problem occurs immediately pull the plug from the connector on the high speed camera When ...

Page 7: ... and dust conduct electricity which can cause a fire or electric shock Ambient temperature 0 40 C humidity 85 RH or lower maximum altitude 2000 m or lower and no condensation Using the product outside of these limits can cause malfunction Do not store the product in a location where the temperature goes 20 C or lower or 60 C or higher Also ensure that condensation does not form This product is for...

Page 8: ...ording Settings 13 2 3 6 Saving Accessing Settings 13 2 3 7 Using Low Light Mode 14 Chapter 3 Recording Playback Operations 15 3 1 Saving Video 16 3 2 Video Playback 19 3 3 Fast Forward Rewind 20 3 4 Single Frame Advance 21 3 5 Enlarging Shrinking the Playback Screen Zoom Fit Scroll 21 3 5 1 Screen Fit Display 22 3 5 2 Enlarge Screen Zoom Display 24 3 5 3 Scrolling the Enlarged Screen 25 3 6 Segme...

Page 9: ...9 Automatically Hide Screen Text AUTO OSD OFF 64 4 4 Other Detailed Settings 65 4 4 1 Setting the Date Time 65 4 4 2 Post Recording Auto Playback Setting AUTO PLAY 66 4 4 3 Change Trigger Operation RECORDING TYPE 67 4 4 4 Reset to the Factory Default State 68 4 4 5 Loop Playback Setting PLAYBACK TYPE 69 4 4 6 RESOLUTION LOCK 70 4 4 7 Display the System Revision 71 Chapter 5 Product Specifications ...

Page 10: ......

Page 11: ...Chapter 1 Overview 1 1 Product Overview and Features 1 Remote Controller User s Manual ...

Page 12: ...ecting it to the KEYPAD connector on the body of that camera The remote controller is also hot pluggable it can be plugged into and unplugged from the camera while the power is on Camera connector name Signal Camera connector model name Remote controller connector model name KEYPAD Keypad signal PT02A 12 10S 023 PT06A 12 10P 023 2 ...

Page 13: ...Chapter 2 Basic Operation 2 1 About the Components 2 2 Device Connections 2 3 Remote Controller Basic Operation 3 Remote Controller User s Manual ...

Page 14: ...ackaging and check them 1 Remote controller unit 1 2 Remote controller connection cable 7 m 1 3 Remote controller connection cable 0 5 m 1 4 Strap strap bracket 1 set 5 Camera installation bracket 1 set 6 Remote Controller User s Manual this manual 1 4 Strap bracket and 5 Camera installation bracket are packaged integrated with the remote controller 4 ...

Page 15: ... on a high speed camera body with the included cable The photo shows an example connection to the FASTCAM BC2 HD The cable connects to the connector on the right side 15 pin The connector on the left side 9 pin is for future expansion purposes and not currently used The remote controller is hot pluggable it can be plugged into and unplugged from the high speed camera while the power is on 5 Remote...

Page 16: ...king frequently repeated functions easily accessible Detailed settings have also been organized in a menu which can be operated efficiently using the ARROW keys This section explains the basic remote controller operations necessary when recording with a high speed camera 2 3 1 Remote Controller Parts Remote controller exterior 6 ...

Page 17: ... Key descriptions 14 20 21 22 19 10 7 1 2 12 11 3 4 5 6 8 9 18 17 16 15 13 7 Remote Controller User s Manual ...

Page 18: ...s on off the OSD display 8 LOW LIGHT LOW LIGHT Mode 9 ZOOM Zoom 10 SCROLL Scroll 11 FIT 1 1 Fit monitor screen 1 1 display 12 CALIBRATE Execute calibration 13 MENU Menu display 14 BACK Return from setting condition 15 ARROW keys Move up down left right 16 ENTER Confirmation 17 STATUS Status display 18 STORE Store settings store a marker 19 SEGMENT PLAYBACK For segment playback 20 LIVE Change LIVE ...

Page 19: ... power switch on the high speed camera body to turn on the power After switching the power on the current IP address setting is displayed as text in the upper left of the LCD monitor screen Example Cable Device Connections To AC 100V outlet To DC IN PC Gigabit Ethernet Connection To HD SDI Device AC Power Supply Unit HD Monitor Remote Controller 9 Remote Controller User s Manual ...

Page 20: ...planation 1 Display mode LIVE mode MEMORY playback mode 2 Currently used partition block number of configured partition blocks 3 Currently set trigger mode 4 At the current setting recordable frame count recordable time FR frames S seconds 5 Current frame rate FPS frames second 6 Current resolution 7 Current shutter speed S second 8 Photron logo 1 2 3 4 5 6 7 8 10 ...

Page 21: ...ed on the LCD monitor screen by pressing the remote controller s MENU key To leave the menu list screen without making a selection cancel press the remote controller s MENU key or the BACK key Menu List Screen Menu Submenu 11 Remote Controller User s Manual ...

Page 22: ...s Find the item to set in the submenu and press the right key to move to the submenu To return to the menu from the submenu press the left key Move to the item you wish to configure using the keys and press the ENTER key The configuration item will appear on the left side of the screen where the menu was displayed Use the ARROW keys to change the setting To return to the submenu from the configura...

Page 23: ...xplicitly saving the settings MENU OTHERS DIGITAL I F SET setting MENU DISPLAY NTSC PAL setting 2 3 6 Saving Accessing Settings A maximum of four configuration settings can be saved How to save access these settings is explained next In addition for details on how to set recording conditions refer to the high speed camera s hardware manual separate manual On the remote controller press the numbere...

Page 24: ...hat temporarily increases the exposure time in this kind of situation making the screen easier to see Press the LOW LIGHT key once to turn on low light mode Press the LOW LIGHT key once more to clear low light mode Pressing the REC READY key automatically clears low light mode and returns you to the selected frame rate and shutter speed When in low light mode LOW LIGHT is displayed in the lower le...

Page 25: ... Saving Video 3 2 Video Playback 3 3 Fast Forward Rewind 3 4 Single Frame Advance 3 5 Enlarging Shrinking the Playback Screen Zoom Fit Scroll 3 6 Segment of Interest Playback 3 7 Playback Event Marker Function 15 Remote Controller User s Manual ...

Page 26: ...igger Operation RECORDING TYPE setting For more details see 4 4 3 Changing the Trigger Operation RECORDING TYPE For the START trigger mode Connect the camera body and monitor and verify that the camera is in LIVE mode Press the remote controller s REC READY key to switch to the READY state record ready Press the remote controller s REC key to start recording If you record until the memory is full ...

Page 27: ... READY state record ready Press the remote controller s REC key to start recording The display shows ENDLESS and the camera continuously records video Press the remote controller s REC key again to end recording For CENTER MANUAL the video before and after the REC key is pressed is saved For END the video up until the REC key is pressed is saved 17 Remote Controller User s Manual ...

Page 28: ...e controller s REC READY key to switch to the READY state record ready Press the remote controller s REC key to enter the recording mode The display shows REC Each time the REC key is pressed the specified number of frames is saved In the screen below 1000 frames are saved with each press of the button If you record until the camera s memory is full the camera returns to LIVE mode and recording en...

Page 29: ...d The fast forward speed is changed in order with each press of the button Fast Reverse Fast Forward 3 2 Video Playback You can easily playback video by using the remote controller The method differs depending on the set trigger mode Switch from LIVE to MEMORY mode If the camera is in LIVE mode press the remote controller s LIVE key to switch to MEMORY mode If the camera is in MEMORY mode the LIVE...

Page 30: ... PLAY key Next you can fast forward and rewind the video by pressing the FF key fast forward or FR key rewind Each time you press the fast forward or rewind key you can change the playback speed in three steps x10 x100 x1 000 Press the PLAY key to return to the normal playback speed Press the PAUSE key to pause playback 20 ...

Page 31: ...high speed cameras use high resolution sensors For this reason depending on the monitor there may be portions of the video that cannot be displayed when displayed as 1 1 video By also increasing the recording speed or decreasing the resolution there are situations where the video on the screen becomes extremely small In these situations use the fit function to instantly shrink enlarge the video to...

Page 32: ...wing section explains an example where a 512x128 pixel video is fit to a NTSC monitor The FASTCAM BC2 HD does not have a NTSC output function Only HD SDI output is available Press the remote controller s FIT 1 1 key The monitor screen s display size changes and the recording area is displayed at its maximum size on the screen 640x480 NTSC 512x128 640x480 NTSC 640x160 22 ...

Page 33: ... Press the FIT 1 1 key again to return to the original size 640x480 NTSC 512x128 23 Remote Controller User s Manual ...

Page 34: ...ed zoomed Press the remote controller s ZOOM key The LED for the remote controller s ZOOM key illuminates The ZOOM message and current zoom factor are also displayed on the monitor screen Enlarge or shrink the display with the up and down ARROW keys The function maintains the center of the screen while zooming Enlarge Shrink 24 ...

Page 35: ...mage that has been enlarged in the previous section Press the remote controller s SCROLL key The LED for the SCROLL key illuminates The SCROLL message is displayed in the upper right of the monitor screen Scroll the screen with the ARROW keys Up Down Left Right 25 Remote Controller User s Manual ...

Page 36: ...ion to playback only the range of images you wish to view by simply specifying the start and stop points of that range This section explains how to use the segment playback Set the camera to MEMORY mode Playback the video using the normal procedure Press the START key at the start point of the range of images you wish to view Press the END key at the end point of the range of images you wish to vi...

Page 37: ... the camera to MEMORY mode Playback the video using the normal procedure Display the frame to store and press the STORE key Repeat steps 2 and 3 above You can store a total of 10 points You can jump to the event marker frames using the up and down SHUTTER keys When an event marker frame is displayed MARKER FRAME x appears in the screen text Where x is a number from 1 10 When storing a frame that e...

Page 38: ...Chapter 3 Recording Playback Operations 28 ...

Page 39: ...Chapter 4 System Settings 4 1 Function Settings 4 2 Network Settings 4 3 Display Settings 4 4 Other Detailed Settings 29 Remote Controller User s Manual ...

Page 40: ...e ones shown below RANDOM FRAME To use the RANDOM trigger the number of frames to save each time the trigger is input must be set in advance before recording For the RANDOM trigger s operation refer to the Selecting the Trigger Mode section of the camera s hardware manual RANDOM FRAME Sets the number of frames to record for each trigger You can enter a value of TOTAL FRAME or lower For example by ...

Page 41: ...es to record before the trigger input The settable range is 0 to TOTAL FRAME For example by entering 1000FR MANUAL 4457FR is displayed on the screen This is the FRAME value which is the FRAME value subtracted from TOTAL FRAME FRAME Shows the number of frames to record after the trigger input Only FRAME can be set TOTAL FRAME Shows the total recordable frames according to the memory capacity and re...

Page 42: ...ord before the trigger input FRAME Sets the number of frames to record after the trigger input TOTAL FRAME Different than the RANDOM and MANUAL triggers this does not show the total number of recordable frames it shows the total of FRAME and FRAME RANDOM E TIMES When using the RANDOM CENTER and RANDOM MANUAL triggers you can set how many times to record For the detailed operation refer to the Sele...

Page 43: ...lens is completely shielded and that no light is leaking into the sensor Press the remote controller s MENU key to display the menu Using the remote controller s ARROW keys select the CALIBRATE menu then select the CALIBRATE menu from the submenu With the remote controller s keys move to ON verify that the lens is shielded and then press the remote controller s ENTER key Calibration finishes execu...

Page 44: ... faithful image output it is highly recommended to execute calibration before recording when the following settings are changed When the frame rate is changed When the shutter speed is changed When the resolution is changed Also depending on the settings phenomena such as the following may occur Fixed noise like horizontal bands appears A portion of the screen is clear but noise appears in the are...

Page 45: ...em Select the SAVE item with the remote controller s keys then press the ENTER key to save The save process can take from tens of seconds to a few minutes Loading calibration settings Press the remote controller s MENU key to display the menu Use the remote controller s keys to select the CALIBRATE menu Press the remote controller s ENTER key to select the item Select the LOAD item with the remote...

Page 46: ...Chapter 4 System Settings Calibration mode option Only the corresponding model can change the calibration method NORMAL Calibrate using a normal method FINE Calibrate using a fine method 36 ...

Page 47: ...partitioned before recording The procedure for configuring these settings is explained here Press the remote controller s MENU key to display the menu list Select PARTITION SETUP from the PARTITION submenu with the remote controller s ARROW keys and press the ENTER key A message to confirm whether or not to configure partitions is displayed To configure partitions select YES The setup menu is disp...

Page 48: ...Settings Select the number of partitions with the remote controller s ARROW keys When finished press the ENTER key to complete the setting Verify that the ID display on the screen has changed to the fraction display 38 ...

Page 49: ...d to is set record following the normal recording procedure Recorded section playback The images recorded to each partitioned section can be played by selecting the section ID Verify that the camera is in MEMORY mode Select the section ID you wish to play with the remote controller s ARROW keys Verify the ID display on the screen When the section ID you wish to play is set play it following the no...

Page 50: ...anges to 02 and the camera waits for the REC trigger input This means in START mode the camera is in the READY state In CENTER END and MANUAL modes the camera is in the ENDLESS state Input the REC trigger to start recording Recording ends The ID automatically changes to 03 and the camera waits for the REC trigger input Steps and are repeated recording finishes with ID10 and then the camera returns...

Page 51: ...able white balance Using preset white balance There are two types of white balance presets 5100K 3100K for use with common light sources The suggested color temperature for these presets is listed below 5100K daylight outdoors 3100K halogen light source Press the remote controller s MENU key to display the menu list Select COLOR TEMP from the ADJUSTMENT submenu with the remote controller s ARROW k...

Page 52: ...er s MENU key to display the menu list Select COLOR TEMP from the ADJUSTMENT submenu with the remote controller s ARROW keys and press the ENTER key Select AUTO USER1 or AUTO USER2 and press the ENTER key to start the white balance adjustment mode Verify that a value similar to that shown below is displayed at the bottom left of the screen Turn on the lighting to be used for recording and in the c...

Page 53: ...ed Reduce the light intensity Press the remote controller s ENTER key when PUSH ENTER KEY is shown The camera acquires the appropriate white balance value with this operation Verify that the display image has been adjusted The set value can be loaded by selecting USER1 or USER2 AUTO USER1 is saved in USER1 AUTO USER2 is saved in USER2 43 Remote Controller User s Manual ...

Page 54: ...ed conditions frame rate shutter speed resolution for recording Press the remote controller s MENU key to display the menu list Select COLOR TEMP from the ADJUSTMENT submenu with the remote controller s ARROW keys and press the ENTER key Select EDIT USER1 or EDIT USER2 and press the ENTER key The white balance adjustment items are displayed Use the ARROW keys to set the RGB values Press the ENTER ...

Page 55: ...the ENTER key The settings are displayed Each setting is described in the chart below Use the remote controller s keys to select one of the modes listed above When finished press the ENTER key to complete the setting Menu display Explanation OFF Turns color enhancement mode off LEVEL 1 Sets x0 5 color enhancement LEVEL2 Sets x1 default color enhancement LEVEL3 Sets x1 5 color enhancement LEVEL4 Se...

Page 56: ...d in advance on the camera This section explains about each of these patterns Press the remote controller s MENU key to display the menu list Select LUT SELECT from the ADJUSTMENT submenu with the remote controller s ARROW keys and press the ENTER key Select D1 through D9 and that LUT setting is loaded 46 ...

Page 57: ...tions D2 Gain 2x The gain is doubled and you can display the dark areas of the image emphasized D3 Gain 4x The gain is quadrupled and you can display the dark areas of the image emphasized This LUT emphasizes the dark portions even more than D2 47 Remote Controller User s Manual ...

Page 58: ... Gamma 0 56 This LUT is 0 56 gamma correction The optimum Gamma for a MAC monitor D5 Gamma 0 56 Gain 2x This LUT is double gain at 0 56 gamma correction D6 Gamma 0 56 Gain 4x This LUT is quadruple gain at 0 56 gamma correction 48 ...

Page 59: ...amma correction The optimum Gamma for a video monitor D8 Gamma 0 45 Gain 2x This LUT is double gain at 0 45 gamma correction D9 Gamma 0 45 Gain 4x This LUT is quadruple gain at 0 45 gamma correction 49 Remote Controller User s Manual ...

Page 60: ...r 4 System Settings Using a custom LUT Creating a LUT pattern is done with PFV For details refer to the Photron FASTCAM Viewer User s Manual About USER1 Select USER1 to use the custom LUT created with PFV 50 ...

Page 61: ... in three steps with the camera s edge enhancement setting Press the remote controller s MENU key select EDGE ENHANCEMENT from the ADJUSTMENT submenu and press the ENTER key The setting are displayed Each setting is described in the chart below Use the remote controller s ARROW keys to select one of the modes listed above When finished press the ENTER key to complete the setting 51 Remote Controll...

Page 62: ...he remote controller s MENU key select BLACK ADJ LEVEL from the ADJUSTMENT submenu and press the ENTER key The setting are displayed Each setting is described in the chart below Use the remote controller s ARROW keys to select one of the modes listed above When finished press the ENTER key to complete the setting 52 ...

Page 63: ...are refer to the Photron FASTCAM Viewer User s Manual This section explains the required network settings when connecting a high speed camera to a PC The default values of the high speed camera s network settings are listed below IP ADDRESS 192 168 0 10 NETMASK 255 255 255 0 GATEWAY ADDRESS 0 0 0 0 PORT 2000 fixed not changeable 53 Remote Controller User s Manual ...

Page 64: ...rom the OTHERS submenu with the remote controller s ARROW keys and press the ENTER key Use the ARROW keys to move between digits and the keys to set the IP address Press the ENTER key to confirm When connecting the Gigabit Ethernet interface compatible Photron cameras to a PC set each of those devices to a different IP address When connecting to an existing network do not use IP addresses that are...

Page 65: ...NTER key to confirm When OFF is selected the IP address specified in the previous section 4 2 1 Setting the IP Address is valid When ON is selected the IP address is acquired from the DHCP server and that acquired IP address is valid If the camera is not connected to a DHCP server the IP address is acquired when a connection is made to the server You can verify the acquired IP address with the DIG...

Page 66: ...e screen The procedure to display them is explained here Press the remote controller s MENU key to display the menu list Select DATE TIME from the OTHERS submenu with the remote controller s ARROW keys and press the ENTER key The DATE TIME menu is displayed Select DATE or TIME with the keys The selected option is displayed on the screen When the setting is complete press the ENTER key to finish Ve...

Page 67: ... When OFF text is not displayed on the screen When the setting is complete press the ENTER key to finish Verify that the screen s text display is ON or OFF You can also change the display with a single button by pressing the FUNCTION key 4 3 3 Display Crosshairs Displays crosshairs a reference line or reticule on the LCD monitor screen The crosshairs can be used to determine the position of an obj...

Page 68: ...N2 When ON is selected the crosshairs reticule reference lines are displayed on the screen At the same time the coordinates of the center point of the crosshairs are displayed on the screen The reference line can be moved to any position using the remote controller s ARROW keys Be aware that the cursor s coordinates are the coordinates for the VIDEO output screen display not the coordinates of the...

Page 69: ...lay the menu list Select R G B from the DISPLAY submenu with the remote controller s ARROW keys and press the ENTER key Select the R G B plane to be displayed or all of the RGB planes with the remote controller s keys Press the ENTER key to complete the setting 59 Remote Controller User s Manual ...

Page 70: ...NTSC PAL from the DISPLAY submenu with the remote controller s ARROW keys and press the ENTER key Select NTSC or PAL with the remote controller s keys and press the ENTER key Cycle the power on the high speed camera to enable the setting The video output format changes and the camera starts up The frequencies that can be set with HD SDI output change depending on the NTSC PAL setting For details s...

Page 71: ...D SDI from the DISPLAY submenu with the remote controller s ARROW keys and press the ENTER key Select desired item with the remote controller s keys and press the ENTER key Cycle the power on the high speed camera to enable the setting The HD SDI output frequency changes and the camera starts up Configurable output frequencies NTSC 60i 59 94i 30p 29 97p 24p 23 98p 24p sF 23 98p sF PAL 50i 25p 24p ...

Page 72: ...y cleaner looking for example 1 1000 s 1 3000 s whereas the 0 000000s display is accurate Press the remote controller s MENU key to display the menu list Select SHUTTER DISPLAY from the DISPLAY submenu with the remote controller s ARROW keys and press the ENTER key Select 1 xxxS or 0 xxxS with the remote controller s keys and press the ENTER key The display format for the LCD monitor is changed 62...

Page 73: ... screen display elements ON OFF Press the remote controller s MENU key to display the menu list Select OSD CUSTOM from the DISPLAY submenu with the remote controller s ARROW keys and press the ENTER key With the remote controller s keys select the item and show hide with the keys Items with the symbol are displayed The display items are changed 63 Remote Controller User s Manual ...

Page 74: ...data playback Press the remote controller s MENU key to display the menu list Select AUTO OSD OFF from the DISPLAY submenu with the remote controller s ARROW keys and press the ENTER key Select ON OFF with the ARROW keys When ON is selected the text is not displayed on the screen in MEMORY mode When the setting is complete press the ENTER key to finish Verify that the screen s text display is ON o...

Page 75: ...MENU key to display the menu list Select TIME SET from the OTHERS submenu with the remote controller s ARROW keys and press the ENTER key The TIME SET settings are displayed on the left of the screen You can move to the item with the keys and change the setting s value with the keys When all the settings are complete press the ENTER key to finish Increase Decrease Value Move Item TIME SET DATE 00 ...

Page 76: ...nient for immediately verifying the recorded video after recording Press the remote controller s MENU key to display the menu list Select AUTO PLAY from the OTHERS submenu with the remote controller s ARROW keys The menu to select the AUTO PLAY format ON OFF is displayed on the left side of the screen Select ON OFF with the remote controller s keys Press the ENTER key then the MENU key to close th...

Page 77: ...the operation of the system Press the remote controller s MENU key to display the menu list Select RECORDING TYPE from the OTHERS submenu with the remote controller s ARROW keys Select either READY AND TRIG or DIRECT TRIG on the menu Press the ENTER key to confirm The operation of the high speed camera for each item is shown below READY AND TRIG READY key input is always necessary before the REC t...

Page 78: ...set to the Factory Default State You can reset the high speed camera s settings frame rate resolution menu settings etc to the factory default state Press the remote controller s MENU key to display the menu list Move to the FACTORY DEFAULTS item from the OTHERS submenu with the remote controller s ARROW keys and press the ENTER key Select CANCEL or RESET with the remote controller s keys CANCEL c...

Page 79: ...lay the menu list Select PLAYBACK TYPE from the OTHERS submenu with the remote controller s ARROW keys The menu to select the PLAYBACK TYPE format ON OFF is displayed on the left side of the screen Select ON OFF with the remote controller s keys Press the ENTER key then the MENU key to close the menu list The setting is complete Verify the loop playback operation by playing video in MEMORY mode 69...

Page 80: ...d while resolution is fixed to a certain value Press the remote controller s MENU key to display the menu list Select RESOLUTION LOCK from the OTHERS submenu with the remote controller s ARROW keys The menu to select the RESOLUTION LOCK format ON OFF is displayed on the left side of the screen Select ON OFF with the remote controller s keys Press the ENTER key then the MENU key to close the menu l...

Page 81: ...the OTHERS submenu with the remote controller s ARROW keys and press the ENTER key The system revision of the high speed camera currently being used is displayed The high speed camera model name memory capacity system revision I F version and hardware version is displayed The image above and the revision version may differ depending on when the camera was shipped 71 Remote Controller User s Manual...

Page 82: ...Chapter 4 System Settings 72 ...

Page 83: ...Chapter 5 Product Specifications 5 1 General Specifications 5 2 Dimensions 5 3 Equipment Diagrams 73 Remote Controller User s Manual ...

Page 84: ...e humidity 85 or less no condensation Guaranteed operating temperature 0ºC to 40ºC no condensation Guaranteed operating humidity 85 or less no condensation External dimensions Remote controller unit 155 4 H x 105 4 W x 28 1 D mm excluding protrusions Weight Remote controller unit only 460 g Unit 7 m cable 1 15 kg Unit 0 5 m cable 620 g 74 ...

Page 85: ... RESOLUTION SHUTTER TRIGGER MODE FR REV PLAY FF PAUSE STOP ZOOM SCROLL FIT 1 1 SEGMENT PLAYBACK START END PARTITION PLAYBACK RATE MENU BACK SLOW FAST ENTER STORE STATUS LIVE REC READY REC ON OFF CALIBRATE FUNCTION 105 4 28 1 155 4 mm 75 Remote Controller User s Manual ...

Page 86: ...Chapter 5 Product Specifications 5 3 Equipment Diagrams 5 3 1 Camera Installation Bracket Equipment Diagram 76 ...

Page 87: ...5 3 2 Camera Installation Diagram 77 Remote Controller User s Manual ...

Page 88: ...Chapter 5 Product Specifications 5 3 3 Strap Equipment Diagram Equipped with Connector Up Equipped with Connector Down 78 ...

Page 89: ...Chapter 6 Warranty 6 1 About the Warranty 79 Remote Controller User s Manual ...

Page 90: ...ire earthquake water damage lightning other natural disasters pollution or the effects of abnormal voltage Damage or malfunction as a result of dropping or mishandling during shipment or when moving after purchase or misuse Consumable goods cables When repair adjustment or alternation done by an entity other than Photron service has been performed on the system or damage or malfunction that is det...

Page 91: ...Chapter 7 Contacting Photron 7 1 Contacting Photron ...

Page 92: ... number Check on the nameplate sticker Reason of inquiry System condition or what you know about it Contact Information In Americas and Antipodes PHOTRON USA INC 9520 Padgett Street Suite 110 San Diego CA 92126 4446 USA Phone 800 585 2129 or 858 684 3555 Fax 858 684 3558 E mail image photron com www photron com In Europe Africa and India PHOTRON EUROPE LIMITED The Barn Bottom Road West Wycombe Buc...

Page 93: ...rinted in Japan Control No E150615U R Re em mo ot te e C Co on nt tr ro ol ll le er r User s Manual Revision 1 03E Publication Date June 2015 Publisher PHOTRON LIMITED 21F Jimbocho Mitsui Bldg 1 105 Kanda Jimbocho Chiyoda Ku Tokyo 101 0051 JAPAN ...

Reviews: