background image

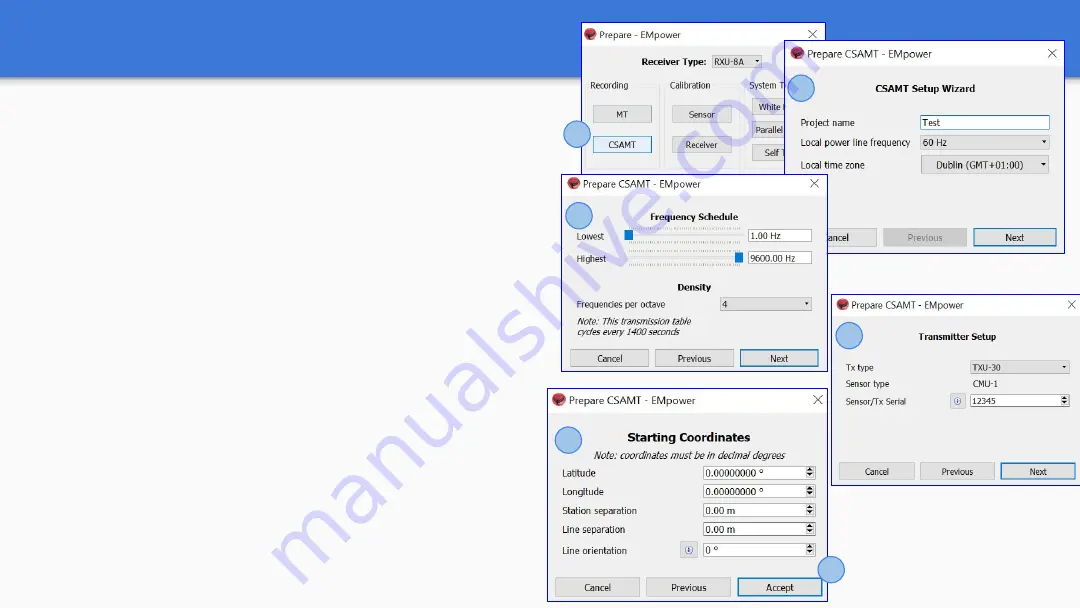
Configuration Creator - CSAMT acquisition

1.

Select the 

CSAMT 

recording type 

2.

CSAMT Setup Wizard

Type the Project name

Select the Local power line frequency

Choose the Local time zone and click Next 

3.

Frequency Schedule

Define the lowest and highest frequency

Select the Frequency per octave  and click Next 

4.

Transmitter Setup

Select the Transmitter (Tx) type

Type the sensor/ Tx serial  and click Next 

5.

Starting Coordinates

Enter the base coordinates of the grid (latitude and 
longitude)

The Station Separation within a same line

Separation between lines 

The Line orientation

6.

Click Accept

1

2

3

4

5

6

5

Summary of Contents for RXU-8A

Page 1: ...eator MT acquisition 7 Electric Channel Settings MT acquisition 8 Magnetic Channel Settings 9 Using Remote Control Client 10 Saving a Configuration File 11 RXU 8A Connections 12 SD Card Recording Data...

Page 2: ...connectors E4 electrode connectors E5 electrode connectors 4 Ground electrode connector 5 12VDC power input 6 LAN connector 7 GPS antenna connector 8 H1 Hx magnetic sensor connector H2 Hy magnetic sen...

Page 3: ...ectric channels can be used to acquire a redundant recording on the same site or to acquire an adjacent site Excellent choice for controlled source acquisitions that require a large density of electri...

Page 4: ...ation Creator see next page 3 Calibration 3 1 Sensor Calibration 3 2 Receiver Calibration No additional configuration needed 4 System tests 4 1 White Noise 4 2 Parallel Noise Configuration Creator 4 3...

Page 5: ...requency Schedule Define the lowest and highest frequency Select the Frequency per octave and click Next 4 Transmitter Setup Select the Transmitter Tx type Type the sensor Tx serial and click Next 5 S...

Page 6: ...le to define the time and date 3 Ethernet port see the Networking Settings manual 4 Channels Settings see pages 7 8 5 Define the Sampling Mode and or Sampling Rate 6 Configuration Layout Con guration...

Page 7: ...le or Disable the channel s Disable the channel s If you do not plan to use them during the recording This will save space on the SD card 3 Complete the information in the Electric channel settings 2...

Page 8: ...to use them during the recording This will save space on the SD card 3 Fill in the required information on the Magnetic channel settings 2 Channel settings can be configured by using the right click m...

Page 9: ...Choose Receiver Type 5 Enter the instrument ID 6 Configure Electric and Magnetic channels as needed 7 Click on the Send Configuration button 2 3 4 5 Receiver with rmware newer than v1 54 1 will ignor...

Page 10: ...USB card reader 2 Click the File menu Save or Ctrl S Select the SD card EMpower will automatically create the file config json 3 Save the configuration file config json in the root folder of the SD c...

Page 11: ...2 Ey E W Channels E3 E4 E5 are normally not required in a conventional Single site MT survey 3 Magnetic sensors to channels H1 Hx H2 Hy and H3 Hz 4 GPS antenna 5 12V DC Power Source 6 Network connecto...

Page 12: ...utomatically according to the schedule Recording SD Recording 1 Insert the SD card 2 To turn on the receiver press the Power button briefly 2 1 Wait until both LEDs are solid blue 2 2 Automatic Start...

Page 13: ...ing Ready SD 3 1 Press the Power button briefly and release to stop recording Wait until both LEDs are steady blue 2 Turn off the receiver pressing the Power button for a few seconds the LEDs will fla...

Page 14: ...elect the SD card The recording creates two folders log and recdata 4 Open the recdata folder and select the recording folder and click Choose Receiver Serial Number Recording Date Recording Start Tim...

Page 15: ...and make the necessary corrections Serial Polarity H1 H 3 Azimuth 3 View Recording Details see page 15 4 Process the recorded data after the reviewed the information see next page Evaluate 13 4 This s...

Page 16: ...entering a start and end date time 3 Enable the electric power grid filter that corresponds to the frequency carried by the power lines in the survey region 50Hz 60Hz or None 4 Click the Process butt...

Page 17: ...uality control 1 Battery Voltage 2 Internal Temperature 3 Number of Satellites 4 Saturated Frames If saturation is not close to 0 review the channel configuration see pages 4 6 the channel gain might...

Page 18: ...Email support phoenix geophysics com Phone 1 416 491 7340 Technical Support Contact 18...

Reviews: