background image

20141229 V2 

9

9)


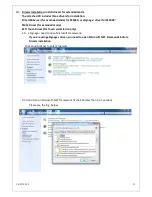
Each client connection will be completed as below: 


10)


At this stage, you should be able to see all the assigned monitors in active Windows 
Desktop mode. 


11)


Start “ViewSpan Configuration” in the Task-Bar. 
  Make sure to set all zero client monitors as “Extended” 


Summary of Contents for ZE6000

Page 1: ...AV adaptor and Power supply Adaptor near water The AV adaptor is featured with 75mm x 75mm and 100mm x 100mm VESA mount For easy and safe use it is recommended to mount AV adaptor on the rear cover of...

Page 2: ...inux Multi seat 10 Zero Client with WMS2012 Multipoint 11 III Driver Installation 12 19 eSignage need to open Microsoft Framework 12 Install Elite USB Server 13 14 Install SMSC Driver 15 16 Install EE...

Page 3: ...tek special software application such as eSignage Features Simple Ethernet connection ZE6000 ZE6000 connect to Host server through Ethernet cable connection this type of connection can exceed the leng...

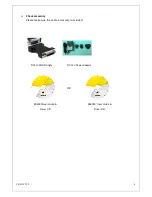
Page 4: ...20141229 V2 4 Check accessory Please make sure the entire accessory is included OR DVI to VGA Dongle DC 12V Power Adaptor ZE6000 User Guide Driver CD ZE6000 User Guide Driver CD...

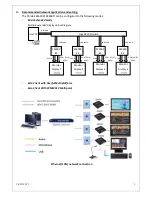
Page 5: ...iagram Zero Client with Userful Multiplatform Zero Client With WMS2012 Multipoint Ethernet LAN network connection Audio Audio LAN cable LAN cable LAN cable LAN cable LAN cable VGA DVI D HDMI Host PC G...

Page 6: ...20141229 V2 6 ZE6000 apply with Phistek eSignage...

Page 7: ...thernet recommend Gigabit Switched and ideally having a dedicated switch per each cluster 1 2 Installation Part 1 Host PC Windows OS Preparations 1 Host PC to run Windows Update and install all availa...

Page 8: ...E6000 ZE6000 Zero Clients 5 Click Configuration tick DHCP 6 Per each cluster per each client terminal Click Assign to this PC 7 Windows will identify and install USB sound driver 8 A dialog may pop up...

Page 9: ...tion will be completed as below 10 At this stage you should be able to see all the assigned monitors in active Windows Desktop mode 11 Start ViewSpan Configuration in the Task Bar Make sure to set all...

Page 10: ...age application software 2 1 With Phistek eSignage user can broadcast and monitor extended zero clients display on the Host PC control center see details in eSignage application Doc 2 2 Drivers Follow...

Page 11: ...Windows MultiPoint Server 2012 zero clients can work independently as standalone PC 4 2 Pls visit Microsoft Website for Windows MultiPoint Server 2012 Evaluation to get image and installation guide h...

Page 12: ...iver for extended mode EETI Touch Driver For Touch workstation only 1 0 eSignage need to open Microsoft Framework If you are using eSignage driver you need to open Microsoft NET Framework before Drive...

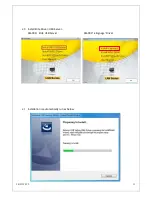
Page 13: ...20141229 V2 13 2 0 Install Elite Driver USB Server ZE6000 Elite USB Server ZE6000 eSignage Driver 2 1 Installation is automatically run as below...

Page 14: ...20141229 V2 14 2 2 After installation screen will display as below please press Finish 2 3 Screen will then display as below please choose to restart your computer...

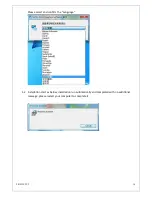
Page 15: ...20141229 V2 15 3 0 Install SMSC Driver ZE6000 ZE6000 3 1 Please press I Accept...

Page 16: ...0141229 V2 16 Please select and confirm the Language 3 2 Installation start as below installation run automatically and completed with no additional message please restart your computer to complete it...

Page 17: ...20141229 V2 17 4 0 Install EETI Touch Driver For Touch workstation only ZE6000 ZE6000 4 1 Screen display as below please click Next...

Page 18: ...20141229 V2 18 4 2 Select the set up type don t tick the box if PS2 interface is not required Click Next 4 3 RS232 interface driver installed is default please click Next...

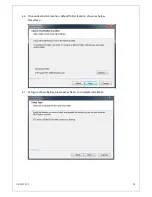
Page 19: ...20141229 V2 19 4 4 You can select to do Touch screen calibration after system boot up or not Default setting is None 4 5 Select to use Multi Monitor system then press Next...

Page 20: ...20141229 V2 20 4 6 Choose destination location default folder location shown as below Press Next 4 7 As Figure shown below please press Next to complete installation...

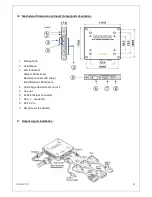
Page 21: ...V Output signals installation 1 Microphone 2 Headphone 3 LED indicators Power LED Yellow Network connect LED Blue Identification LED Green 4 USB A type downstream port x 4 5 Line out 6 RJ 45 Ethernet...

Page 22: ...20141229 V2 22 VI Adaptor installation 1 Type1 2 Type2 3 Type3...

Page 23: ...20141229 V2 23 4 Type 4...

Page 24: ...nst harmful interference when the equipment is operated in a commercial environment This equipment generates uses and can radiate radio frequency energy and if not installed and used in accordance wit...

Page 25: ...deo output x1 DVI I connector for VGA DVI or HDMI Digital signal connection x1 DVI I to VGA Dongle for VGA signal connection Audio output 1 x1 Line out Audio output 2 x1 headphone Audio input x1 Micro...

Page 26: ...ients shall be IP 192 168 1 xxx Subnet mask 255 255 255 0 There are two ways to set up IP address DHCP See a general home network diagram below as an example Connect Host PC and zero clients to a netw...

Page 27: ...29 V2 27 Check if zero clients are at DHCP status Click configuration a set up table will appear DHCP shall be ticked Set Host PC to DHCP see below properties of IPV4 tick Obtain an IP address automat...

Page 28: ...28 After all devices IP address has been set up to DHCP the router will assign IP automatically the USB server utility will look like as below Click Assignment to this PC for each client connection w...

Page 29: ...assign IP If the system is for local use not connect to router to website you may also assign IP manually The IP address shall be in the same segment and Subnet mask shall be the same For example Hos...

Reviews: