background image

VGA IN

L

R

L

R

AUDIO 

VGA OUT

3

L

R

AUDIO IN

Y

C b

CVBS

Y/C

S-VHS

CVBS

AV3

AV2

AV1

AV4

C r

AUDIO

2

2

OUT 

AUDIO 

IN 

MAINS
INLET

~ MAINS

EXTERNAL 5

ANTENNA

EXTERNAL 3

EXTERNAL 1

EXTERNAL 2

EXTERNAL 4

AUDIO OUT

R

L

NO FUNCTION

PL/MAC IN

CENTER IN

MONITOR OUT

L

L

R

R

L

R

Pr

Pb

Y

CABLE

1

4

AUDIO

AUDIO

AUDIO

~ MAINS

RS232

DVI-D

Y/C S-VHS

L

R

L

R

AUDIO IN

AUDIO IN

G/Y/Y

CVBS

B/Pb/Cb

R/Pr/Cr

V

H

AUDIO IN

R

VGA 1

VGA 2

RC-OUT

AV2

AV1

AV3

L

AUDIO

VGA 1

VGA 2

DVI-D

2

3

DVI-D

Y/C S-VHS

G/Y/Y

CVBS

B/Pb/Cb

R/Pr/Cr

V

H

VIDEO 2

(AV2)

VIDEO 1

(AV1)

VIDEO 3

(AV3)

2

MAINS INLET

3

~ MAINS

RS232

VGA 1

VGA 2

RC-OUT

CVBS 1

CVBS 2

Y/C

VGA

R/Cr/Pr

Y

Cb/Pb

Cr/Pr

DVD/HD1

RGB/DVD/HD2

G/Y

B/Cb/Pb

HD

DVI

EXTERNAL

CONTROL

VD

Summary of Contents for FlatTV FTR9964

Page 1: ...OR OUT L L R R L R Pr Pb Y CABLE 1 4 AUDIO AUDIO AUDIO MAINS RS232 DVI D Y C S VHS L R L R AUDIO IN AUDIO IN G Y Y CVBS B Pb Cb R Pr Cr V H AUDIO IN R VGA 1 VGA 2 RC OUT AV2 AV1 AV3 L AUDIO VGA 1 VGA 2 DVI D 2 3 DVI D Y C S VHS G Y Y CVBS B Pb Cb R Pr Cr V H VIDEO 2 AV2 VIDEO 1 AV1 VIDEO 3 AV3 2 MAINS INLET 3 MAINS RS232 VGA 1 VGA 2 RC OUT CVBS 1 CVBS 2 Y C VGA R Cr Pr Y Cb Pb Cr Pr DVD HD1 RGB DV...

Page 2: ...964 only 21 Teletext Guide 22 24 Teletext 25 27 Connect Peripheral Equipment Connecting and selecting equipment 28 31 Remote Control functions for peripherals 32 33 Recording 34 Tips 35 Index 35 Glossary 36 Help If this instruction manual does not give an answer or if Tips do not solve your TV problem you can call your Local Philips Customer or Service Centre See the supplied World wide guarantee ...

Page 3: ...ormat p 13 B Switch to standby p 12 i Screen information p 12 0 Smart surf key p 13 Video recorder function p 32 b Teletext on off p 25 Ï Main menu on off p 4 Cursor to select your choice V Volume Up Down p 12 Sound mute p 12 P Programme selection p 12 w Peripherals p 31 Source selection of EXT1 EXT2 EXT3 EXT4 EXT5 FRONT VGA or TV channels Mode keys p 12 TV VCR DVD SAT TAPE CD TUNER or CDR selecti...

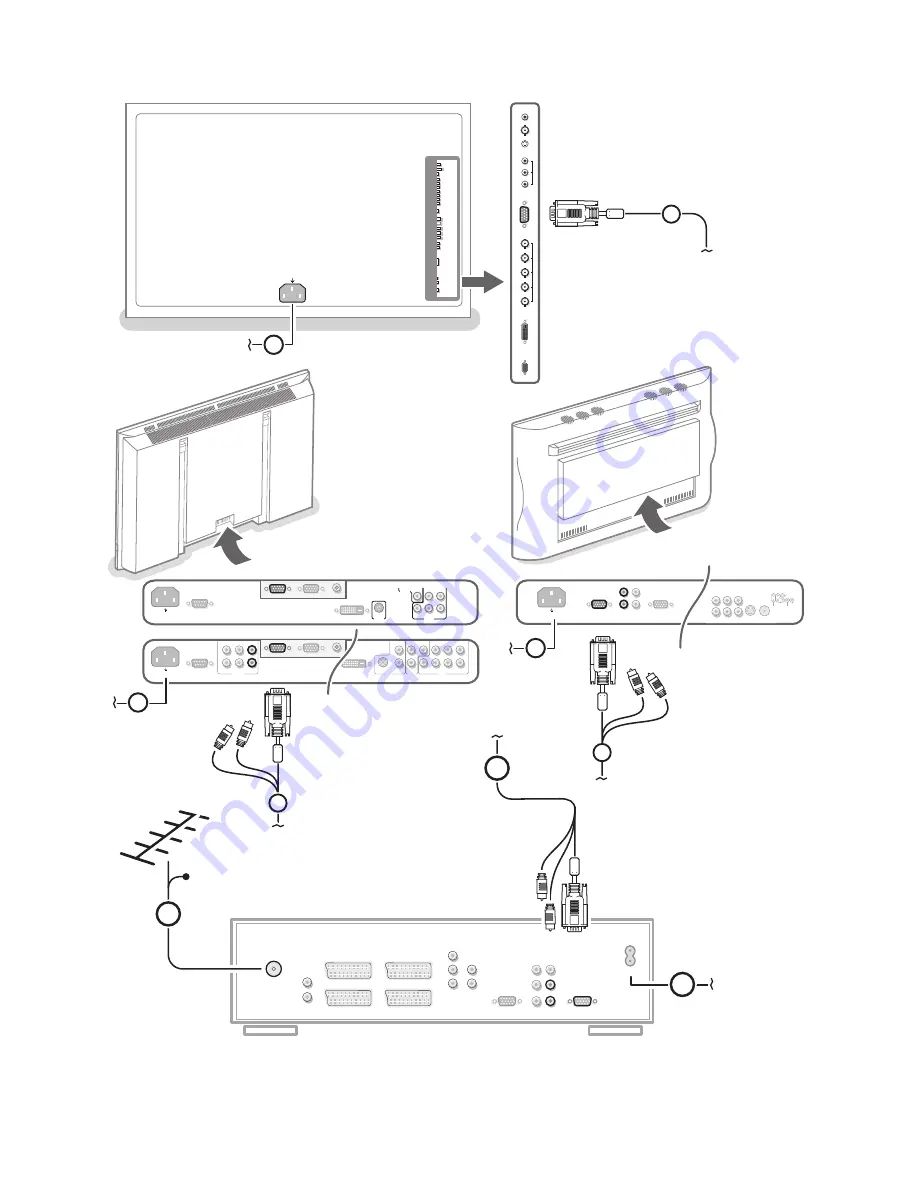
Page 4: ...als see p 28 In order to obtain the best result please use only the supplied antenna cables between the receiver box and videorecorder and between videorecorder and antenna connector Insert the mains cord supplied 3 into the MAINS at the back of the monitor and the mains cord 4 at the back of the receiver Put both in the wall sockets Remote control Remove the cover of the battery compartment Inser...

Page 5: ...r indicate which directions to choose In this way users can navigate through the menu hierarchy to arrive at the control they wish to adjust Pressing a valid key on the remote control shifts focus from the current ball to the next one connected by a pipe in that direction Balls represent a branch of the menu hierarchy All menu items are represented by balls Each ball is identified with an identify...

Page 6: ...e your preferred language and press the OK key on the remote control Proceed with the Install menu é Use the cursor down to select Install Use the cursor right to select Language Follow the instructions on screen Use the cursor up down to select your preferred language and press the OK key to confirm your selection Proceed with the Install menu Select the menu language 2 1 3 B w æ b Ï TV VCR DVD S...

Page 7: ... displayed When the Automatic installation is complete the puck navigates to Install again If a cable system or a TV channel which broadcasts ACI Automatic Channel Installation or a TV channel transmitting a teletext page with the frequencies and programme names of all the TV channels which can be received is detected the search is stopped and the programme list appears The programme list is autom...

Page 8: ...to display upper or undercast characters on the keyboard Special to display special characters on the keyboard Press OK to confirm Press the cursor left repeatedly when you have finished the name giving of the selected channel or peripheral Select another programme number and repeat steps to To exit the Give name menu keep the cursor up pressed Reshuffle the programme list According to your prefer...

Page 9: ...gh the speakers and audio from the other screen through the headphones This menu allows you to select the preferred format which can then be displayed toggling the b key on and off See Dual screen PIP p 20 Select Dual screen format with the cursor down é Press the cursor right Select Dual screen Large PIP Medium PIP or Small PIP with the cursor up down When Dual screen is selected and Dual screen ...

Page 10: ...menu you can select which option you prefer Note Continuing to hold the S key down will also cycle the TV through the various formats Changing the format this way does not store the selected format Select Freeze format with the cursor down é Press the cursor right Select Freeze Replay Photo finish with the cursor up down Factory settings This function allows you to reset most of the picture and so...

Page 11: ...event children from watching certain programmes To watch locked channels you need to enter an access code The Set Change code menu item allows you to create or change a Personal Identification Number PIN Select Set Change code with the cursor down é If no code exists yet the menu item is set to Set code Follow the instructions on screen If a code has previously been entered the menu item is set to...

Page 12: ...the external inputs Press the cursor right to enter the list of types of peripherals attached to the selected input Select the peripheral device with the cursor up down Once you have selected the source e g VCR this source will automatically be selected when your remote control is in VCR mode see p 12 and you press the w key on the remote control Source EXT1 EXT2 EXT3 EXT4 EXT5 Front Setup ...

Page 13: ...reeze format on off FTR9964 only This function is not available with a VGA source See Setup menu General Freeze format p 9 where you can select among three modes to be displayed when the freeze key is pressed on the remote control Freeze Replay Photo finish When the mode is Freeze press the S key to activate de activate a frozen picture The audio continues to play When the mode is Replay press the...

Page 14: ...icture format Auto format Super zoom 4 3 Movie Expand 14 9 Movie Expand 16 9 Subtitle zoom Wide screen Auto format makes the picture fill the screen as much as possible In case of subtitles in the bottom black bar Auto format makes the subtitles visible In case of a broadcaster logo in the corner of the top black bar the logo disappears from the screen Super zoom removes the black bars on the side...

Page 15: ...Each time it is pressed a different sound setting is selected corresponding with specific factory setting of bass and treble a Picture Each time it is pressed a different picture setting is selected corresponding with specific factory settings of Contrast Colour Sharpness Colour Enhancement DNR and Dynamic Contrast Personal refers to the personal preference settings of picture and sound selected i...

Page 16: ...rol allows you to adjust the edge definition of a picture Tint This control allows you to select the colour temperature of the picture Normal Warm or Cool Digital natural motion Line doubling eliminates line flicker motion compensation reduces jitter and offers smooth yet sharp motion reproduction in movie broadcasts Select On or Off to really see the difference in picture quality Dynamic Contrast...

Page 17: ...ase you connect your TV receiver box with a speakerless monitor and without having connected an audio receiver all references made to sound reproduction volume control and audio connections are not applicable Select the menu items in the Sound menu with the cursor up down and adjust the settings with the cursor left right Remember control settings are at normal mid range levels when the bar scale ...

Page 18: ...t on a selected programme and the TV is placed in Stereo mode the sound coming from the set will remain monaural Your selection is stored per TV channel Digital Analogue Only selectable in case of digital transmission Select Digital or Analogue if the TV channel transmits digital sound In case of weak digital sound signals due to the transmission select Analogue Your selection is stored per TV cha...

Page 19: ...ll automatically be displayed on the selected TV channels if subtitles are in the transmission A symbol will indicate that the mode is on Select On during mute when you want to have the subtitles automatically been displayed when the sound has been temporarily interrupted with the key on the remote control Child lock The Child lock feature allows you to lock TV channels and externals to prevent ch...

Page 20: ... to enter the channel list Select the TV channel or external you want your TV to switch to on a selected time and day Not possible with a VGA source Press the cursor right again to select a day of the week or to select Daily Press the cursor right once again to enter the time è Enter the time with the digit keys or with the cursor up down Press the OK key to activate ç Press the MENU Ï key to turn...

Page 21: ...e external sources in the highlighted screen Making the PIP screen movable Select a PIP format é Highlight the PIP picture with the cursor left right Press the OK key to make the PIP screen movable The PIP screen can now be moved This is made visible with a blue border around the PIP screen Press the cursor up down left right to move the PIP screen in the direction of the cursor press Press the OK...

Page 22: ...ing the P or the 0 key or the digit keys changes the channel or source for the currently highlighted screen Note channels cannot be added or deleted from the Smart surf list when Multipip is activated Press the c key to swap the highlighted screen and the main screen With PIP 3 and PIP 8 press the cursor up down to display a following series of PIP screen With PIP 12 highlight the PIP picture in t...

Page 23: ...sfies the VPT requirements the TV will remember the last selected teletext page number of that channel that contains programme guide information and indicates which programme starts at what time Every time you press the æ key the teletext programme guide page of the selected TV channel will be available Note The broadcaster is responsible for the content of the information The TV is responsible fo...

Page 24: ... the Video Programming via Teletext VPT requirements and transmits times of programmes Make sure you are on the TV programming page Review Press the grey colour key to activate Review and to get an overview of all the programmes which are marked as reminders or for recording When more than one programme to be recorded has an overlap in time these programmes will me marked by a red colour After the...

Page 25: ...are managed depend on the type of video recorder you have When all video recorder timers are full the item Record in the menu will not be present Upload video recorder overview only with Philips VCR s When the TV is switched on the timer recordings are uploaded to the TV to check if any manual addition or deletions have been done This is shown in the Review The video recorder manages and removes t...

Page 26: ...etext broadcast by the selected TV channel Press the b key to return to a full screen picture or press the b key to return to a full teletext picture Quickly run through the teletext pages Press the cursor up down or the P key to run through the previous or the following pages Select the previously selected teletext page Press the 0 key Note Only possible when teletext pages are active not when th...

Page 27: ...s on the keyboard Press the cursor left repeatedly to return to the Teletext menu again Searching a word Type in the word on screen or select a word from the history list on the right Whether upper or lowercase is used has no influence Searching for numbers is not possible é Select Search and press OK again The message Searching appears When the word is found it is highlighted in the teletext page...

Page 28: ...he teletext menu and that the puck is in the upper left corner of the screen é Press the cursor key down to highlight the first word or a number on the page Use the cursor up down left right to select the word or number you want to search for Press the OK key to confirm A message appears at the bottom of the screen to indicate that the searching is going on or that the word or page is not found Pr...

Page 29: ...t Picture setting without changing the picture setting manually Note Do not place your video recorder too close to the screen as some video recorders may be susceptible for signals out of the display Keep a minimum distance of 0 5 m to the screen Connect the supplied aerial cables 1 2 and to obtain a better picture quality a cable 3 as shown opposite If your video recorder is provided with the Eas...

Page 30: ...bles with the S VHS input 3 instead of VIDEO IN 2 and AUDIO inputs 1 Camera camcorder S VH S VID EO IN A U D IO L R 1 2 3 Video recorder and other peripherals Connect the aerial cables 1 2 and 3 as shown only if your peripheral has TV aerial in output Connect your equipment with a cable 4 or 5 to one of the euroconnectors EXT1 2 3 or 4 to obtain a better picture quality é Look for the test signal ...

Page 31: ...ceiver See the separate supplied instruction manual with your monitor Connect your computer AUDIO OUT L R 1 2 CENTRE Insert the plug into the headphone socket L behind the door at the front side of the receiver Press the centre of the door to open é Press to switch off the internal loudspeakers of the TV The headphone impedance must be between 8 and 2000 Ohm The headphone socket has a 3 5 mm jack ...

Page 32: ... source has been connected and activated See also the separate supplied instruction manual with your monitor Note In case you connect your VGA source with a speakerless monitor and without having connected an audio receiver all references made to sound reproduction are not applicable Select VGA with the w key and press the OK key to confirm é Press the MENU Ï key to switch on the VGA menu Select o...

Page 33: ...st of the audio and video equipment from our range of products can be operated with the remote control of your TV Press the VCR DVD SAT TUNER CD TAPE or CDR key according to the equipment you want to operate with this remote control See Use of the remote control p 12 Video recorder without EasyLink Press one of the video recorder keys after you pressed the VCR key for record Ò for rewind for stop ...

Page 34: ...ng keys after you have pressed the TUNER CD TAPE or CDR key Ï to switch the menu on or off tuner 0 to select a frequency tuner to record Ò to search down tuner rewind CD tape speed down CDR stop π play to search up tuner forward CD tape speed up CDR æ RDS news TA tuner select following disc CD CDR S pause CD CDR tape b RDS display tuner info on screen CD CDR P next previous CD Q surround modes CD ...

Page 35: ... being displayed on the TV screen Press the INSTANT record key under the door of the remote control of the TV or of the video recorder or the record key on the video recorder The video recorder switches on from standby and a message of what is being recorded appears on the screen The video recorder starts recording the programme you are watching é Press the key to stop the recording Do not switch ...

Page 36: ...ician End of life directives We are paying a lot of attention to using environmentally friendly production methods Your new flat colour television contains materials which can be recycled and reused At the end of life specialised companies can dismantle the discarded flat colour television to concentrate the reusable materials and to minimise the amount of materials to be disposed of Please ensure...

Page 37: ... Teletext pages and gives you instant access to them Menu On screen display of functions and facilities in a well organised survey NTSC The broadcasting system used in the USA Japan and parts of South America and Southeast Asia Picture Freeze TV mode which allows you to freeze a certain image in order to study a specific detail at ease e g to make notes of certain programme information like phone ...

Reviews: