background image

12

Network

12.1

Home Network

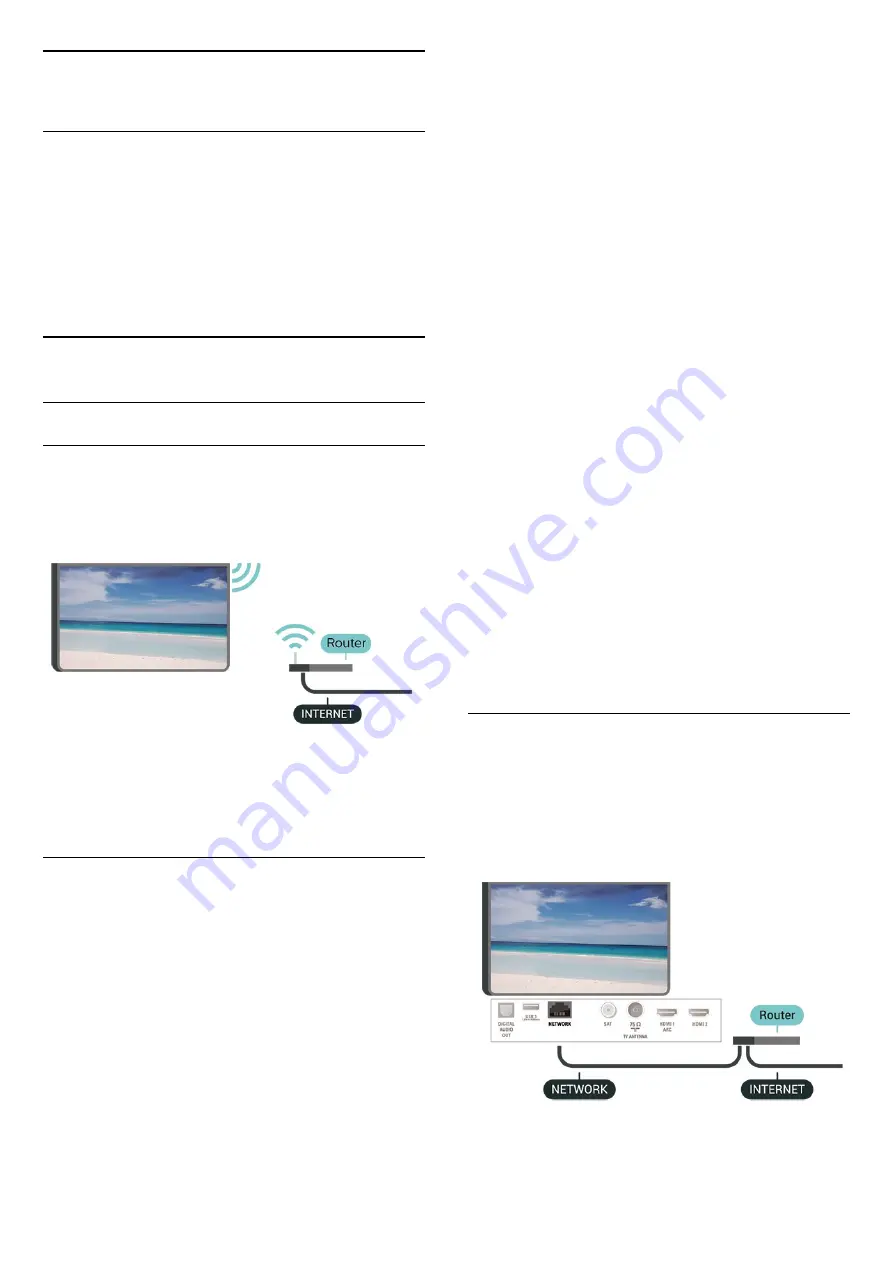
To enjoy the full capabilities of your Philips Smart TV,
your TV must be connected to the Internet.

Connect the TV to a home network with a high-speed
Internet connection. You can connect your TV
wirelessly or wired to your network router.

12.2

Connect to Network

Wireless Connection

What You Need

To connect the TV to the Internet wirelessly, you need
a Wi-Fi router with a connection to the Internet. Use
a high-speed (broadband) connection to the Internet.

Turn Wi-Fi On or Off


 (Home) > Settings > Network > Wi-Fi On/Off


Make the Connection

Make the Connection - Wireless


(Home) 

Settings

 > 

Network

 > 

Connect to

network

 > 

Wireless

1 - 

In the list of found networks, select on your

wireless network. If your network is not in the list
because the network name is hidden (you switched
off the SSID broadcast of the router), select Add New
Network to enter the network name yourself.

2 - 

Depending on the type of router, enter your

encryption key - WEP, WPA or WPA2. If you entered
the encryption key for this network before, you can
select 

OK

 to make the connection immediately.

3 - 

A message will be shown when the connection is

successful. 


Make the Connection - WPS


(Home) 

Settings

 > 

Network

 > 

Connect to

network

 > 

WPS

If your router has WPS, you can directly connect to
the router without scanning for networks. If you have
devices in your wireless network that use the WEP
security encryption system, you cannot use WPS.

1 - 

Go to the router, press the WPS button and return

to the TV within 2 minutes.

2 - 

Select 

Connect

 to make the connection.

3 - 

A message will be shown when the connection is

successful. 


Make the Connection - WPS with PIN Code


(Home)

 > 

Settings

 > 

Network

 > 

Connect to

network

 > 

WPS with PIN Code

If your router has WPS with a PIN code, you can
directly connect to the router without scanning for
networks. If you have devices in your wireless
network that use the WEP security encryption system,
you cannot use WPS.

1 - 

Write down the 8-digit PIN code shown on screen

and enter it in the router software on your PC. Consult
the router manual on where to enter the PIN code in
the router software.

2 - 

Select 

Connect

 to make the connection.

3 - 

A message will be shown when the connection is

successful.

Wired Connection

What You Need


To connect the TV to the Internet, you need a
network router with a connection to the
Internet. Use a high-speed (broadband) connection
to the Internet.

Make the Connection


(Home)

 > 

Settings

 > 

Network

 > 

Connect to

40

Summary of Contents for 6162 series

Page 1: ...Register your product and get support at 6162 series www philips com welcome User Manual 43PUS6162 49PUS6162 50PUS6162 55PUS6162 65PUS6162 ...

Page 2: ... Menu Overview 31 11 2 Utilities Menu 31 11 3 Quick Settings and All Settings 31 11 4 All Settings 31 12 Network 40 12 1 Home Network 40 12 2 Connect to Network 40 12 3 Network Settings 41 13 Smart TV 42 13 1 Setup Smart TV 42 13 2 Smart TV Start Page 42 13 3 App Gallery 42 13 4 Multi View 42 14 Netflix 43 15 Environmental 44 15 1 European Energy Label 44 15 2 Product Fiche 44 15 3 End of Use 44 1...

Page 3: ...lt our online support You can select your language and enter your product model number Go to www philips com support On the support site you can find your country s telephone number to contact us as well as answers to frequently asked questions FAQs In some countries you can chat with one of our collaborators and ask your question directly or send a question by email You can download new TV softwa...

Page 4: ...he TV Select Start and press OK An identification file is written on the USB memory device 3 Download the TV software Insert the USB memory into your computer On the USB memory device locate the file update html and double click it Click on Send ID If new software is available download the zip file After the download unzip the file and copy the file autorun upg onto the USB memory device Do not pl...

Page 5: ...ld batteries according to the end of use directions Cleaning Your remote control is treated with a scratch resistant coating To clean the remote control use a soft damp cloth Never use substances such as alcohol chemicals or household cleaners on the remote control Key Overview Top 1 Standby On To switch the TV on or back to Standby 2 Playback and Record Play to playback Pause to pause playback St...

Page 6: ... level 3 Number keys To select a channel directly 4 SUBTITLE To switch subtitles on off or to show automatically 5 Channel To switch to the next or previous channel in the channel list To open the next or previous page in Text Teletext To start the next or previous chapter on a disc 6 Mute To mute the sound or to restore it 7 TEXT To open or close Text Teletext 3 2 IR sensor The TV can receive com...

Page 7: ...3 Press up or down to adjust the volume or tune to the next or previous channel Press up or down to go through the list of sources including the tuner selection The menu will disappear automatically 7 ...

Page 8: ... 49PUx6162 VESA MIS F 200x200 M6 Minimum 10 mm Maximum 14 mm 50PUx6162 VESA MIS F 200x200 M6 Minimum 10 mm Maximum 14 mm 55PUx6162 VESA MIS F 300x200 M6 Minimum 10 mm Maximum 14 mm 65PUx6162 VESA MIS F 400x200 M6 Minimum 10 mm Maximum 16 mm Preparation First remove the 4 plastic screw caps out of the threaded bushes on the back of the TV Make sure that the metal screws to mount the TV to the VESA ...

Page 9: ...all joystick key on the back of the TV Switch to standby To switch the TV to standby press on the remote control You can also press the small joystick key on the back of the TV In standby mode the TV is still connected to the mains power but consumes very little energy To switch off the TV completely disconnect the power plug When disconnecting the power plug always pull the power plug never the c...

Page 10: ... philips com 5 2 Antenna Insert the antenna plug firmly into the Antenna socket at the back of the TV You can connect your own antenna or an antenna signal from an antenna distribution system Use an IEC Coax 75 Ohm RF antenna connector Use this antenna connection for DVB T and DVB C input signals 5 3 Satellite Attach the satellite F type connector to the satellite connection SAT at the back of the...

Page 11: ...audio jacks 5 5 Audio Device HDMI ARC Only HDMI 1 on the TV have HDMI ARC Audio Return Channel If the device typically a Home Theatre System HTS also has the HDMI ARC connection connect it to HDMI 1 connection on this TV With the HDMI ARC connection you do not need to connect the extra audio cable that sends the sound of the TV picture to the HTS The HDMI ARC connection combines both signals Digit...

Page 12: ...www wi fi org Wi Fi the Wi Fi CERTIFIED logo the Wi Fi logo are registered trademarks of the Wi Fi Alliance Wi Fi CERTIFIED Miracast Miracast are trademarks of the Wi Fi Alliance Using Miracast Switch on Miracast Press SOURCES Miracast Share a Screen on TV 1 Activate Miracast Screen mirroring on your mobile device 2 On your mobile device select the TV This TV will be displayed as TV model name 3 S...

Page 13: ...tched on or off via your phone 5 7 Other Device CAM with Smart Card CI About CI This TV is ready for the CI Conditional Access With CI you can watch premium HD programmes like movies and sports offered by digital TV operators in your region These programmes are scrambled by the TV operator and descrambled with a prepaid CI module Digital TV operators provide a CI module Conditional Access Module C...

Page 14: ...alled on your TV before you install the USB Hard Drive 1 Connect the USB Hard Drive to one of the USB connections on the TV Do not connect another USB device to the other USB ports when formatting 2 Switch on the USB Hard Drive and the TV 3 When the TV is tuned to a digital TV channel press Pause Trying to pause will start the formatting Follow the instructions on screen When the USB Hard Drive is...

Page 15: ...a computer To format a USB Hard Drive 1 Connect the USB Hard Drive to one of the USB connections on the TV Do not connect another USB device to the other USB ports when formatting 2 Switch on the USB Hard Drive and the TV 3 When the TV is tuned to a digital TV channel press Pause Trying to pause will start the formatting Follow the instructions on screen 4 The TV will ask if you want to use the US...

Page 16: ...d press OK the preset name appears in the typing field 4 In the typing field press OK then enter new name using on screen keyboard Press red key to enter with lower case Press green key to enter with upper case Press yellow key to enter number and symbol Press blue key to delete a character 5 Select Done when complete the editing 6 3 Re scan Connections You can rescan all TV connections to update ...

Page 17: ...press OK 2 Select Antenna DVB T or Cable DVB C and select one item you need to re install 3 Select Digital and analogue channels Only digital channels or Only analogue channels 4 Select Start and press OK to update channels This can take a few minutes Channel Settings Home Settings Antenna cable installlation Search for channels Reinstall channels 1 Select the country where you are now and press O...

Page 18: ... or if channels are updated or removed a message is shown at TV start up To avoid this message to appear after every channel update you can switch it off Digital Reception Test Home Settings Antenna cable installlation Digital reception test The digital frequency is shown for this channel If the reception is poor you can reposition your antenna To check the signal quality of this frequency again s...

Page 19: ...aleus which you can enter here LNB Power By default LNB Power is set to On 22 kHz Tone By default the Tone is set to Auto Low LO Frequency High LO Frequency The local oscillator frequencies are set to standard values Adjust the values only in case of exceptional equipment that needs different values Add Satellite or Remove Satellite Home Settings Satellite installlation Search for satellite Add sa...

Page 20: ...ls you pay for Select From a sorted channel package to install the channels of the package only or select All channel unsorted to install the package and all other available channels too We recommend a Quick installation for subscription packages If you have additional satellites that are not part of your subscription package we recommend a full installation All installed channels are put in the c...

Page 21: ...tifies you if the channel list is copied to the TV successfully Unplug the USB flash drive Channel Options Open Options While watching a channel you can set some options Depending on the type of channel you are watching or depending on the TV settings you made some options are available To open the options menu 1 While watching a channel press OPTIONS 2 Press OPTIONS again to close Subtitles To sw...

Page 22: ...fer multi video signals multi feed broadcast different camera viewpoints or angles of the same event or different programmes on one TV channel The TV shows a message if any such TV channels are available 7 3 Channel List Open Channel List To open the current channel list 1 Press to switch to TV 2 Press LIST to open the current channel list 3 Press OPTIONS Select channel list and select one channel...

Page 23: ...nlock channel To prevent children from watching a channel you can lock a channel To watch a locked channel you must enter the 4 digit Child Lock PIN code first You cannot lock programmes from connected devices The locked channel will have next to the channel logo Remove Favourite List LIST OPTIONS Remove favourite list To remove existing favourite list select Yes 7 4 Favourite Channels About Favou...

Page 24: ...t a subpage press or T O P Text pages Some broadcasters offer T O P Text To open T O P Text pages within Text press OPTIONS and select T O P overview Text Options In Text Teletext press OPTIONS to select the following Freeze page To stop the automatic rotation of subpages Dual screen Full screen To show the TV channel and Text alongside each other T O P overview To open T O P Text Enlarge To enlar...

Page 25: ...ogramme press INFO Change Day If the TV guide information comes from the broadcaster you can press to view the schedule of one of the next days Press to go back to the previous day Alternatively you can press OPTIONS and select Change day Set a Reminder You can set a reminder for a programme A message will alert you at the start of the programme You can tune to this channel immediately In the TV G...

Page 26: ...sed from the last seven days Watch live TV and on demand all in one place without entering an app you can search Freeview Play programmes in TV Guide Watch over 60 standard channels and upto 15 HD channels Enjoy on demand services like BBC iPlayer the ITV Hub All 4 Demand 5 and UKTV Play There are no contracts and no monthly costs you re in control For detail please visit https www freeview co uk ...

Page 27: ...few days from today maximum of 8 days away The TV will use the data from the TV Guide to start and end the recording To record a programme 1 Press TV GUIDE 2 On the TV guide select the channel and programme you wish to record Press Right or Left to scroll through the programmes of a channel 3 With the programme highlighted press the colour key Record The programme is scheduled for recording A warn...

Page 28: ...ontinuously stores the TV broadcast you are watching When you switch to another channel the broadcast of the former channel is cleared Also when you switch the TV to standby the broadcast is cleared You cannot use Pause TV when you are recording Pause a Programme To pause and resume a broadcast To pause a broadcast press Pause A progress bar at the bottom of the screen appears briefly To call up t...

Page 29: ...folder Jump to the next photo in a folder Start slideshow playback Pause the playback Start slideshow Rotate photo Photo Options With a photo on screen press OPTIONS to List Thumbnails View photos with list view or thumbnails view Shuffle off Shuffle on View the pictures in sequential order or at random Repeat Play once View the pictures repeatedly or once only Slideshow speed Set the speed of the...

Page 30: ...der 1 Press SOURCES select USB and press OK 2 Select USB Flash Drive and press right to select the USB device you need 3 Select Music and select one of music you can press OK to play the selected music Select a music and press INFO to show file information Playback a music and press INFO to show below Progress bar Playback control bar Jump to the previous music in a folder Jump to the next music i...

Page 31: ...s and All Settings Quick settings menu Press SETUP key on the remote control to find frequently used settings in Quick settings menu Picture style Select one of preset picture styles for ideal picture viewing Picture format Select one of preset picture format which fits the screen Sound style Select one of preset sound styles for ideal sound settings Ambilight style Select one of preset Ambilight ...

Page 32: ...uce power consumption Adjust the picture sharpness Home Settings Picture Sharpness Press the arrows up or down to adjust the sharpness value of the picture Adjust the picture brightness Home Settings Picture Brightness Press the arrows up or down to set the level of brightness of the picture signal Note Setting of brightness much away from reference value 50 may result lower contrast Advanced Pict...

Page 33: ...the arrows up or down to adjust the video contrast level Gamma Home Settings Picture Advanced Contrast Gamma Press the arrows up or down to set a non linear setting for picture luminance and contrast Ultra Resolution Home Settings Picture Advanced Sharpness Ultra Resolution Select On to have a superior sharpness in line edges and details Picture Clean Home Settings Picture Advanced Picture clean N...

Page 34: ...ture manually Shift select on the arrows to shift the picture You can only shift the picture when it is zoomed in Zoom select on the arrows to zoom in Stretch select on the arrows to stretch the picture vertically or horizontally Undo select to return to the picture format you started with Quick Picture Settings Home Settings Picture Quick picture settings During the first installation you did som...

Page 35: ...r Sound Home Settings Sound Advanced Clear Sound Select On to improve the sound for speech Ideal for news programmes Digital Output Settings Digital output settings are available for SPDIF output optical and HDMI ARC sound signals Digital out fomat Home Settings Sound Advanced Digital out format Set the audio out signal of the TV to fit the sound capabilities of the connected Home Theatre System S...

Page 36: ...key on the remote control during a 4 hour period TV switches off if not receiving a TV signal nor a remote control command for 10 minutes If you use the TV as a monitor or use a digital receiver to watch TV a Set Top Box STB and you do not use the remote control of the TV you should deactivate this automatic switch off to set the value to 0 General Settings Connection Related Settings USB Hard Dri...

Page 37: ...Cr 4 2 0 YCbCr 4 2 2 YCbCr 4 4 4 RGB 4 4 4 10 bit YCbCr 4 2 0 YCbCr 4 2 2 12 bit YCbCr 4 2 0 YCbCr 4 2 2 Supported only when HDMI Ultra HD is set to UHD 4 4 4 4 2 2 Location Home or Shop Home Settings General settings Location Select the location of your TV Select Shop the picture style is switched back to Vivid and can adjust shop settings Shop mode is for in store promotion Shop Setup Home Setti...

Page 38: ...lected Set teletex preference language Home Settings Region and language Language Primary text Secondary text Some digital TV broadcasters have several Text languages available Clock Home Settings Region and language Clock Correct clock automatically Home Settings Region and language Clock Auto clock mode The standard setting for the TV clock is Automatic The time information comes from the broadc...

Page 39: ... broadcast special audio commentary describing what is happening on screen Home Settings Universal access Audio description Audio description Mixed volume Speakers Headphones Audio effects Speech Select Mixed volume you can mix the volume of the normal audio with the audio commentary Press the arrows up or down to adjust the value Select Speakers Headphones to set the sound from TV speakers or con...

Page 40: ...e connection is successful Make the Connection WPS Home Settings Network Connect to network WPS If your router has WPS you can directly connect to the router without scanning for networks If you have devices in your wireless network that use the WEP security encryption system you cannot use WPS 1 Go to the router press the WPS button and return to the TV within 2 minutes 2 Select Connect to make t...

Page 41: ... with Wi Fi WoWLAN You can switch this TV on from your smartphone or tablet if the TV is in Standby The setting Switch On with Wi Fi WoWLAN must be switched on Digital Media Renderer DMR Home Settings Network Digital Media Renderer DMR If your media files do not play on your TV make sure that the Digitial Media Renderer is switched on As a factory setting DMR is switched on Switch on Wi Fi connect...

Page 42: ...e and full screen Recommended Apps In this window Philips presents a range of recommended Apps for your country Apps for Online TV or a selection of rental movies from Video stores You can select and open them from the Recommended Apps window Search With Search you can search the App gallery for relevant Apps Enter a keyword in the text field select and press OK to start searching You can enter na...

Page 43: ... Netflix menbership subscription you can enjoy Netflix on this TV Your TV must be connected to the Internet To open Netflix press to open the Netflix App You can open Netflix immediately from a TV in standby www netflix com 43 ...

Page 44: ...m 55 inch On Mode Power Consumption W 63 W Annual Energy Consumption kWh 92 kWh Standby Power Consumption W 0 30 W Display Resolution Pixels 3840 x 2160 65PUx6162 Energy Efficiency Class A Visible Screen Size 164 cm 65 inch On Mode Power Consumption W 68 W Annual Energy Consumption kWh 100 kWh Standby Power Consumption W 0 30 W Display Resolution Pixels 3840 x 2160 Energy consumption kWh per year ...

Page 45: ...Please find out for yourself about the local rules on separate collection of batteries because correct disposal will help to prevent negative consequences for the environment and human health 45 ...

Page 46: ...162 139 cm 55 inch 65PUx6162 164 cm 65 inch Display resolution 3840 x 2160 16 4 Supported Input Resolution Video Support Timing Video support timing also includes field frame rate 23 976Hz 29 97Hz and 59 94Hz HDMI 480i 24Hz 25Hz 30Hz 50Hz 60Hz 480p 24Hz 25Hz 30Hz 50Hz 60Hz 576i 24Hz 25Hz 30Hz 50Hz 60Hz 576p 24Hz 25Hz 30Hz 50Hz 60Hz 720p 24Hz 25Hz 30Hz 50Hz 60Hz 1080i 24Hz 25Hz 30Hz 50Hz 60Hz 1080p...

Page 47: ... v2 up to v9 2 WMA PRO v9 and v10 Subtitles Format SRT SMI SSA SUB ASS TXT Character encodings UTF 8 Central Europe and Eastern Europe Windows 1250 Cyrillic Windows 1251 Greek Windows 1253 Turkish Windows 1254 Western Europe Windows 1252 Image Codec JPEG GIF PNG BMP Wi Fi Certified This TV supports Miracast certified devices Performance may vary depending on the capabilities of the mobile device a...

Page 48: ...om the TV and try switching on If the standby light on TV is on the TV might not respond to the remote control Creaking sound at startup or switch off When you are turning the TV on or standby you hear a creaking sound from the TV chassis The creaking sound is due to the normal expansion and contraction of the TV as it cools and warms up This does not affect performance The TV goes back to standby...

Page 49: ...te Satellite installtion is only for xxPUS6162 xxPUS6262 xxPUS6272 TV models DVB T2 HEVC channel See the technical specifications to make sure that your TV supports DVB T2 HEVC in your country and reinstall DVB T channel 17 5 Satellite The TV cannot find the satellites I want or the TV installs the same satellite twice Check if the correct number of satellites is set in settings at the start of th...

Page 50: ...onnected properly Make sure that the device s output video setting is the highest possible resolution if applicable Restore picture style or change to another picture style Picture settings change after a while Make sure that Location is set to Home You can change and save settings in this mode Home Settings General settings Location A banner appears If an on screen promotion banner appears occasi...

Page 51: ...e this behaviour is normal 17 9 USB Photos videos and music from a USB device do not show Check if the USB storage device is set to Mass Storage Class compliant as described in the storage device s documentation Check if the USB storage device is compatible with the TV Check if the audio and picture file formats are supported by the TV For more information in Help press the colour key Keywords and...

Page 52: ...rs no responsibility for improper wall mounting that results in accident injury or damage Parts of this product are made of glass Handle with care to avoid injury or damage Risk of damage to the TV Before you connect the TV to the power outlet ensure that the power voltage matches the value printed on the back of the TV Never connect the TV to the power outlet if the voltage is different Risk of I...

Page 53: ...lean Never touch push rub or strike the screen with any object Unplug the TV before cleaning Clean the TV and frame with a soft damp cloth and wipe gently Never use substances such as alcohol chemicals or household cleaners on the TV To avoid deformations and colour fading wipe off water drops as quickly as possible Avoid stationary images as much as possible Stationary images are images that rema...

Page 54: ... risk of electric shock Never remove the TV cover Always contact Philips TV Customer Care for service or repairs Find the telephone number in the printed documentation that came with the TV Or consult our website www philips com support and select your country if needed Any operation expressly prohibited in this manual or any adjustments and assembly procedures not recommended or authorised in thi...

Page 55: ...actured under license from Dolby Laboratories Dolby Dolby Audio and the double D symbol are trademarks of Dolby Laboratories 20 5 DTS 2 0 Digital Out For DTS patents see http patents dts com Manufactured under license from DTS Licensing Limited DTS the Symbol DTS and the Symbol together are registered trademarks and DTS 2 0 Digital Out is a trademark of DTS Inc DTS Inc All Rights Reserved 20 6 Wi ...

Page 56: ...ard It offers functional improvements over sh for both programming and interactive use In addition most sh scripts can be run by Bash without modification Source http www gnu org software bash c ares 1 10 0 c ares is a C library that performs DNS requests and name resolves asynchronously Source http c ares haxx se coreutils 6 9 The GNU Core Utilities are the basic file shell and text manipulation ...

Page 57: ...dler wrote the decompression part Source http www gnu org software gzip inetutils 1 4 2 Inetutils is a collection of common network programs Source http www gnu org software inetutils iptables 1 4 15 For Cross connection Source http www netfilter org projects iptables iputils s20101006 The iputils package is set of small useful utilities for Linux networking It was originally maintained by Alexey ...

Page 58: ...the hardware drivers and the upper layers of the system Hardware drivers need to know nothing about the storage formats used such as FTL FFS2 etc but will only need to provide simple routines for read write and erase Presentation of the device s contents to the user in an appropriate form will be handled by the upper layers of the system This piece of software is made available under the terms and...

Page 59: ...viously created archives to extract files to store additional files or to update or list files which were already stored Source http www gnu org software tar u Boot 2011 12 The uboot will load the linux kerenl to dram and jump to run This piece of software is made available under the terms and conditions of the u Boot loader license which can be found below Source http www denx de udhcpc 0 9 8cvs2...

Page 60: ...ices and or software offered by third parties Services and or software offered by third parties may be changed suspended or terminated without prior notice TP Vision does not bear any responsibility in these sorts of situations 60 ...

Page 61: ...al Out Menu 35 Digital Out Offset 35 Display Resolution 46 Dynamic Contrast 33 E End of Use 44 Energy Saving 36 European Eco label 44 F Favourite Channel Channel Range 23 Favourite Channel Create 23 Favourite Channel Edit 23 Favourite Channels 23 G Gamma 33 General Settings 36 H HbbTV 38 HDMI 10 HDMI CEC 36 HDMI ARC 11 HDMI Sound System 35 HDMI Ultra HD 37 HDR 33 Headphone Connection 12 Headphone ...

Page 62: ...9 Static IP 41 Subtitle Language 38 Switch Off Timer 36 Switch On with Wi Fi 41 Switching On 9 T Teletext 24 Text 24 Time 38 Time Zone 38 Troubleshooting 48 TV Guide 25 TV Guide Data 37 TV Network Name 41 TV Placement 35 TV Speaker 35 U Ultra Resolution 33 Universal Access 39 Universal Access Audio Description 39 Universal Access Audio Effects 39 Universal Access Hearing Impaired 39 Universal Acce...

Page 63: ...Powered by TCPDF www tcpdf org 63 ...

Reviews: