background image

3.8

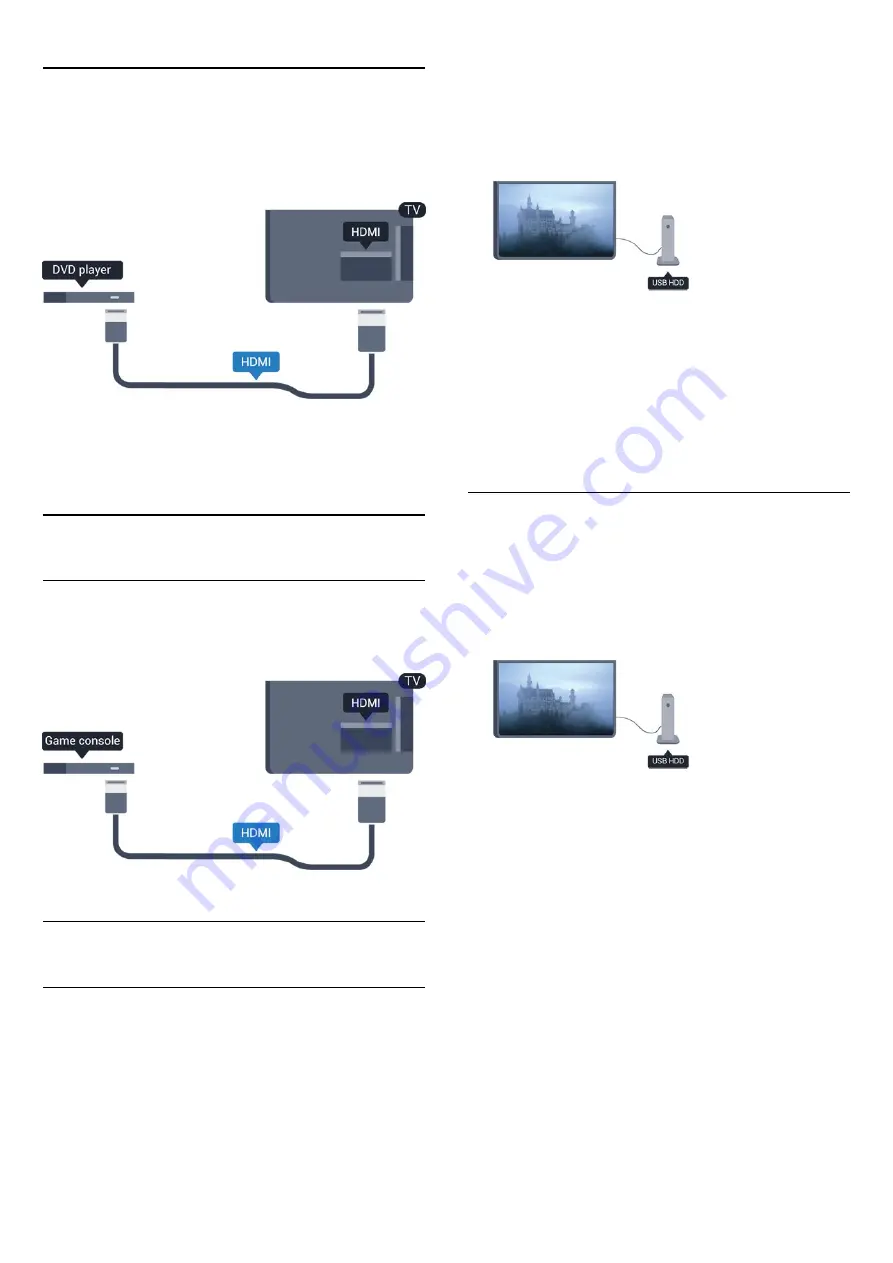
DVD player

Use an HDMI cable to connect the DVD player to the TV.
Alternatively, you can use a SCART cable, if the device has no
HDMI connection.

If the DVD player is connected with HDMI and has EasyLink
CEC, you can operate the player with the TV remote control.


3.9

Game console

HDMI

For best quality, connect the game console with an High speed
HDMI cable to the TV

3.10

USB Hard Drive

What you need

If you connect a USB Hard Drive, you can pause or record a TV
broadcast. The TV broadcast must be a digital broadcast (DVB
broadcast or similar).

To pause


To pause a broadcast, you need a USB 2.0 compatible Hard

Drive with a minimum of 32GB disc space.

To record


To pause and record a broadcast, you need a minimum of
250GB disc space.

TV guide


Before you decide to buy a USB Hard Drive to record, you can
check if you can record digital TV channels in your country.
Press 

 TV GUIDE

 on the remote control. If there is a Record

button on the TV guide page, you can record.


Installation

Before you can pause or record a broadcast, you must connect
and format a USB Hard Drive.

1. Connect the USB Hard Drive to one of the 

USB

 connections

on the TV. Do not connect another USB device to the other
USB ports when formatting.

2. Switch on the USB Hard Drive and the TV.

3. When the TV is tuned to a digital TV channel, press 

 (Pause).

Trying to pause will start the formatting.

Follow the instructions on screen.

When the USB Hard Drive is formatted, leave it connected
permanently.

Warning


The USB Hard Drive is formatted exclusively for this TV, you
cannot use the stored recordings on another TV or PC. Do not
copy or change recording files on the USB Hard Drive with any
PC application. This will corrupt your recordings. When you
format another USB Hard Drive, the content on the former will
be lost. A USB Hard Drive installed on your TV will need
reformatting for use with a computer.


11

Summary of Contents for 48PFK4100

Page 1: ...Register your product and get support at LED TV www philips com welcome 32PFK4100 32PHK4100 40PFK4100 48PFK4100 User Manual ...

Page 2: ...5 Satellite installation 26 7 6 Problems with satellites 28 8 TV guide 30 8 1 Using the TV guide 30 8 2 Recordings 30 8 3 Receiving TV guide data 30 9 Sources 31 9 1 Sources list 31 9 2 From standby 31 9 3 EasyLink 31 10 Timers and clock 32 10 1 Sleep timer 32 10 2 Clock 32 10 3 Auto switch off 32 11 Your photos videos and music 33 11 1 From a USB connection 33 12 Pause TV 35 12 1 Pause TV 35 13 R...

Page 3: ... answer that urgent phone call or simply take a break during a sports match while the TV stores the broadcast on the USB Hard Drive You can start watching again later 1 2 EasyLink With EasyLink you can operate a connected device like a Bluray Disc player with the remote control of the TV EasyLink uses HDMI CEC to communicate with the connected devices 3 ...

Page 4: ...imum 12 mm Maximum 16 mm 40Pxx4100 VESA MIS F 200x200 M4 Minimum 12 mm Maximum 16 mm 48Pxx4100 VESA MIS F 200x200 M6 Minimum 12 mm Maximum 16 mm 40Pxx6300 VESA MIS F 200x200 M6 Minimum 14 mm Maximum 24 mm 48Pxx6300 VESA MIS F 400x400 M6 Minimum 14 mm Maximum 24 mm 55Pxx6300 VESA MIS F 400x400 M6 Minimum 14 mm Maximum 24 mm Caution Wall mounting the TV requires special skills and should only be per...

Page 5: ...a plug firmly into the ANTENNA socket at the back of the TV You can connect your own antenna or an antenna signal from an antenna distribution system Use an IEC Coax 75 Ohm RF antenna connector Use this antenna connection for DVB T and DVB C input signals 2 6 Satellite dish For PxK models Attach the satellite F type connector to the satellite connection SAT at the back of the TV 5 ...

Page 6: ... them with the TV remote control EasyLink HDMI CEC must be switched On on the TV and the connected device DVI to HDMI Use a DVI to HDMI adapter if your device only has a DVI connection Use one of the HDMI connections and add an Audio L R cable mini jack 3 5mm to Audio In for sound on the back of the TV Copy protection DVI and HDMI cables support HDCP High bandwidth Digital Content Protection HDCP ...

Page 7: ...net Aquos Link Bravia Theatre Sync Kuro Link Simplink and Viera Link Not all brands are fully compatible with EasyLink Example HDMI CEC branding names are property of their respective owners Operate devices For 4000 4100 5210 TV models To operate a device connected to HDMI and set up with EasyLink select the device or its activity in the list of TV connections Press SOURCES select a device connect...

Page 8: ... level of copy protection Contact a digital TV broadcaster for more information on terms and conditions CAM Insert a CAM module Switch off the TV before inserting a CAM Look on the CAM for the correct method of insertion Incorrect insertion can damage the CAM and TV Use the Common Interface slot on the TV to insert the CAM card With the front of the card facing to you gently insert the CAM as far ...

Page 9: ... to connect With HDMI ARC you do not need to connect the extra audio cable The HDMI ARC connection combines both signals All HDMI connections on the TV can offer the Audio Return Channel ARC signal But once you connected the Home Theatre System the TV can only send the ARC signal to this HDMI connection If the Home Theatre System has no HDMI ARC connection add an optical audio cable Toslink to sen...

Page 10: ...press OK 2 Select TV settings Sound Advanced Audio out format 3 Select Multichannel or Stereo 4 Press repeatedly if necessary to close the menu Audio Out levelling Use the Audio Out leveling setting to level the volume loudness of the TV and the Home Theatre System when you switch over from one to another Volume differences can be caused by differences in sound processing To level the difference i...

Page 11: ...tal TV channels in your country Press TV GUIDE on the remote control If there is a Record button on the TV guide page you can record Installation Before you can pause or record a broadcast you must connect and format a USB Hard Drive 1 Connect the USB Hard Drive to one of the USB connections on the TV Do not connect another USB device to the other USB ports when formatting 2 Switch on the USB Hard...

Page 12: ...an use a DVI to HDMI adapter to connect the PC to HDMI and an audio L R cable mini jack 3 5mm to AUDIO IN L R on the back of the TV Settings Ideal monitor setting If your computer is added as a Computer type of device in the Source menu the list of connections the TV is set to the ideal Computer setting automatically If you use your computer to watch movies or use it to play games you might want t...

Page 13: ...nes separately To adjust the volume 1 Press and select Setup and press OK 2 Select TV settings Sound Headphone volume and press OK 3 Press up or down to adjust the volume 4 Press repeatedly if necessay to close the menu 13 ...

Page 14: ...he remote control to switch the TV on Switch to standby To switch the TV to standby press on the remote control Switch Off To switch the TV Off press the Joystick on the right or on the back The red indicator light is off The TV is still connected to the mains power but consumes a minimum of energy To switch off the TV completely disconnect the power plug When disconnecting the power plug always p...

Page 15: ...ion 4 BACK To switch back to the previous channel you selected To close a menu without changing a setting 5 HOME To open or close the home menu 6 EXIT To switch back to watching TV 7 OPTIONS To open or close the Options menu 8 OK key To confirm a selection or setting 9 Arrow navigation keys To navigate up down left or right 10 LIST To open or close the channel list Bottom 1 Volume To adjust the vo...

Page 16: ...with 2 type AAA LR03 1 5V batteries Make sure the and the ends of the batteries line up correctly 3 Reposition the battery door 4 Slide it back until it clicks Remove the batteries if you are not using the remote control for a long time Safely dispose of your old batteries according to the end of use directions 5 4 Cleaning Your remote control is treated with a scratch resistant coating To clean t...

Page 17: ...ch With the Favourite channel list selected you will only see your favourite channels when you switch through channels Create your favourite channel list 1 While watching a TV channel press LIST to open the channel list 2 Select the channel to mark as favourite and press OPTIONS 3 Select Add favourites and press OK The selected channel is marked with a 4 To finish press The channels are added to t...

Page 18: ... code and confirm Now you can set an age rating 4 Set the age and press OK 5 Press repeatedly if necessary to close the menu 6 To switch off the parental age rating select None as age setting The TV will ask for the code to unlock the programme For some broadcasters operators the TV only locks programmes with a higher rating Set or change the lock code To set the lock code or to change the current...

Page 19: ...g a channel on the device press OPTIONS select Show device keys and select the key and press OK 3 Press to hide the device keys 4 To close Text press again Digital Text UK only Some digital broadcasters offer dedicated Digital Text or interactive TV on their digital TV channels This includes normal Text using the number colour and arrow keys to select and navigate To close Digital Text press Text ...

Page 20: ...his analogue channel subtitles will be shown if available To know if a channel is analogue or digital switch to the channel and open Status in the Options menu Audio languages Digital TV channels can broadcast audio with several spoken languages for a programme You can set a preferred primary and secondary audio language If audio in one of these languages is available the TV will switch to this au...

Page 21: ...utes Follow the instructions on screen Full installation To redo a full TV installation 1 Press and select Setup and press OK 2 Select TV settings General settings Reinstall TV and press OK The installation may take a few minutes Follow the instructions on screen Factory settings Factory settings sets the TV back to the original TV settings for picture and sound To switch back to the original Fact...

Page 22: ...setting to start a new channel installation 1 Press and select Setup and press OK 2 Select Channel settings and press OK 3 Select Channel installation Antenna connection Antenna DVB T or Cable DVB C and press OK 4 Select the DVB setting you want 5 Press repeatedly if necessary to close the menu DVB C channel installation For ease of use all DVB C settings are set to automatic If your DVB C provide...

Page 23: ...g analogue channels you can skip searching for analogue channels Select Off Free Scrambled If you have a subscription and a CAM Conditional Access Module for pay TV services select Free scrambled If you did not subscribe to pay TV channels or services you can select Free channels only Manual installation Analogue TV channels can be manually installed channel by channel To install analogue channels...

Page 24: ... view the channel list options on the current channel 1 With the All channels list on screen select a channel and press OPTIONS 2 Select the option you want and press OK Available options for satellite channels Satellite Filter the channel list to only show the channels of a specific satellite or show the channels of all satellites Free Scrambled Filter the channel list to only show the free to ai...

Page 25: ...To lock a channel 1 While watching a TV channel press LIST to open the Channel list 2 In any list select the channel you want to lock 3 Press OPTIONS and select Lock channel In a channel list a locked channel is marked with a lock To unlock a channel select the locked channel in the channel list and select the Unlock channel option You will need to enter the Child lock code Use an age rating To pr...

Page 26: ...cording the number of satellites you want to install for Unicable Select the setting you want and press OK 4c If the exact number of satellites is set or you completed the Unicable settings select Search and press OK 5 The TV will search for satellites available on the alignment of your antenna dish This may take a few minutes If a satellite is found its name and reception strength are shown on sc...

Page 27: ...s the channels of the found satellites 6 To store the channels and radio stations select Finish and press OK Remove a satellite You can remove one or more satellites from your current satellite installation You remove the satellite and its channels However some satellite operators do not allow removing a satellite To remove satellites 1 Press and select Setup and press OK 2 Select Search for satel...

Page 28: ...ess OK 2 Select Satellite settings Languages Audio description Speech and press OK 3 Select Descriptive audio or Subtitles and press OK 4 Press repeatedly if necessary to close the menu Manual installation Manual installation is intended for expert users You can use Manual installation to quickly add new channels from a satellite transponder You need to know the frequency and polarization of the t...

Page 29: ...te channels seem to have disappeared from the channel list If some channels seem to be gone or displaced the broadcaster might have changed the transponder location of these channels To restore the channel positions in the channel list you can try an update of the channel package I cannot remove a satellite Subscription packages do not allow removing a satellite To remove the satellite you have to...

Page 30: ... TV guide can show scheduled programmes for the upcoming days maximum up to 8 days If the TV guide information comes from the broadcaster you can press to view the schedule of one of the next days Press to go back to the previous day Alternatively you can press OPTIONS and select Change day Select Previous day Today or Next day and press OK to select the day of the schedule Search by genre If the ...

Page 31: ... switch on both disc player and TV from standby and start playing the disc or programme immediately press play on the TV remote control The device should be connected with an HDMI cable and both TV and device must have HDMI CEC switched on Home Theatre System You can switch on your Home Theatre System to listen to an audio disc or a radio channel and leave the TV in standby To only switch on the H...

Page 32: ...ght saving change might be ignored and the TV might show an incorrect time To correct the TV clock 1 Press and select Setup and press OK 2 Select TV settings General settings Clock Auto clock mode and select Country dependent 3 Select Daylight saving and select the appropriate setting 10 3 Auto switch off If you do not press a key on the remote control during a 4 hour period or if the TV receives ...

Page 33: ...cture and press OK Options Press OPTIONS Start slideshow Stop slideshow Start or stop slideshow Slideshow transitions Set the transition from one picture to the next Slideshow frequency Select the display time for each photo Repeat Play once View the pictures repeatedly or once only Shuffle off Shuffle on View the pictures in sequential order or at random Rotate image Rotate photo Show info Displa...

Page 34: ...To close Browse USB press and select another activity 34 ...

Page 35: ...o another digital channel the broadcast of the new channel is buffered and the broadcast of the former channel is cleared When you switch to a connected device a Blu ray Disc player or digital receiver the USB Hard Drive stops buffering and the broadcast is cleared Also when you switch the TV to standby the broadcast is cleared Whilst recording a programme on the USB Hard Drive you cannot pause a ...

Page 36: ...buffer at the end of the programme You can add some extra buffer if needed If you plan to record a programme in your absence remember to leave the TV switched to standby and the USB Hard Drive switched on List of recordings To view the list of recordings and scheduled recordings press select Recordings and press OK In this list you can select a recording to watch remove recorded programmes adjust ...

Page 37: ...l settings Location and press OK 3 Select Home and press OK 4 Press repeatedly if necessary to close the menu Picture settings Backlight contrast With Backlight contrast you can adjust the brightness of the display backlight To adjust the level 1 Press and select Setup and press OK 2 Select TV settings Picture Backlight contrast 3 Press right and adjust the value with up or down 4 Press repeatedly...

Page 38: ...om in the Tint setting to make the Custom tint menu available Custom tint is a setting intended for expert users To set a custom colour temperature 1 Press and select Setup and press OK 2 Select TV settings Picture Advanced Custom tint 3 Press right 4 Select a setting with the arrow keys WP is white point and BL is black level 5 Press OK to confirm a setting You can also select one of the presets ...

Page 39: ... You can adjust a Sound style 1 Select the style and press OK 2 Press and select Setup and press OK 3 Select TV settings navigate to the individual setting and adjust it 4 Press to close the menu to store your setting To return to the original Sound style values 1 Press and select Setup and press OK 2 Select TV settings Sound Restore style Sound settings Bass With Bass you can adjust the level of ...

Page 40: ...watching TV press OPTIONS and select Picture and sound 2 Select Speakers and select TV or Amplifier audio device 3 Press repeatedly if necessary to close the menu Clear sound With Clear sound you improve the sound for speech Ideal for news programmes You can switch the speech improvement on or off To switch on or off 1 Press and select Setup and press OK 2 Select TV settings Sound Advanced Clear s...

Page 41: ...if necessary to close the menu To switch to speakers directly 1 While watching TV press 2 Select Speakers and select TV or Amplifier audio system 3 Press repeatedly if necessary to close the menu TV placement As part of the first installation this setting is set to either On a TV stand or Wall mounted If you have changed the placement of the TV since then adjust this setting accordingly for best s...

Page 42: ...mos Active control Demo and press OK 3 Select a setting to check the corresponding values European energy label The European Energy Label informs you on the energy efficiency class of this product The greener the energy efficiency class of this product is the lower the energy it consumes On the label you can find the energy efficiency class the average power consumption of this product in use and ...

Page 43: ...0 Hz 1680 x 1050 60 Hz 1920 x 1080 60 Hz Computer formats VGA Resolution refresh rate 640 x 480 60 Hz 800 x 600 60 Hz 1024 x 768 60 Hz 1280 x 1024 60 Hz 1360 x 768 60 Hz 1920 x 1080 60 Hz Video formats Resolution refresh rate 480i 60 Hz 480p 60 Hz 576i 50 Hz 576p 50 Hz 720p 50Hz 60 Hz 1080i 50Hz 60 Hz 1080p 24Hz 25Hz 30Hz 50Hz 60 Hz For certain sets only 15 4 Power Product specifications are subje...

Page 44: ...TV stand Width 911 mm Height 528 3 mm Depth 47 7 mm Weight 9 26 kg with TV stand Width 911 mm Height 591 6 mm Depth 241 5 mm Weight 12 kg 48Pxx6300 without TV stand Width 1079 4 mm Height 623 1mm Depth 48 3 mm Weight 12 3 kg with TV stand Width 1079 4 mm Height 686 2 mm Depth 263 6 mm Weight 16 kg 55Pxx6300 without TV stand Width 1235 mm Height 710 6 mm Depth 48 mm Weight 17 kg with TV stand Width...

Page 45: ... THD Pxx6300 20W RMS 15 THD 15 8 Multimedia Note Multimedia file names must not exceed 128 characters Supported multimedia connections USB 2 0 FAT FAT 32 NTFS only connect USB devices that consume 500 mA of power or less Supported image files JPEG jpg jpeg PNG png jpg Supported audio files MPEG1 mp3 Supported video files avi mp4 mov mkv mpg mpeg Supported subtitle format SRT multiple language supp...

Page 46: ...re settings and press OK 3 Select Current software info and see Release Version 4 Press repeatedly if necessary to close the menu 16 3 Open source software This television contains open source software TP Vision Europe B V hereby offers to deliver upon request a copy of the complete corresponding source code for the copyrighted open source software packages used in this product for which such offe...

Page 47: ...grated windowing system with support for translucent windows and multiple display layers not only on top of the Linux Framebuffer Device It is a complete hardware abstraction layer with software fallbacks for every graphics operation that is not supported by the underlying hardware DirectFB adds graphical power to embedded systems and sets a new standard for graphics under Linux Source http direct...

Page 48: ...ument like start tags Source http expat sourceforge net libdrm libdrm provides core library routines for the X Window System to directly interface with video hardware using the Linux kernel s Direct Rendering Manager DRM Source http dri freedesktop org libdrm FFMpeg 0 6 A complete cross platform solution to record convert and stream audio and video Source www ffmpeg org 48 ...

Page 49: ...n the TV is in standby a Philips startup screen is displayed then the TV returns to standby mode This is normal behaviour When the TV is disconnected and reconnected to the power supply the startup screen is displayed at the next startup To switch on the TV from standby press on the remote control or the TV The standby light keeps on blinking Disconnect the power cable from the power outlet Wait 5...

Page 50: ...io cable is connected to AUDIO IN mini jack only if available EasyLink does not work Make sure that your HDMI devices are HDMI CEC compatible EasyLink features only work with devices that are HDMI CEC compatible No volume icon shown When a HDMI CEC audio device is connected this behaviour is normal Photos videos and music from a USB device do not show Make sure that the USB storage device is set t...

Page 51: ...onsult our website www philips com support TV model number and serial number You might be asked to provide the TV product model number and serial number Find these numbers on the packaging label or on the type label on the back or bottom of the TV Warning Do not attemp to repair the TV yourself This may cause severe injury irreparable damage to your TV or void your warranty 51 ...

Page 52: ... access to the power plug power cord and outlet socket at all times Risk of injury or damage to the TV Two people are required to lift and carry a TV that weighs more than 25 kg or 55 lbs If you mount the TV on a stand only use the supplied stand Secure the stand to the TV tightly Place the TV on a flat level surface that can support the weight of the TV and the stand When wall mounted ensure that...

Page 53: ...revent this do not expose the TV to direct sunlight heat or extreme humidity If condensation occurs it will disappear spontaneously while the TV is playing for a few hours The condensation moisture will not harm the TV or cause malfunction 18 2 Screen care Never touch push rub or strike the screen with any object Unplug the TV before cleaning Clean the TV and frame with a soft damp cloth and wipe ...

Page 54: ...and assembly procedures not recommended or authorised in this manual shall void the warranty Pixel characteristics This LCD LED product has a high number of colour pixels Although it has effective pixels of 99 999 or more black dots or bright points of light red green or blue may appear constantly on the screen This is a structural property of the display within common industry standards and is no...

Page 55: ...tered US trademarks of ACCO World Corporation with issued registrations and pending applications in other countries throughout the world Other trademarks All other registered and unregistered trademarks are the property of their respective owners 55 ...

Page 56: ...Powered by TCPDF www tcpdf org 46 ...

Reviews: