background image

ENGLISH


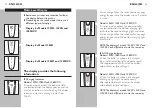
  Never clean, remove or replace shaving unit 

while motor is on.


  Do not apply pressure to shaving head combs.  

Do not touch razor heads with hard objects 

as this may dent or damage precision-made 

slotted combs.


    Do not use razor if shaving head combs are 

damaged or broken. Facial injury may occur. 


    Do not use abrasives, scourers or aggresive 

liquids such as gasoline or acetone to clean 

the razor or Jet Clean System. 

Cleaning the Shaving Unit

The razor heads may be quickly cleaned after 

each use by rinsing with hot water. Water from 

the tap should be on a hot setting, BUT BE 

CAREFUL TO TEST WATER FIRST SO AS NOT 

TO BURN OR SCALD HANDS.


  Regular cleaning guarantees better shaving 

results.


  While rinsing razor heads, water may drip 

out of the base of razor. This is a normal 

occurrence. 


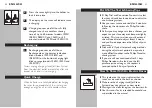
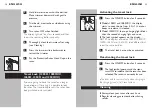
1

  Always turn razor OFF, remove from 

charging stand/Jet Clean System before 

cleaning. 

C

  2

  Rinse the shaving unit by running under 

hot water for a few minutes. 

26

ENGLISH

C


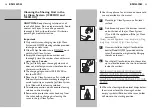
3

  Using your thumb and forefinger, grasp the 

sides of the shaving head near the center 

of the shaving unit and pull each individual 

shaving head open.

C


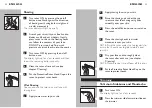
4

  Rinse all three shaving heads and three 

hair chambers under hot tap water by 

letting the water run in and around all the 

openings for at least 30 seconds.

BE CAREFUL TO TEST WATER FIRST SO AS 

NOT TO BURN OR SCALD HANDS.


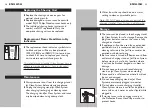
5

  You can also brush the shaving heads and 

hair chambers with the brush supplied.


6

  Carefully shake off excess water and leave 

the shaving heads open to dry the shaving 

unit completely.

NOTE: Do not wipe or dry the shaving unit with 

a towel or tissue. This could damage the shaving 

heads.

C


7

  Press each shaving head back onto the 

shaving unit.  You will hear a ‘click’. 


27

C

F

C

F

Summary of Contents for 1250X/40

Page 1: ...1290X 1280X 1280XCC 1260X 1250X 1250XCC Rechargeable Cordless Tripleheader Razor Register your product and get support at www philips com norelco Model 1290X Shown ...

Page 2: ...1290X 1280X 1280XCC 1260X 1250X 1250XCC Congratulations on your purchase and welcome to Philips Norelco To fully benefit from the support that Philips Norelco offers register your product at www philips com norelco ...

Page 3: ...he razor Only use Jet Clean System supplied with the razor IMPORTANT SAFETY INSTRUCTIONS When using an electric appliance basic precautions should always be followed including the following Read all instructions before using this appliance DANGER To reduce the risk of electric shock 1 Do not reach for a corded Jet Clean System charging stand that has fallen into water Unplug immediately 2 Charging...

Page 4: ... enough time to adapt to the Philips Norelco Shaving System If after that period of time you are not fully satisfied with your Philips Norelco Men s Razor send the product back along with dated sales receipt and we ll refund you the full purchase price The razor must be shipped prepaid by insured mail insurance prepaid and have the original sales receipt indicating pur chase price and the date of ...

Page 5: ... shaving tracks Slots for normal hairs Channels for long hairs Holes for short stubbles Model 1260X Model 1250X Model 1250XCC Model 1290X Model 1280X Model 1280XCC 1 2 3 Features GyroFlex 3D Contour Following System Shaving Unit Hair Chamber captures shaven hair SkinGlide System Protective Razor Head Cap Electronic On Off Button Multi Level Display Shows remaining power level in batteries 1260X 12...

Page 6: ...XCC 1250XCC Razor Holder Cleaning Indicator Light Drying Indicator Light ON OFF Button Cleaning Program Selector Button 1280XCC Cleaning Solution Canister Release Buttons Cleaning Solution Low Indicator Light Removable Cleaning Solution Canister ...

Page 7: ... 1250XCC As soon as you connect the power cord to an electrical outlet the bottom charging light blinks then the second charging light and so on Quick charge When the razor contains enough energy for one shave the bottom charging light blinks white NOTE The displays of models 1260X 1250X and 1250XCC look different but work the same way Full Charge Indicator C Models 1290X 1280X and 1280XCC When th...

Page 8: ...ink For models 1290X 1280X and 1280XCC you will also hear a beep The replacement shaving unit symbol will remain visible for the next 7 shaves to remind you that with new shaving heads you will guarantee yourself optimal shaving performance C Blocked Shaving Heads Indicator If the display shows a blinking replacement shaving unit symbol and faucet symbol with exclamation mark clean the razor thoro...

Page 9: ...aving minutes or battery power left Before First Use Charge the razor before you start using it see Charging Make sure the razor is ENGLISH switched off before you start charging it Remove any sticker or protective foil from the Display before using razor Important Only use the power cord and charging stand or Jet Clean System models 1280XCC and 1250XCC only provided to charge the razor The power ...

Page 10: ...zor tightly into the holder making sure the charging contacts on each side of the razor fit into the holder ENGLISH 3 The display on the razor will indicate razor is charging 4 Charging requires one full hour A fully charged razor has a cordless shaving time of up to 60 minutes models 1290X 1280X 1280XCC and 1260X or 50 minutes models 1250X and 1250XCC Charging Razor with Jet Clean System 1280XCC ...

Page 11: ...It is a fact that your skin and beard need time to adjust to a new shaving system Use your new razor exclusively for 3 weeks to fully enjoy the closeness of a Philips Norelco shave At first you may not get as close a shave as you expect or your face may even become slightly irritated This is normal since your beard and skin will need time to adjust Invest 3 weeks and you ll soon experience the ful...

Page 12: ... the razor to protect razor heads Wet Shaving You can also use the razor on a wet face with shaving foam 1 Apply some water to your skin 22 ENGLISH 2 Apply shaving foam to your skin 3 Rinse the shaving unit under the tap to ensure that the shaving unit glides smoothly over your skin 4 Press the on off button once to switch on the razor 5 Move the shaving heads in circular movements over your skin ...

Page 13: ...ent 24 ENGLISH Activating the travel lock C 1 Press the ON OFF button for 3 seconds Models 1280X and 1280XCC the display starts to count down from 3 At 1 the razor beeps to indicate it is locked Model 1250XCC the top charging light blinks then the second charging light and so on The lock symbol appears on the display NOTE The displays of models 1280X 1280XCC 1260X 1250X and 1250XCC look different ...

Page 14: ...of razor This is a normal occurrence 1 Always turn razor OFF remove from charging stand Jet Clean System before cleaning C 2 Rinse the shaving unit by running under hot water for a few minutes 26 ENGLISH C 3 Using your thumb and forefinger grasp the sides of the shaving head near the center of the shaving unit and pull each individual shaving head open C 4 Rinse all three shaving heads and three h...

Page 15: ... solution To avoid evaporation do not expose cleaning solution to direct sunlight Remove the protective razor head cap from the razor before charging or cleaning the razor in the Jet Clean System 28 ENGLISH Use this appliance for its intended household use as described in this manual 1 Place the Jet Clean System on a flat level surface C 2 Simultaneously press the buttons located on both sides of ...

Page 16: ...lug into any 100V to 240V AC outlet Use only the charging plug provided 2 Place the Jet Clean System on a flat level surface Fill the canister with cleaning solution see Preparing Jet Clean System For Use 30 ENGLISH C 3 Remove protective razor head cap from razor C 4 Place the razor head side down in the razor holder with the display facing the front of the Jet Clean System C 5 Press the razor tig...

Page 17: ... to blink and the razor is automatically lowered into the cleaning solution The razor stops charging while it is being cleaned The cleaning cycle takes 4 to 6 minutes For model 1280XCC only the intensive program takes approximately 35 minutes During the first phase of the cleaning cycle the razor will automatically turn on and off several times while the razor holder lowers and raises the razor s ...

Page 18: ...ad open C 4 Press the retainer release tab 1 until the retainer opens 2 C 5 Remove the cutter from the comb Do not clean more than one cutter and comb at a time since they are all matching sets If you accidentally put a cutter in the wrong comb it may take several weeks before optimal shaving performance is restored 34 ENGLISH 35 ENGLISH 1 2 C 6 Clean the cutter with the cleaning brush supplied C ...

Page 19: ...ning solution canister and thoroughly rinse the canister clean every 2 weeks 1 Place the Jet Clean System on a flat level surface 36 ENGLISH C 2 Simultaneously press the buttons located on both sides of the Jet Clean System 1 and lift the appliance off the Jet Clean canister 2 Always remove appliance from canister by lifting straight up Do not tilt Jet Clean System C 3 Discard any remaining cleani...

Page 20: ...m the tap should be on a warm setting to clean any washable parts Note DO NOT place or clean any parts of the charging stand Jet Clean System in a dishwasher Storage The razor can be placed in the charging stand Jet Clean System for safe storage Remove the plug from outlet as soon as the razor is fully charged or cleaned If appliance will not be used for an extended period of time it is recommende...

Page 21: ... Do not attempt to replace battery Insulate battery ends by covering with tape and or place battery in a small plastic bag 40 ENGLISH 41 7 Discard your razor Do not attempt to plug electrical cord into the outlet or recharge the razor after the battery has been removed 8 Contact your local town or city officials for battery disposal information or call 1 800 8 BATTERY or www rbrc com for battery d...

Page 22: ...n warranty service simply go to www philips com norelco or call 1 800 243 3050 for assistance It is suggested that for your protection you return shipments of product by insured mail insurance prepaid Damage occurring during shipment is not covered by this warranty NOTE No other warranty written or oral is authorized by Philips Electronics North America Corporation This warranty gives you specific...

Reviews: