All manuals and user guides at all-guides.com
all-guides.com
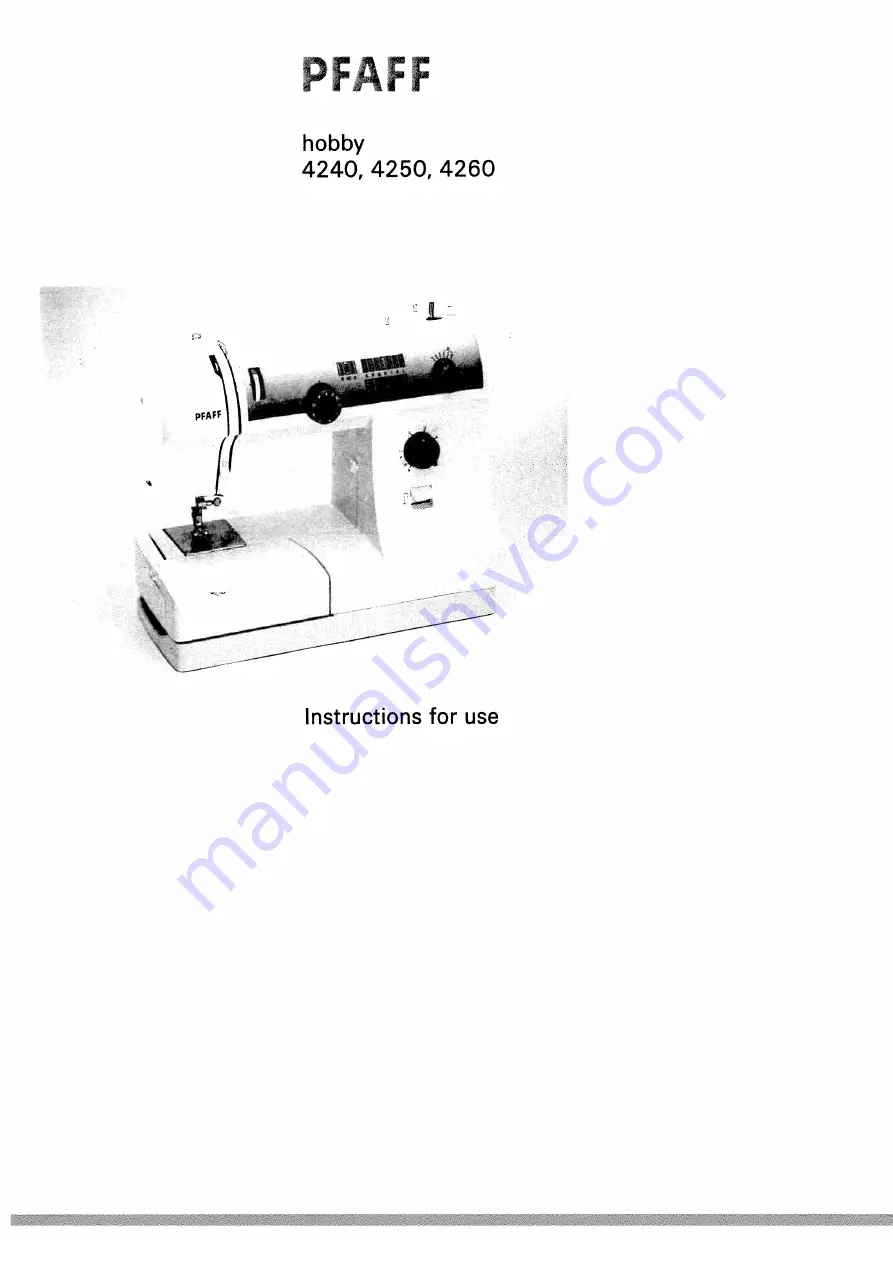
Page 1: ...F hobby 4240 4250 4260 4 Instructions for use All manuals and user guides at all guides com a l l g u i d e s c o m...
Page 2: ...nected to the terminal which is marked with the letter N or coloured black The wire which is coloured brown must be connected to the terminal which is marked with the letter L or coloured red Cut off...
Page 3: ...or mechanical adjustment 4 Never operate the sewing machine with any air openings blocked Keep ventilation openings of the sewing machine and foot control free from the accumulation of lint dust and...
Page 4: ...PFAFF 20 H 10 19 11 18 d 17 12 16 13 15 ___ ___ ___ ___ 14 29 232425 26 All manuals and user guides at all guides com...
Page 5: ...n bushing 1 3 On off switch 14 Baseplate 1 5 Detachable work support with accessory box 1 6 Needle plate 1 7 Presser foot holder with presser foot 1 8 Thread guide 1 9 Thread guide 20 Threading slots...
Page 6: ...for any damage caused 10 To avoid the risk of electric shock do not open the machine There are no parts inside the machine which the user can repair This is solely the responsibility of our qualified...
Page 7: ...at these instructions are just as easy to use as your PFAFF sewing machine itself If you take the time to read through the instruction booklet carefully nothing can go wrong It s worth it Because this...
Page 8: ...tears Detachable work support Drawing up the bobbin thread Edge guide Elastic blind stitch Elastic stitch Elastic stitches Electrical connection Foot control Free arm Gathering with the elastic threa...
Page 9: ...stitch 29 Servicing and trouble shooting 61 64 Setting the utility stitches 24 Sewing lamp 63 Sewing on zippers 44 45 Shell edging 48 Smocking 39 Special accessory chart 55 Spring stitch 35 Stabilizi...
Page 10: ...tching two touching fabric layers K Greek stitch A classical decorative stitch e g for borders and towels L Shell edging stitch For decorative hems on fine materials e g linen flfl E Stretch triple Fo...
Page 11: ...ble hem attachment and simultaneous serging K Greekstitch A classical decorative stitch e g for borders and towels L Shell edging stitch For decorative hems on fine materials e g linen liii E Stretch...
Page 12: ...serging and appliqu in various widths H Elastic stitch For stitching on elastic band darning tears and patches I Elastic blind stitch For invisible hem attachment and simultaneous serging flfl E Stre...
Page 13: ...anging the needle Needle thread tension Covering the feed dog Control panel Reverse sewing Stitch length adjustment button Stitch width adjustment button Setting the utility stitches Setting the stret...
Page 14: ...le This can be raised by lightly pressing the round groove in the carrying handle 4 V 1 Electrical connection On off switch This appliance has a polarized plug one blade wider than the other To reduce...
Page 15: ...ting the detachable work support be careful to ensure that it is flush with the free arm of the sewing machine Accessory compartment Detachable work support Open the detachable work support 15 Using b...
Page 16: ...e pin of the bobbin winding mechanism and press it down as far as possible Pull the bobbin to the right as far as it will go Note It is only possible to wind the bobbin when it is positioned as far to...
Page 17: ...e stops automatically Press the full bobbin to the left remove it from the pin and cut the thread Don t forget Press the handwheel release disc 9 back to the sewing symbol and turn the handwheel 8 tow...
Page 18: ...ease the cover and remove the bobbin To ensure perfect sewing and a durable seam the top and bottom thread tensions must be well adjusted to each other and the threads must be interlaced between the t...
Page 19: ...uring this movement Adjusting the setting Using the screwdriver from the accessories turn setting screw C to the left the bobbin thread tension becomes weaker Turn setting screw C just a little to the...
Page 20: ...k to the front into the thread guide 2 and pass it downwards through the right threa ding slot 20 Pass the thread around lug B back upwards through the left threading slot up to the take up lever 21 T...
Page 21: ...Threading the needle Thread the needle thread through the eye of the needle from the front to the back 17 All manuals and user guides at all guides com a l l g u i d e s c o m...
Page 22: ...ndwheel towards you until the needle returns to its highest position and the bobbin thread has formed a loop Pull the needle thread to draw up the bobbin thread 30 Bobbin thread Thread trimmer Close t...
Page 23: ...sser foot Lay the presser foot underneath the presser foot holder 17 so that the pins of the foot click into the presser foot holder when the presser foot lifter 23 is lowered Check Please ensure that...
Page 24: ...old the needle and tighten the retaining screw 22 Turn the needle thread tension 3 to the desi red setting The normal setting for sewing is between 4 and 5 and for sewing buttonholes between 2 and 3 s...
Page 25: ...gth the buttonhole spacing and the stretch stitches Only on model 4260 With the upper right adjustment button 7 you can vary the zigzag width from 0 to 5 mm and on the straight stitch E you can alter...
Page 26: ...to 0 the den ser the stitch becomes Stitch length adjustment button With the stitch length adjustment button 10 you can adjust the stitch length infinitely bet ween 0 and 4 mm by turning the point mar...
Page 27: ...portant Only use the twin needle for straight and zigzag stitches Above the stitch widths 0 and 1 you will find the symbol twin needle If you wish to sew the zigzag stitch with the twin needle the sti...
Page 28: ...the stitch pattern chart 25 Using the stitch pattern adjustment button 24 you set the desired stitch by turning the dial so that the required letter is directly underneath the point marking 3 2 c 0 Se...
Page 29: ...i e they are suitable for stretch fabrics Turn the stitch length adjustment button 10 to the stretch symbol and select the desired stitch with the stitch pattern adjustment button 24 I Adjusting the...
Page 30: ...All manuals and user guides at all guides com...
Page 31: ...cking Gathering Darning Sewing on zippers Stabilizing edges Sewing lace Shell edging Page 28 Page 29 Pages 30 32 33 35 Page 31 Page 34 Pages 36 37 Page 38 Page 39 Pages 40 41 Pages 42 43 Pages 44 45 P...
Page 32: ...e threads are interlaced below the lower fabric ply The adjustment of the bobbin thread tension is described on page 1 5 I r Topstitching with the edge guide special accessories For broad topstitching...
Page 33: ...djusting its setting Blind stitch foot no 3 is particularly suitable for serging difficult materials While sewing the thread passes over bar C thus preventing the fabric edge from rolling up This ensu...
Page 34: ...necessary On materials which fray strongly serge the hem edge separately Fold the hem width inwards Now lay the hem back outwards so that the hem edge protrudes by about 1 cm Now lay the fabric undern...
Page 35: ...he button Now lower the presser foot lifter this holds the button off the blade Now sew on the button Take care to ensure that the needle also enters the right hand hole in the button Knot the thread...
Page 36: ...re sewn e g crotch seams Stretch triple zigzag The stretch triple zigzag is a very elastic and decorative seam which is particularly suitable for T shirts and underwear Serge the fabric edge Fold over...
Page 37: ...neath it and pin it down Sew it on using the elastic stitch Allow the ends of the elastic band to overlap a little and overstitch with the elastic stitch On skirts and trousers the elastic tape is sew...
Page 38: ...rfectly You can also sew on sleeve cuffs and knit collars Tip We recommend using blind stitch foot no 3 when sewing overlock seams It guides Tip Ensure that the sleeve cuff is stretched particularly w...
Page 39: ...0 00 GD U ct 3 0 GD 0 7 ZGD GD ci o 0 GO 0 0 0cD EcD cDc o 0 C C o p4 0 C 0 1 GD GD 3 GD GD 0 C GD 0 GO GD 0 GIG 3 a DI 0 GD 3 GD 3 U All manuals and user guides at all guides com...
Page 40: ...ater On materials such as velvet and thick wool fabrics which feed poorly it can be used either on or underneath the fabric The material is thus fed more effi ciently by the machine and buttonholes ar...
Page 41: ...0 Sew a few tying off stitches Cut open the buttonhole with the aid of a pair of scissors or a slitting knife Linen buttonhole with gimp thread To sew especially durable buttonholes e g on sportswear...
Page 42: ...st iron over the width of fabric desired for the hem Then topstitch the hem from the face side Finally cut the protruding hem edge back to the seam Tip On difficult materials such as ribbed knit wear...
Page 43: ...he bobbin thread tension the more intense the gathering effect Sew a test seam to determine the level of gather Mark the first line on the face side of the fabric and sew along it Each additional seam...
Page 44: ...of the fabric and sew along it Allow the threads to protrude approx 10 20 cm Each subsequent seam can be sewn one presser foot width from the last Gather the piece of fabric by pulling the bobbin thr...
Page 45: ...d lay the elastic thread around the needle Lower the presser foot and sew a few stit ches Then pull the elastic thread evenly at both ends You determine the amount of gather by the amount you pull the...
Page 46: ...is necessary to sew a new piece of fabric onto the damaged area Baste the new piece of fabric onto the damaged area of the face side of the fabric Sew over the fabric edges with the elastic stitch Now...
Page 47: ...ed fabric rein forces the workpiece and ensures you a per fect repair Lay a piece of fabric underneath the mate rial It must always be a little larger than the damaged area Now sew over the damaged ar...
Page 48: ...oot either on the right or the left of the presser foot holder If the zipper foot is inserted into the left side of the presser foot holder you can additionally use the needle position left on models...
Page 49: ...r under the underlap so that the teeth are visible Insert the zipper foot on the right hand side and move the needle to the correct position Close the zipper and baste the overlap evenly to the other...
Page 50: ...bric edge underneath the hemmer and sew a few stitches with the straight stitch E Stitch length 2 5 3 mm Leave the needle in the fabric raise the presser foot and insert the hemmer foot scroll into th...
Page 51: ...de Sew over both edges of the lace with a small dense zigzag stitch Cut back the extra fabric Attaching lace You can beautify and remodel home textiles with an appropriate lace over and over again And...
Page 52: ...ce Take care that the fabric only runs half underneath the presser foot while sewing This intensifies the effect of the shell edging Tip By sewing a coloured woollen thread into the seam you strengthe...
Page 53: ...Richelieu Page 50 Patchwork quilt Page 51 Hemstitch seam Page 52 I TradtionaI embroidery techniques 49 All manuals and user guides at all guides com...
Page 54: ...0 To lend more durability to the embroidery sew all of the contours twice using the straight stitch stitch length approx 1 mm Then carefully cut out the fabric from the areas which are to be hollow 2...
Page 55: ...ed for your patchwork The templates should include a seam allowance of 1 4 inch 0 63 cm Spread these pieces out in front of you in accordance with the pattern and form small squares which you can then...
Page 56: ...stitch sew along both of the fabric edges The needle must perforate the area of the pulled threads just next to the edges This bundles the threads Hem edge sewn with hemstitch seam Iron the hem over t...
Page 57: ...chart Bias tape binder Multi stitch gathering attachment Felling foot Single needle cording foot Knit edge foot Quilt and patchwork foot Needle chart Page 54 Page 55 Page 56 Page 56 Page 57 Page 57 P...
Page 58: ...d presser foot Part no 98 694 847 00 3 Blind stitch foot Part no 98 694 845 00 4 Zipper foot Part no 98 694 843 00 I I Darning plate Screwdriver Brush Oil tube Knife Felt discs 2 x I 6 _ _s V 54 All m...
Page 59: ...lap felling seams Clear view foot 98 694 864 00 Multiple uses e g for buttonholes Buttonhole roller 98 694 882 00 For sewing buttonholes Multi stitch gathering attachment 98 999 650 00 For sewing dens...
Page 60: ...ound into the slot of the tape binder The trimmed edge must be inserted between the band The bias tape automatically wraps around the edge of the fabric automatically during the sewing operation Tip Y...
Page 61: ...que by which an embroide red purl seam results from embroidering over bead yarn or a fine filler cord This allows you to achieve a similar effect to that of soutache braiding This raised purl seam als...
Page 62: ...om the needle to the outer right edge of the foot is 1 4 inch 0 63 cm and to the inner right edge 1 8 inch 0 31 cm Patching Insert the quilt and patchwork foot Sew the pieces of fabric together with t...
Page 63: ...ss ball point loped for Pfaff Particularly suitable for 75 90 delicate stretch and knitted fabrics 130 705 H SKF Large Wide meshed corsetry Lycra Needle thickness ball point Simplex and Lastex 7 0 110...
Page 64: ...e handwheel and check to see if the needles perfo rate the fabric properly This helps to prevent needle breakages Decorative and zigzag patterns 130 705 H ZWI Thickness 80 0 5 1 5 mm Wide 1 6 mm Ornam...
Page 65: ...aintenance and trouble shooting Cleaning and oiling Page 62 Removing the needle plate Page 63 Replacing the sewing lamp Page 63 Trouble shooting Page 64 61 All manuals and user guides at all guides co...
Page 66: ...the hook cover ring out towards you Then place one drop of oil into the hook race every 15 20 hours of operation The machine is maintenance free and must not be oiled at any other points Cleaning and...
Page 67: ...e detachable work support 15 Loosen the two screws with the screwdriver and lift the needle plate 16 Now clean the feed dog with the brush To simplify changing the sewing lamp we recommend laying the...
Page 68: ...in the hook race Important notes Solution Push the needle up as far as it will go With the flat side facing the rear Insert needle system 130 705 H Insert a new needle Check the correct threading of...
Page 69: ...All manuals and user guides at all guides com...
Page 70: ...3 On off switch 14 Base plate 1 5 Detachable work support with accessory compartment 1 6 Needle plate 1 7 Presser foot holder with presser foot 1 8 Thread guide 1 9 Thread guide 20 Threading groove 2...
Page 71: ...21 II PFAFF hbby44O 30 29 232425 28 12 13 UI 20 PFAFF ___ 8 49 15 14 All manuals and user guides at all guides com a l l g u i d e s c o m...
Page 72: ...ruheDurIach Gritznerstrale 11 76227 Karlsruhe Gedruckt in Deutschland Druckerei Gablenz GmbH 76356 Weingarten Stettiner StraBe 17 Technisohe Anderungen vorbehalten Nr 29 629996 66 000 DO deutsch 1 94...