


ROHO AGILITY CARBON Contour Back Support Operation Manual
15
Troubleshooting
For additional assistance, contact your equipment provider, distributor, or Customer Support.
The hardware is loose
on the wheelchair back
canes.
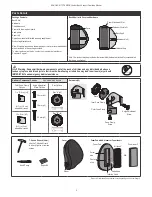
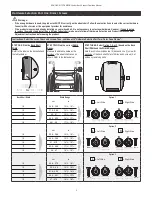
The wheelchair canes are too small. Check the outer cane clamp size. If the back canes on your wheelchair are ¾ in.
(2 cm) in diameter, you must use the 3/4 in. (2 cm) Outer Cane Clamps. See “Hardware Selection”.
The hardware won’t fit
onto the wheelchair back
canes.
The wheelchair canes are too large. Check the outer cane clamp size. If the back canes on your wheelchair are 1 in.
(2.5 cm) in diameter, you must use the 1 in. (2.5 cm) Outer Cane Clamps. See “Hardware Selection”.
The hardware will not
tighten or stay secure.
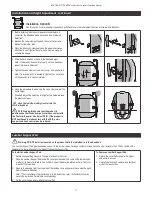
Make sure that the hardware is correctly sized. See "Hardware Selection".
Mare sure the hardware is correctly assembled and oriented to the back shell. The markers on the back shell should
align with the marker on the inner cane clamp. See "Hardware Attachment".
The back support
appears to be unevenly
installed.
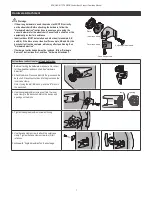
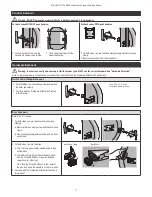
Use a tape measure or ruler to make sure the hardware is at the same height on both wheelchair canes.
Make sure the same discs are used on both sides (for example, AB and BA; not AA and BA). See “Hardware
Attachment”.
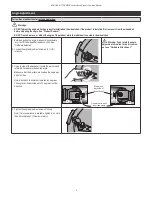
The air insert is not
holding air.
Inflate the air insert. Inspect the inflation valve and hose for damage. Confirm that the inflation valve is completely
closed. Look for holes in the air insert. If very small holes or no holes are visible, follow the instructions in the Repair
Kit provided with your product.
The air insert does not
feel comfortable.
Add or remove air to adjust to your comfort level. See "Air Insert Adjustment".
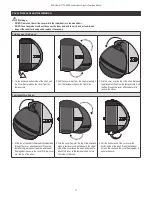
Make sure the air cells are facing the individual and the cover is properly positioned. See "Cover Removal and
Installation" and "Foam Pad and Air Insert Removal and Installation".
The air insert slides out
of position.
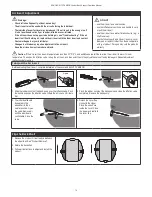
Make sure the air insert is properly positioned and the fabric back of the air insert is secured to the fastener strip in
the cutout area of the foam pad. The perimeter of the air insert should be tucked in between the foam layers around
the edge of the cutout area. See "Foam Pad and Air Insert Removal and Installation".
Maintenance
Warning: DO NOT continue to use the product if any part is broken, cannot be tightened, or is not functioning properly. Periodically, the
product should be thoroughly inspected by a qualified technician.
Check daily to confirm the tightness of screws and hardware. Re-tighten loose screws, following the instructions in this manual. Check components daily
for wear or damage and replace if necessary.
Storage, Disposal, and Recycling
Storage: Clean and disinfect the product before storing. Store the product in a container that protects the product from moisture,
contaminants and damage.
Disposal: The components of the products in this manual are associated with no known environmental hazards when properly used and when disposed of
in accordance with all local/regional regulations. Incineration must be performed by a qualified, licensed waste management facility.
Recycling: Contact a local recycling agency to determine recycling options for the product. For more recycling information, contact Customer Support.
Limited Warranty
Limited Warranty Term, from the date the product was originally purchased: Back Shell and Hardware: 60 months; Cover, Foam Pad, Foam Insert, Lumbar
Support Pad and Air Insert: 18 months. See also the Limited Warranty supplement provided with your product, or contact Customer Support.