GZB5PRO
GAZEBO - 3m x 3m TONNELLE - 3 m x 3 m ZONNETENT - 3 m x 3 m GARTENPAVILLION - 3 x 3m CENADOR - 3 x 3m TOLDO – 3 X 3m
USER MANUAL
3
NOTICE D’EMPLOI
5
GEBRUIKERSHANDLEIDING 7
MANUAL DEL USUARIO
9
BEDIENUNGSANLEITUNG 11
MANUAL DO UTILIZADOR
13
Page 1: ... x 3m TONNELLE 3 m x 3 m ZONNETENT 3 m x 3 m GARTENPAVILLION 3 x 3m CENADOR 3 x 3m TOLDO 3 X 3m USER MANUAL 3 NOTICE D EMPLOI 5 GEBRUIKERSHANDLEIDING 7 MANUAL DEL USUARIO 9 BEDIENUNGSANLEITUNG 11 MANUAL DO UTILIZADOR 13 ...
Page 2: ...GZB5PRO 00 13 01 2012 Velleman nv 2 Figure 1 ...
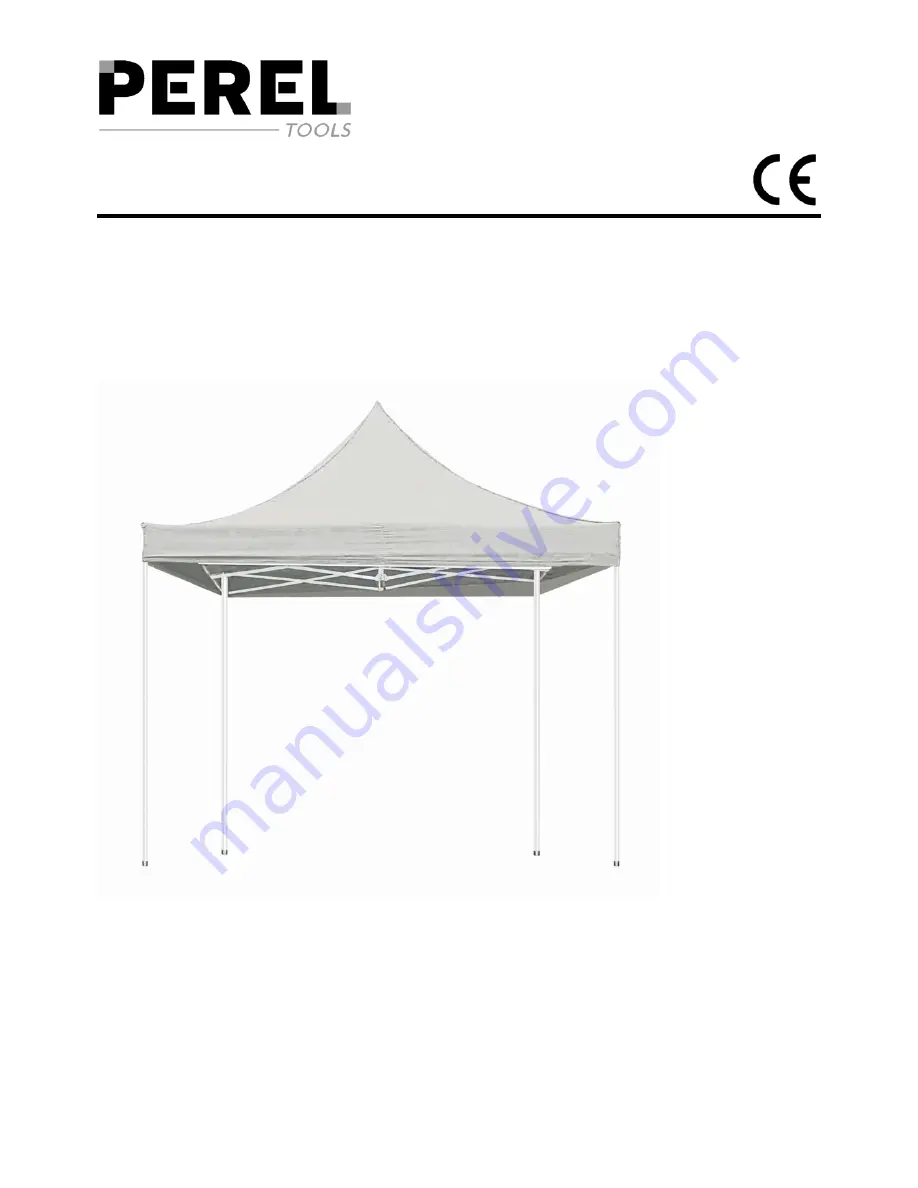
Page 3: ...eatures foldable and easy to set up cover in waterproof nylon 5 Setting up Refer to the illustrations on page 2 of this manual 1 Place the gazebo at the centre of the chosen location Rest the gazebo on its feet and remove the carry bag Lift the gazebo by the four legs and move the legs as far as possible apart 2 Hold the gazebo at opposite legs lift and slowly step backwards until fully opened A y...
Page 4: ...jured by this yoke or any other hinging joints 8 Close the gazebo completely by lifting and pulling the adjacent legs together Make sure the gazebo is completely dry before placing it inside the storage bag 7 Technical specifications GZB5PRO aluminium legs 32 x 32 28 x 28mm thickness 1mm aluminium roof frame 23 x 14mm thickness 0 9mm peak height 3 50m cover waterproof nylon Use this device with or...
Page 5: ... bâche humide favorise la formation de moisissures qui pourront endommager les fibres et former des taches 4 Caractéristiques repliable facile à monter bâche en nylon hydrofuge 5 Montage de la tonnelle Consulter les illustrations à la page 2 de cette notice 1 Choisir un endroit approprié pour la tonnelle Sortir la tonnelle du sac de rangement et la placer sur les pieds Soulever légèrement la tonne...
Page 6: ...t le pied 8 Soulever légèrement la tonnelle et fermer entièrement la tonnelle Ne jamais ranger la tonnelle avec une bâche humide 7 Spécifications techniques GZB5PRO pieds en aluminium 32 x 32 28 x 28 mm épaisseur 1 mm armature en aluminium 23 x 14 mm épaisseur 0 9 mm hauteur max 3 50 m bâche nylon hydrofuge N employer cet appareil qu avec des accessoires d origine SA Velleman ne sera aucunement re...
Page 7: ... dekzeil eerst volledig drogen alvorens de tent op te bergen Een vochtig dekzeil is de ideale kweekvijver voor schimmels die op hun beurt de natuurlijke vezels en de coating aantasten 4 Eigenschappen opvouwbaar eenvoudig op te stellen en af te breken dekzeil in waterdichte nylon 5 Opstellen van de zonnetent Raadpleeg de figuren op pagina 2 van deze handleiding 1 Kies een geschikte plaats voor uw z...
Page 8: ... vingers handen te vermijden 8 Til de tent lichtjes op en sluit het dekzeil volledig Laat een vochtig dekzeil eerst volledig drogen alvorens de tent op te bergen 7 Technische specificaties GZB5PRO aluminium poten 32 x 32 28 x 28 mm dikte 1 mm aluminium dakframe 23 x 14 mm dikte 0 9 mm max hoogte 3 50 m dekzeil waterdichte nylon Gebruik dit toestel enkel met originele accessoires Velleman nv is nie...
Page 9: ...sté completamente seco antes de almacenarlo Una lona húmeda puede causar moho que podría dañar las fibras y la tela 4 Características plegable fácil de montar y desmontar lona de nylon hidrófugo 5 Montar el cenador Véase las figuras en la página 2 de este manual del usuario 1 Seleccione un lugar adecuado para el cenador Sáquenlo fuera de la bolsa de transporte y móntenlo Sujeten cada uno dos patas...
Page 10: ...bre la pata Sean cuidadosos para no pillarse la mano o los dedos 8 Levanten ligeramente el cenador y pliéguenlo completamente Nunca almacenen el cenador con una lona húmeda 7 Especificaciones GZB5PRO patas de aluminio 32 x 32 28 x 28 mm espesor 1 mm armazón de aluminio 23 x 14 mm espesor 0 9 mm altura máx 3 50 m lona nylon hidrófugo Utilice este aparato sólo con los accesorios originales Velleman ...
Page 11: ...tenpavillon lagern Eine feuchte Plane ist ein idealer Zuchtteich für Schimmel die natürlichen Fasern und die Beschichtung angreifen 4 Eigenschaften zusammenklappbar und einfach zu montieren und demontieren aus wasserdichtem Nylon 5 Den Gartenpavillon montieren Siehe Abbildungen Seite 2 dieser Bedienungsanleitung 1 Wählen Sie einen geeigneten Ort für den Gartenpavillon Nehmen Sie den Gartenpavillon...
Page 12: ...enpavillon zusammen schütteln Sie den Gartenpavillon leicht um das Zusammenfalten zu vereinfachen Der Verriegelungsteil gleitet über das Standbein Seien Sie vorsichtig um Verletzungen zu vermeiden 8 Heben Sie den Gartenpavillon ein bisschen hoch und schließen Sie die Plane völlig Lassen Sie eine feuchte Plane zuerst völlig trocknen ehe Sie den lagern 7 Technische Daten GZB5PRO Standbeine aus Alumi...
Page 13: ...tá completamente seco antes de o guardar A lona húmida pode provocar bolor e poderá danificar as fibras e a tela 4 Características dobrável fácil de montar e desmontar lona em nylon hidrófugo 5 Montar o toldo Ver as figuras da página 2 deste manual do utilizador 1 Seleccione o local adequado para o toldo Retire o do estojo de transporte e montá lo Cada pessoa deve segurar em duas das pernas e este...
Page 14: ...ce or a refund at the value of 50 of the retail value in case of a flaw occurred in the second year after the date of purchase and delivery Not covered by warranty all direct or indirect damage caused after delivery to the article e g by oxidation shocks falls dust dirt humidity and by the article as well as its contents e g data loss compensation for loss of profits frequently replaced consumable...
Page 15: ... el período de garantía se reducirá a 6 meses con uso profesional daños causados por un uso incorrecto o un uso ajeno al que está previsto el producto inicialmente como está descrito en el manual del usuario daños causados por una protección insuficiente al transportar el aparato daños causados por reparaciones o modificaciones efectuadas por una tercera persona sin la autorización explícita de Ve...