background image

15

7

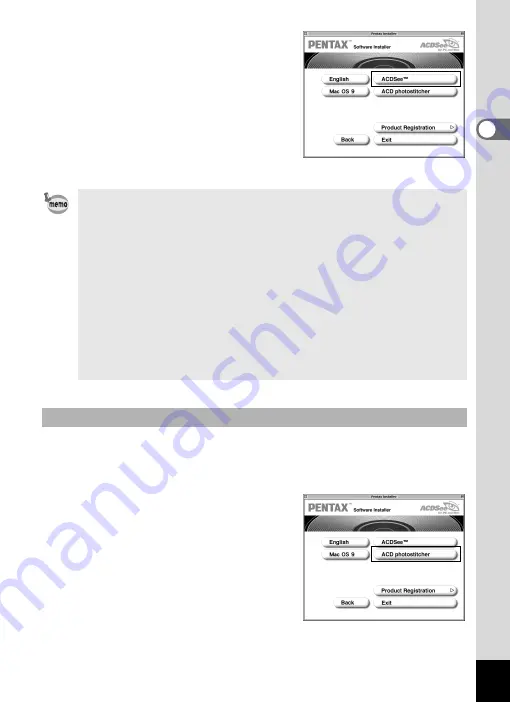
Click [ACDSee™].

The setup screen appears. Follow the 
on-screen guidance to input 
registration information and install the 
software.

This section describes the procedures for installing ACD photostitcher, a 
software application that lets you join a number of images together to 
form a panorama picture.

1

Click [ACD photostitcher].

The licensing agreement appears on 
the screen. After reading it, click 
[Agree] to accept the terms of the 
agreement.

If the message [CarbonLib-xxxxx could not be found] appears 
during installation;

You must add the extension file “CarbonLib” to the Extension 
folder in the System folder in order to install the provided software 
in Mac OS 9.2.
This message appears when this extension file does not exist or 
when an older version of the file exists.
The latest version of the CarbonLib file is available on the Apple 
website. Download the file and then install it.
Apple website: http://www.apple.com

* Contact Apple for detailed information on how to use the 

CarbonLib file.

Installing ACD photostitcher

Summary of Contents for Optio Optio X

Page 1: ...Enjoying Your Digital Camera Images On Your PC PC Connection Manual...

Page 2: ...and other countries All other brands or product names are trademarks or registered trademarks of their respective companies This product supports PRINT Image Matching III PRINT Image Matching enabled...

Page 3: ...es to a Macintosh 24 Viewing Images and Movies 26 Starting ACDSee for PENTAX 26 Displaying a List of Images and Movies 27 Viewing a Full Size Image or Movie 34 Editing Images and Movies 37 Editing Ima...

Page 4: ...a card reader Remove the card from the camera When transferring images on the card to a computer with another device make sure to review the user manual accompanying that device Place the camera on t...

Page 5: ...ee the operating manual of the software you are using for details on how to use images and movies on your website You can use the PC camera function if your computer runs Windows XP SP1 or later See t...

Page 6: ...or PENTAX Image viewing editing software ACD FotoCanvas Image editing software ACD photostitcher Panorama image editing software FotoSlate 2 0 Image layout and printing software ACD Showtime for PENTA...

Page 7: ...used with Windows XP Service Pack 1 PC camera driver must be installed from CD ROM S SW24 supplied with camera For instructions on how to install the PC camera driver see p 66 You cannot install the P...

Page 8: ...6 languages English French German Spanish Italian Japanese OS Windows 98SE Me NT 2000 XP Home Edition Professional CPU Pentium III 500MHz or higher Pentium 4 2 0GHz or higher recommended Memory 128MB...

Page 9: ...nimum The classic system is necessary when using ACD photostitcher with Mac OS X or higher Operation is not guaranteed on all Macintosh computers meeting the system requirements The versions of Intern...

Page 10: ...xit the screen 3 Turn your camera off and place it on the USB cradle 4 Connect the USB cradle to the PC with the USB cable The USB cable cannot be connected to the camera directly 5 Turn your camera o...

Page 11: ...lect CD ROM drive and click Next If another item has been selected click the box to deselect it 9 Confirm that PENSSTOR INF is displayed and click Next Installation of the driver starts 10 Click Finis...

Page 12: ...your device and click Next 13 Select CD ROM drive and click Next If another item has been selected click the box to deselect it 14 Confirm that PENSPDR INF is displayed and click Next 15 Click Finish...

Page 13: ...ose the languages from the displayed screen The software selection screen appears Installing the Image Processing Software ACDSee for PENTAX When multiple accounts have been setup in Windows 2000 or W...

Page 14: ...ear during installation In this case follow the instructions below to update Internet Explorer before installing the software 1 Cancel installation of ACDSee for PENTAX Click OK and then click Finish...

Page 15: ...click the displayed country or region and then follow the instructions to register your product Thank you very much for your cooperation The panoramic image software ACD photostitcher the image layou...

Page 16: ...rive 3 Double click the CD ROM S SW24 icon 4 Double click the Install ACDSee icon The PENTAX Software Installer screen appears Double click the Master Installer icon to display the PENTAX Software Ins...

Page 17: ...ccept the terms of the agreement If the message CarbonLib xxxxx could not be found appears during installation You must add the extension file CarbonLib to the Extension folder in the System folder in...

Page 18: ...ection screen in step 7 1p 15 A world map for Internet Product Registration is displayed If your PC is connected to the Internet click the displayed country or region and then follow the instructions...

Page 19: ...4 Press the four way controller 5 A pull down menu appears 5 Use the four way controller 23 to select PC 6 Press the OK button Setting Up Your Digital Camera Setting the USB Connection Mode to PC Do...

Page 20: ...y will be transmitted to the computer 3 Connect the USB cradle to the PC with the USB cable The USB cable cannot be connected to the camera directly 4 Turn your camera on The Device Detector screen ap...

Page 21: ...reen appears 7 Select a destination folder and click OK 8 Click Next When the digital camera is connected to a computer with the USB cable the A button lights to indicate that the digital camera is co...

Page 22: ...ed that you do not have the following software installed on your computer Ghostscript 7 0 or later may appear in the Components missing dialog box If you will only display or edit images inside the di...

Page 23: ...the images were taken Images taken on September 15 for example are stored in folder xxx_0915 8 Select the folders you want to copy to the PC Hold the Ctrl key on the keyboard while clicking on the fol...

Page 24: ...re screen appears 2 Select USB Mass Storage Device and click Stop The Stop a Hardware device screen appears 3 Select USB Mass Storage Device and click OK A message appears indicating that the hardware...

Page 25: ...PENTAX USB DISK Device and click OK A message appears indicating that the hardware can be safely removed 4 Click OK 5 Disconnect the USB cable Disconnect the USB cable from the USB cradle and your PC...

Page 26: ...ed as untitled NO_NAME in Mac OS X on the desktop The drive name can be changed Transferring Images to a Macintosh Connecting the Camera and Macintosh If the SD Memory Card has a volume label the volu...

Page 27: ...mera images are not transferred they can be directly displayed on the Macintosh from a camera connected to the Macintosh For information on how to directly view the camera images see p 33 To edit imag...

Page 28: ...1 Double click the ACDSee for PENTAX folder on the desktop 2 Double click the ACDSee for PENTAX program icon ACDSee for PENTAX starts and an image list Browser appears Select Exit from the File menu i...

Page 29: ...as well as the names and operation of functions within the Browser c Menu bar You can select and execute the various functions and settings of ACDSee for PENTAX by selecting the menu items from the m...

Page 30: ...rtcut buttons you can copy move or delete items select what file types or folders to display in the File pane and sort your images You can customize the toolbar for easy use by turning the button labe...

Page 31: ...xes or display further command buttons e Navigation pane Navigation pane displays a folder tree of the folders on your computer external drive or peripheral device f Preview pane Preview pane displays...

Page 32: ...rmation in a list format You can change the file information that is displayed 1p 32 Thumbnails Displays image file thumbnails Large Icons Displays large icons and file names Small Icons Displays smal...

Page 33: ...nding descending order using the numeric keypad on the keyboard Categories assigned to the numeric keypad 0 Extension 1 Name 2 Size 3 Type 4 Date 5 Image Properties 6 Description Forward Reverse Chang...

Page 34: ...sor changes to a left right arrow and drag the edge to adjust the row width To view images stored in other folders select a folder from the folder tree in the Navigation pane of the Browser or directl...

Page 35: ...he View menu to display the path box in the File pane Directly enter in the path box the path of the folder containing images you want to view Images in that folder appear in the File pane Also click...

Page 36: ...tion as well as names and operations of functions within the Viewer c Menu bar You can select and execute the various functions and settings of ACDSee for PENTAX by selecting the menu items from the m...

Page 37: ...e Media Window c Menu bar You can select and execute the various functions and settings of ACDSee Media Window by selecting the menu items from the menu bar You can select the image size of the movie...

Page 38: ...ck Clipboard to copy the currently displayed frame of a movie to the clipboard Click Properties to display information of the movie or audio file being played back e Preview pane Preview pane displays...

Page 39: ...as image editing and processing software started from ACDSee for PENTAX To start ACD FotoCanvas select the image you want to edit in the File pane of the Browser and then select the Activities menu Ed...

Page 40: ...Tool Options from the View menu to adjust the tool settings 2 Click or drag the mouse cursor over the image to paint or draw shapes or text You can use the color options on the upper right hand side...

Page 41: ...or joining the pasted image with the background image Blend mode and the transparency opacity 4 Click outside of the dotted line of the pasted image The pasted image is attached to the original image...

Page 42: ...age distort an image make an image look like a painting and create other interesting effects Images edited with ACD FotoCanvas can be saved with various image file formats 1 Select File menu Save As 2...

Page 43: ...ctures to select multiple images After selecting the images select Extras from the Activities menu and select PhotoStitcher from the submenu The PhotoStitcher is not enabled if two or more images are...

Page 44: ...hing position A After the position has been adjusted click the STITCH button B 4 Select the stitching method You can choose from Big Plane or Cylinder for the stitching method Here you will create a f...

Page 45: ...ted lines to adjust the image trimming position A After the position has been adjusted click the Trimming button B 6 Save the image After confirming the trimming click the Save button to save the imag...

Page 46: ...ted images appear on the image layout palette in the Alignment window window 2 B 5 Set the stitching method Click the Stitching method button in the window 2 C to open the stitching settings window Yo...

Page 47: ...ture is displayed 9 Trim the image Click the Trim button in the Stitching result window to display the dotted lines around the image A Move the mouse pointer over the dotted lines It changes into a sy...

Page 48: ...46 10 Save the image Click the Save button in the Stitching result display window window 3 to save the image...

Page 49: ...PENTAX can be started from the Start menu desktop icon or ACDSee for PENTAX 1 Select the ACDSee for PENTAX Activities menu Create ACD Showtime The ACD Showtime for PENTAX startup window appears When a...

Page 50: ...sidebar to create a new project The project currently opened in the Edit Show window closes If the project has not been saved a prompt appears asking if you want to save it With ACD Showtime for PENTA...

Page 51: ...t Show window where video images and music audio files can be rearranged is called the Timeline 2 Drag and drop video and images and rearrange them When loading an audio track you can drag the audio t...

Page 52: ...ects or change the playback time 1 Select the video to edit The Video menu appears on the left sidebar of the Edit Show window 2 Select Effects or Trim from the Video menu Select Effects to create var...

Page 53: ...window 2 Select and set an edit function You can select from the following editing functions in the Image menu Rotate Flip Rotates the image 90 degrees or flips the image vertically or horizontally C...

Page 54: ...of images and fading in and out These effects are called transitions 1 Click the Toggle View Mode button The timeline changes to the display shown on the right 2 Select a transition Click and select a...

Page 55: ...ation in milliseconds by adjusting the slider The actual transition effect and duration can be previewed by clicking the Preview button to play back the show You can adjust the playback time and the v...

Page 56: ...ending points in the Trim window Click the Play button to preview the adjusted starting time and playback time Synchronizing the music audio starting time with the movie or image starting time When th...

Page 57: ...h the length of a movie or image that has the same starting point 1 Click the right mouse button on an audio track in the timeline 2 Select Trim to slide from the menu The playback time of music audio...

Page 58: ...ta for that project are mixed together Make sure to save your project often The completed show can be saved as a digital video file with a format such as Windows Media Video AVI or MPEG 1 Saving a pro...

Page 59: ...ectly change the file extension wmv as your computer may not be able to recognize the video file If you accidentally delete or change the file extension select the video file format from Format to aut...

Page 60: ...displayed 3 Select or change the printing options 4 Click Print You can create and print contact sheets thumbnails of your images You can add captions to each image page headers and footers and chang...

Page 61: ...ges that reside in the same folder as the currently viewed image The Print dialog box is displayed when either is selected 2 Select or change the printing options 3 Click Print You can insert the date...

Page 62: ...ayout in ACDSee for PENTAX and select the Activities menu Print FotoSlate The FotoSlate window appears 2 Click Add Page from the toolbar of the FotoSlate window 3 Select the template you want to use f...

Page 63: ...y is the space where text can be entered Double click this area to display the Enter Text window and then enter the text The font size text color and orientation can be selected 6 Print the image Clic...

Page 64: ...t an image or a group of images To select several images hold the Ctrl key on the keyboard while clicking on all the pictures you want to send 2 Select Share from the Activities menu then select E mai...

Page 65: ...alled for example when your friend wants to play back a movie that you created on your computer Boot the video software and select the video file you want to play by selecting the File menu Open then...

Page 66: ...nctions Be sure to use the help menu if you have problems operating the software 1 Select Search Topics from the Help menu The Help window appears 2 Select the Contents Index or Search tab to search f...

Page 67: ...ct to ACDInTouch dialog box is displayed 2 Click Connect Now ACDInTouch is a service for sending information directly to ACDSee for PENTAX When you connect information is sent to you so that you can r...

Page 68: ...with the camera If you are using Windows XP Service Pack 2 installation is not required You can use the standard OS driver 1 Turn your PC on 2 Insert the CD ROM S SW24 into your CD ROM drive The PENT...

Page 69: ...67 5 Select Explore on the menu 6 Double click the PC_ camera folder 7 Double click the WinXP folder...

Page 70: ...see Setting the USB Connection Mode to PC 1p 17 2 Connect the camera to your PC using the USB cradle Make sure that the camera is turned off before placing it on the USB cradle 3 Run the messaging sof...

Page 71: ...Memo...

Page 72: ...ulmarch 95106 Argenteuil Cedex FRANCE PENTAX Benelux B V for Netherlands Spinveld 25 4815 HR Breda NETHERLANDS http www pentax nl for Belgium Luxembourg Weiveldlaan 3 5 1930 Zaventem BELGIUM http www...

Reviews: