COLORFX Water Bowl Installation and User’s Guide
IMPORTANT SAFETY INSTRUCTIONS
READ AND FOLLOW ALL INSTRUCTIONS
SAVE THESE INSTRUCTIONS
MAGICBOWL™ WATER EFFECT
WITH FIREFX™ LED LIGHT
FOR POOL AND SPA
INSTALLATION
AND
USER’S GUIDE
Page 1: ... Bowl Installation and User s Guide IMPORTANT SAFETY INSTRUCTIONS READ AND FOLLOW ALL INSTRUCTIONS SAVE THESE INSTRUCTIONS MAGICBOWL WATER EFFECT WITH FIREFX LED LIGHT FOR POOL AND SPA INSTALLATION AND USER S GUIDE ...
Page 2: ...lling the MagicBowl Water Effect Niche after electrical requirements are met 4 Important General Precautions 4 Installing the FireFX LED Light Assembly After Niche Installation 6 Installing the MagicBowl Water Effect Assembly on the Niche 8 Replacing FireFX LED Light Assembly in an existing installation 10 Replacing FireFX LED Light Assembly after electrical requirements are met 11 Winterizing the...
Page 3: ...re servicing the light Failure to do so could result in death or serious injury to service person pool users or others due to electric shock When installing and using this electrical equipment basic safety precautions should always be followed include the following This underwater light must be installed by a licensed or certified electrician or a qualified pool professional in accordance with the...
Page 4: ...OMPLETE NON METALLIC LOW VOLTAGE LIGHTING SYSTEM THIS CONFIGURATION DOES NOT REQUIRE BONDING OR GROUNDING WHEN POWERED BY A LISTED 100 WATT OR 300 WATT 12 VAC TRANSFORMER AND INSTALLED IN COMPLIANCE WITH THE CURRENT NATIONAL ELECTRIC CODE NEC UNBONDED LIGHTING NEC PROVISIONS WHEN THE UL LISTED NON METALLIC FIREFX LIGHT LOW VOLTAGE LIGHTS ARE USED WITH THE LIGHT APPROVED NICHE THE CURRENT NEC PROVI...
Page 5: ...slight difference in character patina and appearance from bowl to bowl this is normal and expected If multiple LED lighting is being used it is recommended that these lights be run independent of each other using a separate transformer for each group or type of light Otherwise all lights connected to the same transformer will be working together See page 2 for more information MagicBowl Water Effe...
Page 6: ...t is 36 Watts maximum One AmerBrite Color LED Pool Light is 36 Watts maximum Note If multiple LED lighting is being used it is recommended that these lights be run independent of each other using a separate transformer for each group or type of light Otherwise all lights connected to the same transformer will be working together Powering On the FireFX LED Light When the FireFX LED light is powered...
Page 7: ...ately rated circuit breaker The conductors on the load side of the GFCI circuit shall not occupy conduit boxes or enclosures containing other conductors unless the additional conductors are also protected by a GFCI Refer to local codes for complete details The Junction Box and the low voltage transformer is located at least 4 in 10 16 cm above ground level or 8 in 20 3 cm above maximum water level...
Page 8: ...f the spillway the water flow should be adjusted to a flow rate that eliminates or minimizes the drips Some water dripping may be unavoidable due to water flow surface conditions or irregularities on the lip If the FireFX LED light assembly is not installed in the provided niche the LED light will be damaged and the warranty void Splicing of the light engine cable is not permitted unless done in a...
Page 9: ...ounting surface see Figure 1 Note The niche is PVC so use PVC cement to connect the water line and electrical conduit and drain line to the niche 2 Set the niche in the mounting surface as per current local building codes 3 Backfill around the niche to the top of the flange thereby securing the niche into place 4 The niche should be installed so that the finish grade taking into account tile or fi...
Page 10: ...tra cord 4 Strip back three 3 inches of the outer cord jacket to expose the two insulated wires be careful not to damage the insulation on the two 2 inner wires Strip back the two conductors Be careful not to damage the copper conductor 5 Connect both 2 wires to the corresponding circuit wires in the Junction Box or 12 Volt AC Transformer black wire to power white wire to common and secure the Jun...
Page 11: ...e grommet pre installed around the cable into the conduit opening until it is firmly seated in the conduit See figure 1 8 Place the light engine into the niche so that it sits firmly on the ribs inside the niche Note If the light engine is not seated properly in the niche it will be damaged by the bowl voiding the warranty 9 Final check for proper FireFX LED light operation Switch on the main swit...
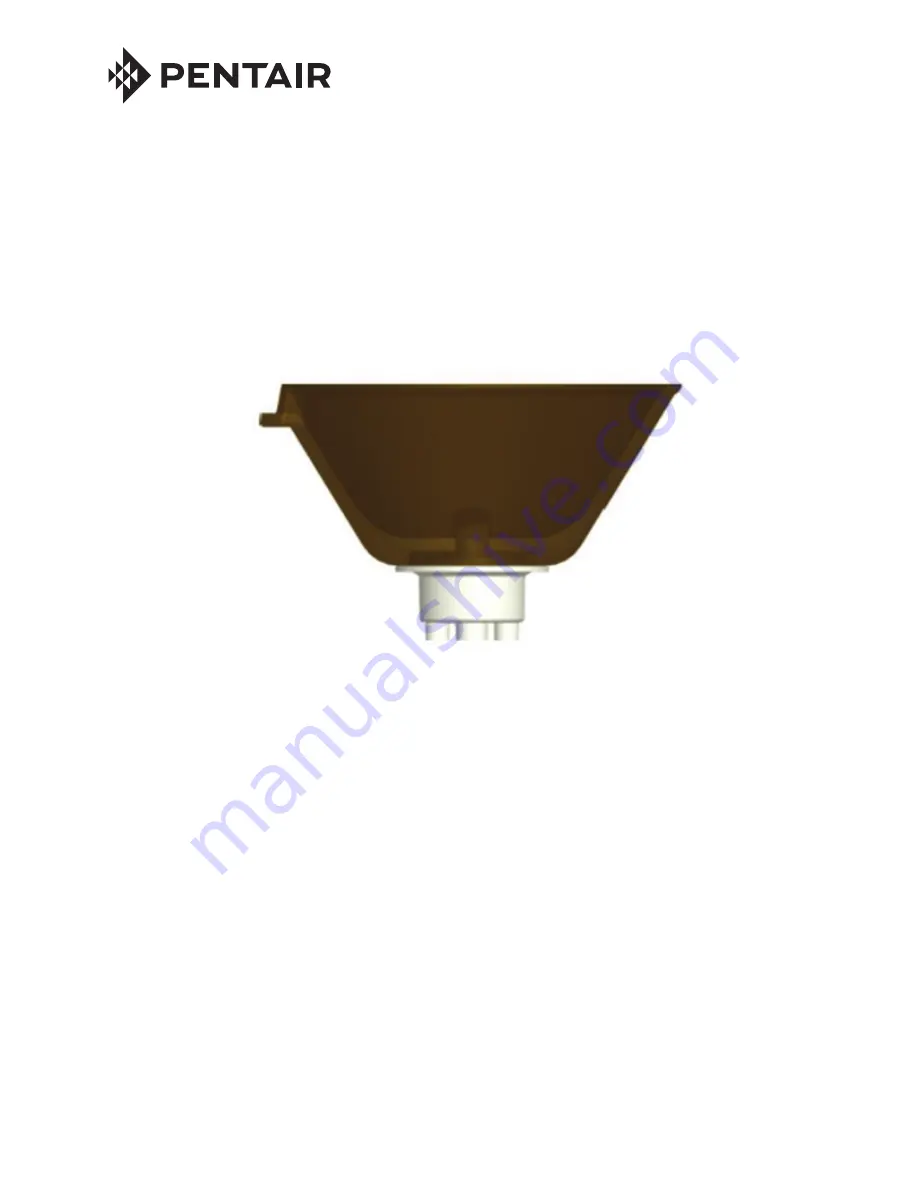
Page 12: ... spout installed Note Do not remove the bulkhead assembly from the bowl The bulkhead assembly MUST be installed on the bowl while gluing onto the niche 5 When ready to install the bowl you should apply commercially available PVC cement to the inside of the slip portion of the bulkhead fitting and the center niche pipe 6 Lower the bowl with attached fitting onto the center niche pipe pushing down f...
Page 13: ... from the bulkhead unscrew the retaining nut and gasket from the inside of the bowl and lift the bowl up and over the center fitting The bulkhead will stay attached to the niche 9 To re install the bowl place the thick foam gasket on the bulkhead lower the bowl over the spout and bulkhead fitting install the gasket and nut and torque until tight 10ft lbs Install the water spout assembly INSTALLING...
Page 14: ... at least 48 inches 1 22 m from the edge of the pool See Figure 1 on page 7 To be certain that the pool s electrical system meets all applicable requirements the electrician should also consult the local building department Risk of Electrical Shock or Electrocution This underwater light must be installed by a licensed or certified electrician or a qualified pool professional in accordance with the...
Page 15: ...res to the corresponding circuit wires in the Junction Box or 12 Volt AC Transformer black wire to power white wire to common and secure the Junction Box cover in place 9 Push the grommet pre installed around the cable into the conduit opening until it is firmly seated in the conduit 10 Place the FireFX LED light assembly into the niche so that it sits firmly on the ribs inside the niche Note If t...
Page 16: ...rotect from the elements The bowl may be removed and stored for the winter but caution should be taken to keep the light engine protected while the bowl is removed In areas with deep freeze water must be drained from the bowl and the water lines evacuated of water Once the water lines are drained remove the water spout from inside the bowl and plug the water line with a 1 plug The bowl should be f...
Page 17: ...t the 120 Volt side of a 12 VAC transformer to the LOAD SIDE of one of the auxiliary AUX relays in the load center 6 Connect the Neutral conductor from the 12 VAC transformer to the Neutral bus bar in the load center 7 After the connection has been completed close the control panel and secure it with the two 2 retaining screws 8 Close the load center front door Fasten the spring latch D A N G E R ...
Page 18: ...ite CIRCUITBREAKER LOAD 1 LINE 1 NEUTRAL EASYTOUCH 4 AUTOMATION CONTROL AUXILIARY RELAYS AUX 1 see page 2 for transformer load maximum Note FireFX LED Light to EasyTouch or IntelliTouch Control System Load Center Wiring Connection Diagram FireFX LED Light Standard Wiring Connection Diagram Three 3 FireFX LED Lights 12 VAC require a 100 Watt transformer Load Center CONNECTING MAGICBOWL WATER EFFECT...
Page 19: ...esponds to its assigned circuit name 2 Press the Up Down button to scroll through the list of preset names Select a name such as Pool Light AUX 1 has now been assigned the circuit name Pool Light To assign a Circuit Function go to MENU SETTINGS CIRCUIT FUNC 3 Press the Menu button to return to the Settings menu Press the Down but ton to and select Circuit Func Press the Right button to access the ...
Page 20: ...pump pool and spa modes and all high voltage auxiliary circuits connected to the main Load Center or Power Center Display 2 This screen shows circuit names for the additional auxiliary circuits connected to the first expansion center Load Center or Power Center Display 3 This screen shows circuit names for the additional auxiliary circuits connected to the second expansion center Load Center or Po...
Page 21: ...creen Assign the MagicBowl Water Effect circuit to the Lights screen 4 Press the Lights button on the bottom of the screen 5 Press the right side button next to CONFIGURE 6 Press the button next to NONE to assign a light circuit to the selected button Light names can be setup to display on the left side for Spa features and on the right side for the Pool features 7 Press the top left or right side...
Page 22: ...gicBowl Square Bronze 1 590169 MagicBowl Square Silver 1 590170 MagicBowl Square Brass 1 590171 MagicBowl Square White 1 590172 MagicBowl Square Gray 1 590173 MagicBowl Square Natural 8 590158 GASKET PACK OF 2 9 590159 BULKHEAD NUT 10 580055 100 LED Light Engine 10 580056 150 LED Light Engine 11 590157 NICHE 12 590174 WATER SPOUT COPPER 12 590175 WATER SPOUT BRONZE 12 590176 WATER SPOUT SILVER 12 ...
Page 23: ...MAGICBOWL WATER EFFECT Installation and User s Guide 19 MagicBowl Water Effect Niche Dimensions 6 380 11 0 4 320 3 9 7 8 10 9 28 5 12 5 10 5 29 0 14 5 28 5 15 3 28 5 10 5 12 5 29 0 14 5 ...
Page 24: ...nited States and or other countries Unless expressly noted names and brands of third parties that may be used in this document are not used to indicate an affiliation or endorsement between the owners of these names and brands and Pentair Water Pool and Spa Inc Those names and brands may be the trademarks or registered trademarks of those third parties Because we are continuously improving our pro...