


EN
120
EN
121
1x
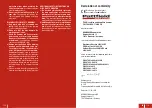
Lieferumfang
Etendue de livraison
Materiale compreso nella fornitura
Leveringsomvang
Leveransomfång
Rozsah dodávky
Rozsah dodávky
Volumul livrat
Scope of delivery
DE
SV
IT
SK
FR
CZ
NL
RO
GB
1x
1x
3x
1x
2x
1
3
4
2
8
5
6
7
9
2
1
1.
2.
3.
Using the tool
Warning!
Risk of serious injuries.
Do not turn the tool towards your-
self, other people or animals.
1.
Follow the instructions in section „Prepa-
ration“ („Handle assembly“ to „Insert
chisel“) before use.
2.
Plug the power cord into a suitable wall
socket (see “Technical data“, EU plug
(6822596), Swiss plug (10252553).
3.
Hold tool firmly with both hands at its
handle
8
and auxiliary handle
2
. Stand
securely.
4.
To turn on the tool press and hold the on/
off switch
9
. The tool will start vibrating.
5.
To lock the tool, press the on/ off switch
9
and press the locking knob
1
.
6.
Run the hammer unloaded for a few
seconds for lubricating purposes when
the ambient temperature is low or after
breaks.
7.
Set the hammer with the chisel tip onto
the working surface. The chiselling will
start automatically.
8.
To switch off the tool, release the on/ off
switch
9.
To release the knocking knob
1
press the on/ off
9
switch shortly before.
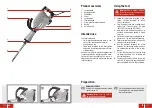
Product overview
1
Locking knob
2
Auxiliary handle
3
Tool holder
4
Chisel
5
Locking bolt
6
Clamping knob
7
Screw plug for lubricating tank
8
Handle
9
On/ off switch
Intended use
This tool is intended
– for chipping and demolition work in con-
crete, stone and equivalent material.
– only for private use
– to be used according to the descriptions
and safety instructions indicated in this op-
erating manual.
Any other use is not as intended. Improper use
is not covered by the warranty and the manu-
facturer will reject any liability. The user is li-
able for all injuries to third parties and damage
to their property.
1
2
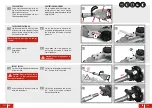
HANDLE ASSEMBLY
Release the clamping knob
6
by turning
counterclockwise.
Warning!
Make sure the tool is
switched off and unplugged.
Set the desired position of the handle
8
and tighten the clamping knob
6
by
turning it clockwise.
Preparation


