www.partyrobotics.com
Getting Started Guide
Model Number:
B001V1
Please read this guide before
operating your ShotBot
EDITION
Thanks for backing us!
v 1.0
Bartendro
TM
ShotBot
Page 1: ...www partyrobotics com Getting Started Guide Model Number B001V1 Please read this guide before operating your ShotBot EDITION Thanks for backing us v 1 0 BartendroTM ShotBot ...
Page 2: ...d for extended periods of time Doing so may cause discoloration or cause mold to form You may need to periodically recalibrate the Dispensers as the tubing wears See www partyrobotics com docs for instructions on how to recalibrate them If storing Bartendro for more than several weeks without use we recommend removing the beige tubing from the Dispensers to extend tube life Please drink and use re...
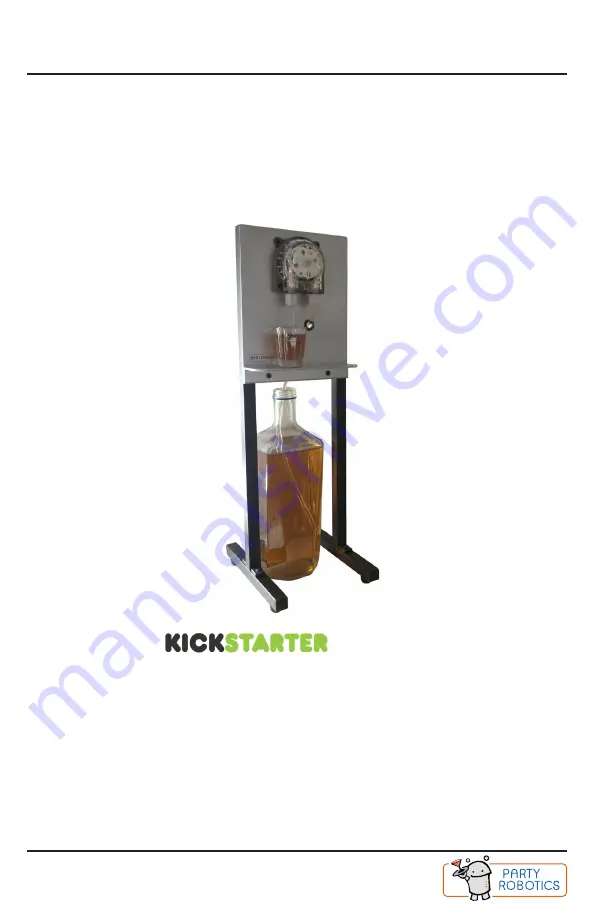
Page 3: ...t 2 B A002V1 Vertical Leg 2 C A003V1 Faceplate D M041V1 Screw 8 E T002V1 Spout F T060V1 Food Grade Tubing G M054V1 Wire Clips 4 H M080V1 Alcohol Pad I N A Dispenser Compression Nut 2 J M101V1 Chopstick tubing replacement tool K E008V1 24V 72W Power Supply with AC Power Cord 3 C E F K H G I D J ...
Page 4: ...pping it upside down and resting it on a solid surface while using both hands to push down on the foot Assembly Instructions Step 2 Attach Faceplate The protrusions from the faceplate C will fit into the large holes in the vertical legs Use the 8 screws D to attach the faceplate to the legs Note If you would like to accommodate taller shot glasses you can either cut the spout so that it is shorter...
Page 5: ...bing goes all the way through the nut and sticks out by about 1 8 on the side that says PP on it If the opening in the compression nut is too small you can use the chopstick to widen it 2 Attach the 2 inch rigid spout on the left side of ShotBot E and attach the flexible tubing on the right F 3 Tighten compression nuts so that there are only one or two threads showing 4 Feed the flexible tubing th...
Page 6: ...o clean the surface before you apply the clips G so that they stick well Remove the backing and attach where desired You may use as many or as few as you like G Step 4 Insert SD Card While looking at the back of ShotBot hold the SD card with the pins facing you and carefully insert into the slot on the back side of the Raspberry Pi board It will hang out a little bit This is okay ...
Page 7: ...wer cord from the wall first 7 Step 7 Insert Tubing into Bottle While Bartendro is booting up you can load your bottle for dispensing shots Insert the long flexible tube into an opened bottle so that it reaches the bottom You ll know Bartendro is ready when the Dispenser s lights begin to fade in and out changing color It normally takes about 1 minute after plugging power in for the system to be r...
Page 8: ...connected to the Bartendro network but the browser does not load the page you may need to change the following setting Click Start bottom left corner Type network connections and hit enter Right click on Wireless Network Connection and select properties Select Internet Protocol Version 4 and click the properties button Make sure obtain DNS server address automatically is selected Pour a Shot The m...
Page 9: ...s Add more ingredients in Admin booze drinks Ignore this tab it is only useful if there is more than one Dispenser present booze Edit and create your ingredients in this section What you save here will be displayed in the pull down menu in Admin dispensers options Customize your settings by enabling or disabling many features here Follow the instructions on screen to make your selections Some opti...
Page 10: ... press the clean button The button is located at the bottom of Admin dispensers This will run the dispenser long enough to wash out the tube Step 4 Repeat step 3 but with the glass of clean water Sanitizing solutions like Star San beer brewing sanitizer may also be used Do not use household chemicals Step 5 Finally remove the tubes from the clean water and press the clean or turn on button once mo...
Page 11: ...bes or dripping This is a sealing issue You can try tightening the compression nuts first to see if they were just too loose There should only be one or two threads visible If that doesn t fix it then the tubing might not be protruding all the way through the compression nut see page 5 for reference Main Menu doesn t allow me to pour a shot Check to make sure there is an ingredient selected and sa...
Page 12: ...ls and other guides at www partyrobotics com docs Email Us support partyrobotics com Maker Warranty We re here for you If you have made modifications to your hardware or software and are having technical issues we will be glad to attempt to resolve them with you If an item was damaged in shipping or is otherwise defective or malfunctioning please email us right away and we will do our best to make...