background image

11 

GB/IE/CY

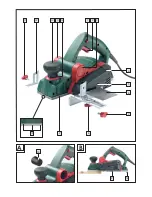
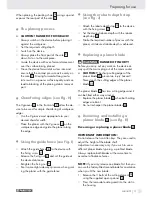
When planing, the parking shoe 

16

 swings up and 

exposes the rear part of the sole 

9

.

  The planing process


CAUTION! DANGER OF KICKBACK!

Always switch on the device before placing it 
against the workpiece.

  Set the required cutting depth.

  Switch on the device.

   Always place the front part of the sole 

9


down first on to the workpiece.

   Guide the device with even forward movement 

over the surface being planed.

   Move the device forward at a slow rate and 

ensure that the contact pressure acts evenly on 
the sole 

9

. Moving forward at too great a 

rate results in a poorer surface quality and can 
lead to blocking of the planing debris removal 
port.

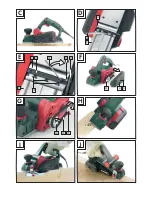
  Chamfering edges (see Fig. H)

The V-grooves 

10

 in the front sole 

9

 allow the de-

vice to be used for simple chamfering of workpiece 
edges.

   Use the V-groove most appropriate to your 

desired chamfer width.

   Place the planer with the V-groove 

10

 on the 

workpiece edge and guide the planer along 
the edge.

  Using the guide fence (see Fig. I)

   Attach the guide fence 

6

 to the device with 

the fixing screw 

7

.

   Release the fixing nut 

8

 and set the guide at 

the desired distance. 

  Retighten the fixing nut 

8

.

   Exert some slight sideways pressure when guid-

ing the planer with the guide fence.

   Using the rebate depth stop 

(see Fig. J)

   Attach the rebate depth stop 

12

 to the device 

with the fixing screw 

11

.

   Set the desired rebate depth with the rebate 

depth stop 

12

.

   Make the required number of passes with the 

planer until desired rebate depth is achieved. 

  Replacing a planer blade

WARNING!


DANGER OF INJURY!

Before you carry out any work on the device al-
ways pull the mains plug out of the mains socket.


CAUTION! 

The sharp cutting edges of the 

planer blade 

20

 present an injury hazard! 

Never touch the cutting edges of the planer 
blade 

20

.

The planer blade 

20

 has two cutting edges and it 

can be fitted either way around.

   Replace the planer blade 

20

 when both cutting 

edges are blunt.

  Do not resharpen the planer blades 

20

.

   Removing and installing a 

planer blade 

20

 (see Fig. D)

Reversing or replacing a planer blade 

20

IMPORTANT INFORMATION:

Do not release the two Allen keys. They are used to 
adjust the height of the blade shaft.
Adjustment is necessary only if you wish to use a 
different planer blade type e.g. a profiled blade.
Always replace both blades at the same time to 
avoid out of balance forces. 

NOTE:

 If you only release one blade first then you 

can use the factory-fitted second blade for orientation 
when you fit the new blade.
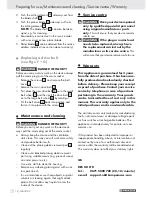
1.   Release the 3 bolts of the cutting element 

18


using the supplied open spanner 

26

.

   Press the removable side guard into the slot in 

the housing.

Preparing for use

Summary of Contents for PEH 30

Page 1: ...PEH30 ELECTRIC PLANER Operation and Safety Notes 6...

Page 2: ...GB IE CY Operation and Safety Notes Page 5 Before reading unfold the page containing the illustrations and familiarise yourself with all functions of the device...

Page 3: ...1 11 12 3 13 14 2 3 4 5 6 7 8 9 B 9 16 A 15 10...

Page 4: ...C H J 6 D 9 26 17 E 9 22 18 17 21 19 I G 23 24 25 F 5 4 23 45 20...

Page 5: ...10 Preparing for use Switching On O Page 10 Setting the cutting depth Page 10 Vacuum extraction of dust debris see Fig A Page 10 Parking shoe see Figs B C Page 10 The planing process Page 11 Chamferin...

Page 6: ...pment 1 Safety lock out 2 ON OFF switch 3 Planing debris removal port right left selectable 4 Belt cover 5 Belt cover screws 6 Guide fence 7 Guide fence xing screws 8 Fixing nut for setting rebate wid...

Page 7: ...also take into account the intervening periods of time when the device is switched o or is running but is not actually in use This can result in a much lower vibration load over the whole of the peri...

Page 8: ...s dust masks non slip safety shoes safety helmets or ear protectors appropriate to the type of elec trical power tool used and work undertaken reduces the risk of injury c Avoid unintentional operatio...

Page 9: ...jury Do not place your fingers in the planer debris removal port 3 Danger of injury from rotating parts Always switch on the device before placing it against the workpiece Oth erwise the device could...

Page 10: ...arry out any work on the device al ways pull the mains plug out of the mains socket Planing debris removal port right left selectable Release the planing debris removal port 3 by turning it against th...

Page 11: ...uide fence Using the rebate depth stop see Fig J Attach the rebate depth stop 12 to the device with the xing screw 11 Set the desired rebate depth with the rebate depth stop 12 Make the required numbe...

Page 12: ...t brush In no circumstances use sharp objects or petrol solvents or cleaning agents that might attack plastic Do not allow any liquids to enter the inside of the device Service centre WARNING Have you...

Page 13: ...transposition into national legislation worn out electrical power tools must be collected separately and taken for environmentally compatible recycling Contact your local refuse disposal authority for...

Page 14: ...IAN 37667 KOMPERNASS GMBH Burgstra e 21 D 44867 Bochum by ORFGEN Marketing Last Information Update 10 2009 Ident No PEH30102009 6 6...

Reviews: