


GB
25
a) Injuries caused by moving parts or hot
surfaces.
b) Ear damage if working without ear
protection.
c) Damage to your health caused by
swinging your hands and arms when
operating the appliance for longer pe-
riods of time or if the unit is not held or
maintained properly.
Warning! During operation, this
electric tool generates an electro-
magnetic field which, under certain
circumstances, may impair the functionality
of active or passive medical implants. To
reduce the risk of serious or lethal injuries,
we recommend that persons with medical
implants consult their doctor and the manu-
facturer of their medical implant before
operating the machine.
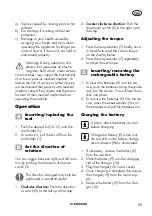
Operation
Inserting/replacing the
tool
1. Push the desired bit (12-15) onto the
tool holder (1).
2. To remove it, pull the bit off from the
tool holder (1).
Set the direction of
rotation
You can toggle between right and left rota-
tion by pushing the direction of rotation
switch (5).
The direction changed may only be
performed in standstill mode!
1.
Clockwise direction:
Push the direction-
al switch (5) to the left up to the stop.
2.
Counter-clockwise direction:
Push the
directional switch (5) to the right up to
the stop.
Adjusting the torque
1. Press the torque button (7) briefly once
to be able to read the current torque
on the display below.
2. Press the torque button (7) repeatedly
to adjust the set torque.
Inserting/removing the
rechargeable battery
1. To insert the batteries (9) into the de-
vice, push the batteries along the guide
rails into the device. you will hear them
click into place.
2. To remove the batteries (9) from the de
-
vice, press the release button (9a) on
the batteries and pull the batteries out.
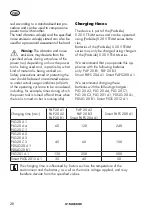
Charging the battery
If warm, allow the battery to cool
before charging.
Charge the battery (9) when only
the red LED on the battery charge
level indicator (9b) is illuminated.
1. If necessary, remove the battery (9)
from the machine.
2. Slide the battery (9) into the charging
slot of the charger (10).
3. Plug the charger (10) into a socket.
4. Once charging is complete, disconnect
the charger (10) from the mains sup-
ply.
5. Remove the battery (9) from the char
-
ger (10).
Summary of Contents for PASSK 20-Li B2
Page 96: ...96 BG 2 a e 3 a...
Page 97: ...97 BG 97 4 a...
Page 98: ...98 BG 5 a 130 C 6 a a...
Page 99: ...99 BG 99 PArkSidE Parkside X 20 V TEAM b c...
Page 100: ...100 BG 1 12 15 1 2 1 5 1 5 2 5 1 7 2 7 1 9 2 9 9a 9 9b 1 9 2 9 10 3 10 4 10 5 9 10 1 3...
Page 101: ...101 BG 101 8 2 3 16 e 10 50 100 km 1 1 2 12 15 3...
Page 102: ...102 BG 4 2 6 11 2012 19 2006 66...
Page 103: ...103 BG 103 3 ii 3...
Page 104: ...104 BG iAN 419085_2210 BG 0800 12220 info kaufland bg iAN 419085_2210...
Page 105: ...105 BG 105 20 63762 33 3 ii iii www grizzlytools shop 104 4 17mm 19mm 21mm 23mm 91105056...
Page 106: ...106...
Page 116: ...116...
Page 117: ...117...
Page 121: ...1 2 3 5 6 7 4 4 5...
Page 199: ...BG 81 81 PArkSidE X 20 V TEAM X 20 V TEAM T3 15A 130 C ii...
Page 200: ...BG 82 130 C PArkSidE...
Page 201: ...BG 83 83 Parkside X 20 V TEAM Parkside X 20 V TEAM...
Page 202: ...BG 84 Parkside X 20 V TEAM 1 4 1 2 4 3 4...
Page 203: ...BG 85 85 2 3 2 1 4 3 4 3 1 4 2 4 5 3 5 4 5 5 4 5 LEd 6 6 7 7 7 6 5 102 mm 7 9 mm...
Page 204: ...BG 86 10 mm 5 2 3 3 0 C 45 C 2012 19...
Page 205: ...BG 87 87 2006 66 3 112 115...
Page 206: ...BG 88 iAN 419085_2210...