background image

20

PHKS 1350 A1

GB
MT

 WARNING!


The arrow on the saw blade   must corre-
spond to the arrow showing the direction of 
rotation (running direction shown on the 
device).


Ensure that the saw blade   is suitable for the 
rotational speed of the tool.

Mounting/setting the guide fence


Loosen the wing screw   and insert the guide 
fence   into the guide fence slot  .


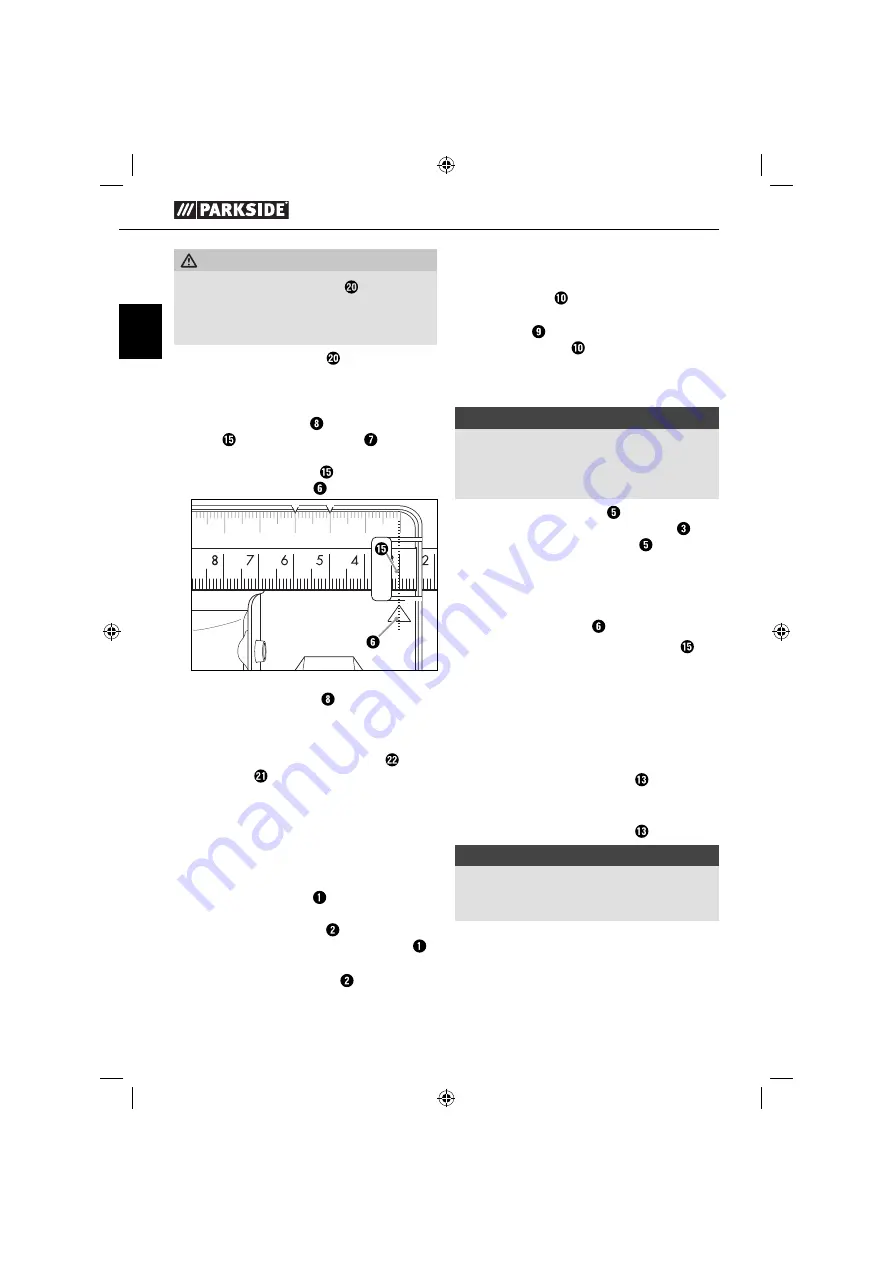
Set the desired cut width with the help of the 
scale on the guide fence   and the marking 
arrow in the base plate   (see also Fig. B).

0

45

45

Fig. B: Cutting width 3 cm


Retighten the wing screw  .

Connecting the sawdust extraction 
appliance


Attach the adapter for dust extraction   to the 
chip ejector  .


Connect an approved dust and chip extraction 
device.

Operation

Switching on and off 

Switching on:


Push the safety lock-out   to the left or right 
and keep it pressed.


Press the ON/OFF switch  . Once the saw is 
running you can release the safety lock-out  .

Switching off :


Release the ON/OFF switch  .

Setting the cutting angle

You can select the cutting angle with the help of the 
cutting angle scale  .


Release the wing screw on the cutting angle 
preselector  , set the desired angle on the 
cutting angle scale   and then re-tighten the 
wing screw.

Setting the cutting depth

NOTE


We generally recommend setting the cutting 
depth to approx. 3 mm more than the thickness 
of the material. This ensures that you achieve 
a clean cut.


Release the locking screw  , set the desired 
cutting depth on the cutting depth scale   and 
then re-tighten the locking screw  .

Working with the circular saw

1.   Switch on the device – as described in "Switching 

on and off " – and then place it with the front 
edge of the base plate   on the material.

2.   Align the machine using the guide fence   or 

by using a marked line.

3.   Hold the machine in both hands using the 

handles and saw by exerting an even pressure.

Switching the laser on and off 

Switching on:


Press the ON/OFF switch laser  .

Switching off :


Press the ON/OFF switch laser  .

NOTE


If the batteries are spent, replace them with 
two new 1.5 V alkaline button cells (type 
AG 13/LR 44, e.g. GPA 76) .

IB_36453_PHKS1350A1_LB5.indb   20

IB_36453_PHKS1350A1_LB5.indb   20

28.04.14   08:36

28.04.14   08:36

Summary of Contents for 36453

Page 1: ...CULAR SAW Translation of original operation manual SEGA CIRCOLARE Traduzione delle istruzioni d uso originali HANDKREISS GE Originalbetriebsanleitung CV_36453_PHKS1350A1_LB5 indd 2 CV_36453_PHKS1350A1...

Page 2: ...e prendere con denza con le diverse funzioni dell apparecchio Before reading unfold the page containing the illustrations and familiarise yourself with all functions of the device Klappen Sie vor dem...

Page 3: ...CV_36453_PHKS1350A1_LB5 indd 4 CV_36453_PHKS1350A1_LB5 indd 4 28 04 14 08 31 28 04 14 08 31...

Page 4: ...Montaggio sostituzione della lama 7 Montaggio regolazione della battuta parallela 8 Collegamento dell aspiratore per trucioli 8 Funzionamento 8 Accensione e spegnimento 8 Regolazione dell angolo di t...

Page 5: ...battuta parallela Vite ad alette per supporto per battuta parallela Vite ad alette per supporto per la preselezione dell angolo di taglio Scala dell angolo di taglio Arresto del mandrino Maniglia sup...

Page 6: ...e e a elettrou tensili a batteria senza cavo di rete 1 Sicurezza del luogo di lavoro a Mantenere l area di lavoro pulita e ben illumi nata Il disordine e la scarsa illuminazione del l area di lavoro p...

Page 7: ...in movimento Gli abiti ampi e pendenti gli ornamenti o i capelli lunghi possono impigliarsi nelle parti mobili g Se possibile montare aspiratori per polvere e trucioli accertarsi che siano collegati e...

Page 8: ...zi di montaggio della sega girano in modo irregolare e provocano la perdita di controllo h Non utilizzare mai lame con rondelle o viti danneggiate o non adatte Le rondelle e le viti della lama sono st...

Page 9: ...formi Aprire la cappa di protezione con l apposita leva e assicurarsi che si muova liberamente e che in tutte le angolazioni e le profondit di taglio non vada a contatto con la lama o con altre parti...

Page 10: ...pericolosa esposizione all irradiazione Accessori originali apparecchi addizionali Utilizzare solo accessori e apparecchi origi nali indicati nel manuale o il cui supporto compatibile con l apparecch...

Page 11: ...elezione dell angolo di taglio impostare l angolo di taglio desiderato sull apposita scala e serrare di nuovo la vite ad alette Impostare la profondit di taglio AVVERTENZA Si consiglia di scegliere un...

Page 12: ...acciare delle linee rispetto a una super cie liscia Per evitare con maggiore e cacia il distacco dei bordi di taglio utilizzare un legno sottile bloccato da segare insieme al materiale in lavorazione...

Page 13: ...interruttori o accumulatori Il prodotto destinato esclusivamente all uso domestico e non a quello commerciale La garanzia decade in caso di impiego improprio o manomissione uso della forza e interven...

Page 14: ...006 95 EC Compatibilit elettromagnetica 2004 108 EC Direttiva RoHS 2011 65 EU Norme armonizzate utilizzate EN 60745 1 2009 A11 EN 60745 2 5 2010 EN 62233 2008 EN 55014 1 2006 A1 A2 EN 55014 2 1997 A1...

Page 15: ...12 PHKS 1350 A1 IB_36453_PHKS1350A1_LB5 indb 12 IB_36453_PHKS1350A1_LB5 indb 12 28 04 14 08 36 28 04 14 08 36...

Page 16: ...n 19 Fitting changing the saw blade 19 Mounting setting the guide fence 20 Connecting the sawdust extraction appliance 20 Operation 20 Switching on and o 20 Setting the cutting angle 20 Setting the cu...

Page 17: ...Base plate Guide fence slot Wing screw for guide fence slot Wing screw for cutting angle preselector Cutting angle scale Spindle lock Auxiliary handle ON OFF switch laser Laser discharge opening Guid...

Page 18: ...1 Work area safety a Keep work area clean and well lit Cluttered or dark areas invite accidents b Do not operate power tools in explosive atmospheres such as in the presence of am mable liquids gases...

Page 19: ...power tool Use the correct power tool for your application The correct power tool will do the job better and safer at the rate for which it was designed b Do not use the power tool if the switch does...

Page 20: ...ety instructions for all saws Kickback causes and related warnings kickback is a sudden reaction to a pinched bound or misaligned saw blade causing an uncontrolled saw to lift up and out of the work p...

Page 21: ...e operation of the lower guard spring If the guard and the spring are not operating properly they must be serviced be fore use Lower guard may operate sluggishly due to damaged parts gummy deposits or...

Page 22: ...ry compart ment cover rmly closed CAUTION If operating and adjustment equipment is used or procedures other than those speci ed here are carried out this may result in hazardous radiation exposure Ori...

Page 23: ...n select the cutting angle with the help of the cutting angle scale Release the wing screw on the cutting angle preselector set the desired angle on the cutting angle scale and then re tighten the win...

Page 24: ...e ective method of protecting the cutting edges is to clamp a thin piece of wood along the cutting line this wood is also sawn Maintenance and Cleaning WARNING RISK OF INJURY Switch the appliance o an...

Page 25: ...to fragile components such as switches or batteries This appliance is in tended solely for private use and not for commercial purposes The warranty is deemed void if this product has been subjected t...

Page 26: ...C EMC Electromagnetic Compatibility 2004 108 EC RoHS Directive 2011 65 EU Applied harmonised standards EN 60745 1 2009 A11 EN 60745 2 5 2010 EN 62233 2008 EN 55014 1 2006 A1 A2 EN 55014 2 1997 A1 A2 E...

Page 27: ...24 PHKS 1350 A1 IB_36453_PHKS1350A1_LB5 indb 24 IB_36453_PHKS1350A1_LB5 indb 24 28 04 14 08 36 28 04 14 08 36...

Page 28: ...kreiss gen 29 Originalzubeh r zusatzger te 31 Inbetriebnahme 31 S geblatt montieren wechseln 31 Parallelanschlag montieren einstellen 32 Spanabsaugung anschlie en 32 Bedienung 32 Ein und ausschalten 3...

Page 29: ...tschl ssel SW 6 Feststellschraube Grundplatte Parallelanschlagaufnahme Fl gelschraube f r Parallelanschlagaufnahme Fl gelschraube f r Schnittwinkelvorwahl Schnittwinkelskala Spindelarretierung Zusatzg...

Page 30: ...betriebene Elektrowerkzeuge mit Netzkabel und auf akkube triebene Elektrowerkzeuge ohne Netzkabel 1 Arbeitsplatz Sicherheit a Halten Sie Ihren Arbeitsbereich sauber und gut beleuchtet Unordnung und un...

Page 31: ...cheren Stand und halten Sie jederzeit das Gleichgewicht Dadurch k n nen Sie das Elektrowerkzeug in unerwarteten Situationen besser kontrollieren f Tragen Sie geeignete Kleidung Tragen Sie keine weite...

Page 32: ...orgene Stromleitungen oder das eigene Netzkabel tre en kann Kontakt mit einer span nungsf hrenden Leitung setzt auch die Metall teile des Elektrowerkzeugs unter Spannung und f hrt zu einem elektrische...

Page 33: ...n kann sich das S geblatt verklemmen und ein R ckschlag auftreten g Seien Sie besonders vorsichtig beim S gen in bestehende W nde oder andere nicht einsehbare Bereiche Das eintauchende S ge blatt kann...

Page 34: ...e Knopf zellen vom Typ AG 13 LR 44 z B GPA 76 gem Polung ein und schrauben Sie die Abde ckung des Batteriefachs wieder fest VORSICHT Wenn andere als die hier angegebenen Bedie nungs oder Justiereinric...

Page 35: ...Sie k nnen den Schnitt Winkel mit Hilfe der Schnitt Winkelskala bestimmen L sen Sie die Fl gelschraube der Schnitt Winkel vorwahl stellen Sie den gew nschten Winkel an der Schnitt Winkelskala ein und...

Page 36: ...einer glatten Ober che Noch wirkungsvoller vermeiden Sie ein Ausrei en der Schnittkante durch ein aufge spanntes d nnes Holz das mitges gt wird Wartung und Reinigung WARNUNG VERLETZUNGSGEFAHR Schalten...

Page 37: ...den privaten und nicht f r den gewerblichen Gebrauch bestimmt Bei missbr uchlicher und unsachgem er Behandlung Gewaltanwendung und bei Eingri en die nicht von unserer autorisierten Service Niederlassu...

Page 38: ...ktromagnetische Vertr glichkeit 2004 108 EC RoHS Richtlinie 2011 65 EU Angewandte harmonisierte Normen EN 60745 1 2009 A11 EN 60745 2 5 2010 EN 62233 2008 EN 55014 1 2006 A1 A2 EN 55014 2 1997 A1 A2 E...

Page 39: ...36 PHKS 1350 A1 IB_36453_PHKS1350A1_LB5 indb 36 IB_36453_PHKS1350A1_LB5 indb 36 28 04 14 08 36 28 04 14 08 36...

Page 40: ...7 BOCHUM DEUTSCHLAND GERMANY www kompernass com Versione delle informazioni Last Information Update Stand der Informationen 04 2014 Ident No PHKS1350A1 122013 2 CV_36453_PHKS1350A1_LB5 indd 1 CV_36453...

Reviews: