


Page 144
– Bulletin 100-50-9.1
21.6 CONFIGURING CONTROLLER IP
ADDRESS AND SUBNET MASK
Each S3C Case Control is supplied from Sporlan with a
unique IP address by default. If your installation utilizes an
addressing scheme that necessitates changing this address,
perform the following procedure. Take care to note the
configured custom IP address in order to ensure the ability
to communicate with the controller via the Ethernet port
subsequent to the change. To avoid the possibility of IP
address conflicts, any third part controllers on the network
can use the address ranges 10.64.x.x. The factory IP range of
the Sporlan S3C Case Control is 10.0.0.1 thru 10.63.255.255
Note: The default address noted on the unit label can
be reloaded by performing a Factory Reset.
For immediate assistance, Technical Support can be
reached at the following: Toll-Free: 888-920-6284
From the
default
display, press the
button. The display
will show
.
9. Use the
▲▼
buttons to enter the
administrator
password and press
SET.
10. The display will show
.
11. Press
SET
to enter the
sub-menu. The display will
show
(Process Values).
12. Press the
▼
button repeatedly until
is displayed.
13. Press
SET
to enter the Network Configuration
sub-menu.
14. Press the
▲
button repeatedly until
1
is displayed.
15. Press SET button and then
▲▼
buttons to change IP
Address Octet 1.
16. Use the
▲
button and the SET button to navigate
through
1 -4
and Subnet Mask
1 -4
.
17. Press the
ESC
button 3 times to revert to the
default
display.
21.5 VIEWING CONTROLLER IP ADDRESS
Viewing of the S3C Case Controller’s current IP address and
IP Subnet Mask is navigated in a similar manner as setting
the IP parameters.
1. From the
Default
display, press the
button. The
display will show
.
2. Use the
▲▼
buttons to enter the
technician
password
and press
SET.
3. The display will show
.
4. Press
SET
to enter the
sub-menu. The display will
show
(Process Values).
5. Press the
▼
button repeatedly until
is displayed.
6. Press
SET
to enter the Network Configuration sub-
menu.
7. Press the
▲
button repeatedly until
1
is displayed.
8. Use the
▲
button and the
SET
button to navigate
through
1 -4
and Subnet Mask
1 -4
.
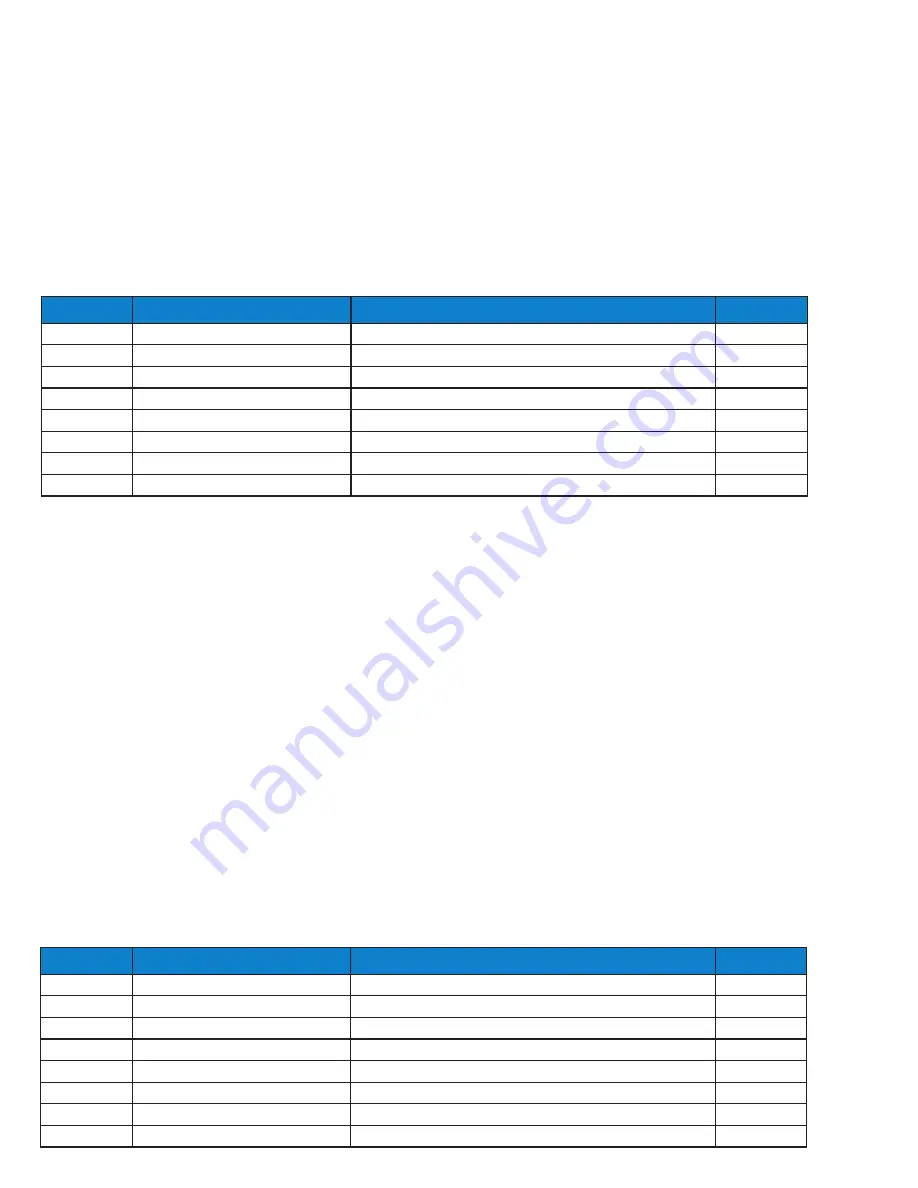
Display
Meaning
Description
Selections
1
IP Address Octet 1
NNN.XXX.XXX.XXX
- 254
2
IP Address Octet 2
XXX.NNN.XXX.XXX
- 254
3
IP Address Octet 3
XXX.XXX.NNN.XXX
- 254
4
IP Address Octet 4
XXX.XXX.XXX.NNN
- 254
1
Subnet Mask Octet 1
NNN.XXX.XXX.XXX
- 255
2
Subnet Mask Octet 2
XXX.NNN.XXX.XXX
- 255
3
Subnet Mask Octet 3
XXX.XXX.NNN.XXX
- 255
4
Subnet Mask Octet 4
XXX.XXX.XXX.NNN
- 255
TABLE 19 – IP ADDRESS PARAMETERS
Display
Meaning
Description
Selections
1
IP Address Octet 1
NNN.XXX.XXX.XXX
- 254
2
IP Address Octet 2
XXX.NNN.XXX.XXX
- 254
3
IP Address Octet 3
XXX.XXX.NNN.XXX
- 254
4
IP Address Octet 4
XXX.XXX.XXX.NNN
- 254
1
Subnet Mask Octet 1
NNN.XXX.XXX.XXX
- 255
2
Subnet Mask Octet 2
XXX.NNN.XXX.XXX
- 255
3
Subnet Mask Octet 3
XXX.XXX.NNN.XXX
- 255
4
Subnet Mask Octet 4
XXX.XXX.XXX.NNN
- 255


