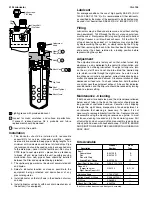
Check Ball
(Dip Tube)
Fill
Plug
Button Head
Fill Fitting
L105 Lubricator
IS-L105
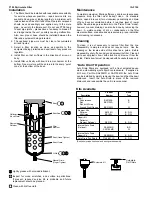
Installation
1. The lubricator should be installed with reasonable
accessibility for service whenever possible – repair
service kits are available. Keep pipe or tubing lengths to a
minimum with inside clean and free of dirt and chips. Pipe
joint compound should be used sparingly and applied only
to the male pipe – never into the female port. Do not use
PTFE tape to seal pipe joints – pieces have a tendency
to break off and lodge inside the unit, possibly causing
malfunction. Also, new pipe or hose should be installed
between the filter and equipment being protected.
2. The upstream pipe work must be clear of accumulated dirt
and liquids.
3. Select a lubricator location as close as possible to the
equipment being protected and downstream of any
pressure regulator.
4. Install lubricator so that air flows in the direction of arrow
on body.
5. Install lubricator vertically with bowl drain mechanism at
the bottom (if so equipped).
Lubricant
For average conditions, the use of high quality SAE #10 (S.U.V.
150-200 SEC @ 100°F) oil is recommended. Other lubricants,
as specified by the maker of the equipment to be lubricated, may
be used if not heavier than SAE #40 (S.U.V. 800 SEC @100°F).
Filling
Lubricators may be filled under pressure, and without shutting
down equipment. To fill through the fill port, a long spout oil can
must be used. Slowly remove fill plug and tip of spout to bottom
of fill port recess or oil blow back will occur. Fill to within 1/4"
of top of bowl using correct oil. Lubricators may also be filled
by depressurizing the system, or slowly removing the fill plug
and then removing the bowl. After bowl has been filled, replace
and ensure it has been returned to a locking position before
repressurizing the system.
Adjustment
The adjustment knob is factory set so that, when turned fully
clockwise, no oil is delivered to the venturi for atomization, and
equipment is not being lubricated. To adjust oil drip rate, turn
on the air, start flow and set knob to obtain the desired drip
rate, which is visible through the sight dome. As a start, one to
two drops per minute is suggested, correct lubrication being a
matter of experience and demand. Clockwise rotation of knob
decreases oil feed rate. To check lubrication, hold thumbnail
or a mirror near the equipment exhaust. A heavy film indicates
over-lubrication and the drip rate should be reduced by turning
knob to a lower setting.
Maintenance - Cleaning
If both air and oil are kept clean, and the oil level never allowed
below end of tube in the bowl, the lubricator should provide
long periods of unattended service. Cessation of oil dripping
through the sight dome, irrespective of knob adjustment, is
an indication that cleaning is necessary. To clean, it is not
necessary to remove lubricator from the line. Depressurize and
disassemble using the drawing on reverse as a guide. In most
instances, cleaning is needed only in the oil metering area. Pull
off adjusting knob, unscrew sight dome assembly, remove inner
drip spout and clean with household soap. PLASTIC BOWLS
AND SIGHT DOME MUST BE CLEANED WITH HOUSEHOLD
SOAP ONLY.
Dip Tube
Bowl Seal
Bowl
(Hand Tighten)
Body
Adjustment
Knob
Sight
Dome
Bowl Guard
Kits Available
Product
Bowl
Description
Number
Type
Bowl*
Polyurethane
BKL105B
B
Zinc
BKL105D
D
Zinc with Wrap
Around Sight Gauge
BKL105W
W
Bowl Seal (In Bowl Kits)
GSK-F105-1015
—
Repair Kit
Tamper-resistant
RKL100
B, D, W
Sight Dome Repair Kit
Adjusting Knob
L100-0726P
—
Button Head Fill Fitting
SAA606C109-1
—
Fill Plug
SA606B4
—
Check Ball (Dip Tube)
606X106
—
*Bowl kits include bowl seal and bowl guard assembly.
Lightly grease with provided lubricant.
Inspect for nicks, scratches, and surface imperfections.
If present, reduced service life is probable and future
replacement should be planned.
Clean with lint-free cloth.


