


Initial Startup and Configuration
3-8
7976-A2-GB20-10
August 1998
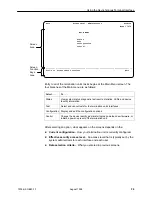
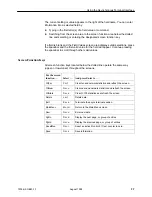
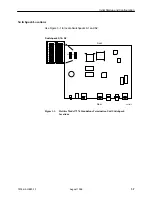
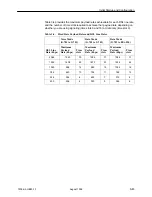
Switchpack Definitions
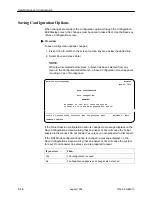
Manually change configuration options by moving Switchpack S1 DIP switches
on the card. Table 3-1 lists Switchpack S1 definitions.
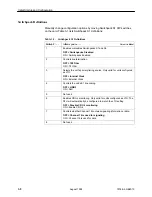
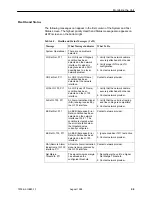
Table 3-1.
Switchpack S1 Definitions
Switch # . . .
Allows you to . . .
Default in Bold
1
Enables or disables Switchpacks S1 and S2.
OFF = Switchpacks Disabled
ON = Switchpacks Enabled
2
Controls line termination.
OFF = 120 Ohm
ON = 75 Ohm
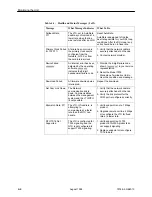
3
Selects the unit’s primary timing source. Only valid for units configured
as LTU.
OFF = Internal Clock
ON = External Clock
4
Controls the unit’s E1 line coding.
OFF = HDB3
ON = AMI
5
Not used
6
Enables CRC-4 monitoring. Only valid for units configured as LTU. The
NTU will automatically be configured to match the LTU setting.
OFF = Disable CRC-4 monitoring
ON = Enable CRC-4
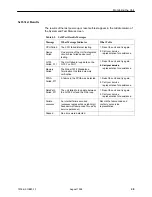
7
Controls whether Channel 16 contains signaling information or data.
OFF = Channel 16 is used for signaling
ON = Channel 16 is used for data
8
Not used
Summary of Contents for Hotwire 7976
Page 56: ...Monitoring the Unit 4 14 7976 A2 GB20 10 August 1998 This page intentionally left blank...
Page 66: ...Testing 5 10 7976 A2 GB20 10 August 1998 This page intentionally left blank...
Page 78: ...Security 7 6 7976 A2 GB20 10 August 1998 This page intentionally left blank...
Page 104: ...Standards Compliance for SNMP Traps B 6 7976 A2 GB20 10 August 1998...
Page 112: ...Technical Specifications D 2 7976 A2 GB20 10 August 1998...