background image

Using Access Control

8

22 

EVOHD User Manual

Using Access Control

8  

8.1 Entering & Exiting

Depending on how your system is installed and on the type of keypad, there are various ways to enter and exit 
Access Control doors:

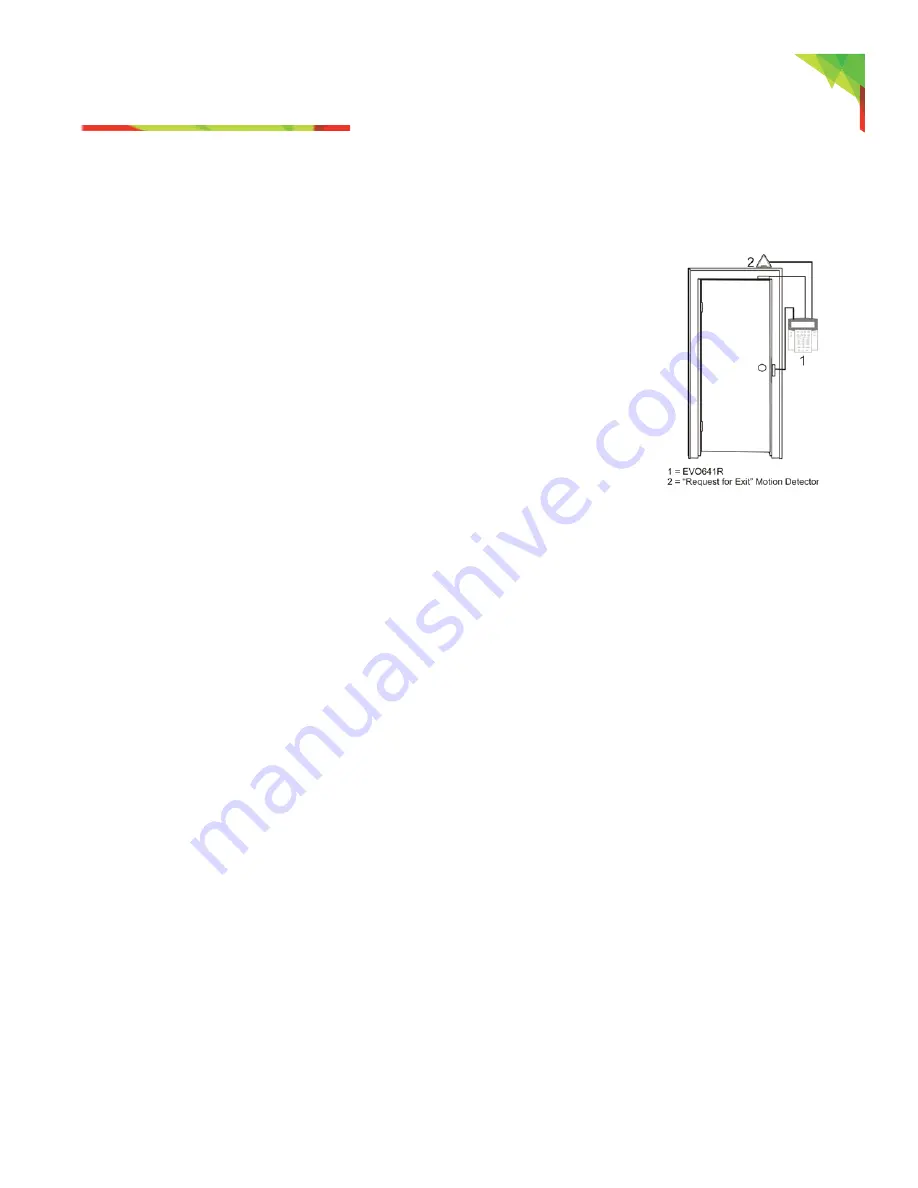
• Present your Access Control card to the reader or the EVO641R or DGP2-641RB 

keypad. The system will verify that the card is allowed access according to its 
assigned Access Level and Schedule. If it is accepted, the system will unlock the 
door. The reader’s light can be programmed by the installer to turn green or 
extinguish briefly to indicate that the door can be opened.

• When the motion detector detects movement (Request for Exit), it will unlock the 

door to permit passage from inside. 

• Enter your user access code on the keypad and press 

[

ACC

]

.

• If the Access Control door is on a “Door Unlocked Schedule”, you may be able to 

open Access Control doors without using a user access code or an Access Control 
card. Depending on the door’s programming, the door can remain unlocked 
during the entire programmed schedule or the door can unlock once a valid 
Access Control card is presented to the reader during the schedule and then will 
remain unlocked for the remainder of the schedule. 

8.2 Arming and Disarming with Card

8.2.1 Arming with Card

• presented to a door during its assigned Schedule (refer to step 8 in 

section 7.5.1

).

• presented to a door within its assigned Access Level (refer to step 8 in 

section 7.5.1

).

• programmed to allow arming (options 

[4]

 and

 [5]

 in (see 

section 7.7)

.

• assigned to all areas that are assigned to the Access Control door (refer to step 7 in 

section 7.5.1

), or assigned 

to at least one of the areas assigned to the Access Control door depending on how your installer has 
programmed the Access Control door.

8.2.2 Disarming with Card

To disarm and unlock an Access Control door when the area assigned to it is armed, present your Access Control 
card to the reader or EVO641R / DGP2-641RB keypad (door). The Access Control card must be:
• presented to a door during its assigned Schedule (refer to step 8 in 

section 7.5.1

).

• presented to a door within its assigned Access Level (refer to step 8 in 

section 7.5.1

).

• programmed to allow disarming (option 

[2]

 in (see 

section 7.7)

.

• assigned to all areas that are assigned to the Access Control door (refer to step 7 in 

section 7.5.1

), or assigned 

to at least one of the areas assigned to the Access Control door depending on how your installer has 
programmed the Access Control door.

8.3 How Access Control Works

To illustrate how Access Control functions, we will use three simple Access Control System examples:

Summary of Contents for EVOHD

Page 1: ...EVOHD User Guide Revision 1 1 www paradox com ...

Page 2: ...ts approvals such as UL and CE please visit www paradox com Note Note This hardware or software product product s and its related documentation are provided by paradox securities for use complying with all local national and international laws Any express or implied warranties including but not limited to the implied warranties of merchantability fitness for a particular purpose and non infringeme...

Page 3: ...dback 8 3 1 Other Indicators 8 Chapter 4 Partitioned System 9 4 1 Area Display 9 Chapter 5 Arming 10 5 1 Exit Delay Timer 10 5 2 Regular Arming 10 5 3 Stay Arming 10 5 4 Instant Arming 10 5 5 Force Arming 10 5 6 Bypass Programming 11 5 7 Keyswitch Arming 12 5 8 Auto Arming 12 Chapter 6 Disarming 14 6 1 Entry Delay Timer 14 6 2 Disarming an Armed System 14 6 3 Alarm Memory Display 14 Chapter 7 Acce...

Page 4: ...9 2 Event Record Display 25 Chapter 10 Additional Features 26 10 1 Programmable Outputs PGMs 26 10 2 Keypad Settings 26 10 3 Setting Time Date 26 10 4 Programming Chime Zones 27 10 5 Panic Alarms 27 10 6 Quick Function Buttons 27 Chapter 11 VDMP3 Plug In Voice Dialer 29 11 1 Calling the VDMP3 outside line 29 11 2 Receiving a Call From the VDMP3 alarm in system 29 Chapter 12 Testing and Maintenance...

Page 5: ...Pad TM50 34 14 1 Touchpad Main Screen 34 14 2 Touchpad Security Functions 35 14 3 Touchpad Control Devices 35 14 4 Touchpad Add on Functions 35 14 5 Touchpad Personalize 36 14 6 Touchpad User Codes 36 14 7 Touchpad Advanced Functions 37 14 8 Touchpad System Security 37 AppendixA 38 Hebrew Special Characters 38 AppendixB 39 Russian Special Characters 39 AppendixC 40 Greek Special Characters 40 Inde...

Page 6: ...fferently depending on the keypad you have selected The 32 character screen on LCD keypads will display messages and menus to guide you through the system s operations Your installer can even customize the messages on keypads for your home or business Since you can communicate your instructions to your system through the keypad please read this manual carefully and have your installer explain basi...

Page 7: ...ad Basic Overview 2 3 Auditory Feedback Beep Tones When you enter information on the keypad the keypad will guide you with beep tones to communicate the acceptance or rejection of your entries Confirmation Beep When an operation i e arming disarming is successfully entered or when the system switches to a new status mode the keypad emits an intermittent beep tone BEEP BEEP BEEP BEEP BEEP Rejection...

Page 8: ... correct status 3 1 Other Indicators Table 1 Full Force Arming Indicators Action LED Sequence Auditory Sequence Disarming Green on TWO BEEPS Exit delay Red green slow flash CONFIRMATION BEEP Arming Entry Delay Red on CONFIRMATION BEEP Alarm Red fast flash ALARM BEEP Table 2 Stay Arming Indicators Action LED Sequence Auditory Sequence Disarming Green on TWO BEEPS Exit delay Yellow green slow flash ...

Page 9: ...use the and buttons and press ENTER when the area you want to view appears on the screen 3 Press CLEAR to exit In Area Status Display mode the following information will scroll on the LCD screen ready if all zones in the selected area are closed not ready if zones in the selected area are open Front Door Open if there is an open zone within that area Trouble s section 9 if a trouble has occurred A...

Page 10: ...r to section 4 1 5 3 Stay Arming Stay arming will partially arm your system to permit you to remain in your home or office by arming the outer zones perimeter of the protected area i e doors and windows To Stay arm 1 Enter your ACCESS CODE 2 Press the STAY button 3 If you have access to more than one area select the area s you wish to Stay arm refer to section 4 1 5 4 Instant Arming This feature i...

Page 11: ...ne 4 Repeat step 3 until all zones you want to bypass have been selected 5 Press the ENTER button to save and exit To view all bypassed zones 1 Enter your ACCESS CODE 2 Press the BYP button 3 Scroll through the zones using the and buttons to view zone status LCD Keypads NOTE In order to bypass a zone the following conditions must be met The zone must have the Bypass option programmed by your insta...

Page 12: ...automatically 5 8 1 Timed Auto Arming Your installer can set Timed Auto Arming to function in either Force or Stay arming mode A sixty second default value Exit Delay sequence will begin prior to your system automatically arming itself at the programmed time To set the Auto Arming timer 1 Enter your ACCESS CODE 2 Press the 0 button 3 Press the MEM button 4 If you have access to more than one area ...

Page 13: ...system can be programmed to send a report to your monitoring station and or arm the system if there is no activity in the area during a specified period of time Your installer can set No Movement Auto Arming to function in either Regular or Stay arming mode ...

Page 14: ... To disarm a system in alarm 1 Enter your ACCESS CODE 2 In the case of a false alarm call your monitoring station quickly to advise them of the false alarm WARNING In the case of a burglar alarm leave the premises and call the Police from a safe location 6 3 Alarm Memory Display When an alarm occurs in a zone The area and zone i e Alarm Area 1 Front Door are displayed zone s LED flashes even when ...

Page 15: ...STEM MASTER CODE Default 1234 for 4 digit code 123456 for 6 digit code 2 Press the 0 button 3 Press the ACC button 4 Enter the numbers 001 5 Enter a NEW CODE 6 Press the ENTER button to save and CLEAR to exit WARNING The System Master Code has access to all Access Control doors and all Access Control features at all times Only the card s serial number and the choice of arming method can be changed...

Page 16: ...et to User Label 5 Type the desired characters as detailed in section 7 3 1 and section 7 3 2 6 Press the button to move the cursor to forward 7 Press the button to move the cursor to back 8 Repeat steps 2 and 3 until the desired label is complete 9 Press the ENTER button to save and exit 7 3 1 Keypad Buttons Every numeric button on the LCD keypads is assigned a set of letters To obtain the desire...

Page 17: ...vice versa Numeric Keys 0 to 9 represent numbers 0 to 9 BYP Lower Case Upper Case Every time the BYP key is pressed it will toggle the case setting from lower to upper case and vice versa MEM Special Characters After pressing the MEM key the cursor will turn into a flashing black square Using Table 6 on page 18 enter the 3 digit number that represents the desired symbol If using a Hebrew keypad se...

Page 18: ...they are assigned to For example if a User with the Master feature is assigned User Option 1 and Area 2 they can only assign Option 1 and Area 2 to a user access code 032 048 064 080 096 112 128 144 160 176 192 208 224 240 033 049 065 081 097 113 129 145 161 177 193 209 225 241 034 050 066 082 098 114 130 146 162 178 194 210 226 242 035 051 067 083 099 115 131 147 163 179 195 211 227 243 036 052 0...

Page 19: ...TE If no area is assigned and if PGMs are programmed by your installer the user can only control the PGMs Refer to section 10 1 for a more detailed explanation of PGMs User Options see section 7 7 User Labels on page 16 Notes For a detailed description of the User Options see section 7 6 By default all users can regular arm the system ...

Page 20: ...rm When the option is OFF the user can either arm or disarm assigned areas Option 6 Stay Instant Arm When option 6 is ON the Stay and Instant arm features are enabled The user can now Stay or Instant arm their assigned areas Option 7 Force Arm When option 7 is ON the Force arm feature is enabled The user can now Force arm their assigned areas Option 8 Area Access When option 8 is ON the keypad wil...

Page 21: ...ption 6 is ON the Schedule Tolerance Window feature is enabled This feature extends a user s scheduled access period through an Access Control door by the amount programmed by your installer For example if the user s assigned schedule for the door is Monday to Friday from 9 00 a m to 5 00 p m and your installer sets the Tolerance Window at one hour the user with the Schedule Tolerance Window enabl...

Page 22: ...of the schedule 8 2 Arming and Disarming with Card 8 2 1 Arming with Card presented to a door during its assigned Schedule refer to step 8 in section 7 5 1 presented to a door within its assigned Access Level refer to step 8 in section 7 5 1 programmed to allow arming options 4 and 5 in see section 7 7 assigned to all areas that are assigned to the Access Control door refer to step 7 in section 7 ...

Page 23: ...t 3 at 3 00 p m she will gain access to the room Figure 4 Example B If Bonnie presents her card to the reader or the EVO641R DGP2 641RB keypad on Door 02 on Saturday or on a Holiday at 3 00 p m she will be denied access Figure 5 Example C If we change Bonnie s Access Level to 02 and she presents her card to the reader or the EVO641R DGP2 641RB keypad on Door 02 on Tuesday August 3 at 3 00 p m she ...

Page 24: ...ler immediately to have your system serviced 9 1 1 Group 1 System 1 AC Failure The control panel has detected a power failure This means that your system is running on the backup battery If this trouble occurs when your establishment is not experiencing a power failure call your installer for repairs 2 Battery Trouble The backup battery is disconnected needs to be recharged or replaced 5 Bell Abse...

Page 25: ...ons that occurred in your system as well as any alarms or troubles i e Access Granted You will only be able to view the events that occurred in the area s assigned to your user access code Only available on LCD keypads To view the Event Record 1 Enter your MASTER CODE 2 Press the 7 button or scroll to view events 3 If you have access to more than one area select the area s you wish to view 4 Use t...

Page 26: ...pear on the screen Figure 6 Modifying LCD screen settings on LCD Keypads 10 3 Setting Time Date To reset the time and date 1 Enter your ACCESS CODE and press the TRBL button 2 Press the 8 button Press 6 Press 1 Scrolling speed Choose a number from 0 to 10 10 is the slowest Press 2 Backlight Choose a number from 0 to 7 7 is the brightest Press 3 Contrast Choose a number from 0 to 4 4 has the most c...

Page 27: ...s the 2 button to set the time period a chimed zone will beep Enter the time that the chimed zone s will start beeping when opened HH MM Enter the time that the chimed zone s will stop beeping when opened HH MM 4 Press CLEAR to exit chime programming 10 5 Panic Alarms Your system can be programmed to send an alarm to your monitoring station to request help from the police a medical facility the fi...

Page 28: ... your ACCESS CODE 2 Press the 0 button 3 Press the STAY to send a test report to the monitoring station FORCE to call the WinLoad software ARM to answer the WinLoad software DISARM to cancel communication with the WinLoad software ...

Page 29: ...in the time limit set by your installer 4 When the VDMP3 answers the line you are prompted to enter your access code 5 Options are given to arm disarm 1 and control features PGMs 2 If your outside line is not connected to an answering machine 1 From an outside line dial the telephone number to which the VDMP3 is connected 2 When the VDMP3 answers the line you are prompted to enter your access code...

Page 30: ...30 EVOHD User Manual ...

Page 31: ... Under normal use your system requires no maintenance other than regular testing We recommend that your installer change the battery every three years 12 4 System Test Speak to your installer before conducting a System Test since the system must be programmed to respond to the test instructions It is normally recommended that you conduct the system test once a week but contact your installer for i...

Page 32: ...thin 30 seconds of the alarm 2 Clear the problem from the area i e clear the smoke from around the smoke detector 3 If the problem remains after 90 seconds the alarm will sound again Press CLEAR again 4 The system will delay reporting the alert for another 30 seconds NOTE If you are unable to cancel the false alarm your system will send an alert Call your monitoring station to advise them of the f...

Page 33: ...ires 13 5 Home Fire Warning System Household fires are especially dangerous at night Fires produce smoke and deadly gases that can overcome occupants while they sleep To warn against fire install smoke detectors outside each separate sleeping area in the immediate vicinity of the bedrooms and on each additional story of the family living unit including basements 13 6 Burglar Alarm If your armed sy...

Page 34: ...gs Main screen direct access Security Functions Control Devices Add ons Personalize User codes Advanced System Settings The touchpad home screen has the following control options directly from the home screen 14 1 Touchpad Main Screen Figure 8 Main Screen Direct Access The Areas button and Panic button need to be added to the home screen by your installer The slide show is accessed with the icon o...

Page 35: ... Security Functions Arm Disarm Bypass Zones Select Arming Method Select Zone ViewSystem Status View Areas View Zones Zone Chiming Select Zone Chime Period Chime Trigger View Troubles View Alarm Memory View Event Log Auto Arm Home Screen Control Devices Smoke Reset Utility Keys 1 to 8 Utility Keys 1 to 8 Utility Keys 1 to 8 Home screen Menu Add on SpotOn Locator One Screen Monitoring Home screen Me...

Page 36: ...13 User Codes Personalize Alarm Clock Languages Slide Show Area Zone Labels Home Page Select the language Set alarm Day and time Home Page Type Default Residential Title Bar Info Set Time Date Show Hide Temperature measurement Home screen Menu User Codes Add User Edit User Delete User Home screen Menu ...

Page 37: ...en Menu Advanced Product info Special Functions Calibrate Screen SMS setup Calibrate sensors upgrade Send test Report Stop Communication Call PC software Answer PC Software System Settings Time Date Display Settings Clean Screen Volume Mute Permissions Zone Chiming Warning Sounds Area zone labels Control Devices Customize home page Home screen Menu ...

Page 38: ...5 241 034 050 066 082 098 114 162 178 194 210 226 242 035 051 067 083 099 115 163 179 195 211 227 243 036 052 068 084 100 116 164 180 196 212 228 244 037 053 069 085 101 117 165 181 197 213 229 245 038 054 070 086 102 118 166 182 198 214 230 246 039 055 071 087 103 119 167 183 199 215 231 247 040 056 072 088 104 120 168 184 200 216 232 248 041 057 073 089 105 121 169 185 201 217 233 249 042 058 07...

Page 39: ... 225 241 034 050 066 082 098 114 162 178 194 210 226 242 035 051 067 083 099 115 163 179 195 211 227 243 036 052 068 084 100 116 164 180 196 212 228 244 037 053 A069 085 101 117 165 181 197 213 229 245 038 054 070 086 102 118 166 182 198 214 230 246 039 055 071 087 103 119 167 183 199 215 231 247 040 056 072 088 104 120 168 184 200 216 232 248 041 057 073 089 105 121 169 185 201 217 233 249 042 05...

Page 40: ...50 066 082 098 114 130 146 162 178 194 210 226 242 019 035 051 067 083 099 115 131 147 163 179 195 211 227 243 020 036 052 068 084 100 116 132 148 164 180 196 212 228 244 021 037 053 A069 085 101 117 133 149 165 181 197 213 229 245 022 038 054 070 086 102 118 134 150 166 182 198 214 230 246 023 039 055 071 087 103 119 135 151 167 183 199 215 231 247 024 040 056 072 088 104 120 136 152 168 184 200 ...

Page 41: ... 21 Can Disarm with Access Card 20 Card to Unlock and Code to Disarm 21 Code Follows Schedule 21 Extended Unlocked Period 21 Add Tolerance Window to User Schedule 21 Alarm Clock 36 Alarm memory 35 Alarm Memory Display 14 Alarm Testing 31 Ambulance 34 Area Access in User Options 20 Area Display 9 Arm 34 35 Arming Automatic Arming 12 Force Arming 10 Instant Arming 10 Keyswitch Arming 12 Regular Armi...

Page 42: ...htness 37 Burglar Alarms 33 Buttons One Touch 12 Quick Function 27 Bypass 34 Bypass Recall 11 Programming 11 Bypass zone 35 C Card Access Control Arming with 22 Disarming with 22 Characters Special 18 Chime Zones 27 Chiming 35 Clean screen 37 Clock 36 Clock Set Time and Date 26 Code Follows Schedule 21 Configuration permissions 37 Copy User Options 15 D Date Set Keypad 26 Date Set Touchpad 37 Deac...

Page 43: ...7 Duress in User Options 20 E Emergency Buttons 27 Entering and Exiting Access Control Doors 22 Entry Delay Timer 14 Erasing User Access Codes 18 Event log 35 Event Record Display 25 Events 34 Exit Delay Timer 10 Extended Unlocked Period 21 F Fire 34 Delayed Fire Zone 32 Minimizing Home Fire Hazards 33 Safety Tips 32 Standard Fire Zone 32 Warning System 33 Fire Alarm Testing 31 Force Arming 10 H H...

Page 44: ...elect language 36 Log 34 Log for events 35 M Master Code 15 Master Feature in User Options 20 Memory alarm 35 Memory of alarms 34 Monitoring 35 Mute 37 N No Movement Auto Arming 13 O One Screen Monitoring 35 One Touch Button for the DGP 641BL RB and the DGP 648 12 One Touch buttons 12 Outputs Programmable PGM 26 P Panel brightness 37 Panic Alarms 27 Panic button 34 Permissions to configure touchpa...

Page 45: ... Recall Bypassed Zones 11 Regular Arming 10 Request for Exit 22 S Safety Tips Fire 32 Schedule Code Follows 21 Schedule Tolerance Window see Add Tolerance to User Schedule Set date 36 Set Time 36 Set Time and Date 36 37 Siren Disconnected 24 Slide Show 34 36 Slides 34 Smoke detector 35 Smoke detector reset 35 Special Characters 18 Special Characters Greek 40 Special Characters Hebrew 38 Special Ch...

Page 46: ... Timer Entry Delay 14 Exit Delay 10 Touchpad Add ons 35 Touchpad Advanced Functions 37 touchpad brightness 37 Touchpad Control Devices 35 Touchpad main screen 34 Touchpad Personalize 36 Touchpad Reset Smoke Detector 35 Touchpad rest smoke detector 35 Touchpad Security functions 35 Touchpad System Security 37 Touchpad User Codes 36 Trouble AC Failure 24 Battery 24 Bell Siren Disconnected 24 Clock 2...

Page 47: ...cess Control see Access Control User Options Area Access 20 Arm Only 20 Bypass 20 Copy 15 Duress 20 Force Arm 20 Master Feature 20 Programming 20 Stay Instant Arm 20 User Settings 19 V VDMP3 Plug In Voice Dialer 29 View memory 35 View Status 35 View troubles 35 Viewing Alarms In Memory 14 User Actions in Memory 25 Volume 37 Z Zone Chiming 35 Zone Labels 36 Zones 34 ...

Page 48: ... 00 a m to 8 00 p m EST You may also e mail us at support paradox com Additional information can be found at PARADOX COM Printed in Canada EVOHD EU00 The whole Paradox team wishes you a successful and easy installation We hope this product performs to your complete satisfaction Should you have any questions or comments please contact us For support please contact your local distributor or dial 1 4...

Reviews: