53
5. Wireless network setup (applicable to Wi-Fi
models)
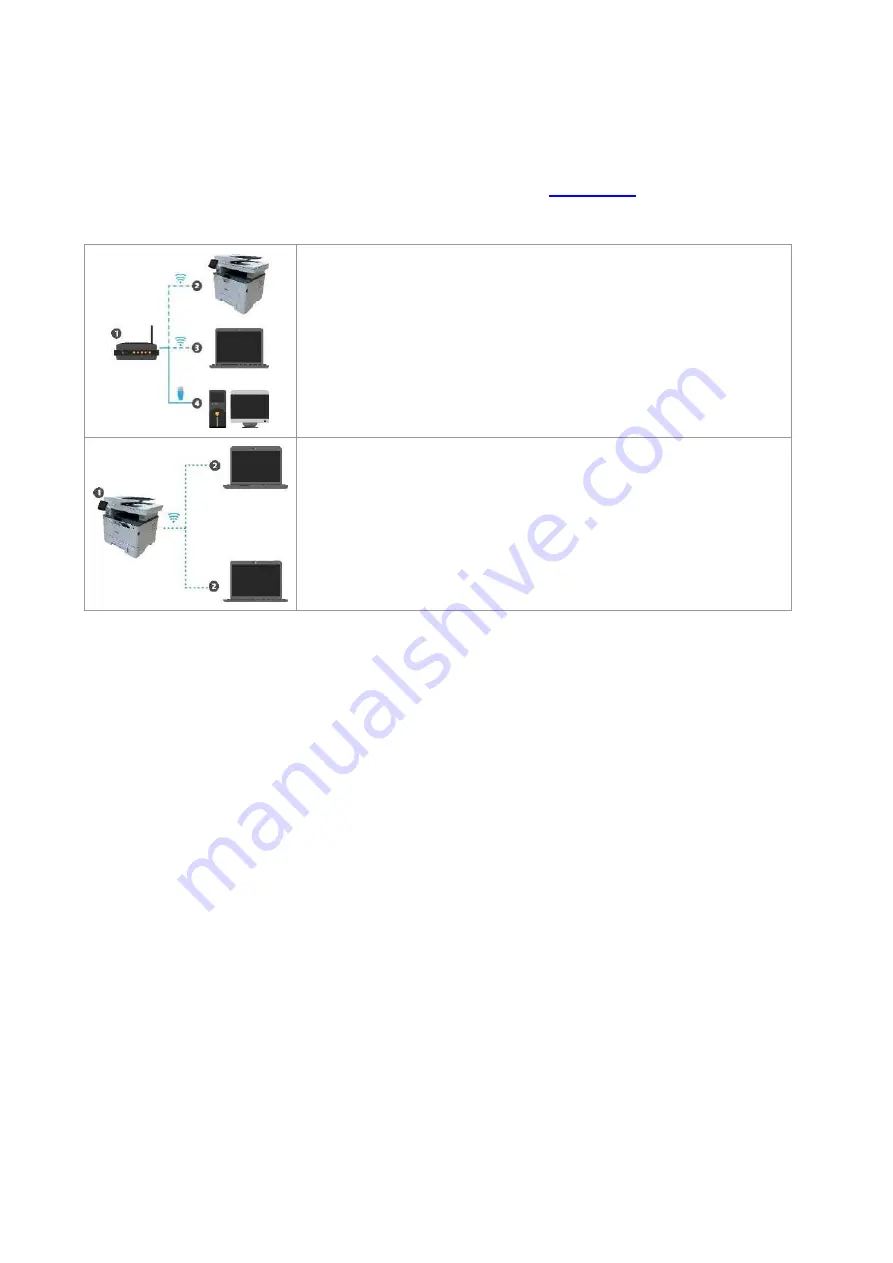
Wireless network connection type is divided into basic structure mode and Wi-Fi Direct mode. If
you have problems with wireless network setup, please refer to
Setup FAQs.
Basic structure mode: connecting to a wireless device via router
1. Access point (wireless router)
2. Wireless network printer
3. Computer connecting to access point via wireless network
4. Computer connecting to access point via network cable
Wi-Fi Direct mode: wireless client is connecting to a printer with
Wi-Fi function
1. Wireless network printer
2. Wireless client is directly connecting to a wireless network printer
5.1. Basic structure mode
You can connect a computer to your printer via access point (wireless router) as the medium.
Access point (wireless router) connection is divided into wireless network setup and Wi-Fi
Protected Setup (WPS).
Important:
Before wireless network installation, you must learn about the service set identifier
(SSID) and password of your access point in order to use them during wireless network setup. If
they cannot be determined, please consult your network administrator or access point (wireless
router) manufacturer.
5.1.1. Wireless network setup tools
If your computer has been installed with a driver and had been connected to wireless network,
but the wireless network was changed, you can set it again with wireless network setup tools.
5.1.1.1. Preliminary preparations
1. Access point (wireless router).
2. A computer that has been connected to network.
3. A printer that has wireless network function.
5.1.1.2. Setup methods of wireless network setup tools
1. Take the wireless network setup tool in computer.
1)
Windows system:
Click the “Start menu” –
“All programs”
-
“Pantum”
-
Product name
–
“Wireless network setup tool”.
Summary of Contents for BM5100FDN Series
Page 89: ...76 6 Single click OK to finish printing setup Click Print to realize auto duplex printing...
Page 146: ...133 6 Open the auto feed tray and wipe the pickup roller gently with dry lint cloth...
Page 159: ...146 2 Gently pull the jammed paper out 3 Install paper tray...
Page 163: ...150 3 Open the fuser door using the handles on both sides 4 Gently pull the jammed paper out...
Page 187: ......


