background image

AT-HDVS-CAM-HDMI

10

10

Zo

om


F1.6

-F3.0   f4.7

mm-

f47

mm


10

X Z

oom

   F

1.6

-F3

.0 

  f

4.7

mm

-f

47

mm

RS-232

USB

HDMI OUT

LAN

DC 12V

USB

AT-HDVS-CAM-HDMI-BK

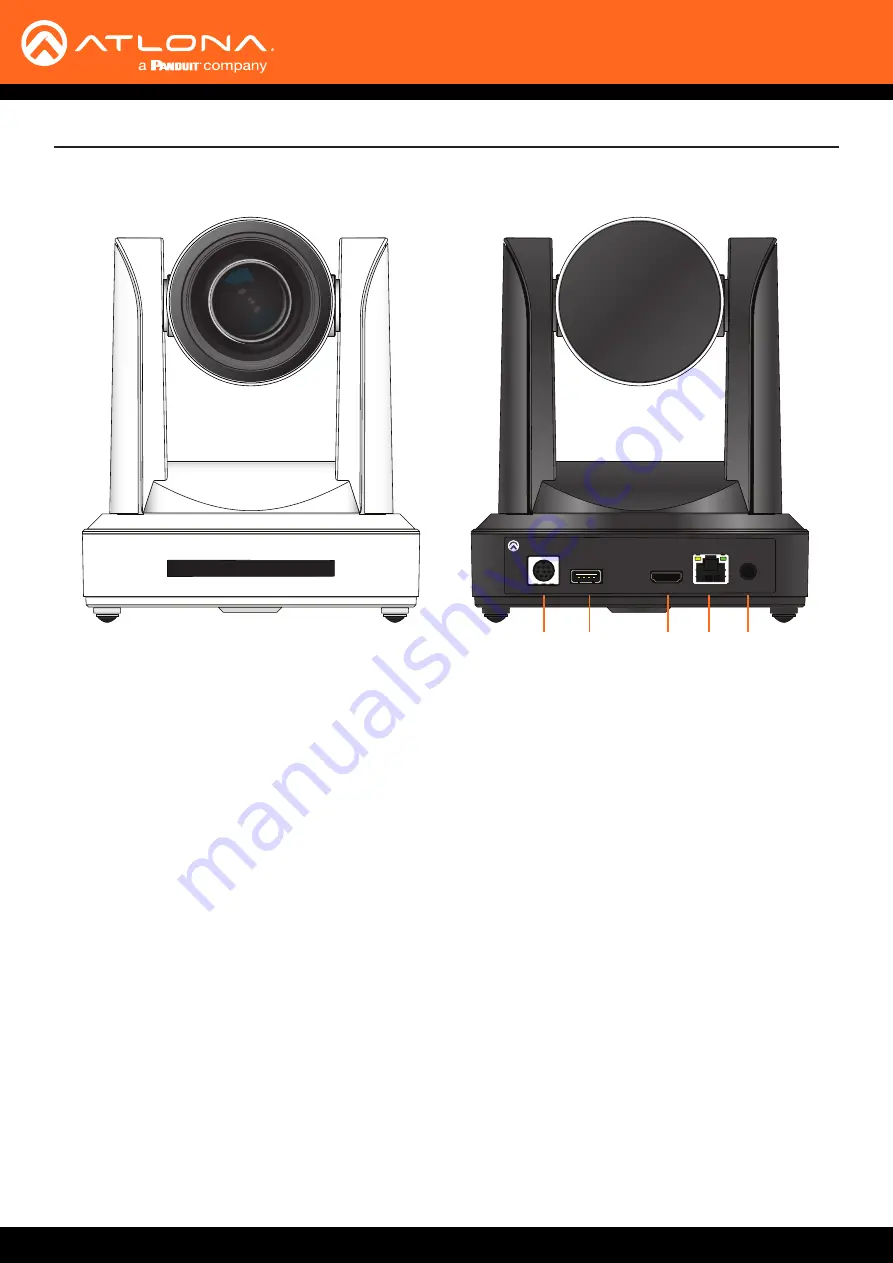
Panel Description

1

3

2

4

5

Front (AT-HDVS-CAM-HDMI-WH shown) 


    Back (AT-HDVS-CAM-HDMI-BK shown)

1.  RS-232


Connect included VISCA to RS-232 adapter here 

to control the camera with a third party software or 

hardware controller. 

2. 

USB


Connect USB A cable from this port to the USB port 

of a conferencing system or USB extender such as 

AT-OME-EX-RX, AT-OME-SR21, etc.

3. 

HDMI OUT


Connect to an HDMI device such as a video 

conference codec or PC.

4. 

LAN


Connect to a network switch to control the unit via 

TCP/IP or webGUI.

5. 

DC 12V


Connect the included 12V power supply to this port.

Summary of Contents for AT-HDVS-CAM-HDMI-BK

Page 1: ...AtlonaManuals Accessories AT HDVS CAM HDMI PTZ Camera with HDMI Output...

Page 2: ...enables the encoding and publishing of video content using H 264 H 265 Refer to Network Streaming page 23 for more information Implemented new device user registration requirements to comply with CA...

Page 3: ...to http www atlona com registration Sales Marketing and Customer Support Welcome to Atlona Operating Notes IMPORTANT Visit http www atlona com product AT HDVS CAM HDMI for the latest firmware updates...

Page 4: ...date for hardware electronics products purchased on or after June 1 2013 PTZ motor is not covered under the 10 year warranty the PTZ motor is covered for 3 years 3 years from proof of purchase date f...

Page 5: ...cts or states do not allow the exclusion or limitation of relief special incidental consequential or indirect damages or the limitation of liability to specified amounts so the above limitations or ex...

Page 6: ...t Safety Information FCC Compliance FCC Compliance and Advisory Statement This hardware device complies with Part 15 of the FCC rules Operation is subject to the following two conditions 1 this device...

Page 7: ...Managing Presets 21 Saving Presets 21 Clearing a Preset 21 Recalling Presets 21 Multiple Camera Control 22 Assigning Changing the Camera Address ID 22 Selecting a Camera for Control 22 Network Streami...

Page 8: ...AT HDVS CAM HDMI 8 Table of Contents IR Remote and OSD 51 IR Remote Control 51 OSD 51 Remote Functions 53 Appendix 54 Using VLC Player 54 Using Facebook Live 56 Using YouTube Live 59 Specifications 64...

Page 9: ...rendering with 1 2 8 low noise HD CMOS sensor Multi element zoom lens with 10x optical zoom and a 60 9 horizontal field of view Camera can be mounted on a wall or inverted for ceiling installation wi...

Page 10: ...onnect included VISCA to RS 232 adapter here to control the camera with a third party software or hardware controller 2 USB Connect USB A cable from this port to the USB port of a conferencing system...

Page 11: ...racket and the AT HDVS CAM HDMI are needed 1 Install the M6 swelling bolts in a rectangular pattern on the wall 100 mm wide and 50 mm high 2 Attached the wall mount bracket onto the wall by placing th...

Page 12: ...needed 1 Install the 4 screw stoppers in the ceiling 2 Connect the upper ceiling covering plate to the screw stoppers using the PA3X30 self tapping screws 3 Connect the lower ceiling covering plate t...

Page 13: ...eakerphone Video Conferencing Codec Projector AT HDVS CAM HDMI I 0 Co de c DP HD MI 3 HD MI 4 PW R LIN K USB C HD Bas eT OU T AT OME M S42 OM EG A TM MU LTI FO MA T SW ITC HE R DP HD MI 3 HD MI 4 USB...

Page 14: ...en the AT HDVS CAM HDMI is in home position the camera is facing forward and has no tilt angle as shown in the illustration below 1 0 X Z o om F1 6 F3 0 f4 7mm f 4 7 m m 1 0 X Z o o m F 1 6 F 3 0 f 4...

Page 15: ...plane The illustration below shows the AT HDVS CAM HDMI pointed at a fixed target The following table provides a list of predefined distances which the camera must be placed from the target in order...

Page 16: ...third value can be calculated as follows Linear Field of View FOV Angle of View Distance to target In the following diagram the camera angle of view is set to 54 7 The viewing area to be captured is...

Page 17: ...BLC ON OFF MENU Press and release the up or down arrow button to adjust the tilt of the camera in small increments Press and hold the up or down arrow button to adjust the camera tilt at a faster rate...

Page 18: ...ck Control in the side menu bar 2 Click the diagonal arrow buttons to simultaneously tilt and pan the camera in the desired direction Upper Diagonal left arrow Pans and rotates camera up and to the le...

Page 19: ...emote Control Press and release to zoom in or press to zoom out Press and hold the these buttons to zoom in or zoom out at a faster rate Press and release the MANUAL button Locate the FOCUS rocker swi...

Page 20: ...BLC on off button SET 1 2 3 1 2 3 4 5 6 7 8 9 8 4 CAMERA SELECT Power button IR Remote Control 1 Point the IR Remote Control at the front of the AT HDVS CAM HDMI 2 Press and release the BLC ON OFF bu...

Page 21: ...HDMI 3 Press the SET PRESET button 4 Press the desired number on the IR Remote Control keypad to assign the position of the camera to the preset 1 Point the IR Remote Control at the front of the AT H...

Page 22: ...MI 2 Assign the camera an ID by sequentially pressing the following series of buttons listed in the table below 1 Point the IR remote control at the front of the desired AT HDVS CAM HDMI 2 Press the b...

Page 23: ...stream used by a digital recorder when saving footage to hard disk Adjusting these settings will affect the recording size and available recording time on the hard disk Sub Stream is the secondary vid...

Page 24: ...pplications such as Blu ray and satellite streams Encoding Protocol Bit Rate Range H 264 64 20480 kb s H 265 64 40960 kb s Resolution 1920x1080 1280x720 640x480 Image Size These resolutions are availa...

Page 25: ...ms should be re pulled and restarted to ensure best video quality If the camera has been power cycled then it will be necessary to re pull both RTMP and RTSP streams 5 Click the Save button to commit...

Page 26: ...n 3 Click the Enable checkbox to enable the Main Stream and or Sub Stream In order to for the stream to be pushed to live streaming platforms such as YouTube Twitch and others follow the procedure bel...

Page 27: ...a multicast address follow the procedure below Device Operation 4 Click the Protocol Type drop down list to select the protocol type Enter the host port in the Host Port field Protocol Description RT...

Page 28: ...d Main operation of the AT HDVS CAM HDMI is handled through the built in web server In order to access the web server the IP address of the unit must be known IMPORTANT The password must contain a min...

Page 29: ...r Name and Password fields click the Clear button NOTE If using a secure connection click the Toggle HTTP HTTPS button 3 Click the Login button 4 The Info page will be displayed and the login process...

Page 30: ...AC address of the unit Serial Number The serial number of the unit MCU Version The version of MCU firmware Camera Firmware The version of camera firmware AF Firmware The version of firmware which cont...

Page 31: ...controls Auto Focus Update File Displays the file currently selected for the update process Browse Click this button to select the desired firmware file for the update process Upgrade Click this butto...

Page 32: ...anges under this section Date Format Displays the file currently selected for the update process Data Separator Click this drop down list to specify the separator between month day and year Zone Click...

Page 33: ...rver address in this field This field is only active if the NTP check box is marked with a checkmark Host Port Specify the NTP port in this field This field is only active if the NTP check box is mark...

Page 34: ...ld is only active if DHCP is set to OFF Gateway Specify the default gateway router address in this field This field is only active if DHCP is set to OFF MAC Address Displays the MAC address of the AT...

Page 35: ...the default port settings Available values are from 0 to 65535 Save Click this button to commit changes under this section Cancel Click this button to abort changes under this section Preferred Enter...

Page 36: ...the desired user name in this field New password Enter the new password in this field Re enter password Confirm the new password by entering it in this field Save Click this button to commit changes...

Page 37: ...the hard disk Sub Stream is the secondary video feed and provides a lower quality video stream This stream is used to stream video to computers and mobile devices Adjusting these settings will affect...

Page 38: ...HD 1080p ap plications such as Blu ray and satellite streams Image Size Click this drop down list to select the desired resolution These resolutions are available for all codecs and profiles Resolutio...

Page 39: ...s Enable Click this check box to enable the main stream sub stream When a stream is enabled the check box will be checked Protocol Type This drop down list is set to RTMP and cannot be changed Host Ad...

Page 40: ...stream When a stream is enabled the check box will be checked Protocol Type Click this drop down list to set the protocol Main Stream Sub Stream Configuration and Management Interfaces Protocol Descr...

Page 41: ...I 41 Reset Page Factory Reset Click this button to factory reset the AT HDVS CAM HDMI Reboot Click this button to reboot power cycle the AT HDVS CAM HDMI Factory Reset Reboot Configuration and Managem...

Page 42: ...lues will introduce a red tint to the image The default setting is 0 BG Tuning Click and drag this slider to adjust the blue gain tuning between a value of 10 and 10 Use this feature to reduce unwante...

Page 43: ...allows the white balance to be set based on the current lighting much like setting the white balance on a DSLR camera VAR When selected a Color Temp drop down list will be displayed below the WB Mode...

Page 44: ...en selected this option will adjust the focus based on the currently captured image The same focus setting will be applied to all other camera movement Auto Focus Zone Click this drop down list to sel...

Page 45: ...e interval required to open and close the shutter during each frame of video Larger values fast shutter speeds will allow less light to enter the camera sensor producing darker images but will produce...

Page 46: ...values in an image Larger values attempt to discern between different color values in the image EV Exposure Value This option essentially combines both shutter speed and iris aperture into a single va...

Page 47: ...drop down list to select the desired image style Style is an image preset which produces a desired look Available options are Default Normal Clarify Bright and Soft Style Configuration and Management...

Page 48: ...White Black Yellow Red and Blue Scale Font with Resolution Click this check box to scale the font title when the resolution changes When enabled the check box will display a check mark Main Stream OSD...

Page 49: ...utput resolution Available resolutions are listed in the table below Video Out Configuration and Management Interfaces Video Out Page Format 1080P60 720P60 1080P50 720P50 1080P30 1080P59 94 1080P25 10...

Page 50: ...18 for more information Pan Tilt Zoom Click these arrows to adjust the pan tilt and zoom of the camera Focus Mode Click this drop down list to select the desired focus mode Camera Control Configurati...

Page 51: ...tton Press and hold for 3 seconds to place the camera into standby mode Number buttons Used in the selection or creation of camera presets Focus Adjust the focus of the camera using the and buttons Au...

Page 52: ...5500K 5000K 4500K 4000K 3500K 3000K RG Tuning 0 RG145 10 to 10 BG Tuning 0 BG56 10 to 10 Saturation 100 100 100 100 100 60 100 110 120 200 Hue 7 7 7 7 7 0 to 14 AWB Sens High High Middle Low Image Br...

Page 53: ...1080i60 2 Switch video format to 1080i50 3 Switch video format to 720p60 4 Switch video format to 720p50 5 Switch video format to 1080p30 6 Switch video format to 1080p25 7 Switch video format to 720...

Page 54: ...tion into the provided field within the VLC Network tab Note that the Access Method fields for the Main Stream and Sub Stream will differ Make sure you specify the correct stream to broadcast This sec...

Page 55: ...AT HDVS CAM HDMI 55 5 Click the Play button to begin streaming VLC will begin buffering the stream Note that it may take a few moments for the network stream to be displayed Appendix...

Page 56: ...Under the Stream Setup tab click Use Stream Key 4 Under Live Stream Setup click the Copy button next to Server URL This section provides step by step instructions on how to display a stream using Fac...

Page 57: ...te that the contents of the Facebook Server URL field can be placed under the Main Stream or Sub Stream Make sure that the contents are pasted into the correct field 7 Enter 443 in the Host Port field...

Page 58: ...or the AT HDVS CAM HDMI for information on Main Stream and Sub Stream configuration Stream Key 11 Click the Save button to commit changes 12 Return to the Facebook Stream Setup tab and scroll up to pr...

Page 59: ...This section provides step by step instructions on how to display a stream using YouTube Live Before proceeding make sure that both the Main Stream and Sub Stream are properly configured Refer to the...

Page 60: ...next screen will provide the option of selecting a Built in webcam or Streaming software Click the Go button next to Streaming software 5 Set the desired settings in the Edit stream dialog box 6 Click...

Page 61: ...AT HDVS CAM HDMI 61 Appendix 7 Click the COPY button next to the Stream URL field 8 Go to the Publishing page of the AT HDVS CAM HDMI web server...

Page 62: ...ace Note that the contents of the YouTube Live Stream URL field can be placed under the Main Stream or Sub Stream Make sure that the contents are pasted into the correct field Stream URL Host Port 10...

Page 63: ...ake sure that the contents are pasted into the correct field Stream Key 13 Click the Save button to commit changes 14 Return to YouTube Live The live stream preview will be displayed in the upper left...

Page 64: ...tronic Shutter Auto Manual BLC ON OFF WDR Off Dynamic Level Adjustment Streaming Video Compression H 264 H 265 Protocol TCP UDP RTMP RTSP Bitrate 46 kbps 40960 kbps Compression Profiles BP MP HP Bitra...

Page 65: ...Operating Humidity RH 20 to 80 non condensing Storage Humidity RH 20 to 95 non condensing Power Consumption 12 W Supply Input 110 220 V AC 50 60 Hz Output 12 V DC 1 A Weight Pounds Kilograms Device 3...

Page 66: ...Toll free US International atlona com 877 536 3976 41 43 508 4321 35287 R3...

Reviews: